How to Add Fonts to Shopify Quickly To Fit Your Brand

Shopify is undoubtedly a leader in the ecommerce space. When it comes to creating a store you can scale, it seems to have it all—the ability to manage multiple channels, fulfillment centers, payment processors, and email marketing—all while keeping stores resilient, fast, and capable of handling thousands of transactions per minute.
Yet when it comes to fonts, their out-of-the-box options are decidedly limited.
While some stores are okay with using basic fonts or whatever comes with their theme, you might prefer custom font options that make your brand stand out.
But where do you start? And, how can you easily add fonts to Shopify?
In this guide, we dive deep into all things about Shopify fonts, exploring:
- How to find fonts on Shopify
- How to add custom fonts to Shopify
- How to change fonts on your Shopify store the easy way
Let’s get started.
#cta-visual-pb#<cta-title>Add fonts to your Shopify store without coding<cta-title>Try Shogun for free to see what fonts you can use for your stunning Shopify store.Start building for free
Finding your Shopify fonts is pretty simple once you’ve gotten familiar with Shopify’s editing features.
However, if you’re new to it all, it just takes a few easy steps:
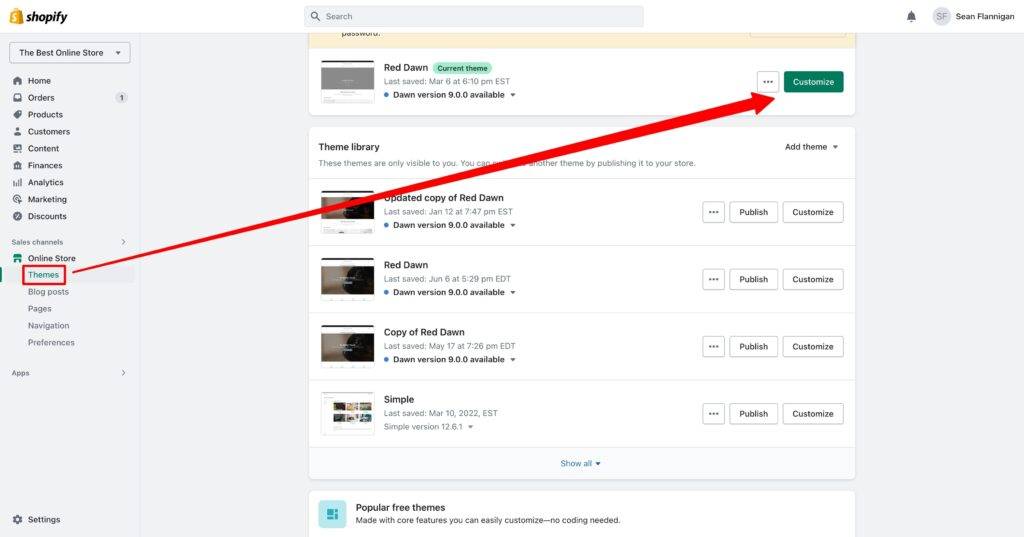
Step 1: Navigate to the Shopify theme editor
Once you’ve logged into your dashboard, navigate to your left-hand menu and click on Online Store > Themes > Customize.
Step 2: Go to Typography settings
You’ll be met with your theme’s editing dashboard. This is where you can change the look of your store.
Though limited, it does come with some useful features, including the ability to add fonts to Shopify.
On the left-hand menu, click on the paintbrush icon for Theme Settings and find Typography.
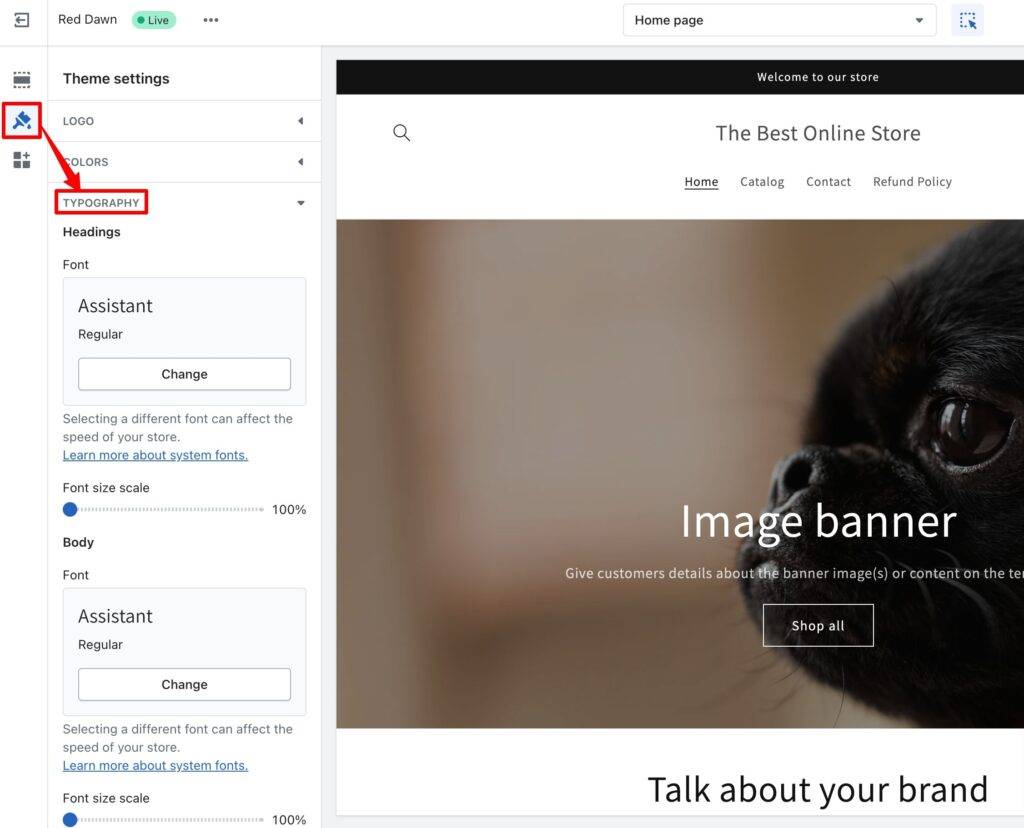
Step 3: Modify the fonts for your headings and body text
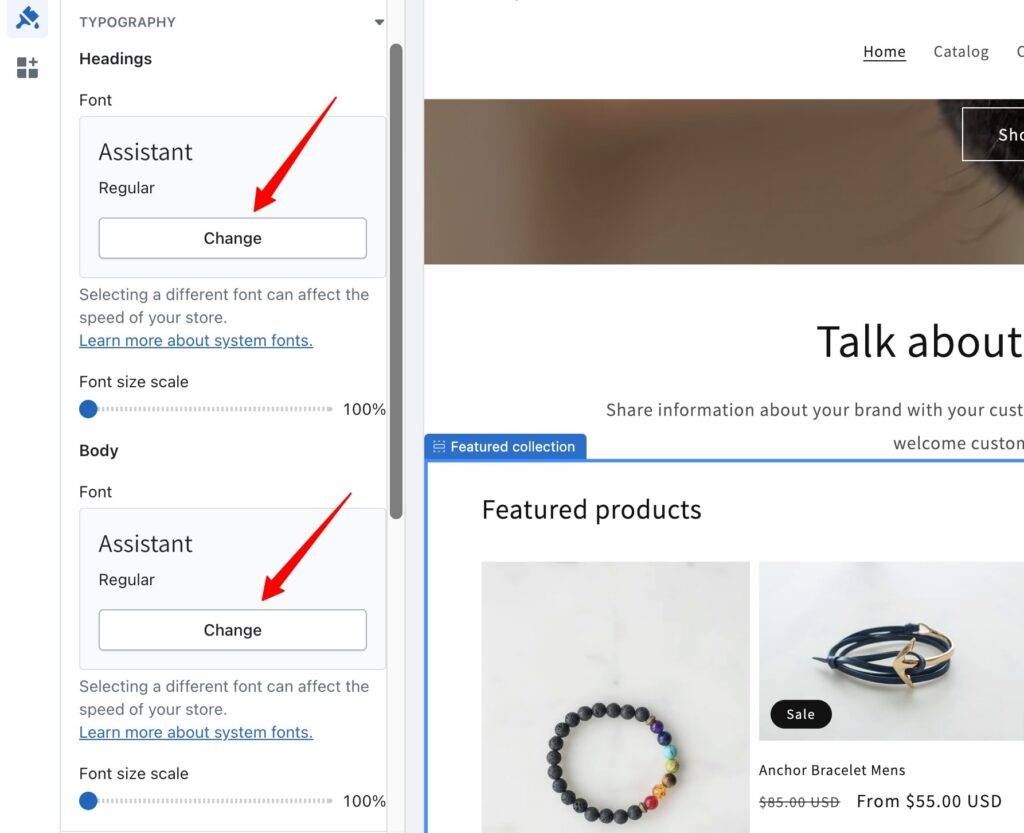
You’ll find a menu of choices that modify your universal theme settings. In your Typography settings, click the Change button to update the fonts for your headings and body text.
You can also adjust the font sizes for each text type and change your font weights.
You’ll probably recognize a lot of popular Shopify fonts already. However, you may want to try and create your own combination of fonts to stand out.
Step 4: Save your changes and marvel at the new fonts
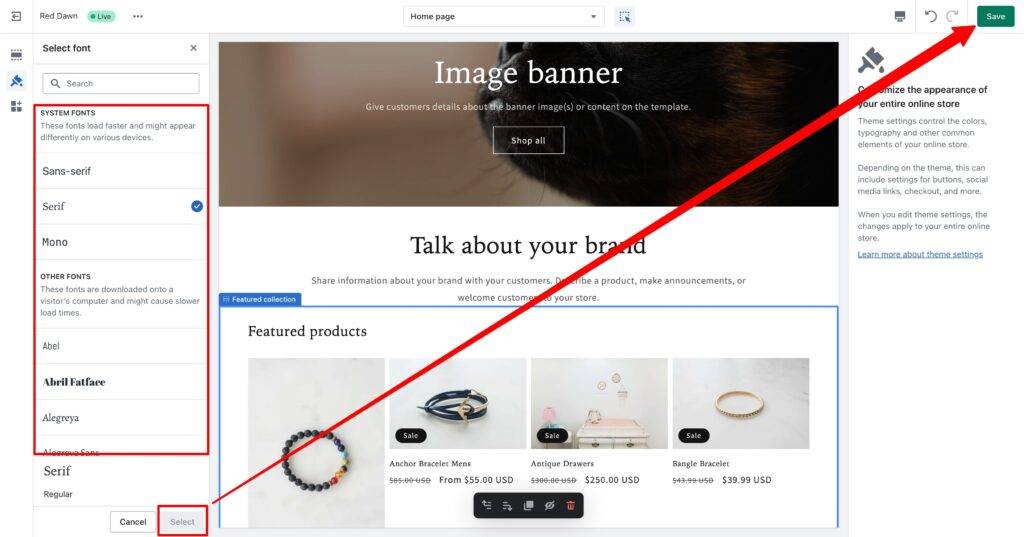
Once you’ve selected your preferred font, click Select at the bottom. Then click the Save button in the top right corner.
Voila! You’ve modified your Shopify fonts with Shopify’s existing font library.
As you make your changes, you’ll be able to preview your Shopify theme fonts in real-time.
Using the Shopify font library
The Shopify font picker gives you plenty of font choices.
It lets you sort fonts by Serif, Sans Serif, or Mono types. Don’t let these terms intimidate you.
Here’s a quick overview of what each means:
Serif
A serif font is a font that has strokes or decorative designs on the end of letters which are the small ends you see on letters from fonts like Times New Roman or Georgia.

Sans Serif
A sans serif font is a font with letters that don’t have those little “tails” or extensions on their ends. They are without “serifs.” Helvetica or the Arial fonts are classic examples of sans serif fonts.

Mono
A mono, or monospaced, font is a font created with letters that occupy the same amount of space.

Shopify’s typography list is made up of pretty basic fonts that you may have already seen before.
When you navigate to your Shopify font library, the fonts are already organized into System Fonts and Other Fonts.
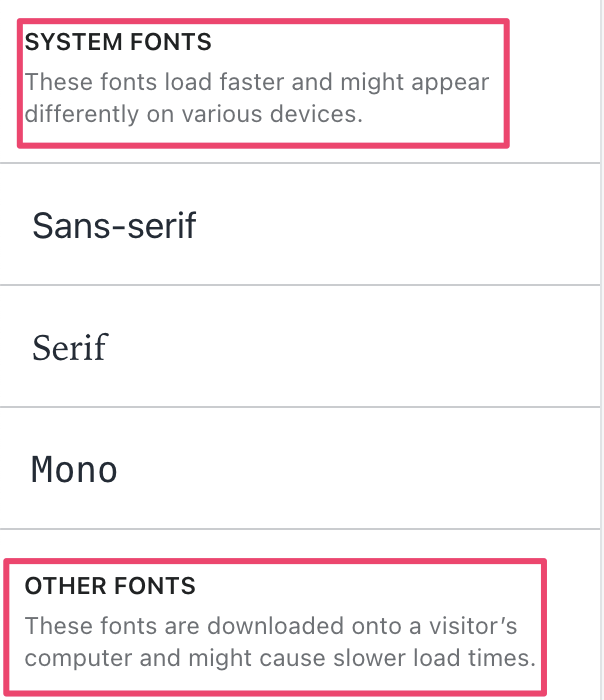
System Fonts are fonts that load faster as they are already installed on a user’s computer, which removes the need for having to download them.
Other Fonts are fonts that, if used, are downloaded into your user’s computer, possibly causing slower loading times.
#cta-visual-pb#<cta-title>Add fonts to your Shopify store without coding<cta-title>Try Shogun for free to see what fonts you can use for your stunning Shopify store.Start designing for free today
There are a few ways to go about adding new fonts to your Shopify store.
Some can be tricky if you’re new to code and may take some time to do correctly. However, there are easier options available, which we will also discuss.
If you aren’t comfortable with code, you can also try using an app like Shogun to get access to more custom fonts without the need for code.
How to add Google Fonts to Shopify
It’s possible to add Google Fonts that you like to your store’s font library in a few steps. We also cover this briefly in our Help Center.
Step 1: Find your preferred Google font
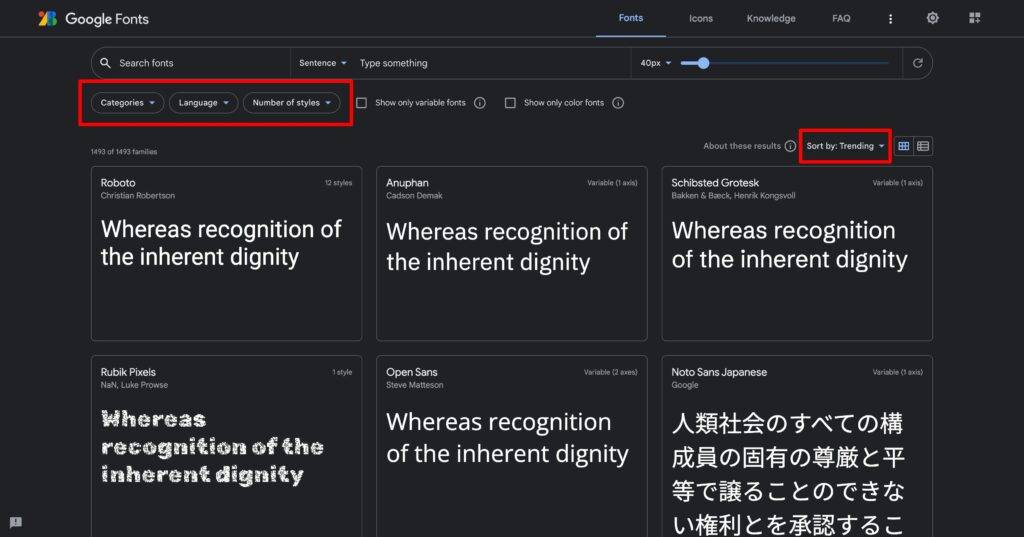
Visit the Google Fonts site and choose your font.
You’ll see that you’re able to filter your fonts by a few different criteria, including category, language, font properties, most popular, newest, name, or even trending.
Step 2: Dig into font details, select your font, and copy the code
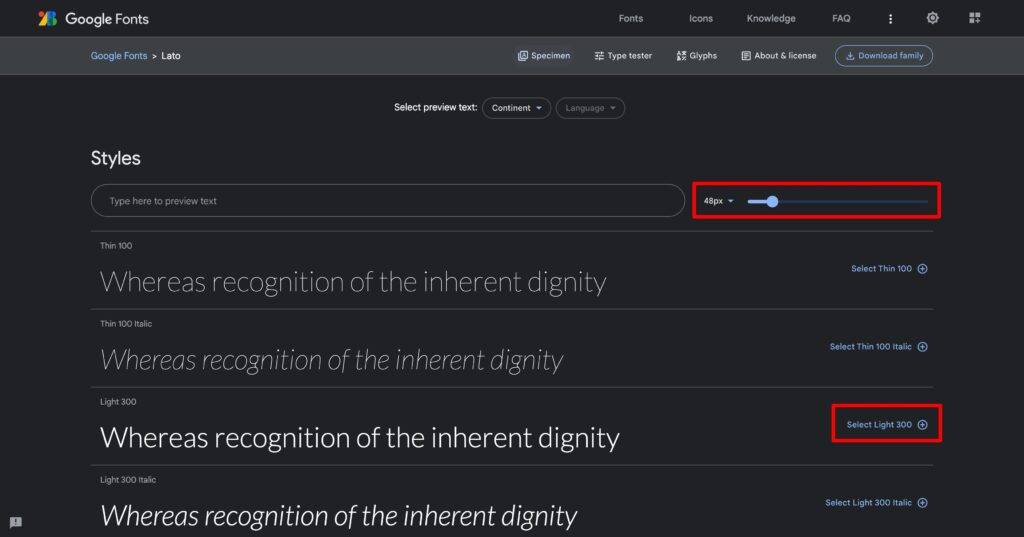
Once you click on the font of your choice, you can adjust the font size, check out the glyphs, the License, and even what other fonts it pairs best with.
Take some time to play around with it to see what is the best font to use for your Shopify store.
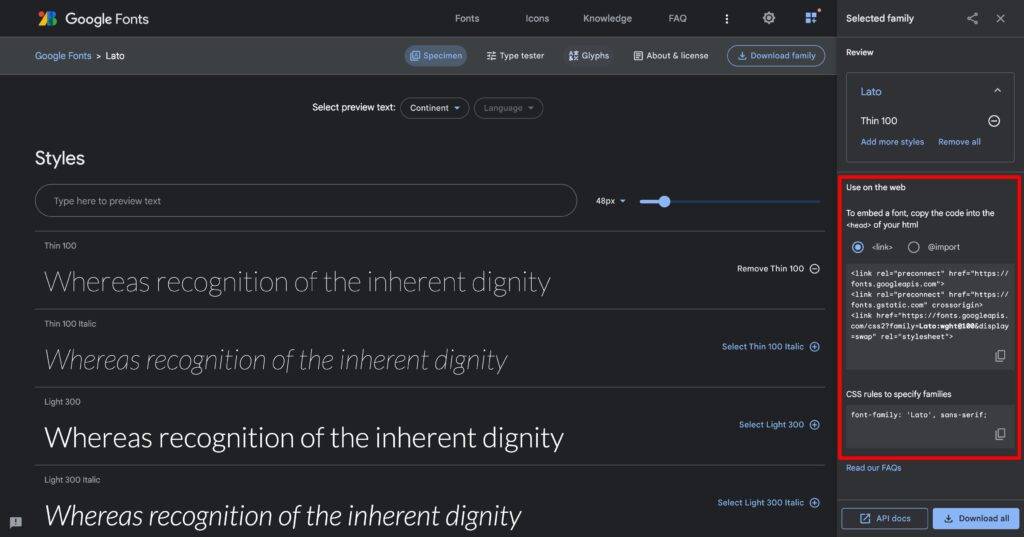
Once you click the “Select this style” button, you’ll be able to copy the code from the pop-up window.
Step 3: Go to your theme files and paste the code in the head tag
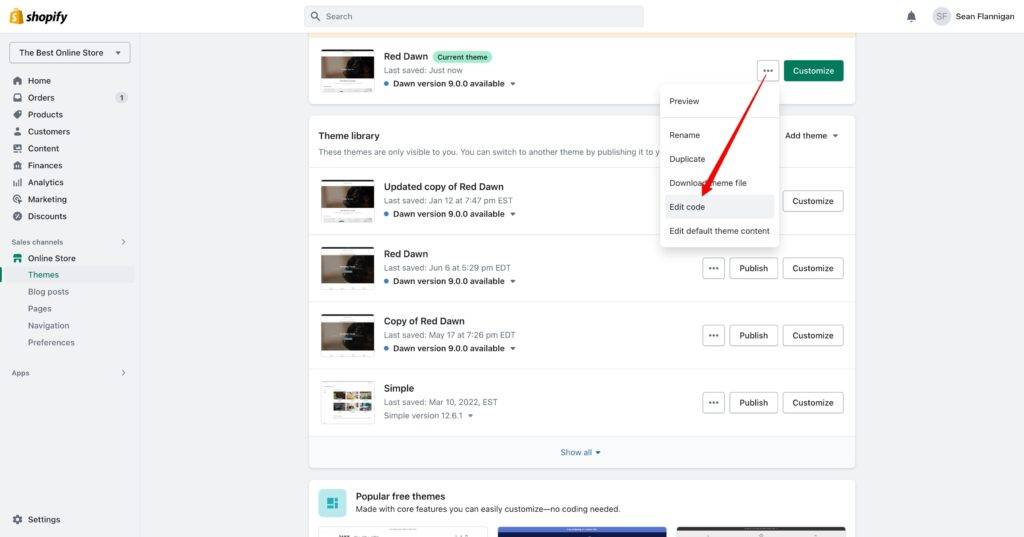
Once you’ve copied your code from your Shopify dashboard, navigate to Online Store > Themes > Actions > Edit Code.
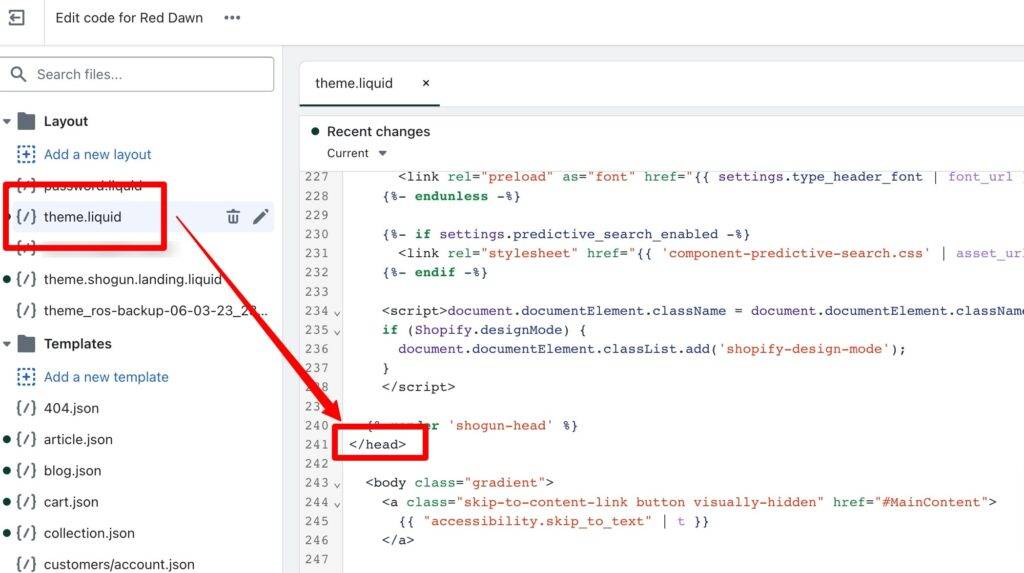
Click on Layout > theme.liquid.
From there, scroll down and find the </head> tag, and paste the code just before the tag. Save your changes once you’re finished.
Step 4: Open your theme’s style files
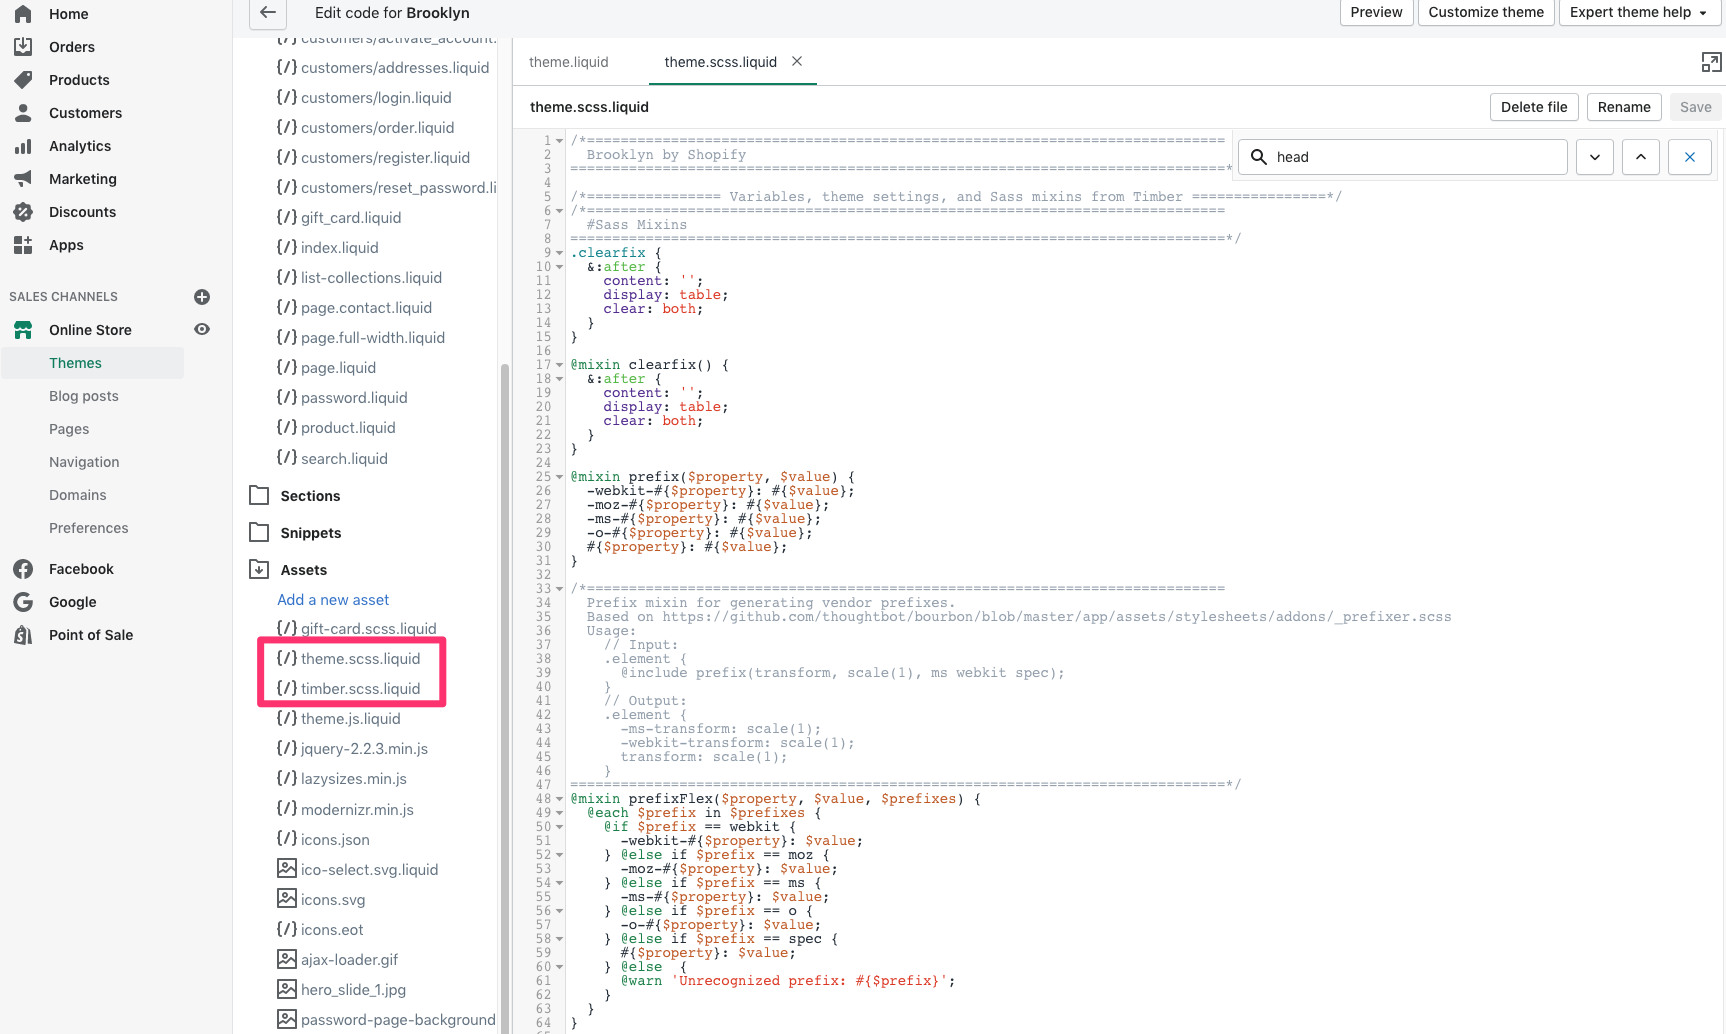
Next, go to the “Assets” folder. You will find the two style files named “theme.scss.liquid” and “timber.scss.liquid”. Open them.
Step 5: From Google, copy font CSS rules
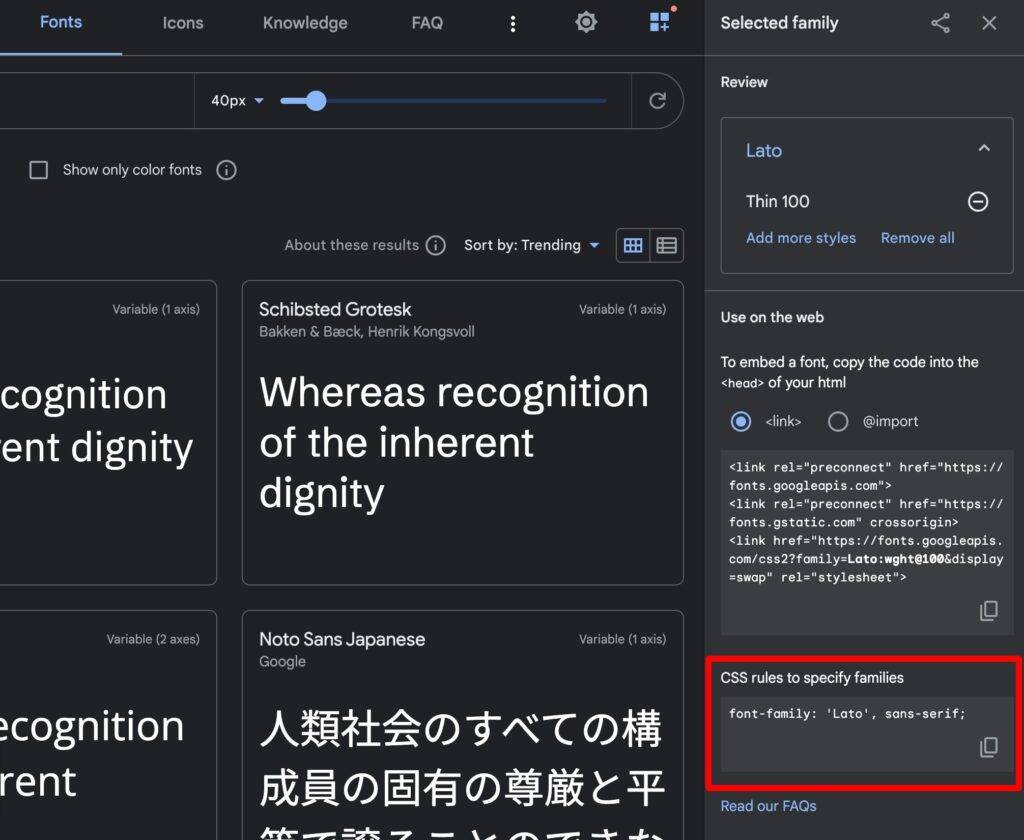
Go back to the page of the Google Font you are using. There you will need to copy the font name. In my case, it’s “‘Lato’, sans-serif;”.
Step 6: Add font details to style files
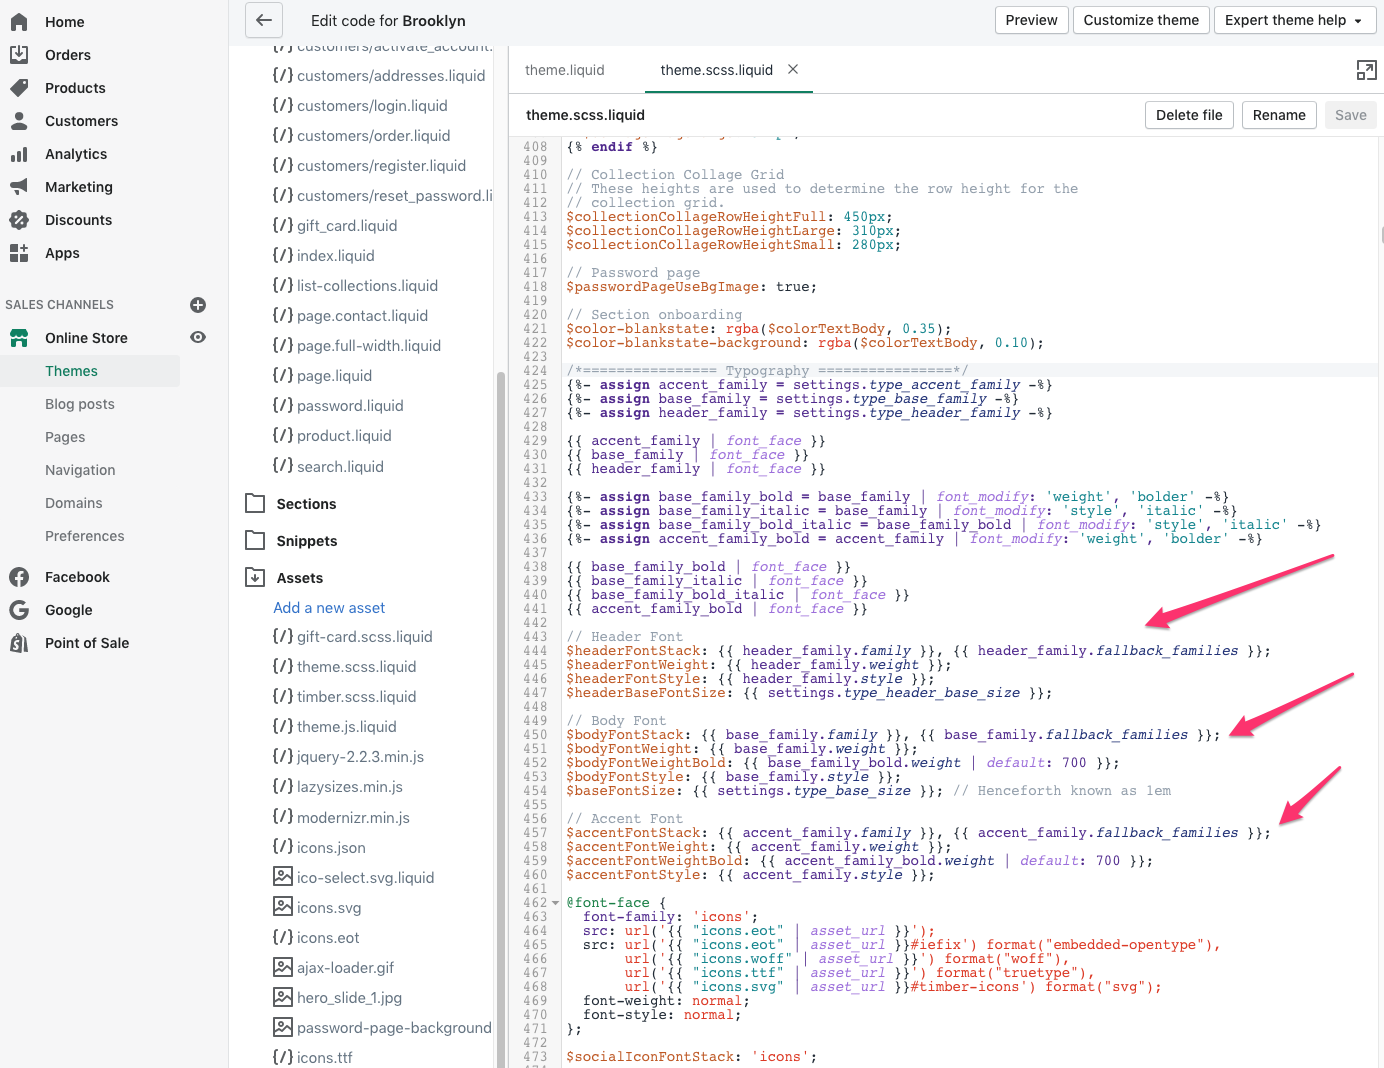
And then finally, go back to the previous style files that you opened in the Assets folder. Scroll down to the “Typography” section and replace these 3 code lines:
$headerFontStack: {{ header_family.family }}, {{ header_family.fallback_families }};
$bodyFontStack: {{ base_family.family }}, {{ base_family.fallback_families }};
$accentFontStack: {{ accent_family.family }}, {{ accent_family.fallback_families }};
with:
$headerFontStack: ‘Rampart One’, cursive;
$bodyFontStack: ‘Rampart One’, cursive;
$accentFontStack: ‘Rampart One’, cursive;
Now, for the easier way of using Google Fonts.
Using Google Fonts in Shogun
If you don’t want to go through the process of manually adding a Google Font to Shopify, there’s an easier way to go about it—Shogun Page Builder.
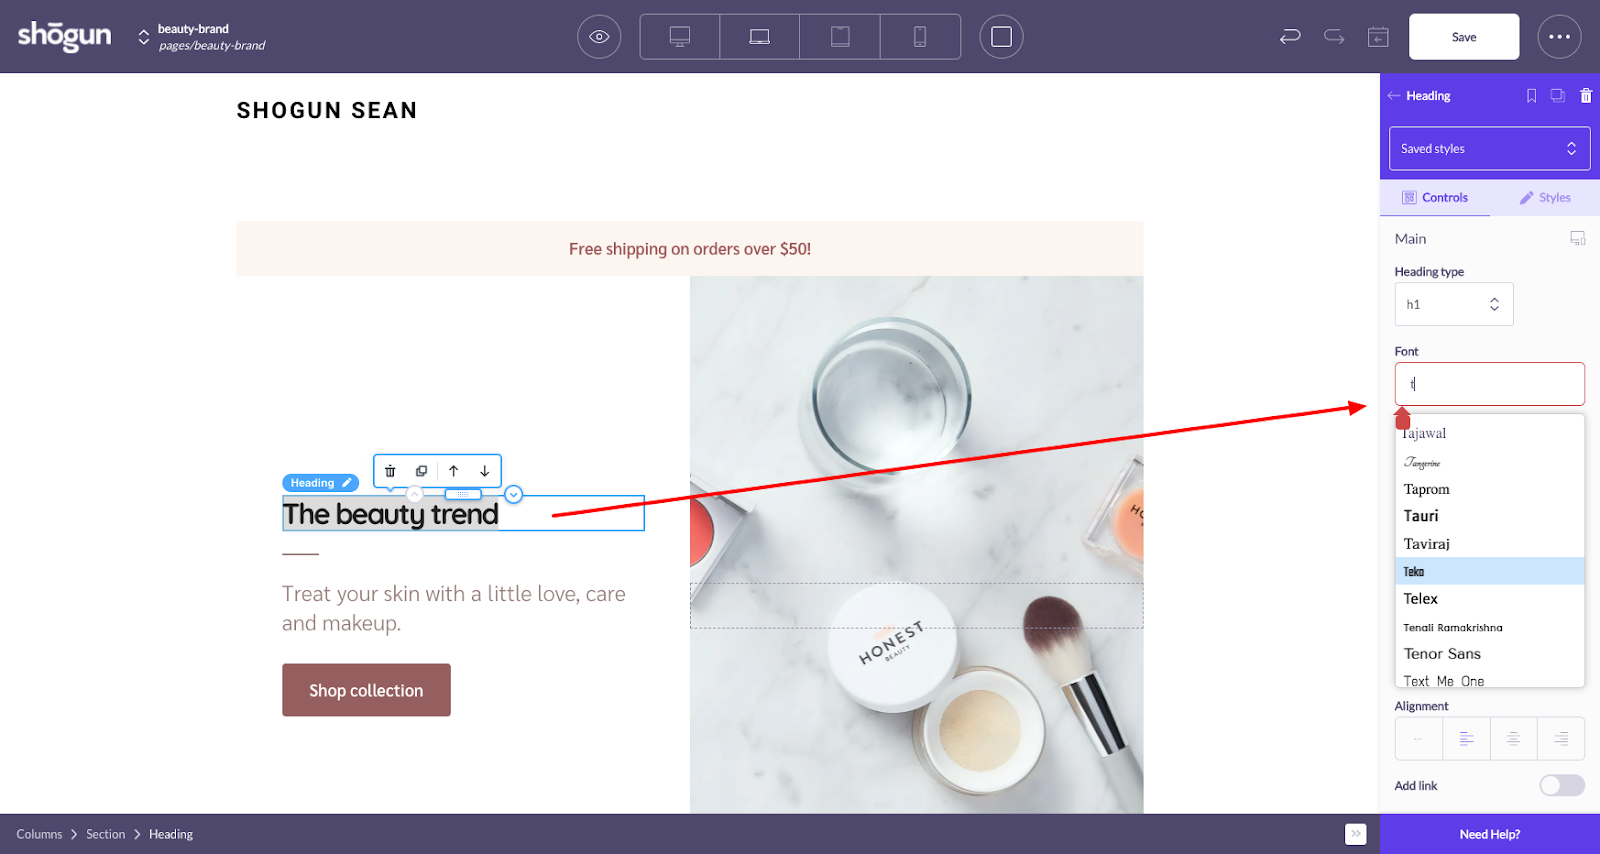
With Shogun, adding any Google Font to your Shopify store literally takes one step since it already has all of Google’s Fonts pre-installed.
We aren’t exaggerating either.
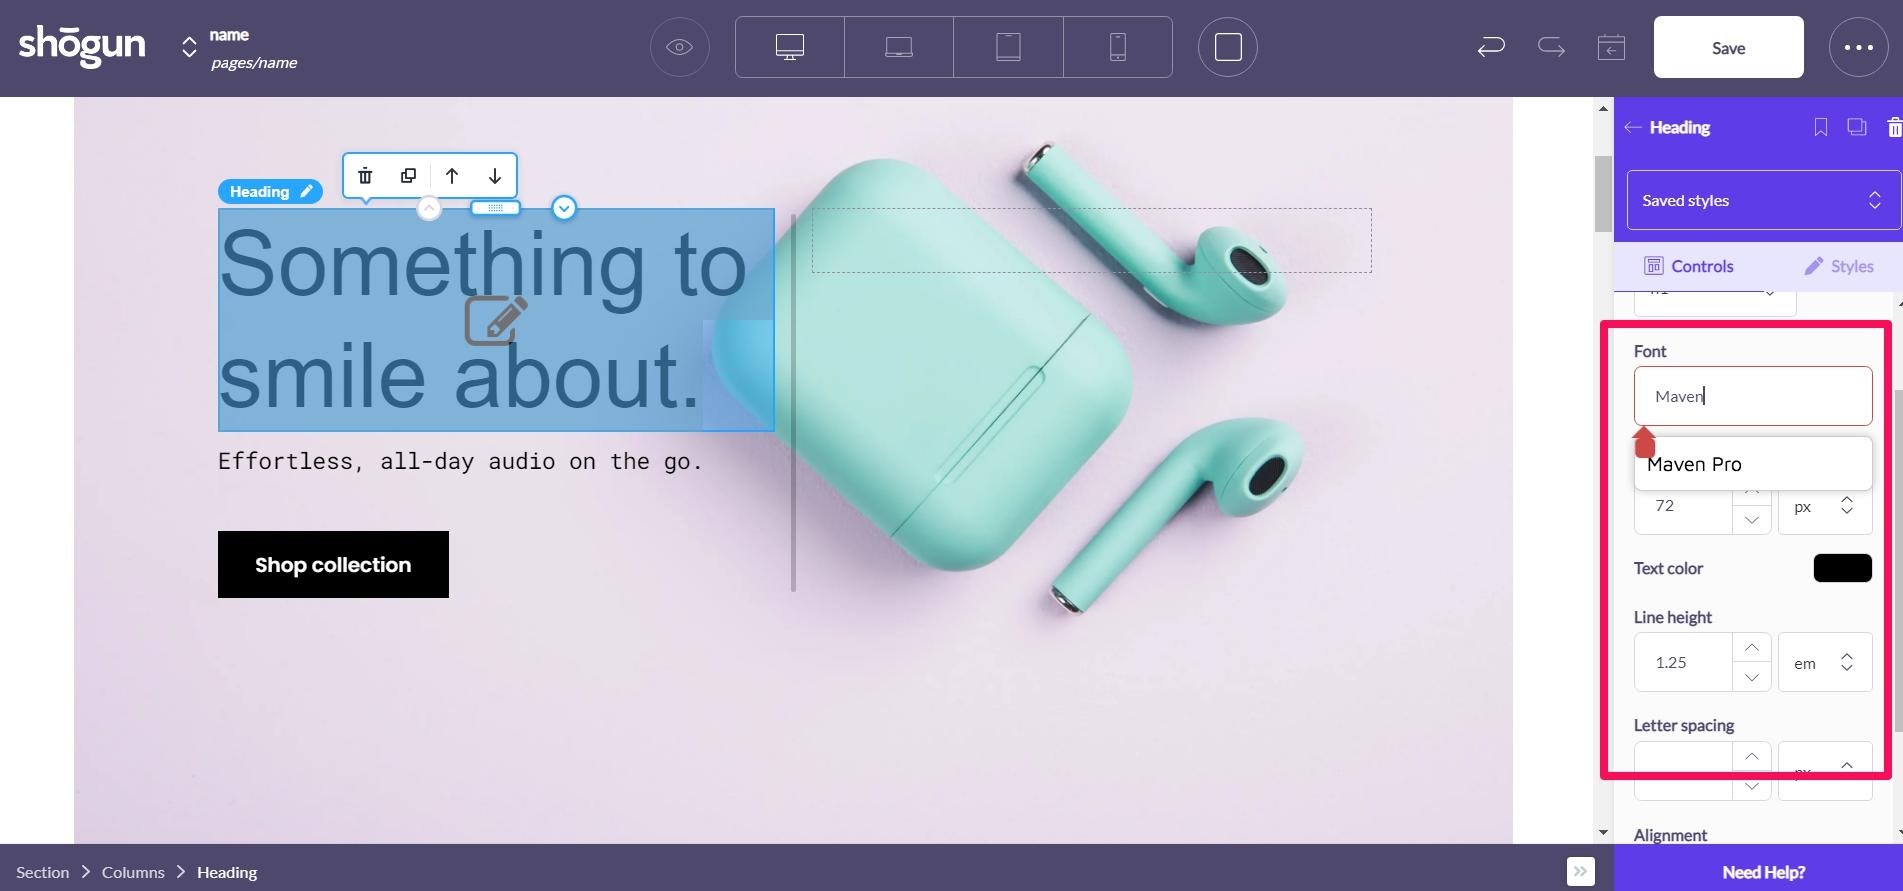
It’s as easy as clicking on a heading, opening the font drop-down menu, and taking your pick of fonts until you’re happy with the results.
#cta-visual-pb#<cta-title>Add fonts to your Shopify store without coding<cta-title>Try Shogun for free to see what fonts you can use for your stunning Shopify store.Start designing for free
How to add custom fonts to Shopify
You might have come to a point where you’re interested in using Shopify custom fonts.
Installing them requires advanced coding skills, and you’ll need to pay close attention so that your store isn’t damaged in the process.
Below, we take you through it step-by-step.
Step 1: Obtain your third-party font
First, find and purchase the third-party font you want to use, and make sure you get it in certain file types like EOG, SVG, TTF, WOFF, or WOFF2.
Then, from your Shopify dashboard, navigate to Online Store > Themes > click Action > Edit Code.

Step 2: Find your stylesheet in Assets and upload your font files
You’ll be met with a simple dashboard.
It’s always a good idea to get a bit familiar with the menu options, so you feel confident navigating the different settings.
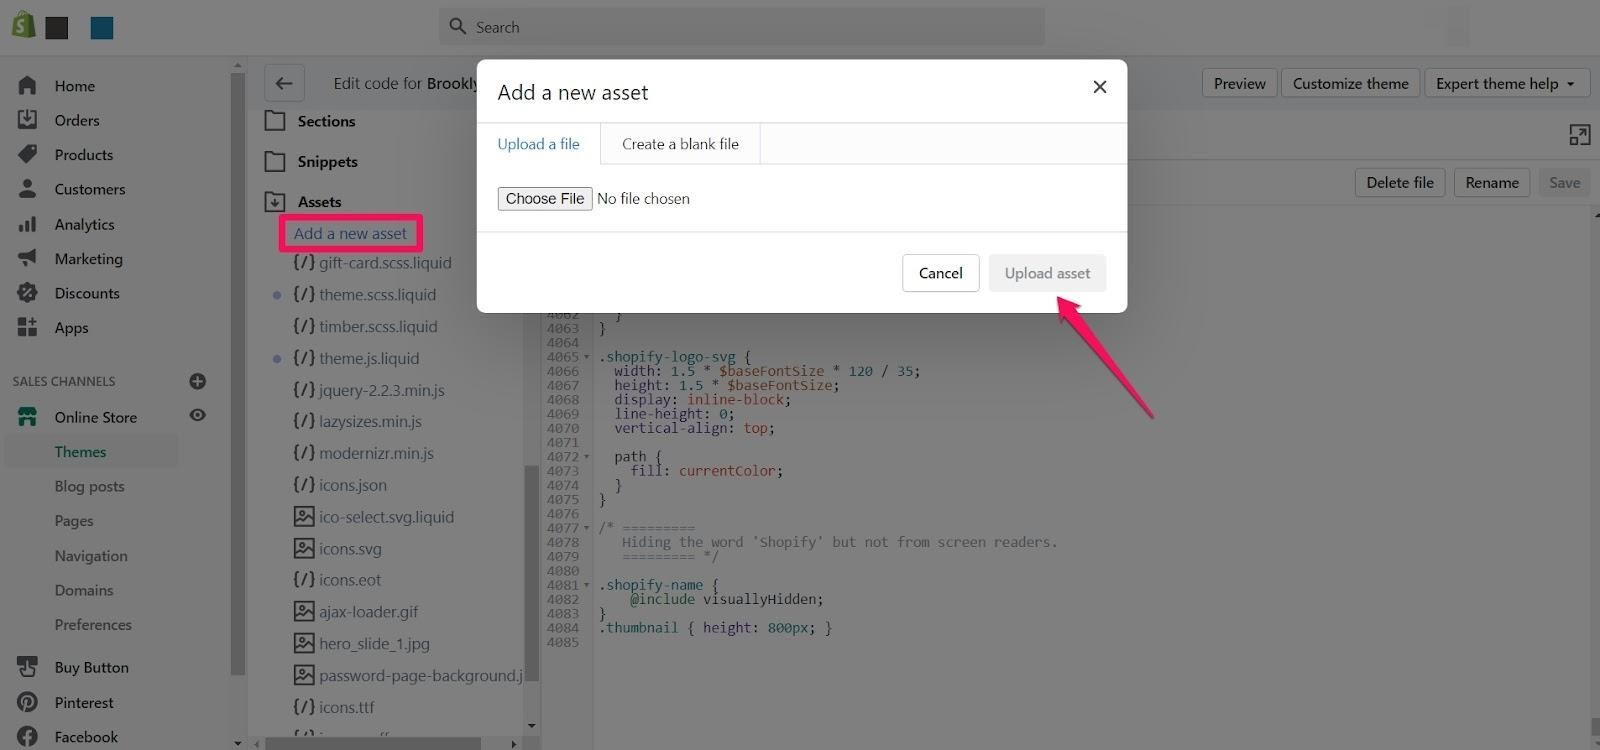
From here, scroll down and click on Assets on the sidebar.
Now, here’s where it might get a little overwhelming.
Be careful not to edit any of the existing code you see on the screen. On the sidebar, click on Assets >Add New Asset > Upload to upload your font files.
Step 3: Paste the following code into theme.scss.liquid
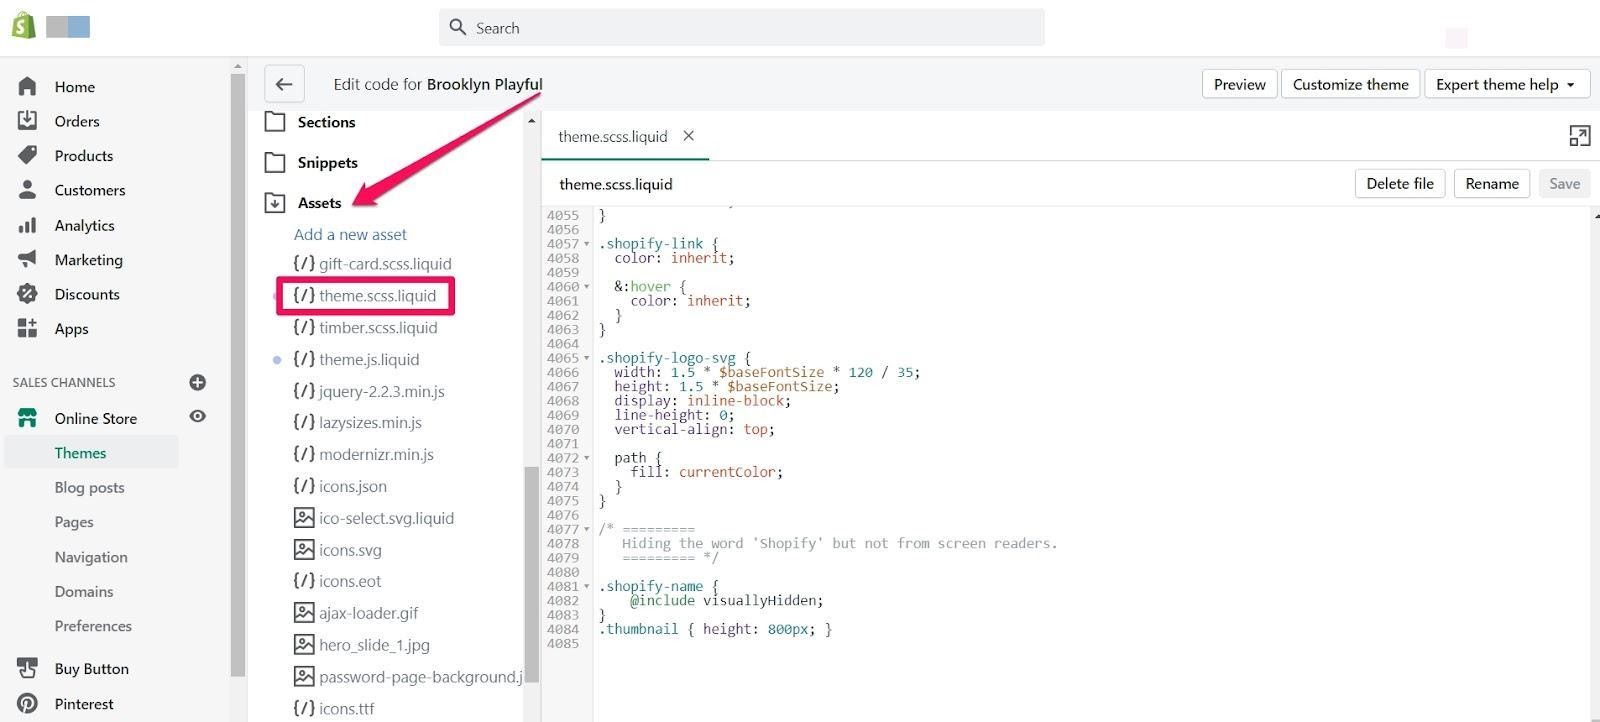
Navigate to Assets, then open theme.scss.liquid. Once there, carefully navigate to the bottom and copy and paste the following code:
@font-face {
font-family: “FONT”;
src: url(‘{{ “FONT.eot” | asset_url }}’);
src: url(‘{{ “FONT.eot” | asset_url }} ?#iefix’) format(“embedded-opentype”),
url(‘{{ “FONT.woff” | asset_url }}’) format(“woff”),
url(‘{{ “FONT.woff2” | asset_url }}’) format(“woff2”),
url(‘{{ “FONT.ttf” | asset_url }}’) format(“truetype”),
url(‘{{ “FONT.svg” | asset_url }} #FONT’) format(“svg”);
}
Step 4: Update code to reflect your new font
Inside the code you just pasted, replace “FONT” with the name of your font, and remember to include any hyphens or underscores in the name so that it’s an exact match.
You may need to add or remove lines from this chunk of code depending on the file types that you’re uploading (for example, if you’re not uploading a woff2 file, remove the woff2 line completely).
Directly below that code, add the following code for the types of text you want to change.
In this example, we’ll be changing the headers, but you can add whatever types of text you want to change to this line of code (click here for a guide to CSS font).
And again, replace “FONT” with the name of your font:
h1, h1 a, h2, h2 a, h3, h3 a, h4, h4 a, h5, h5 a, h6, h6 a, #nav li a, div.title a, .headline, .subtitle { font-family: ‘FONT’ !important; }
Step 5: Save your changes and find peace in your new font
When you’re all finished, make sure to Save your changes.
Congrats! Your font has successfully been added to Shopify. If you want to upload multiple fonts, you need to do so one by one.
Not terribly easy, but you’ll have a deep sense of pride once you’ve accomplished it.
How to add custom fonts to Shopify with Shogun
After you’ve added the font to your theme, you’re only a few easy steps away from integrating it with Shogun Page Builder.
Then you can use it throughout your store as a header or body copy. Just three easy steps this time.
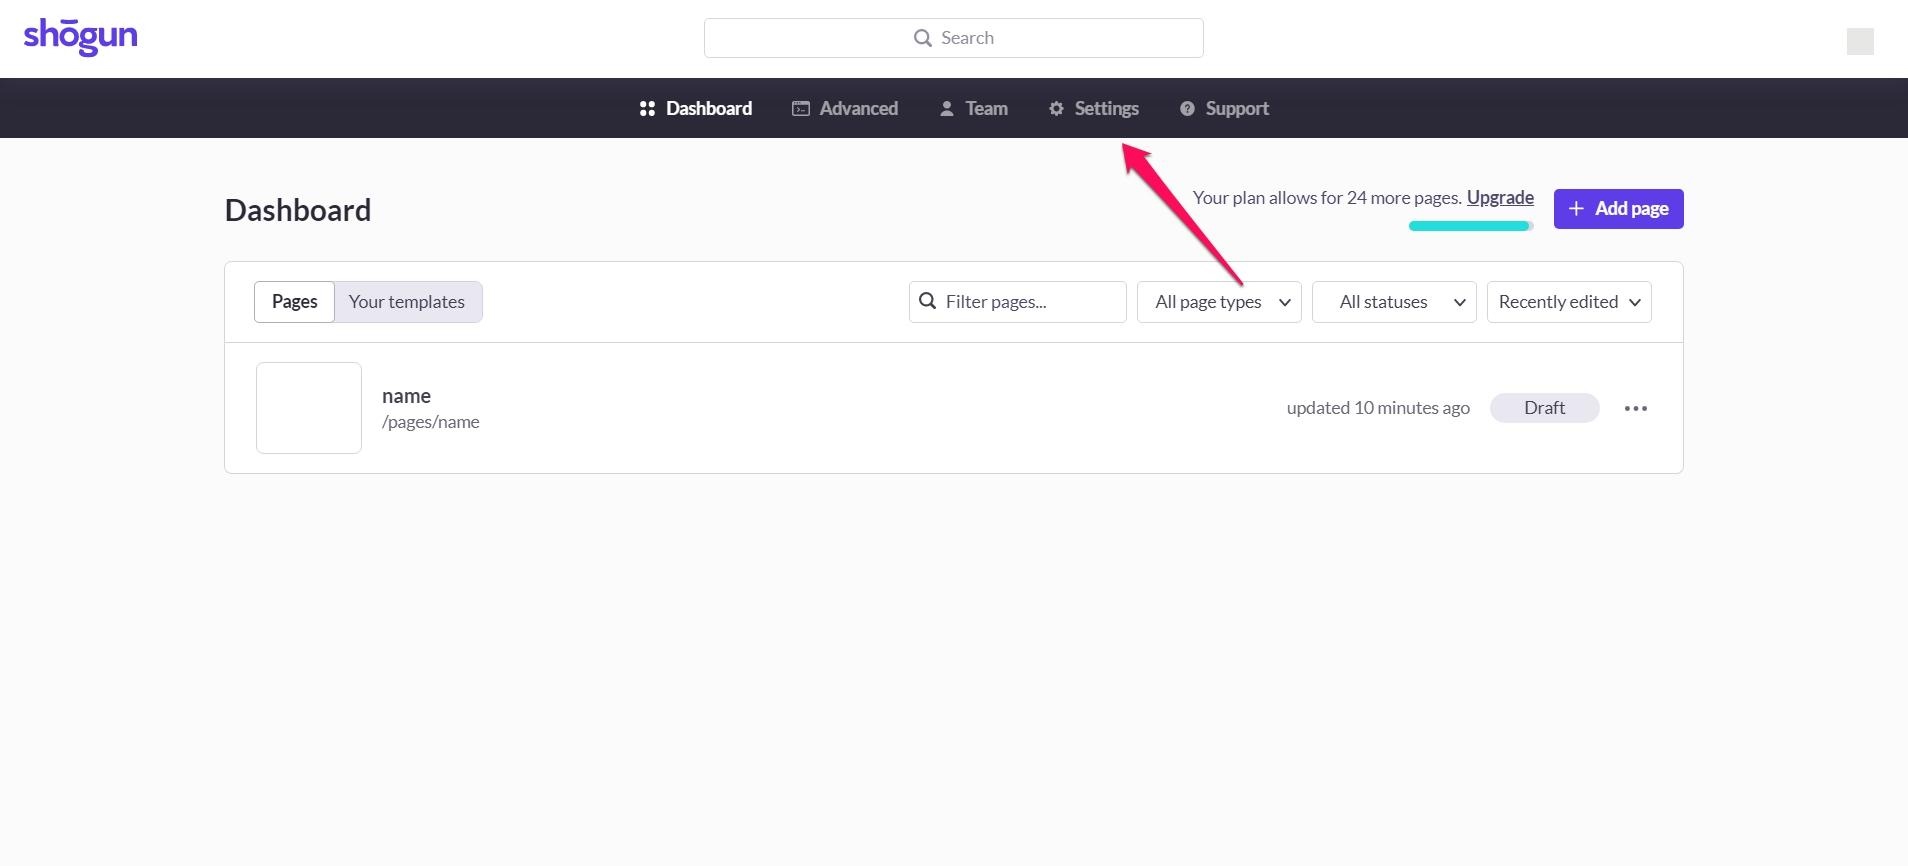
Step 1: In Page Builder, go to your Settings
First, go ahead and open the Shogun app and click on the Settings icon.
Step 2: Add your new font
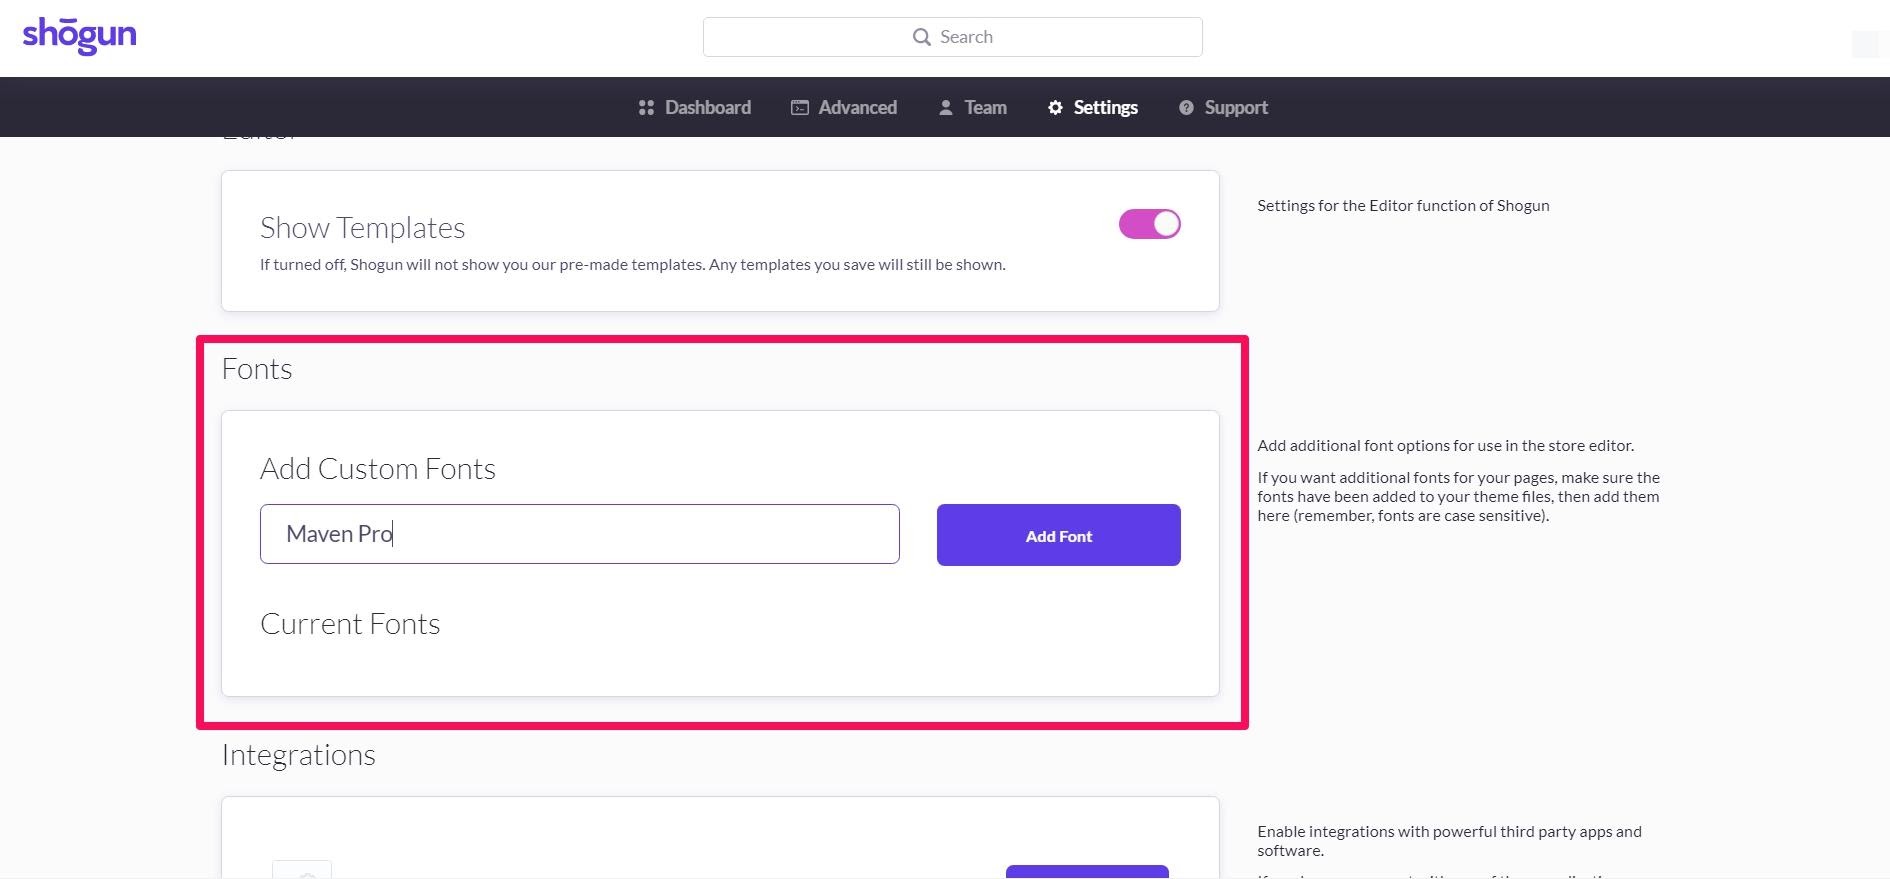
Next, scroll down to the Add Custom Fonts field and enter the name of the font.
This field is case-sensitive, and you’ll want to make sure that hyphens, underscores, and all additional characters are correct for the font as well.
Once you’re finished with that process, click on Add Font.
Step 3: You are all done!
And there you have it. Now, you’ll find that your custom font is now included in the font dropdown menu of the text editor.
It’s as easy as that. That wasn’t even a real third step!
With Shogun, you can do this for as many fonts as you need pretty seamlessly without ever breaking a sweat.
Even more fonts to choose from with Shogun
Shogun also provides you with a number of different font options that you won’t get with Shopify.
In other words, it makes the process of finding fonts for Shopify easy—to help build out your store’s pages quickly and to your brand’s style.
Here’s a quick overview of a few.
Creepster
This spooky font is perfect for the Halloween section of party stores, and any store can use it for Halloween-themed sales or promotions.

Eagle Lake
Eagle Lake pairs well with stores that sell jewelry, designer watches, or other luxury items.

Faster One
This font is an obvious match for any sort of automotive store, and it can help you highlight products that are fast in other ways (fast computers, fast-drying paint, etc.).

Finger Paint
What school supply store wouldn’t want a font that looks like it was made by the students themselves?
Toy stores and clothing stores with kids sections can also make good use of this font.

Press Start 2P
This gaming-themed font is so stylized that you can even use it for your store’s title in lieu of a logo.

By combining Shopify with the Shogun Page Builder App, you will have much more control over the appearance and functionality of your pages. You don’t have to be limited to Shopify’s basic customization options.
Shogun’s easy-to-use interface lets you pick from a number of exciting (and boring) fonts.
It comes with Google Fonts already installed, so you don’t have to worry about editing code or hiring a developer.
In fact, its text editor includes almost every single one of the 1052 fonts in the Google Fonts library, so you don’t have to install them manually.
To access and change these fonts:
After signing up for Shogun, click Apps in your Shopify dashboard and select Shogun Page Builder.
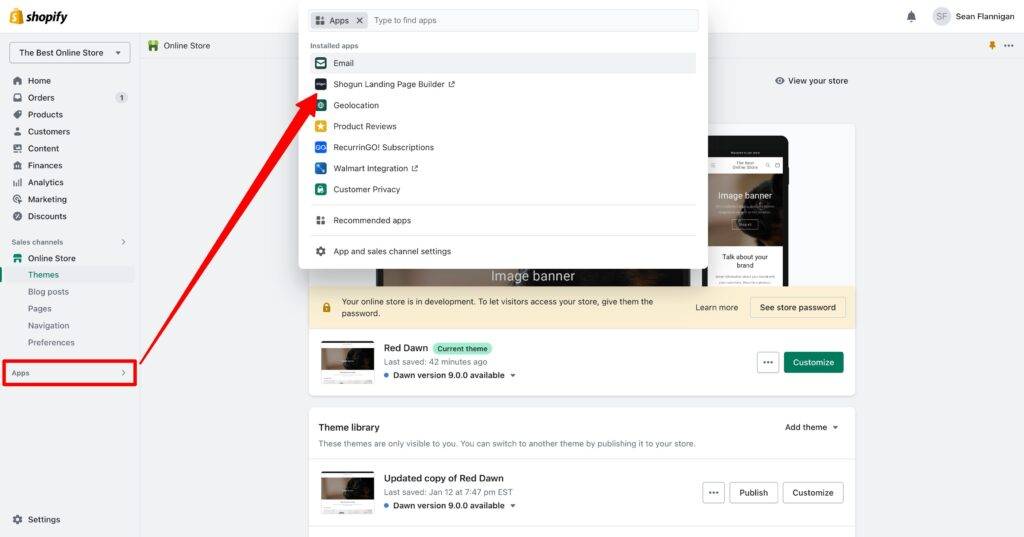
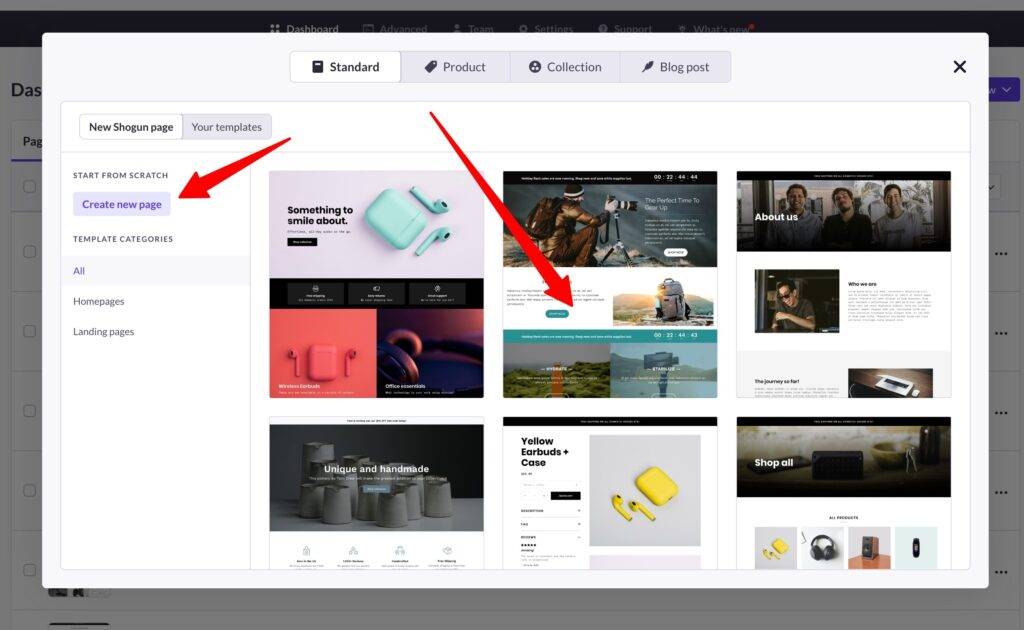
Select an existing page, or click Create new > Page. You can either select a pre-built template or start with a blank page. Add page details and start customizing.
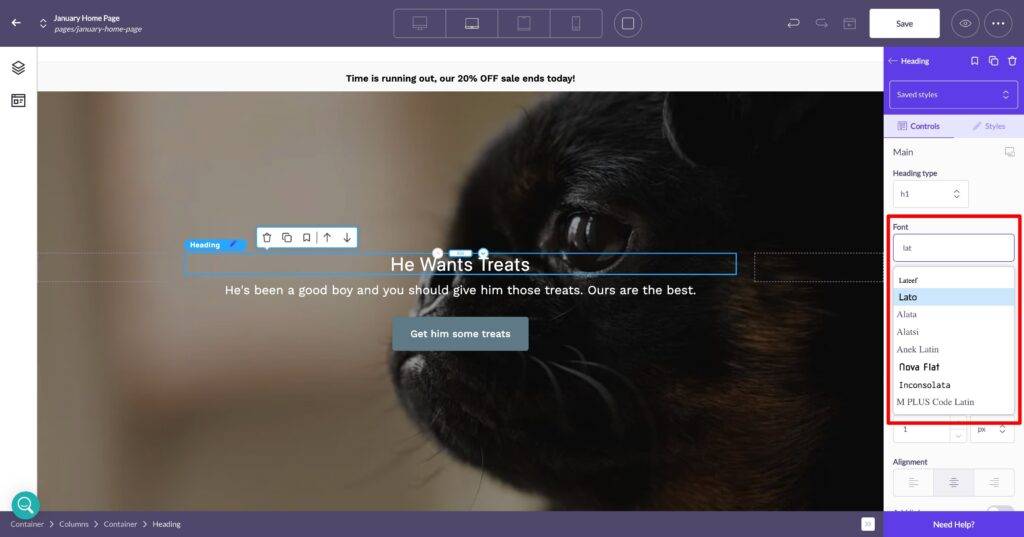
Double-click on the text box you want to edit and highlight your text. Search or scroll through the available fonts. Select the font of your choice and Save your changes.
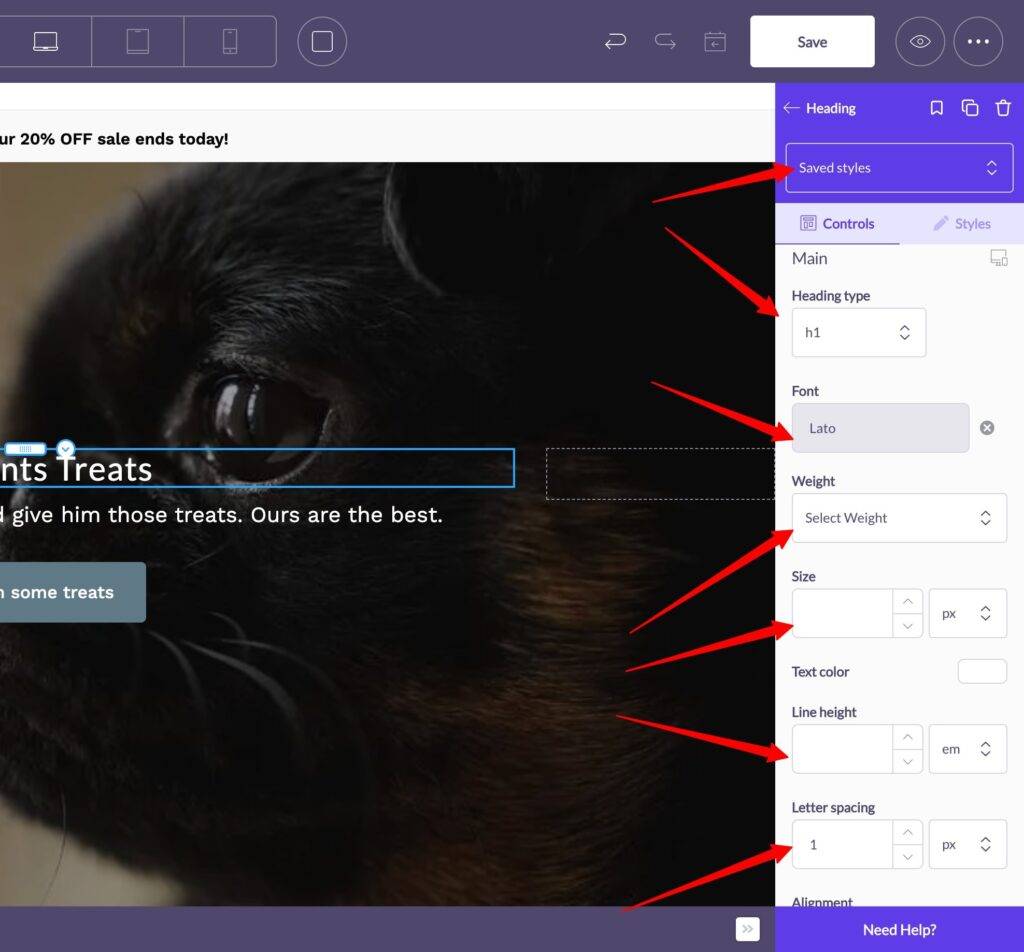
The fun doesn’t stop there. You can also easily adjust your font heading type, font size, line height, text color, alignment, or letter spacing.
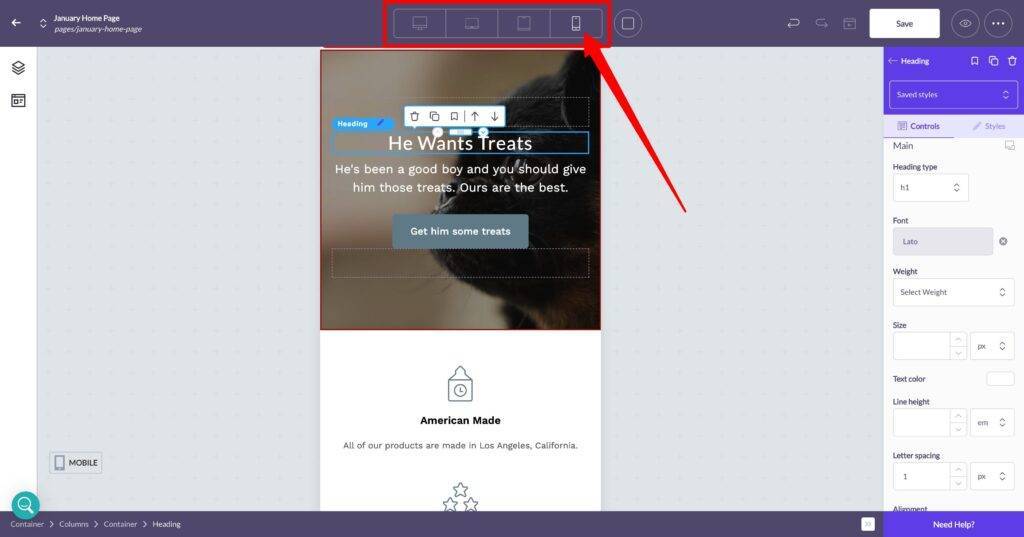
Want to see what your fonts will look like on different screens? Try Shogun’s View feature to see it on different screen sizes.
Shogun gives you more Shopify font options
Adding custom Shopify fonts can be done in many ways.
Using a tool like Shogun is the easiest way to manage all your font needs, whether you’re uploading custom fonts or going with Google Fonts.
Most importantly, it helps you avoid the danger of damaging your store by removing the need to edit your theme’s code.
#cta-visual-pb#<cta-title>Add fonts to your Shopify store without coding<cta-title>Try Shogun for free to see what fonts you can use for your stunning Shopify store.Start building for free

Michelle Deery
Michelle Deery is a writer and strategist for B2B SaaS companies. She writes content that helps brands convert visitors into paying customers.


