Shopify CSS: How to Customize Your Store With Custom CSS Edits
Customizing your Shopify store is vital for creating a final product that looks like your brand and not just another cookie-cutter store with a popular theme.
Even if you use a premium Shopify theme, your basic customization options will be limited, and your store will bear a striking resemblance to any others that used that theme.
To make significant adjustments to your fonts and layouts, you’ll want to tweak your theme’s CSS files.
Unless you have some technical know-how, you may not understand how to add custom code to Shopify.
While it’s essential to let the experts handle adding custom CSS to your Shopify theme (and we do recommend leaving it to them), we’ll break down all things CSS so that you can better understand how to edit CSS on your Shopify store (and whether you should even bother).
In this post, we’ll cover:
First, let’s cover the basics of CSS, and then we can get into how you can use it in your store.
#cta-visual-pb#<cta-title>Customize your Shopify store the easy way<cta-title>Make your store look and feel as unique as your brand by customizing with the best page builder for Shopify.Start building for free
What is CSS?
CSS stands for Cascading Style Sheets. It is a coding language used to specify how hypertext markup language (HTML) elements are displayed on a website.
HTML is the hard-coded skeleton of all web pages, determining the essential structure of a page (headings, body content, images, video, etc). CSS works with HTML to build out how that structure appears to users (layouts, fonts, colors, spacing, etc).
So, a simple example of HTML could be:
#cta-paragraph-pb#<h1>I’m a heading!</h1>
On its own, this would display the phrase “I’m a heading!” in the H1 heading format.
The extent of its decoration would depend on the CSS styling defined in the stylesheet (a separate document called up by HTML to determine the style of elements).
The h1 element’s styling in the CSS stylesheet could look like this:
#cta-paragraph-pb#h1 { color:black; font-size:36px; }
The above styling would make the HTML heading appear as plain 36-point black text. Not terribly exciting, I know.
That one line of CSS would dictate what every H1 on a page would look like.
CSS code structure
The “h1” in the above example of CSS code is referred to as a selector. It could be a paragraph tag (“p”) or a uniquely defined class (“.uniquely-defined-class”).
The selector is the CSS’s connection to the HTML code. So, the “h1” selector is defining the style for all <h1> tags in the HTML document.
Within the curly braces, you have your declarations. In this case, the declarations for the H1 heading are “color:black” and “font-size:36px”.
These declarations are made up of two parts: the property and the value. Color is a property, and black is the value of that property. Declarations determine how the HTML with be stylized.
When you have more than one declaration, as you often will, they must be separated by semicolons. A semicolon also must be used at the end of the declarations.
A note about CSS rules:
If, for some reason, a selector is used more than once in a CSS file, the selector further down the document will be used. Later code overrides older code. This is handy when you are editing a file.
3 Ways to customize your Shopify store
Before we get into how to edit Shopify CSS files, let’s first talk about the various options you have for customizing your Shopify store.
There are a few ways to customize how your Shopify store looks and feels after installing your ideal theme.
Shopify theme editor
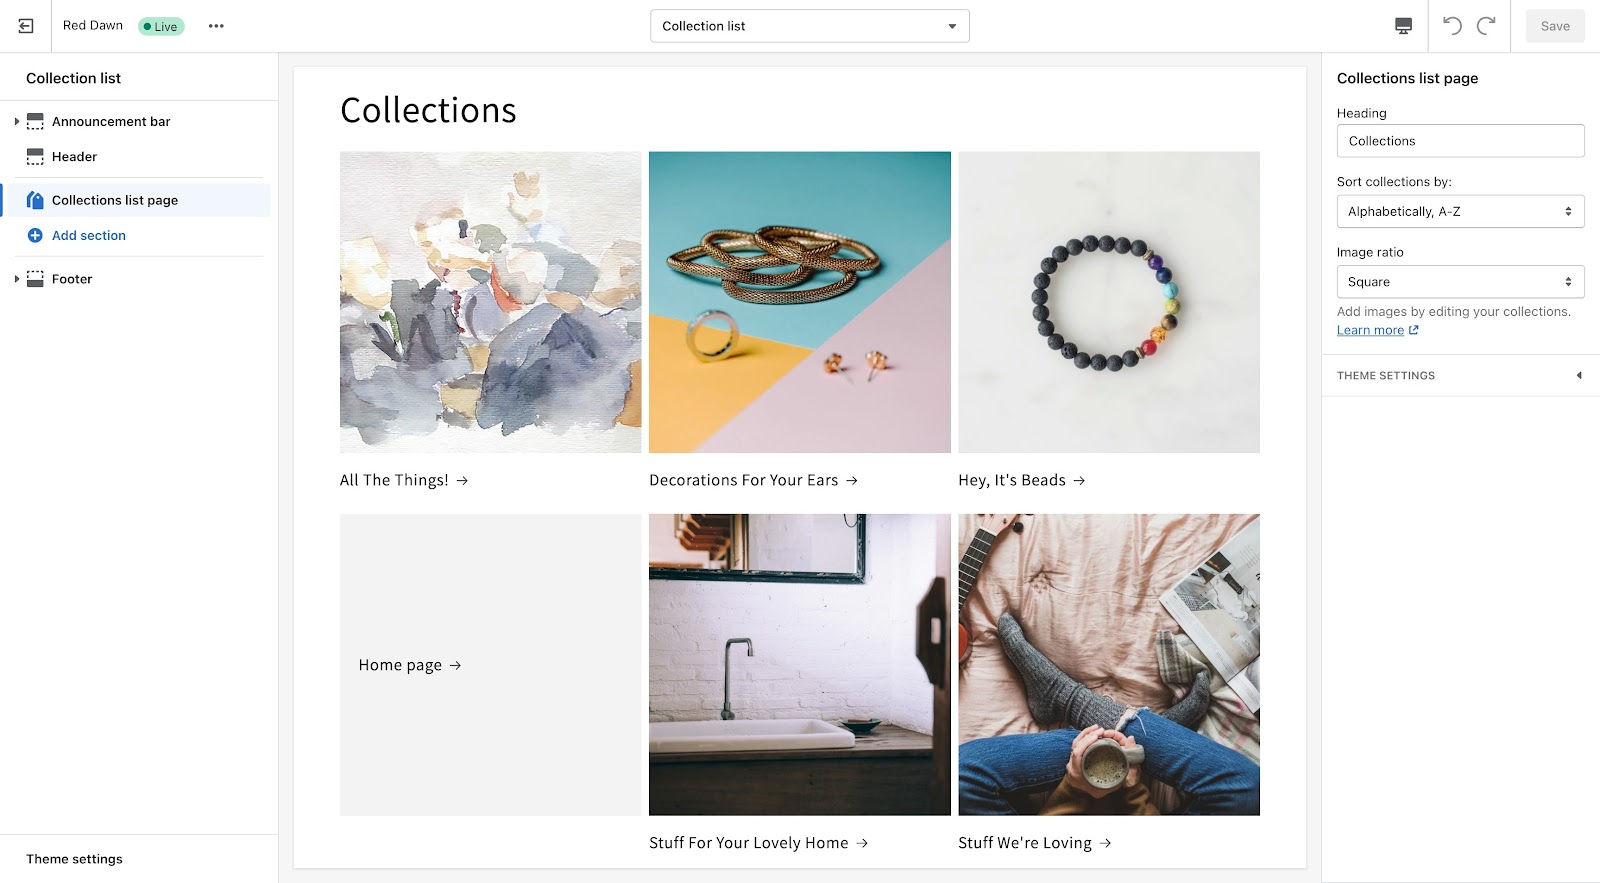
Shopify makes it easy to customize your theme in the theme editor.
You can access it by going to Online Store > Themes, and clicking Customize on the theme you want to make changes to.
The theme editor allows you to make style changes to the overall theme—colors, fonts, button styles, etc—as well as to individual page templates.
With Online Store 2.0 themes, Shopify sections can be added, moved, and customized on any page template.
Shopify code editor
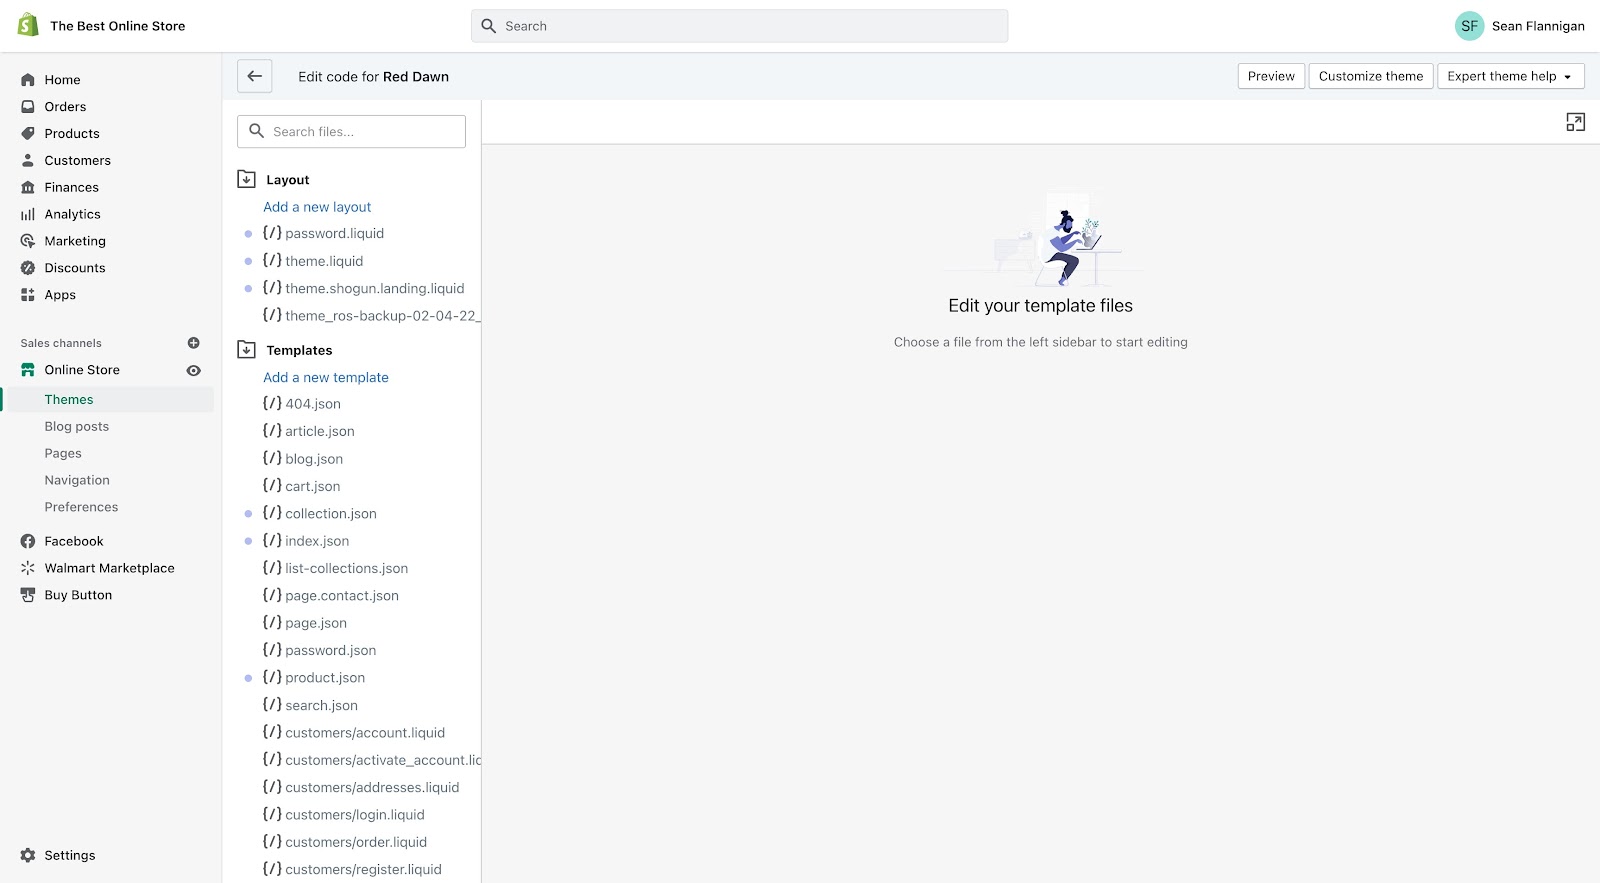
That said, the theme editor is limited in what you can change. That’s where the code editor comes in.
The code editor gives you access to all your theme’s liquid, CSS, and HTML files.
As changes you make to these files can affect the functionality of your theme, they should be made by a developer that knows what they are doing. Also, you should always back up your theme before editing anything.
We’ll be digging into the code editor for what we’re talking about today.
Shogun Page Builder

Finally, if you don’t want to mess with code but need something more powerful for customizing your Shopify store, you can use a page-building app that gives you more control over how page elements work in a drag-and-drop visual editor.
Shogun Page Builder is here for you when you need something powerful and aren’t interested in making code changes.
I’ll show you some examples of what it can do later on.
IMPORTANT: What you need to do before editing your Shopify CSS code
You ALWAYS need to duplicate your theme before customizing your Shopify theme in the code editor.
This creates a backup copy that you can revert back to if your CSS changes end up going awry.
To duplicate your theme, you’ll want to click Actions on the theme in question and select Duplicate from the dropdown menu.
Make sure you rename the backup to make it obvious what version you would be reverting back to—something like the date for a precise timestamp.
#cta-visual-pb#<cta-title>Worried about breaking your theme?<cta-title>Use Shogun Page Builder to customize your store without the threat of mucking up your store theme.Start building for free
How to access CSS files in the Shopify code editor
Accessing the Shopify code editor is simple. As always, you’ll start from your Shopify admin dashboard.
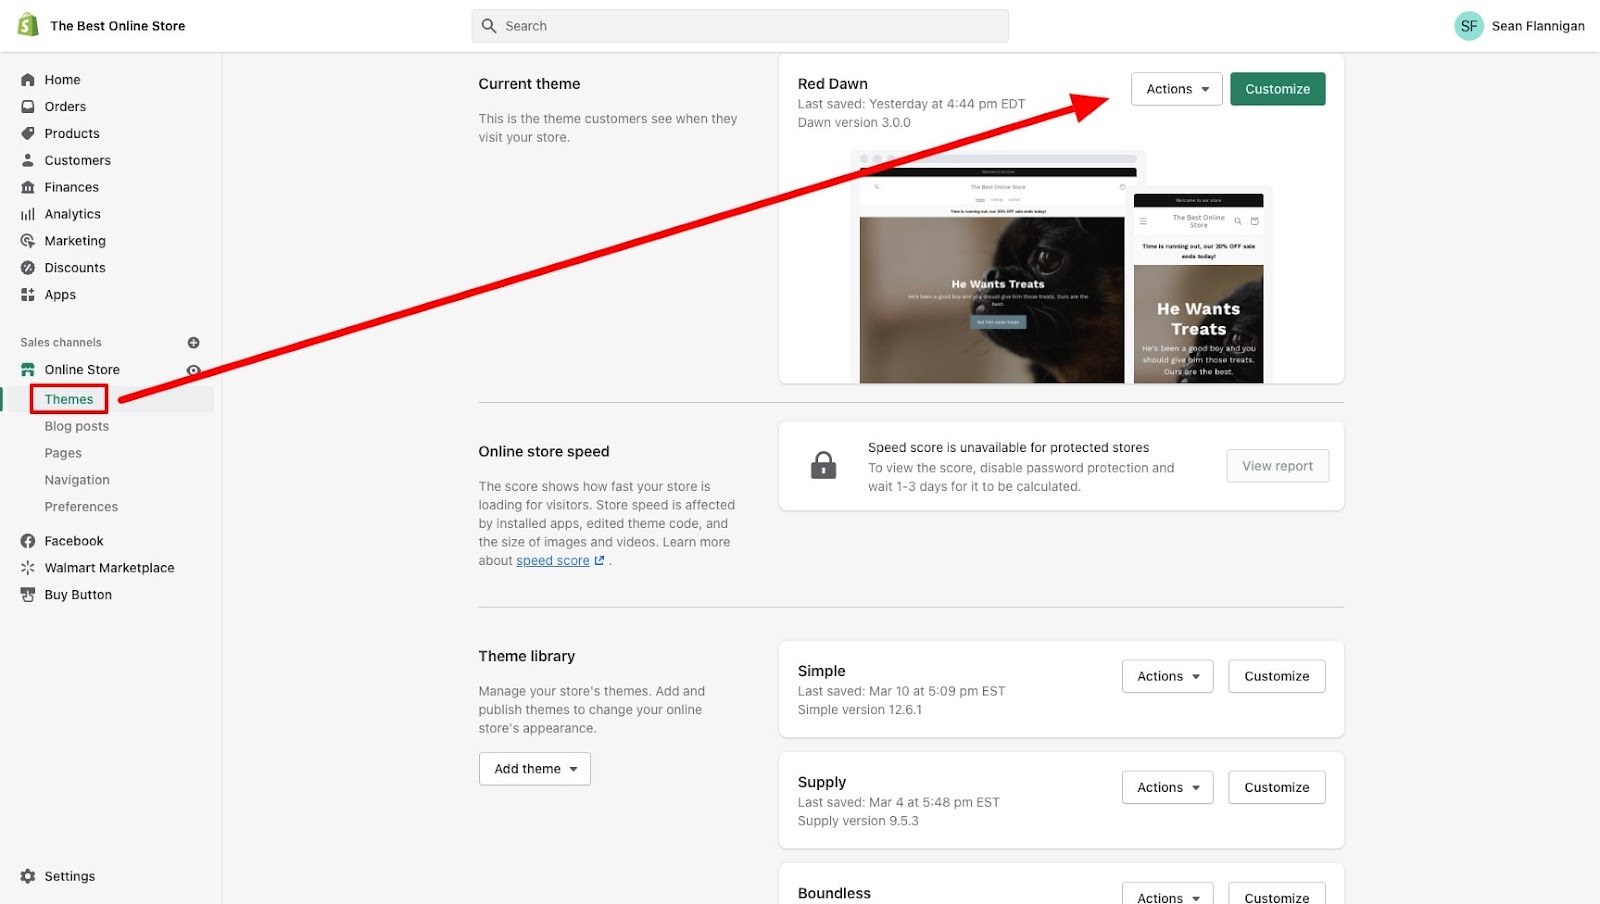
Step 1: Go to your Themes page
Navigate to Online Store > Themes. Find the theme you want to edit on the themes page and click Actions.
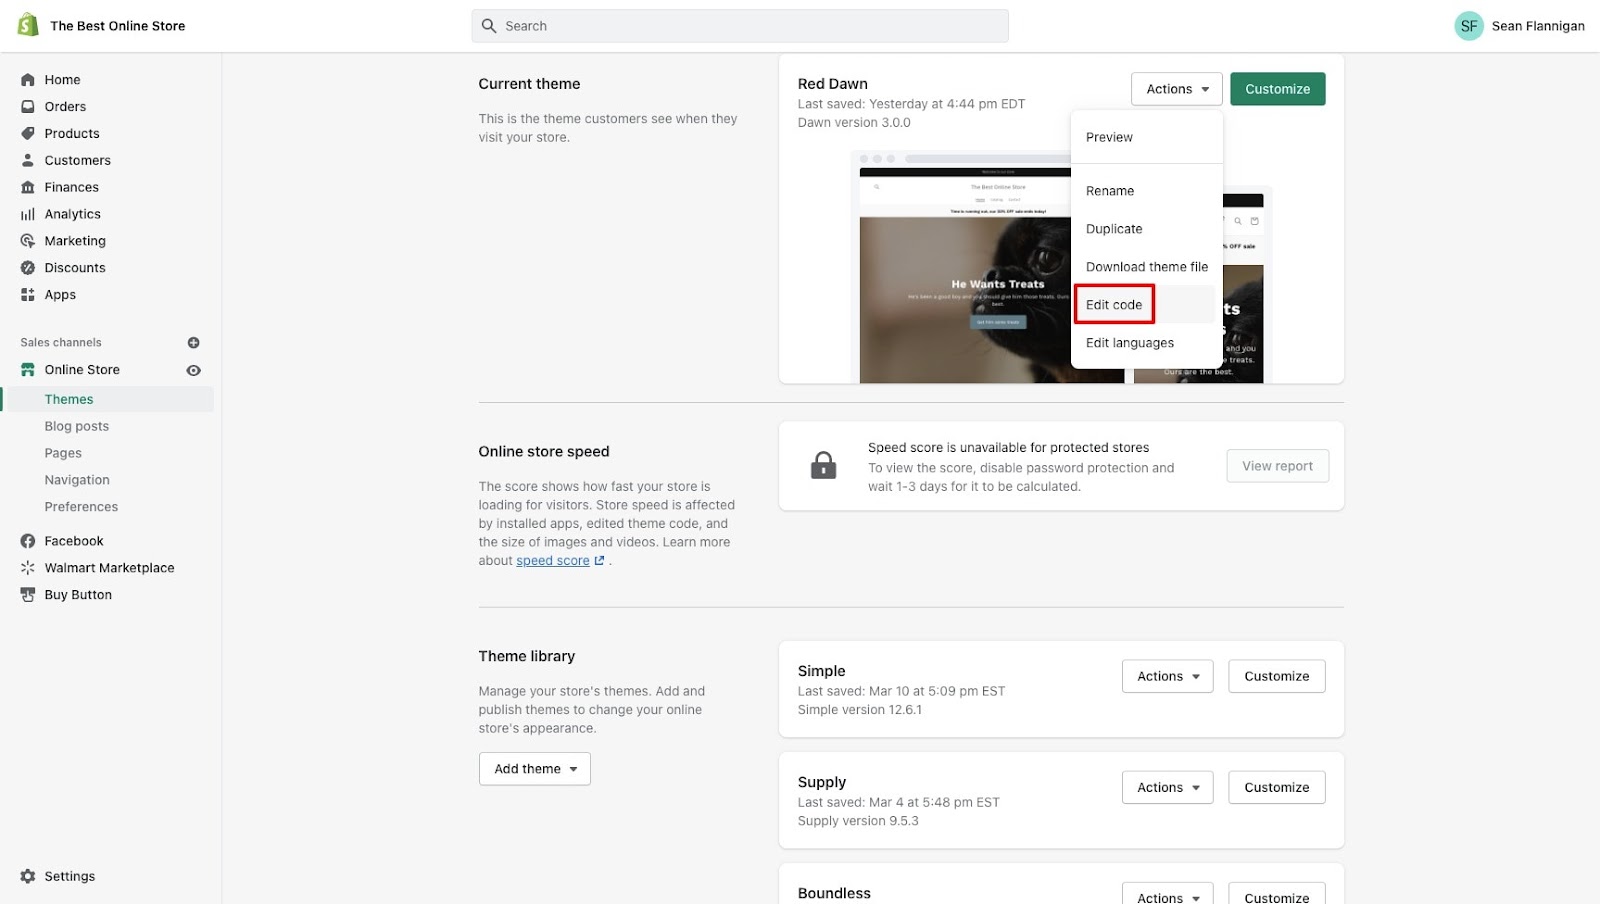
Step 2: Click Edit code
In the Actions dropdown menu, click on Edit code to get to the code editor.
Step 3: Find the Assets folder for CSS files
Once in the code editor, you’ll want to collapse the Templates folder (which is open by default). Below that, you’ll find the Assets folder. Expand it to reveal your theme’s CSS folder.
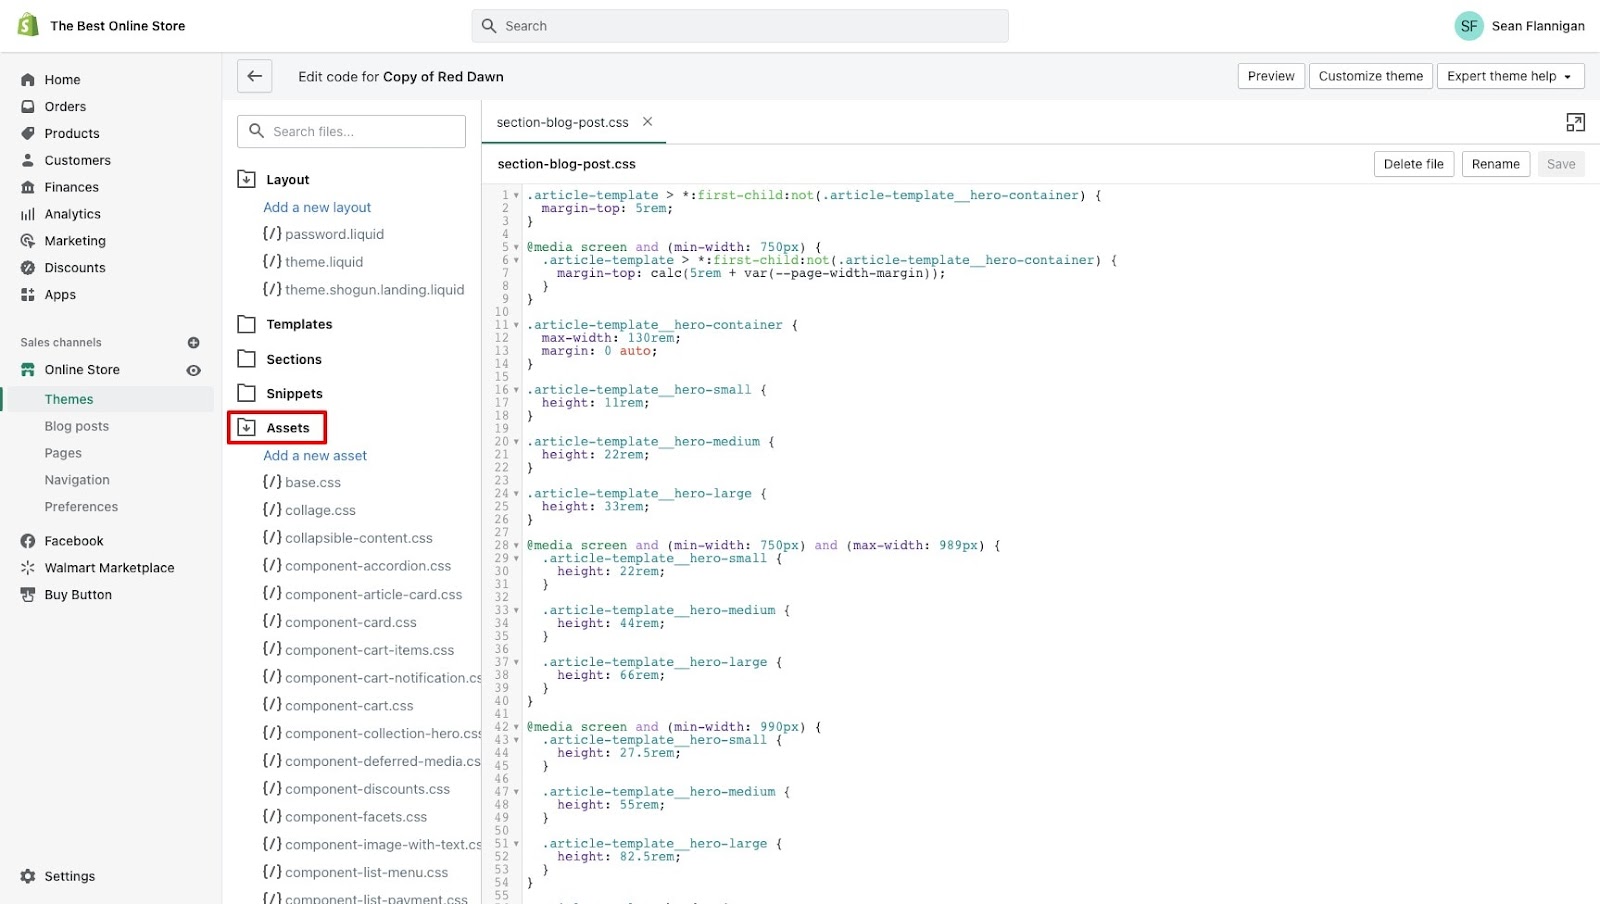
You’ll find a ton of CSS files titled for the components and sections they contain the styling for.
You can click on multiple files, and they’ll remain as tabs in your edit window to customize multiple files at once.
How to edit existing CSS on Shopify
You can make simple CSS edits on existing files in your Shopify theme.
To do so, you’ll want to find the CSS file you wish to make changes in. For the Dawn theme, the main CSS file is called base.css. It could also be called main.css or theme.css.
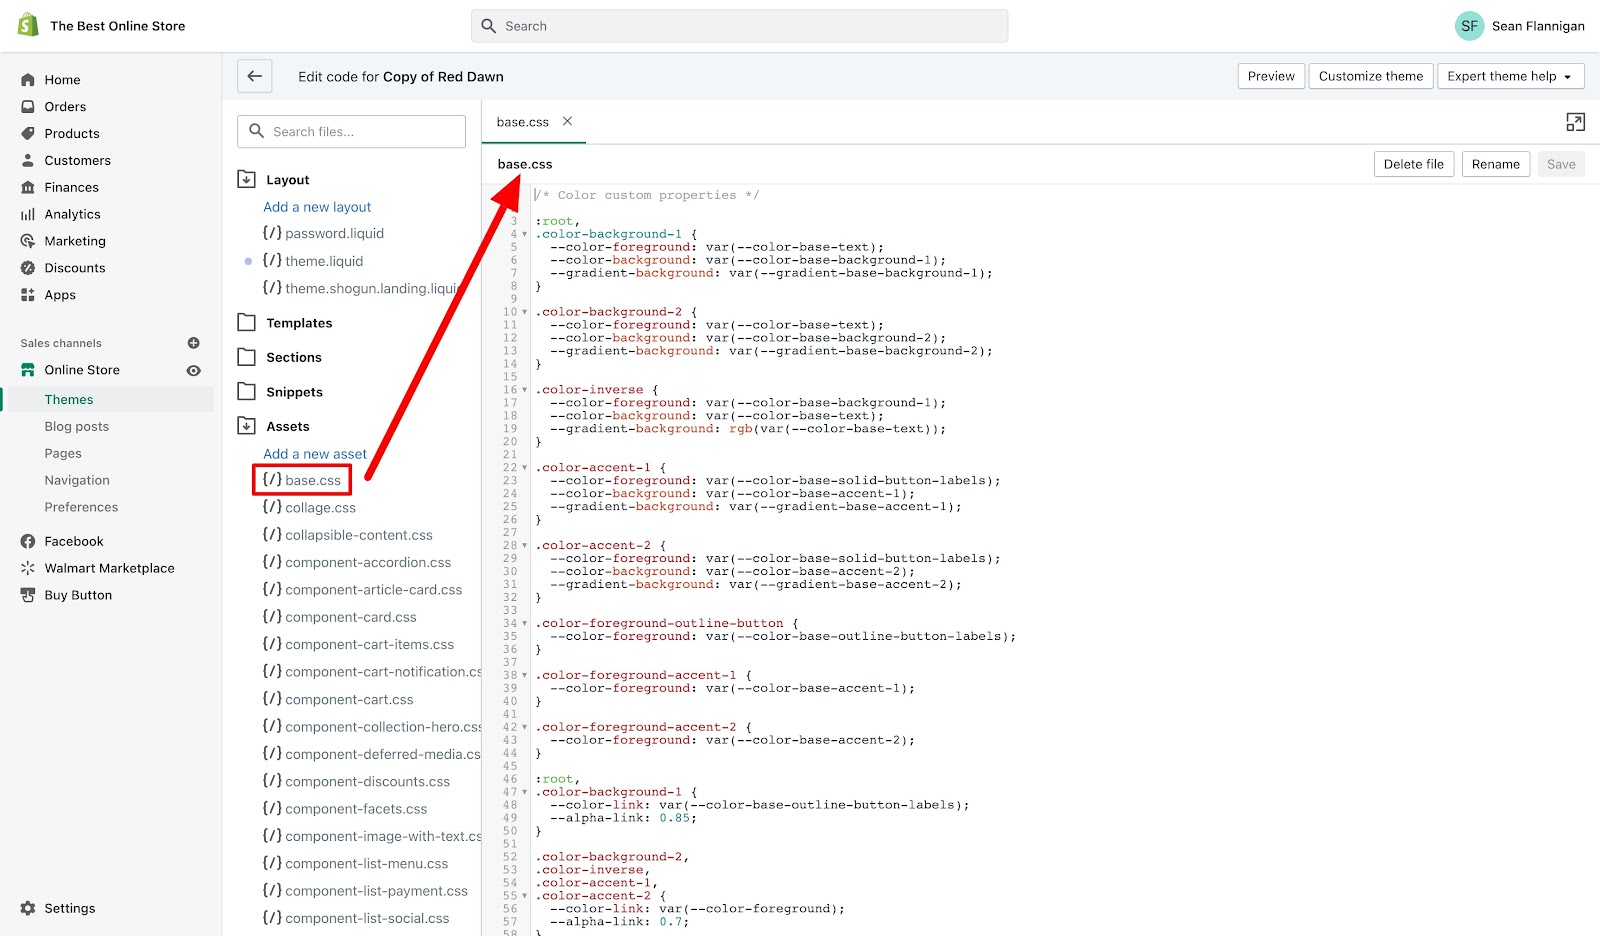
Step 1: Open the base.css file
Under Assets, find the base.css file and click to open. You’ll see it show up in the main editor screen, with a tab above so you don’t lose it when editing other files.
Step 2: Find the name of the element you want to edit
You may already know what elements you want to make changes to, but you can also do your research easily in your browser.
Just pull up your store in your browser, right-click the element you want to make changes to, and click Inspect.
By clicking on the element in the inspector window, you’ll see the CSS attributes already in use.
You can even make changes to the CSS (it won’t affect your actual site) to see how your updates would affect how your store looks.
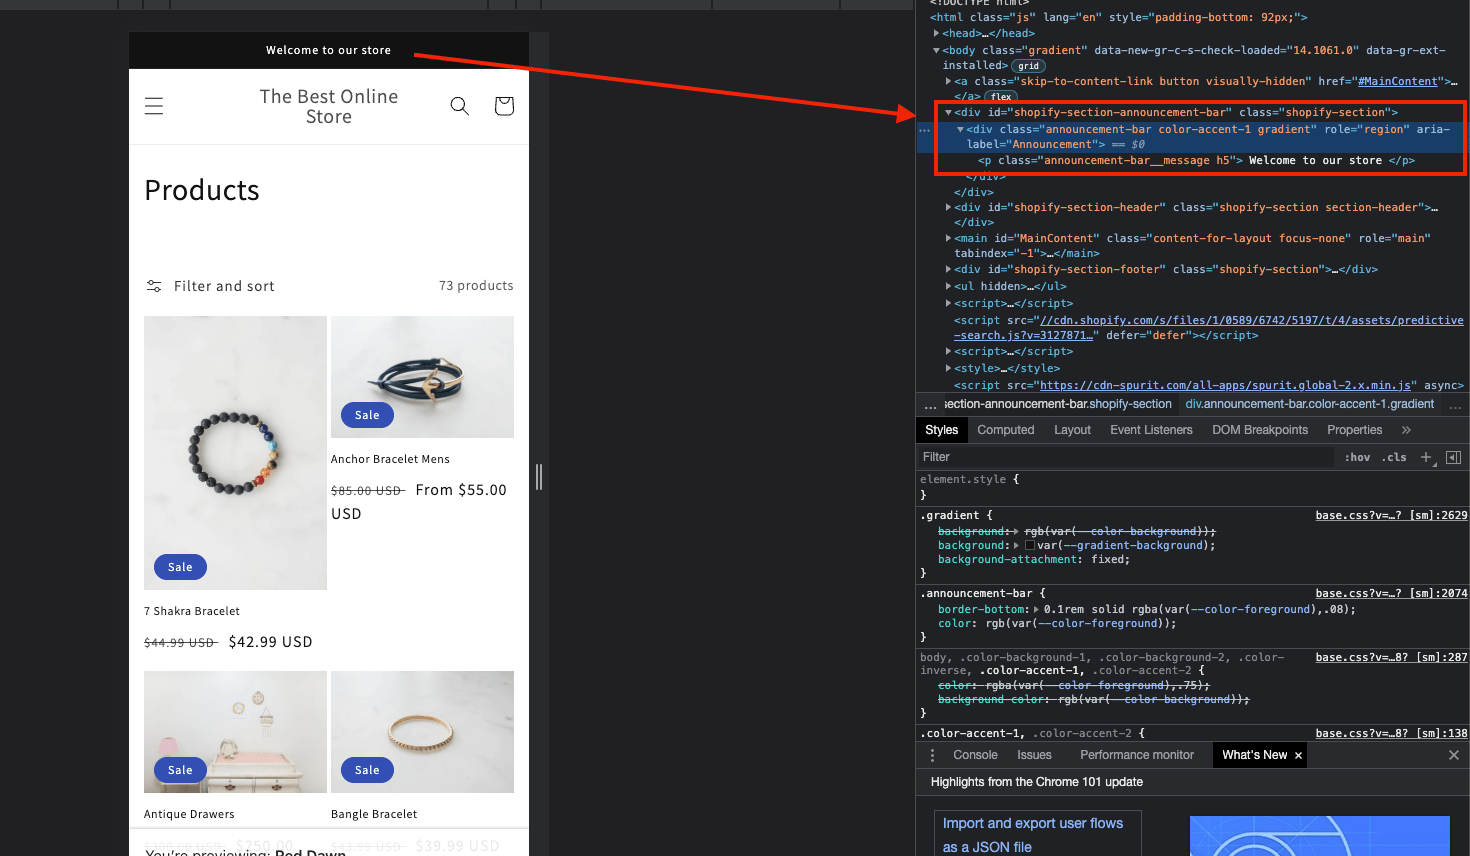
By inspecting the element, you can find the element’s class or id that is used to define it in the CSS file.
Step 3: Find your element in the CSS file
With the CSS element name known, you can simply search your base.css file (it may also be called theme.css) to find what you want to make changes to.
You can search by pressing Control + F (for PCs) or Command + F (for Macs).
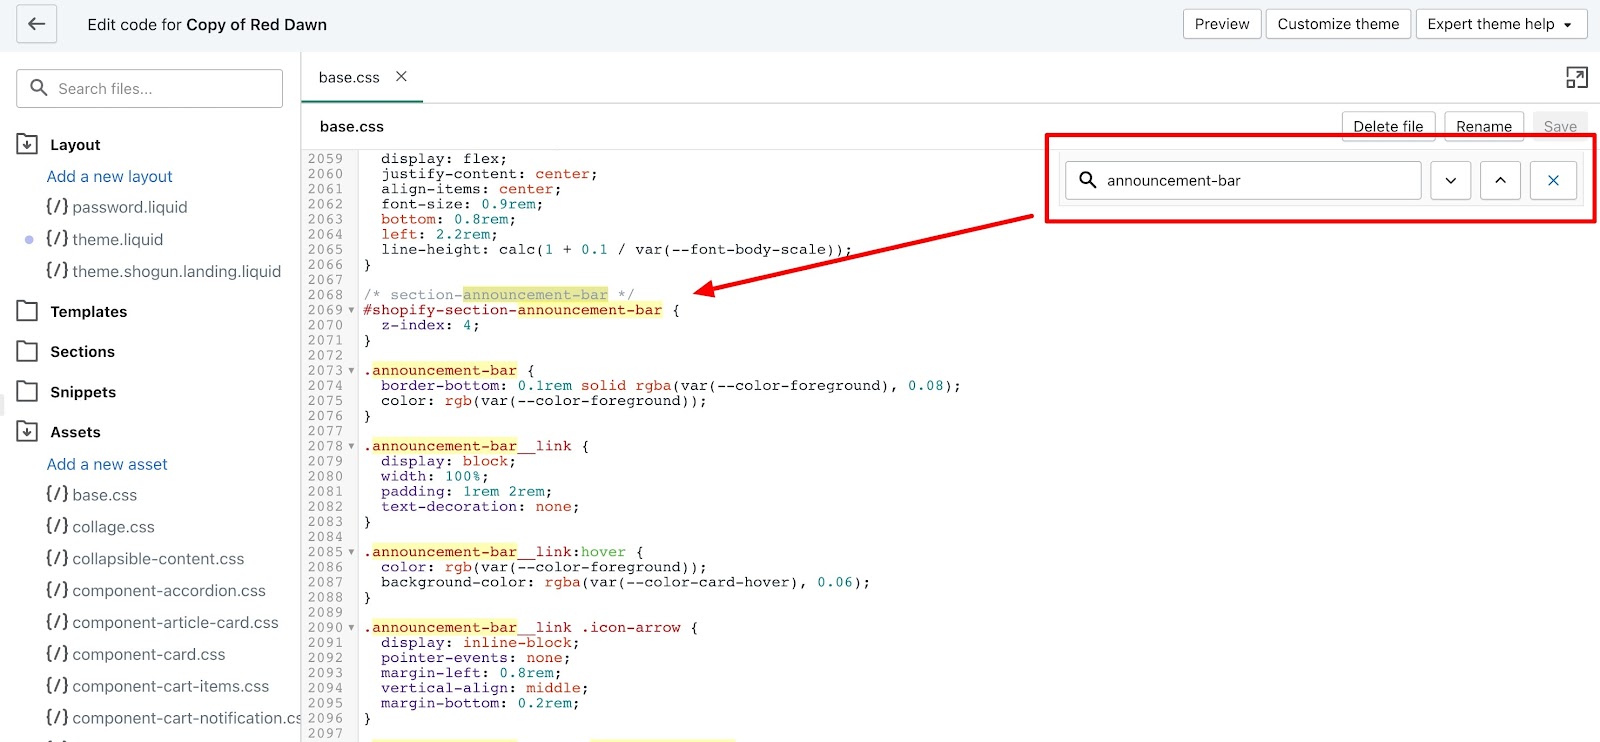
Step 4: Make your CSS edits and save
Once you’ve made the changes to your CSS element, simply click the green Save button in the upper right corner.
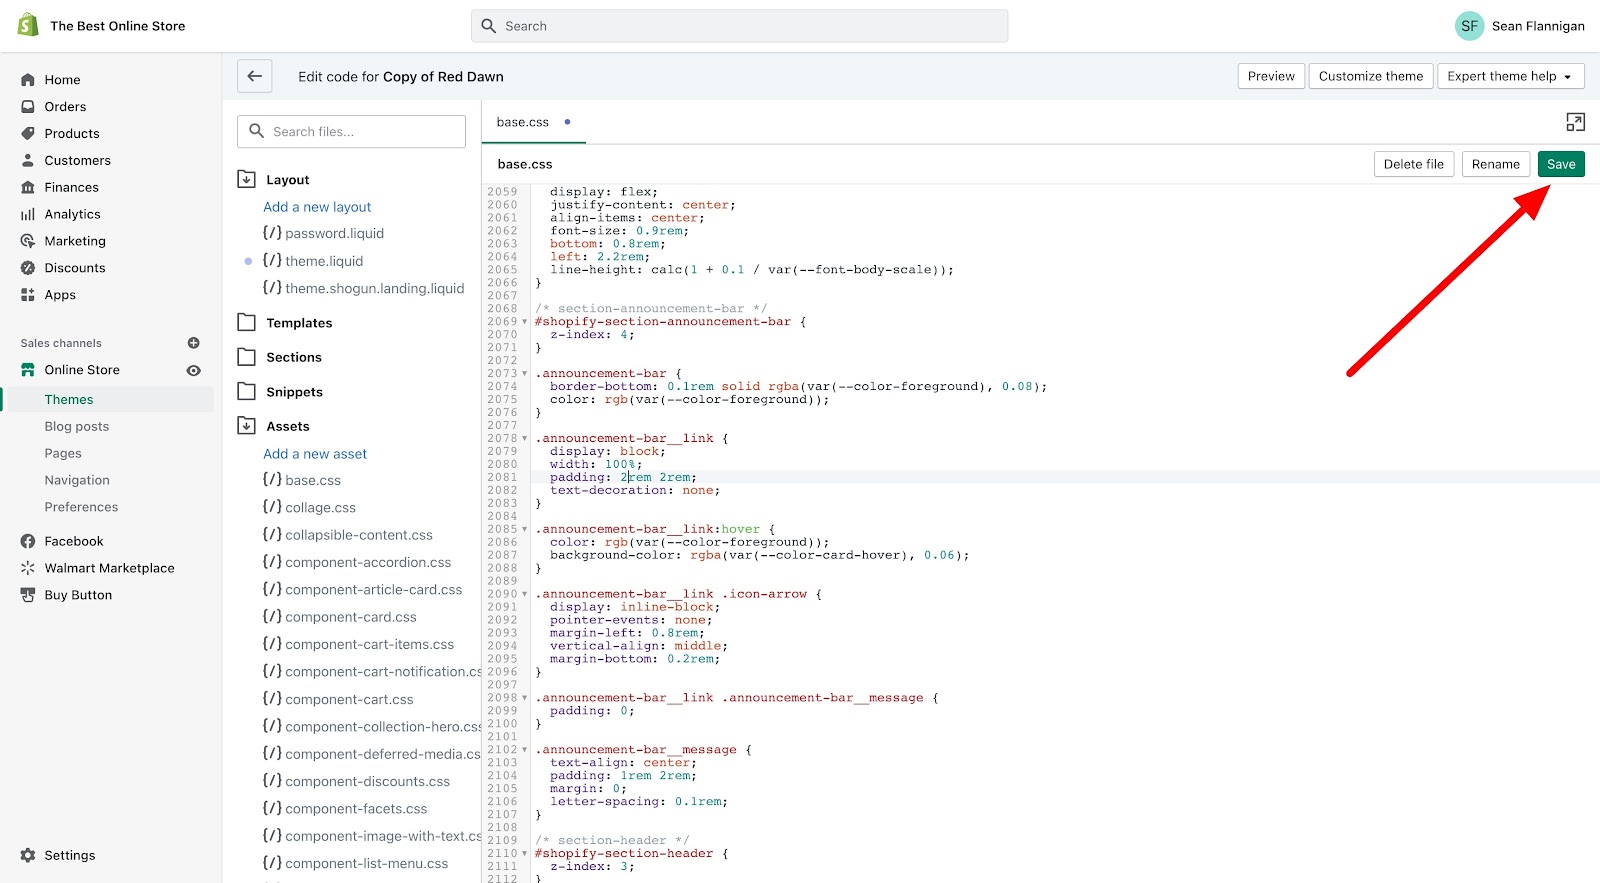
With that, you can click the Preview button to see the effect your changes had on the element in question.
How to create a new custom Shopify CSS file
Creating a new CSS file to host your custom CSS styles only takes a few steps.
Step 1: In the code editor, click “Add a new asset”
Under the Assets folder, click Add a new asset to create a custom CSS file.
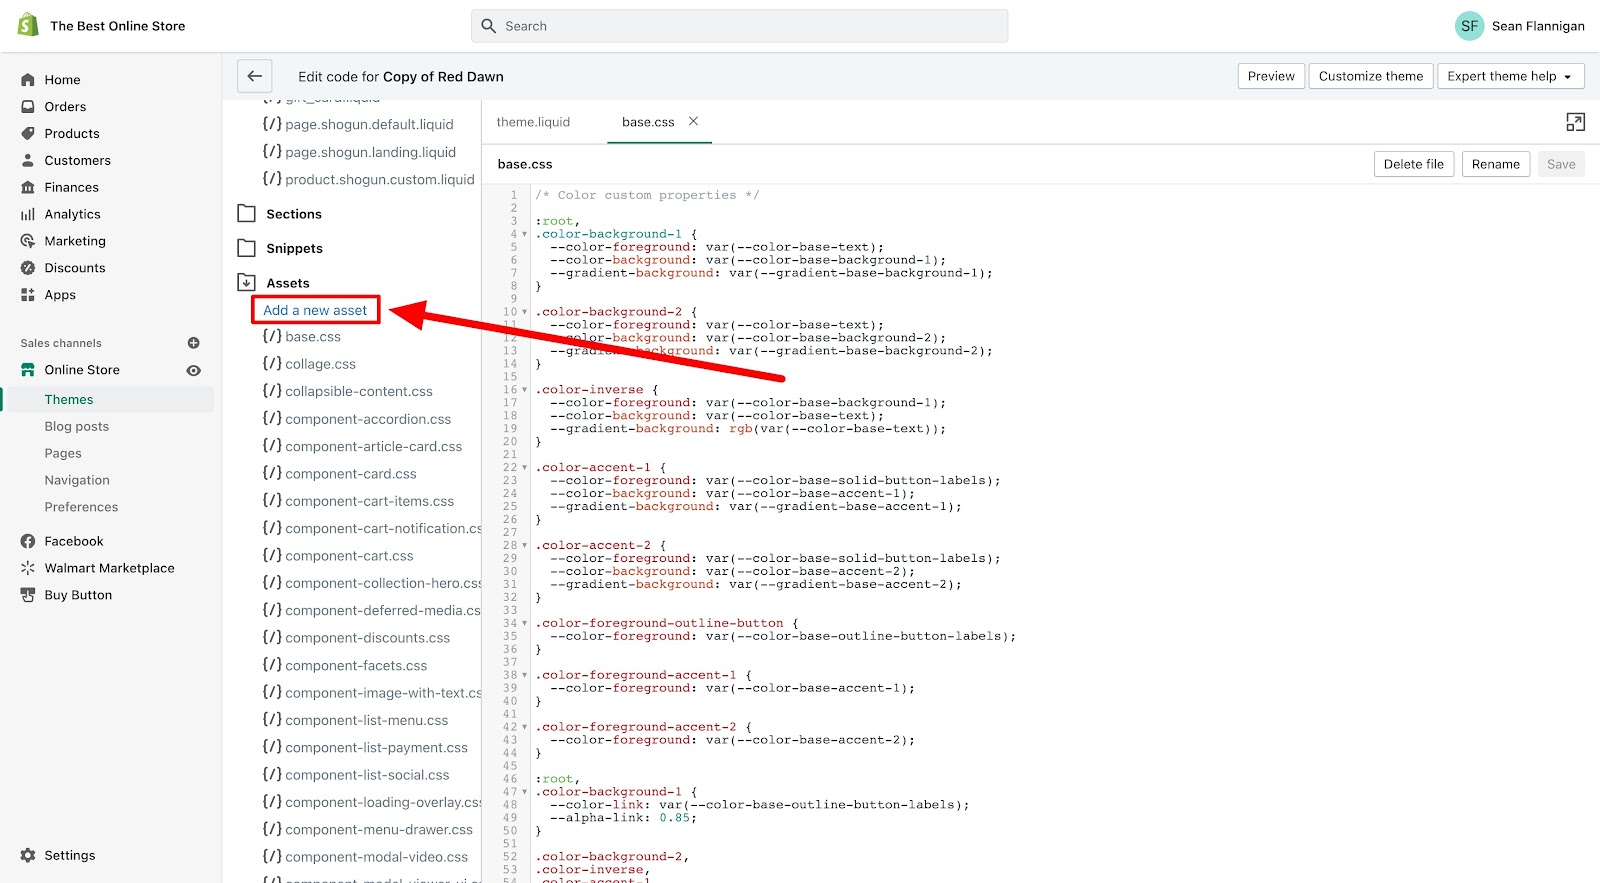
Step 2: Upload an existing CSS file or start from blank
If you already have a CSS file ready to upload, you can simply select the file.
If you are starting from scratch, click the Create a blank file tab and name your CSS file. You can choose your file suffix here too, but updated themes now use the .css file extension.
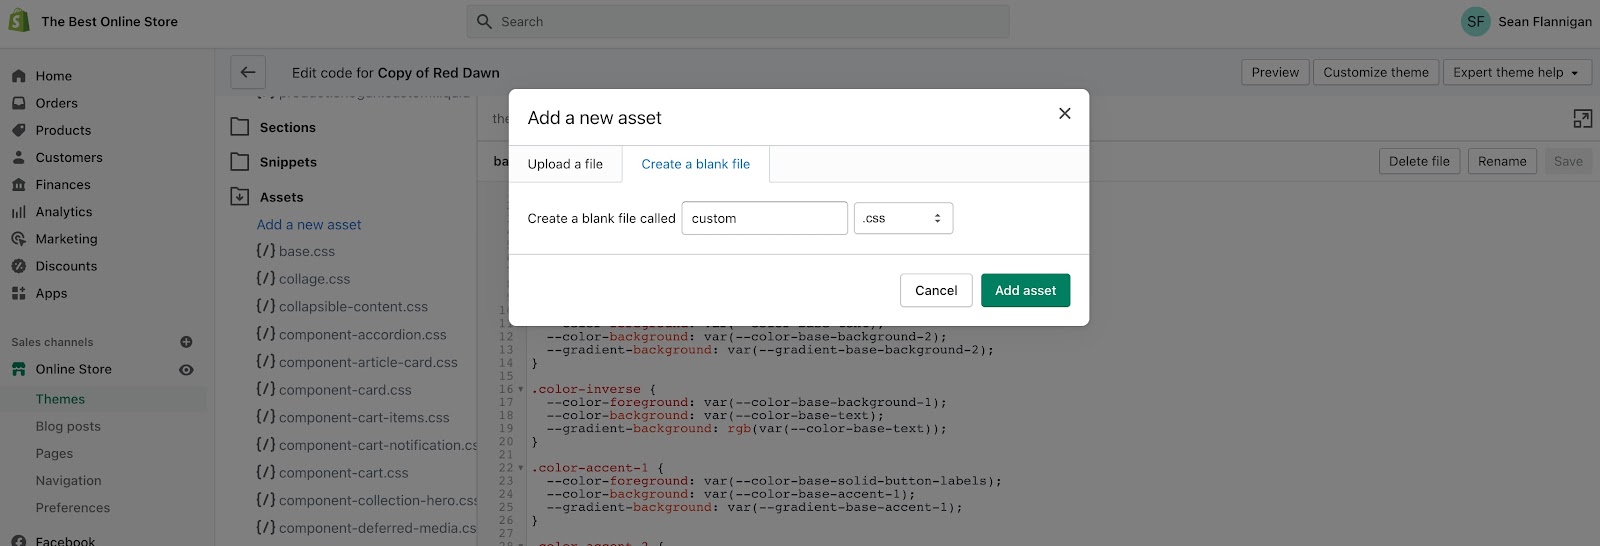
Add your CSS code in the file if you chose to start from a blank file asset. Make sure your CSS code doesn’t have duplicated naming conventions from the base.css file.
Step 3: Go to theme.liquid in the Layout folder
Since you’ve created a new CSS file, it needs to be referenced in the theme file to actually work its magic on your store.
To add CSS to the Liquid file, go to the Layout folder and select the theme.liquid file.
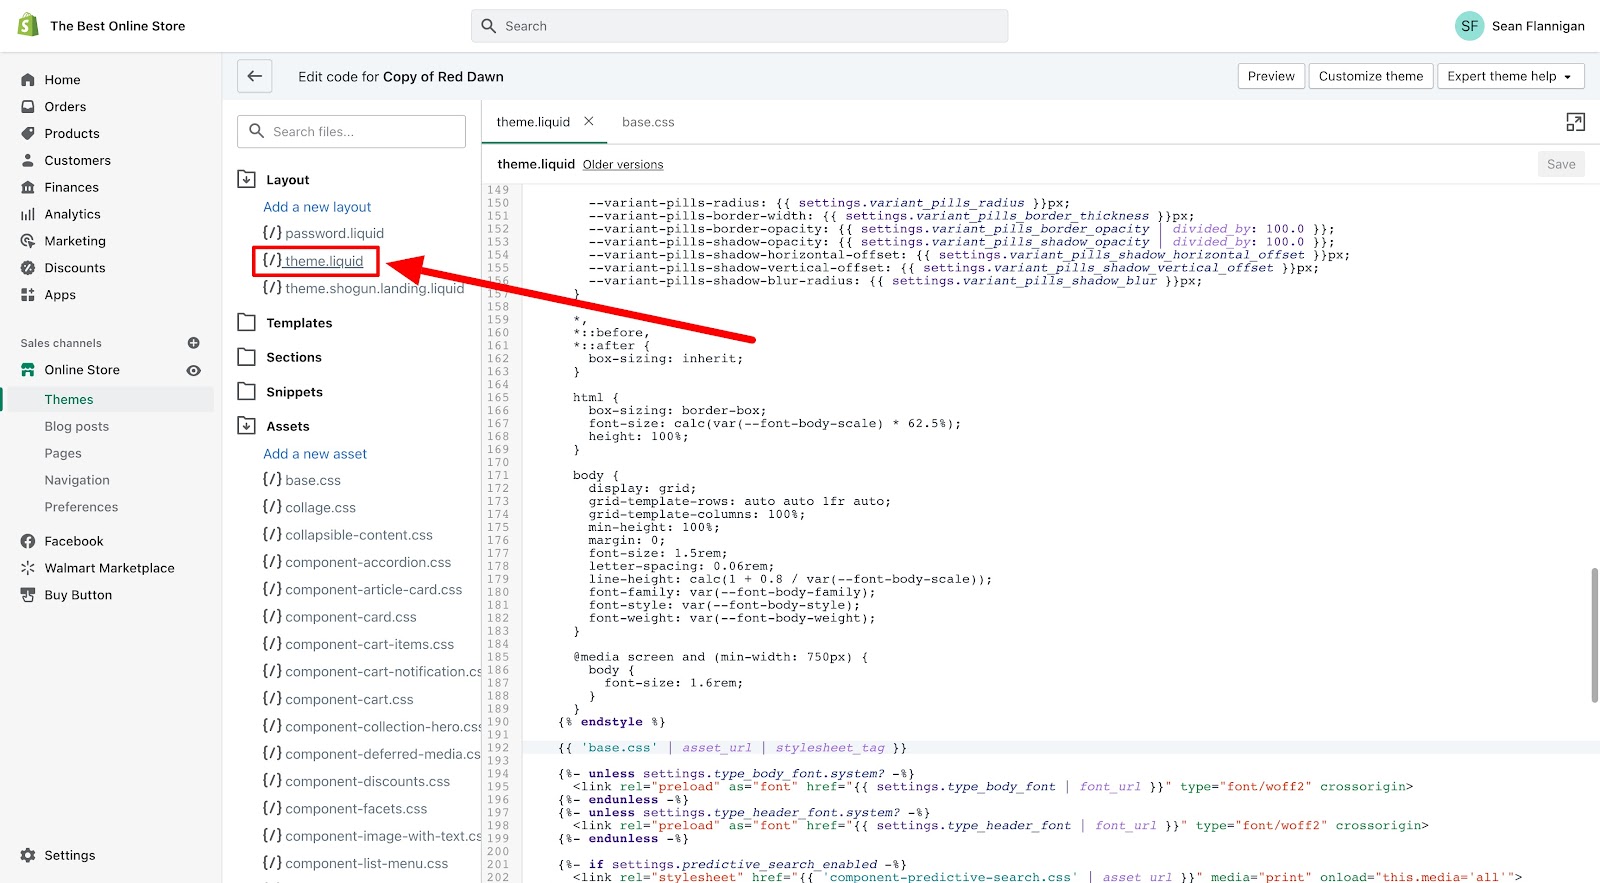
Step 4: Add code for the custom.css stylesheet
Scroll down to where it calls up the base.css file (or search for “base.css”).
Copy the line of code for base.css and paste it below that line. Replace the filename with your own custom CSS filename. In our example, it would be:
#cta-paragraph-pb#{{ ‘custom.css’ | asset_url | stylesheet_tag }}
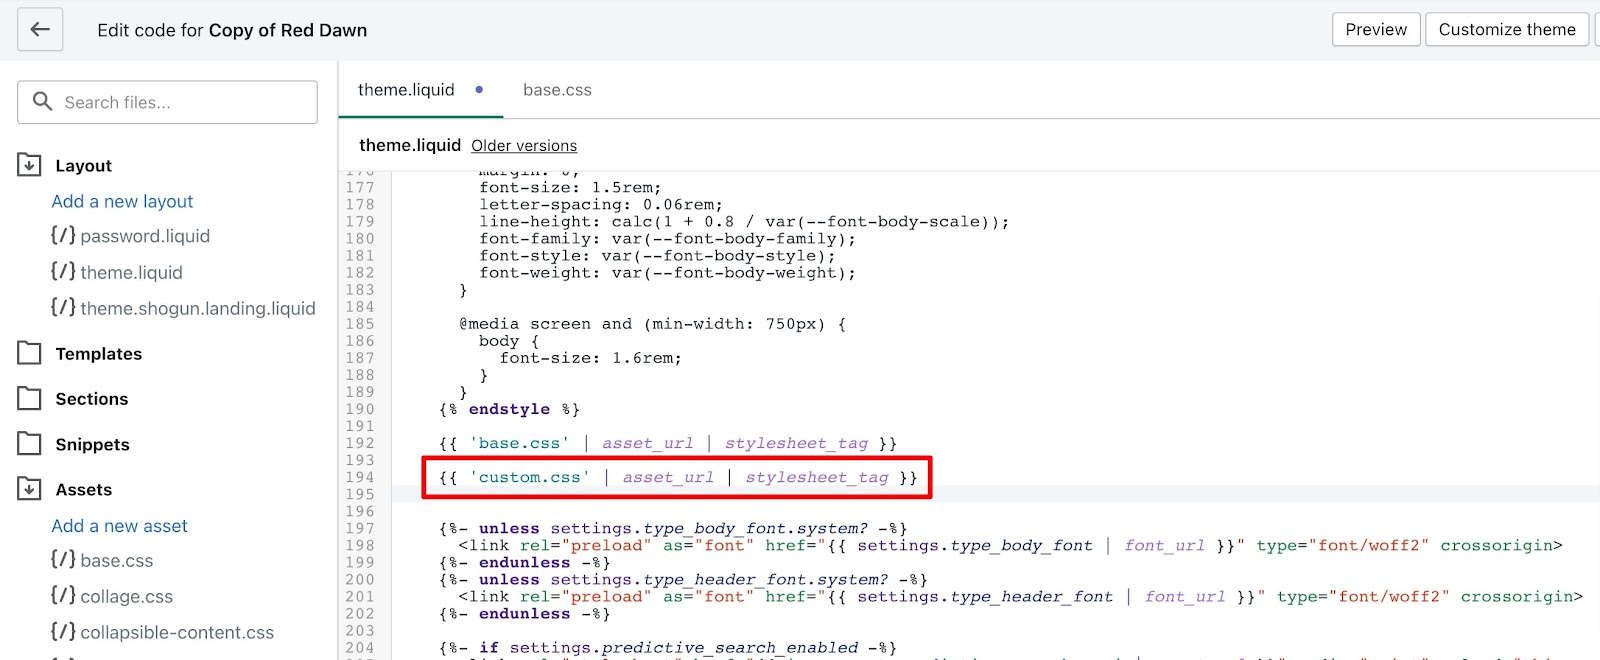
Now click Save in the upper right corner, and your custom CSS will show on your store.
Customize your Shopify store without code
If you want to have more control over the look and feel of your store without messing around with CSS code, Shogun Page Builder is the right Shopify app for you.
These are just a few of the things that you can do with Page Builder but demonstrate the breadth of its capabilities for when you want to make visual changes without the technical know-how.
Animations
To add some motion to certain page elements on Page Builder, choose the element and select the animation effect.
For this container section, I have the option of using animations that trigger upon scrolling into view or upon moving the mouse over the section.
When you’ve chosen an animation effect, you can customize the delay, duration, the number of times it happens, and whether it only triggers once.
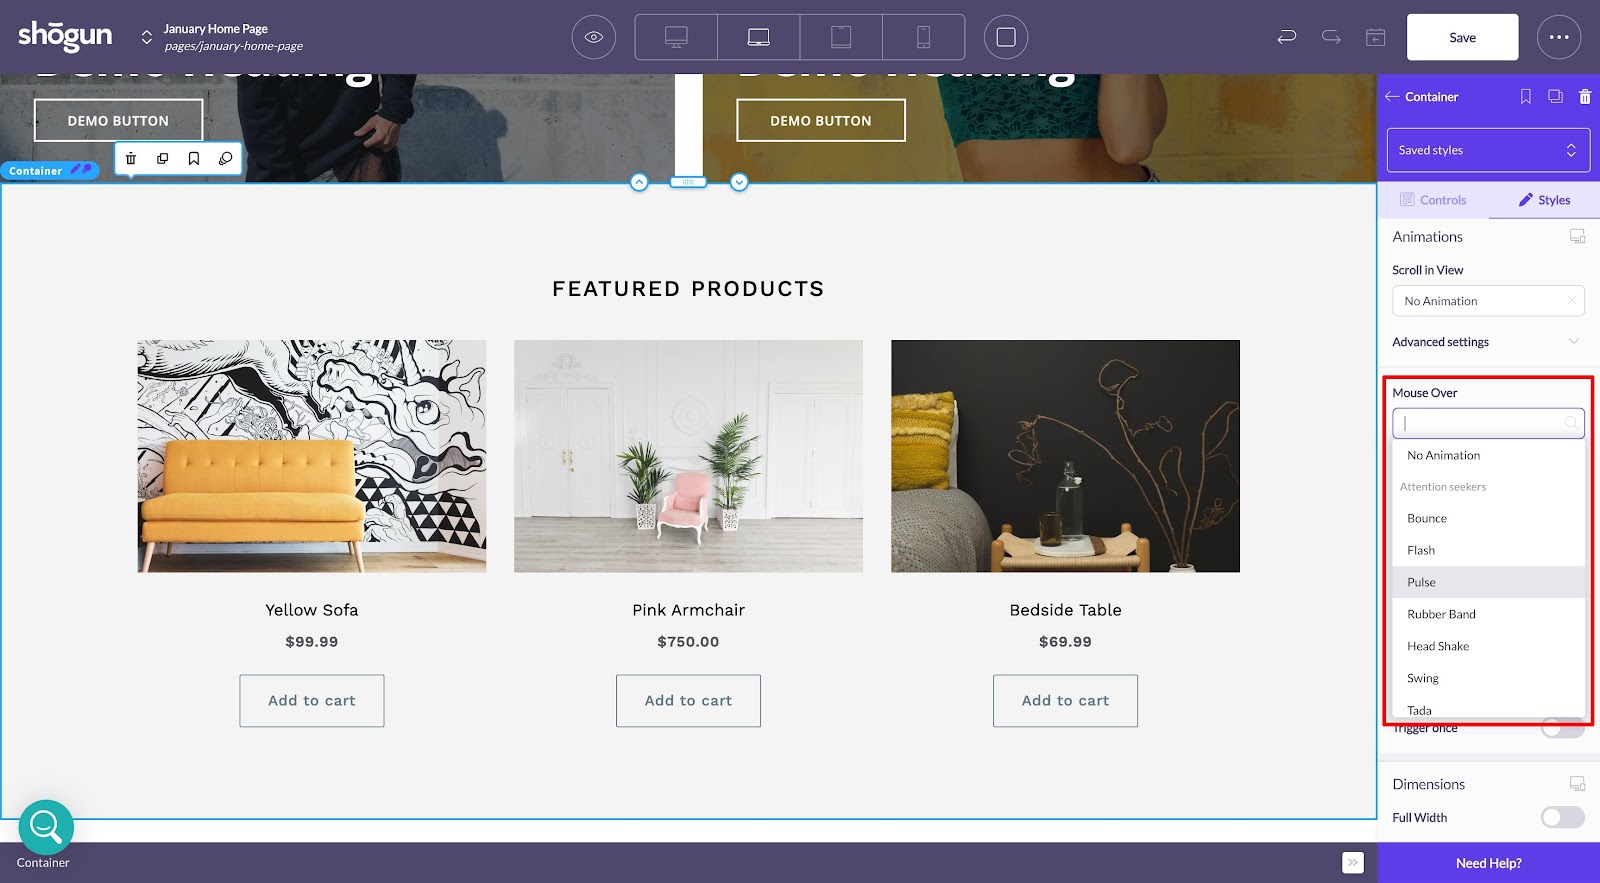
For this, I chose the Pulse animation that triggers upon mouseover. It adds a pleasant motion effect to my shopping experience, and it only took a few seconds to create.

Margins and padding
A big part of CSS styling is how elements are placed on the page.
Margins and padding are the agents that decide how your page elements interact with each other on the page.
I covered precisely how they work in our margins vs padding guide.
In short, margins are the invisible external space between the edge of an element and everything else, whereas padding is the visible internal space between the edge of an element and the content within the element.
On Page Builder, these measurements are available on every element for complete customization control.
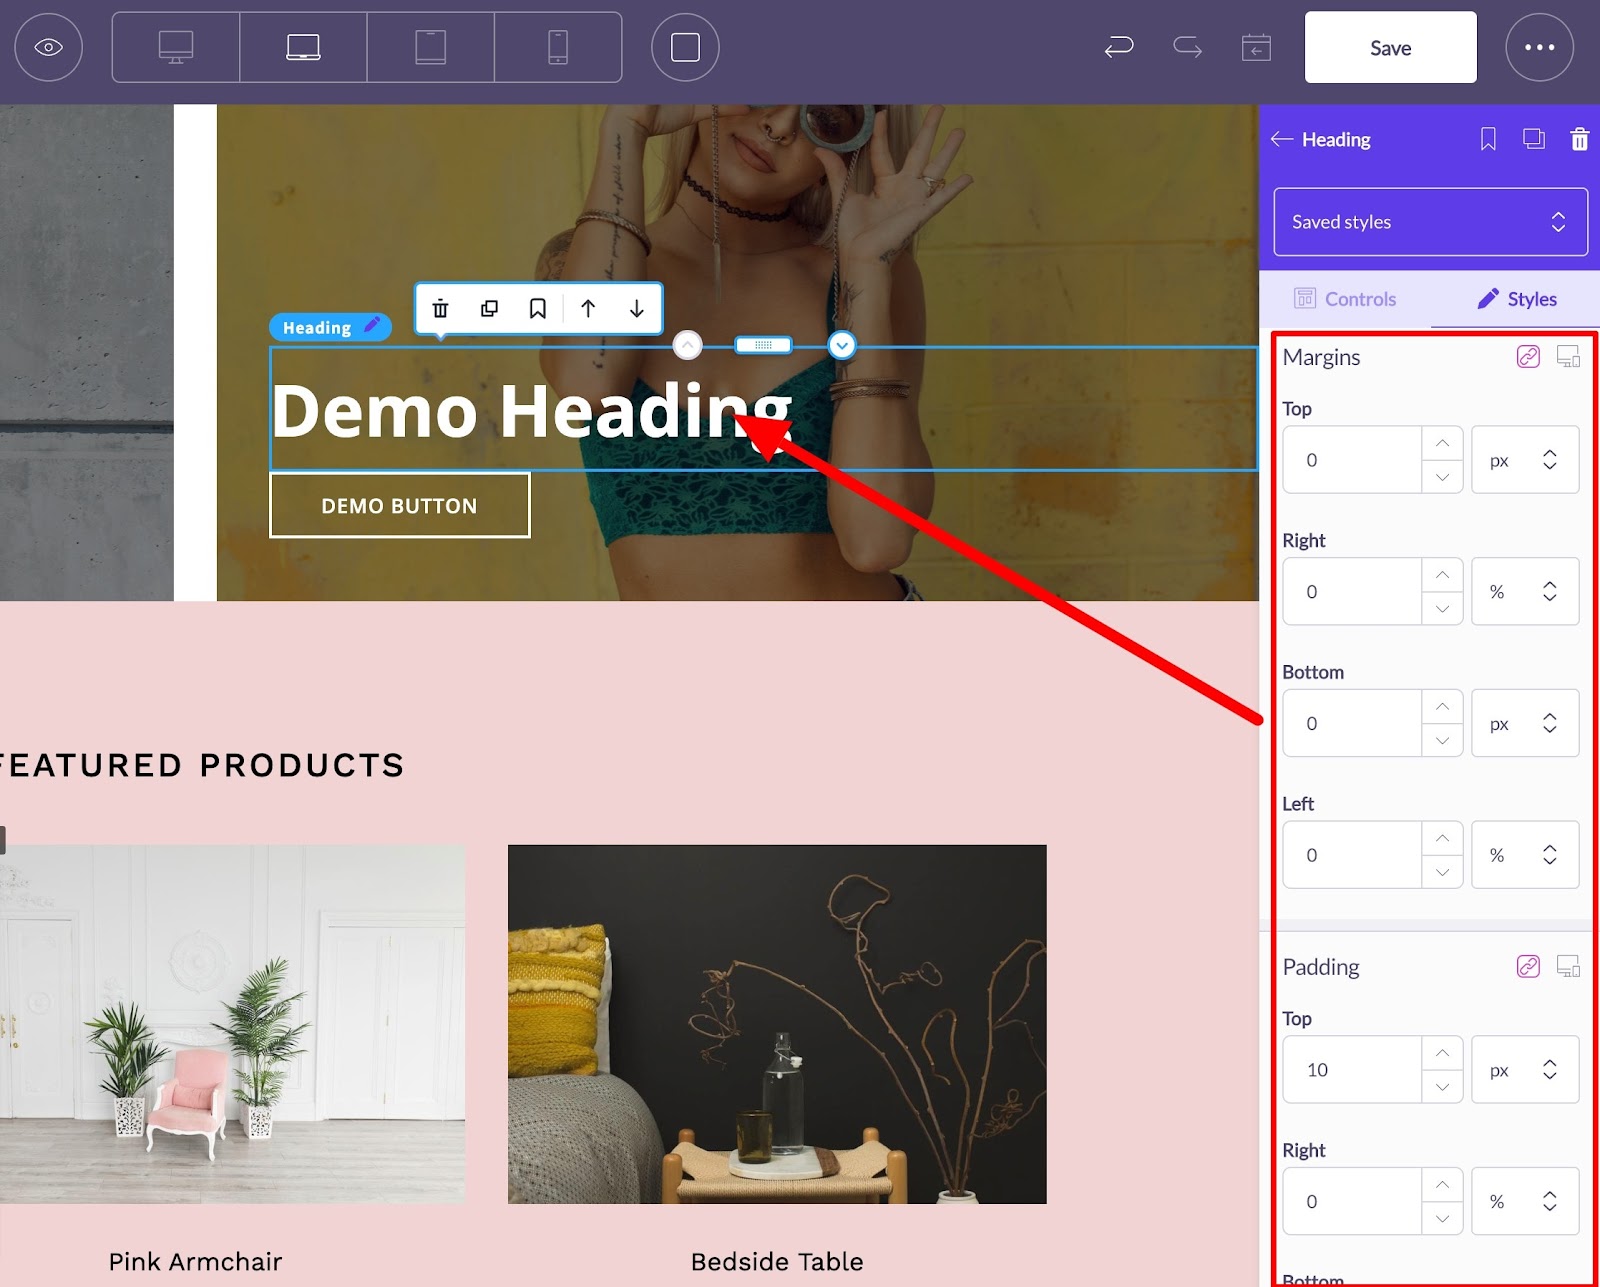
Many page elements will come already spaced appropriately, but you can tweak each to best fit your vision.
Editing font styles
Making your text look just right is so easy. Just click the text or heading element to see the customization options.
Change heading type, font family, font weight, font size, color, line height, letter spacing, and alignment.
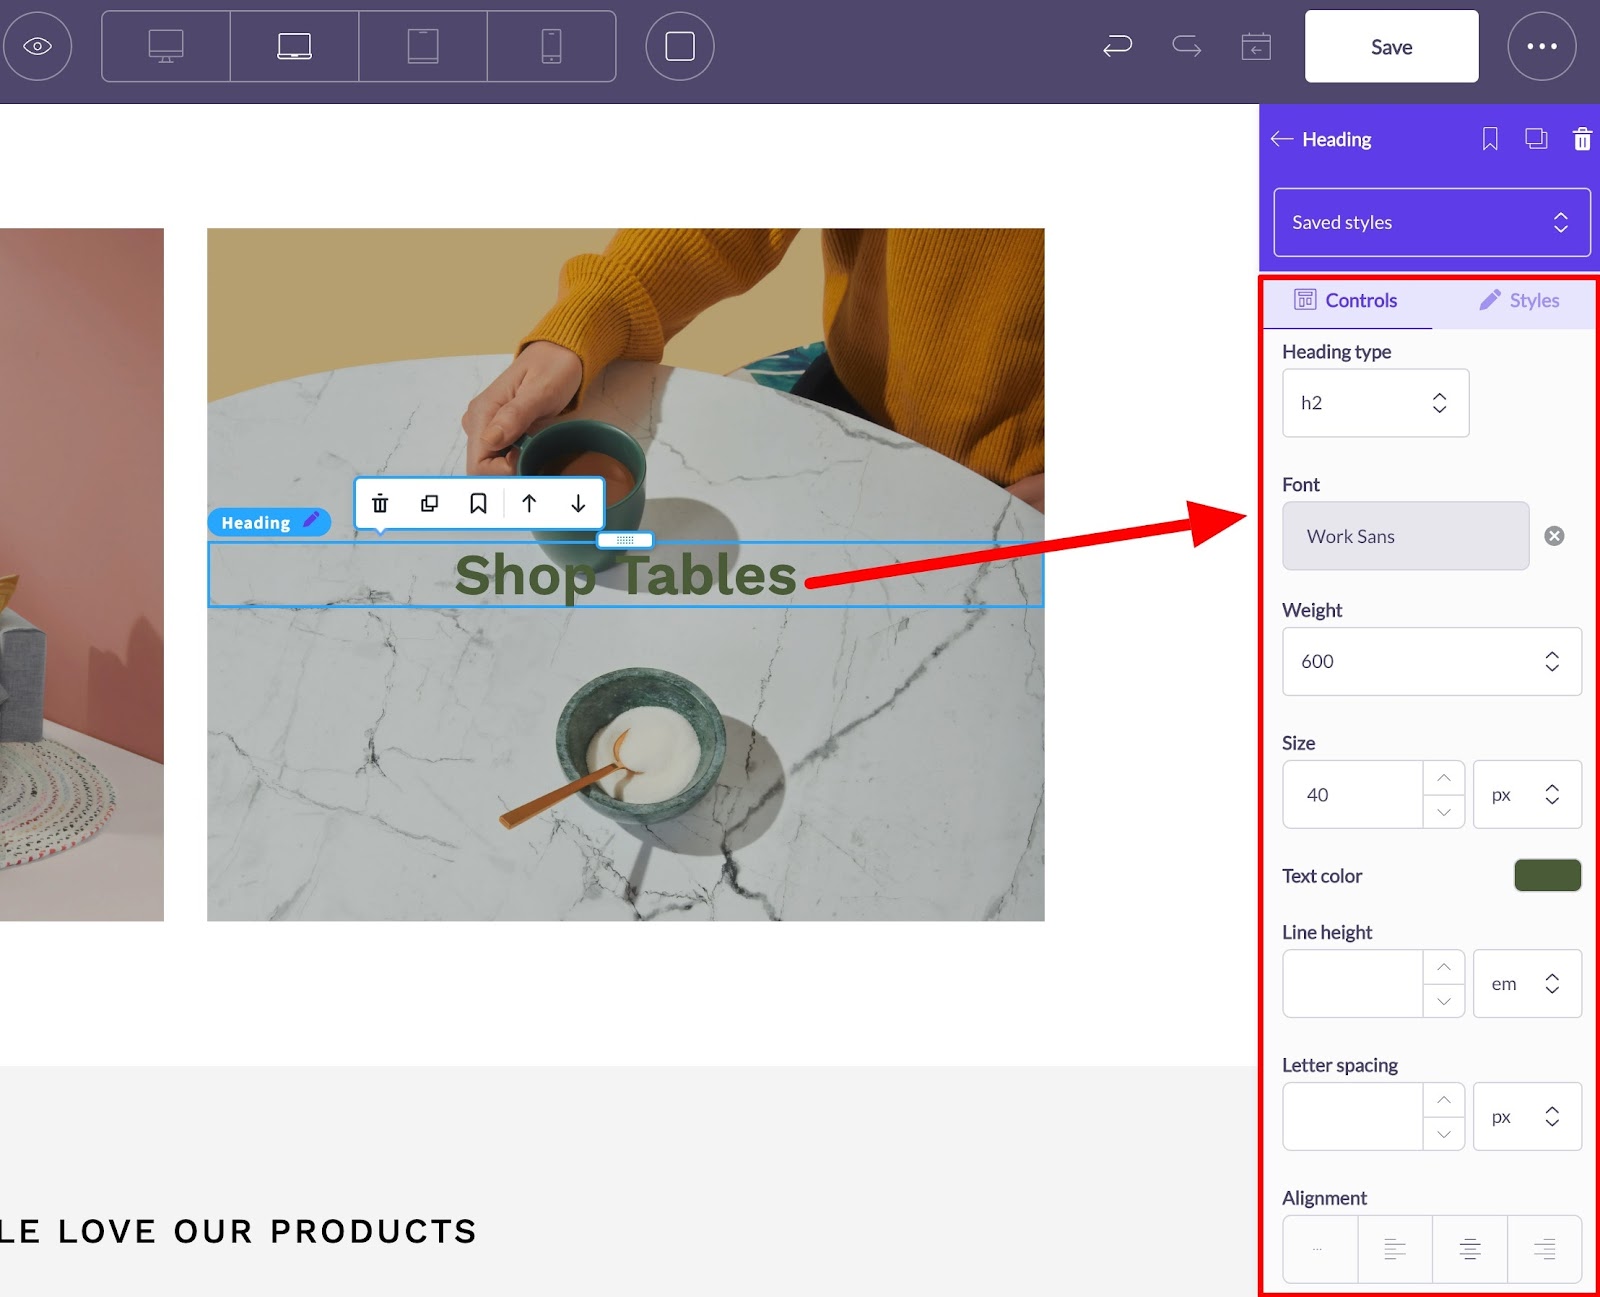
To use custom fonts on your Shopify store, you’ll need to add them before you can access them through Page Builder. Check out our guide to adding and customizing Shopify fonts to learn how to do this.
Then find the best Shopify fonts and pairings to make your store look top-notch.
Changing background colors
Quickly make big changes like the background color of any particular section.
Save your brand’s color palette to access the right colors anytime you need them. Beyond colors, you can also add high-resolution images and full-width videos to create a rich experience for customers.
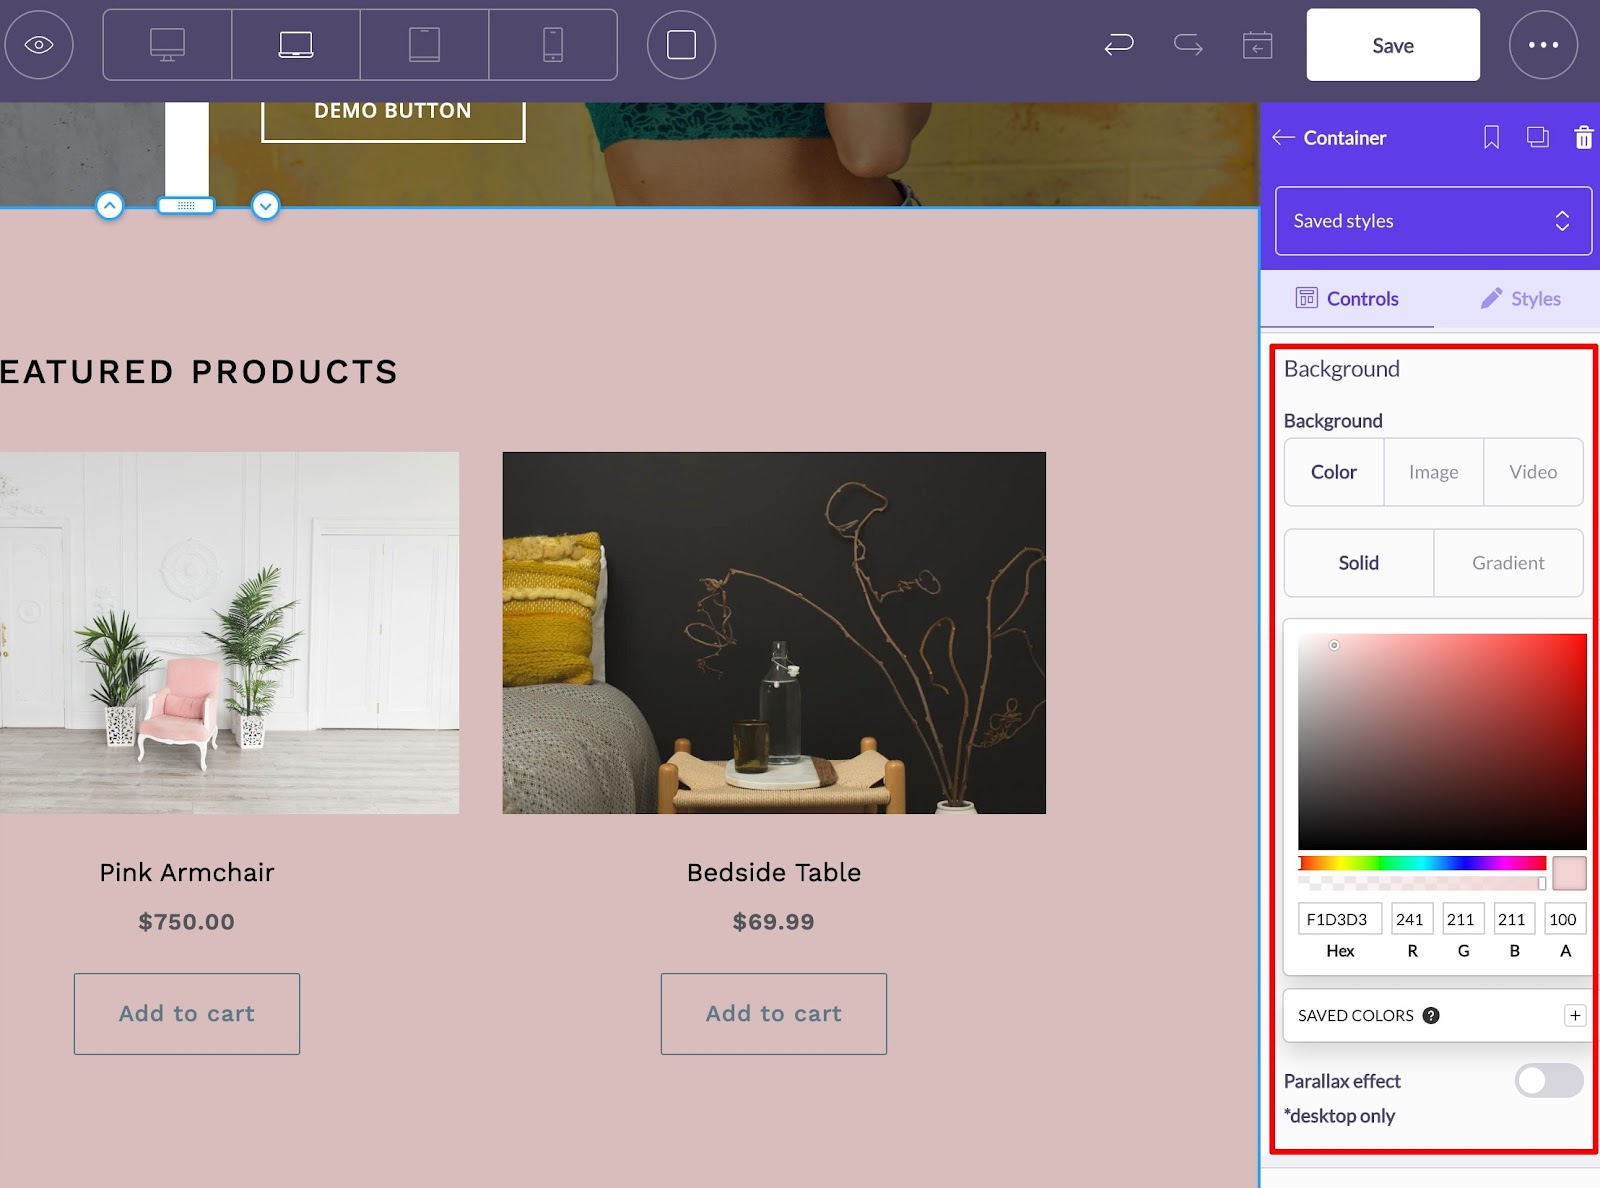
For image backgrounds, the parallax effect is a great way to introduce motion as shoppers scroll—great for a header.
Create custom CSS elements for your Shopify store
You can also create custom CSS elements on Page Builder to add to any page.
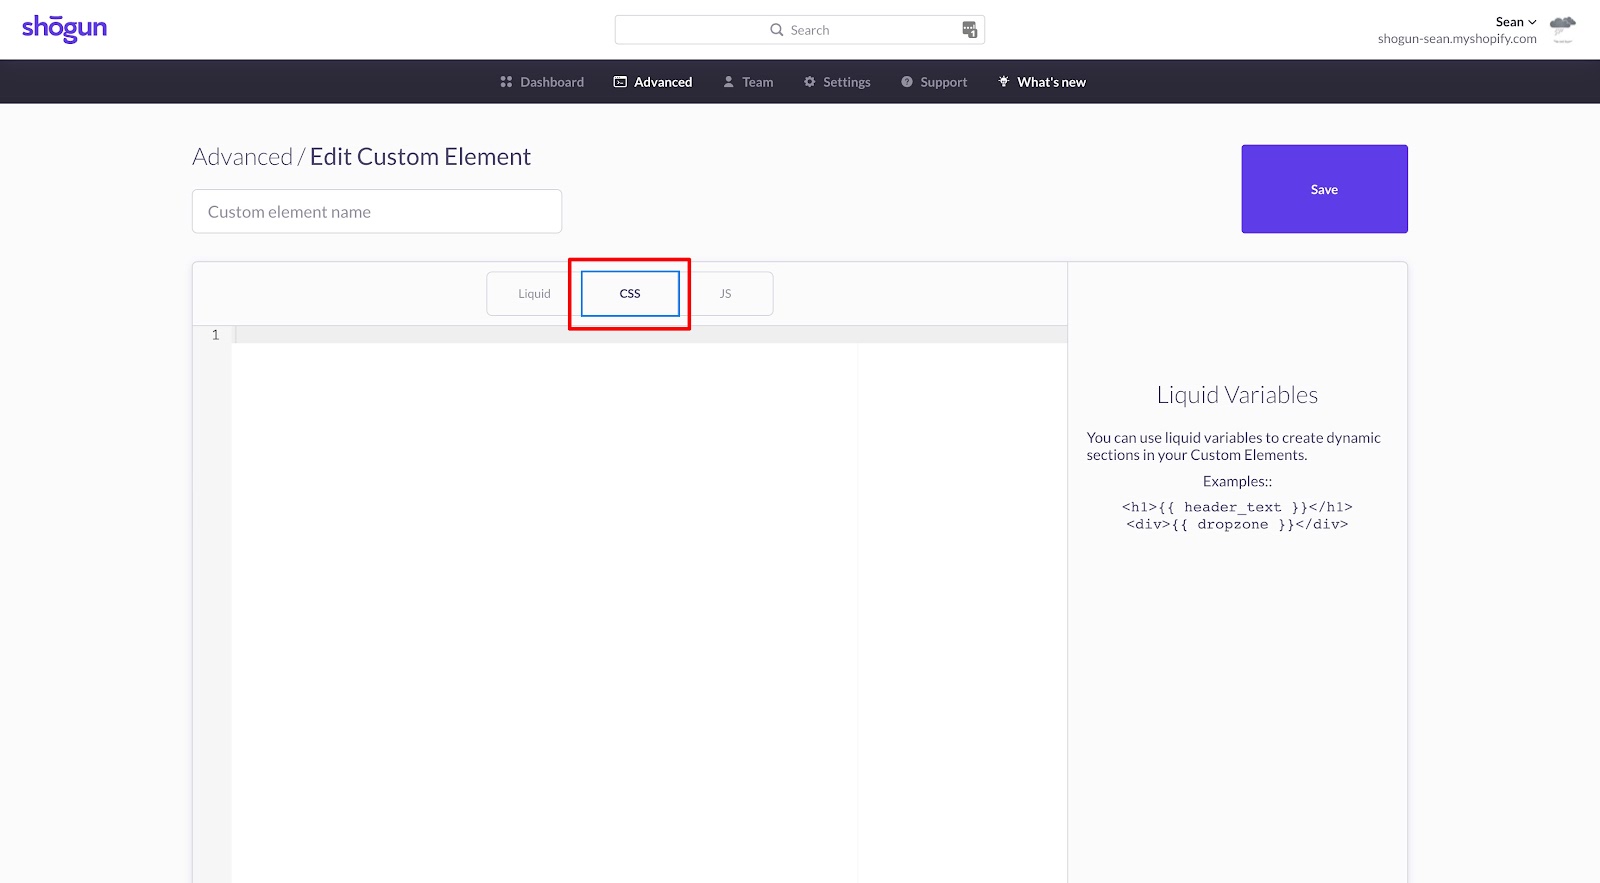
Custom elements are located in the Advanced section of the Page Builder dashboard. To create a new one, click the purple New Custom Element button.
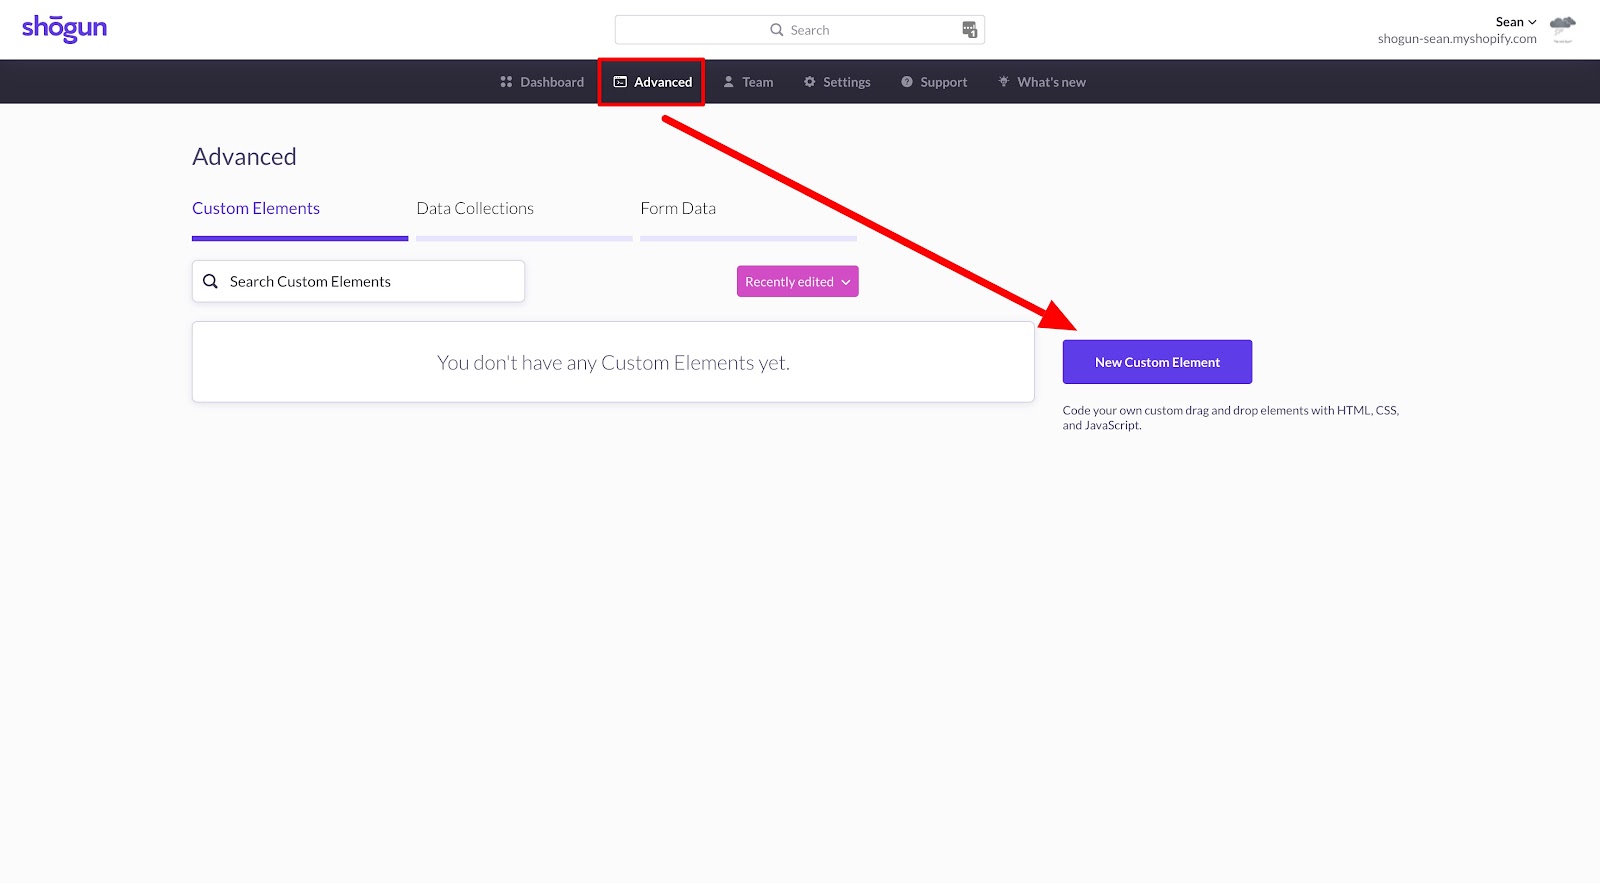
That’ll take you to a code editor page that allows you to create custom code elements in Liquid, Javascript, or CSS.
Select CSS to start using the custom CSS editor. Once done, click Save and your new custom code can be found in your Custom Elements library.
Your custom elements will be accessible right from the drag-and-drop editor to add on any page.
Customize your Shopify store for an on-brand shopping experience
You should now have a clear understanding of how to go about customizing your Shopify CSS to upgrade your shopping experience.
There are tons of custom CSS changes you can make, but they’ll be unique to your store and your brand. Once you know the changes you want to make, you can know exactly how to customize your Shopify store with them.
If you’d rather go with a drag-and-drop editor for these visual updates, Shogun Page Builder is here to make it super easy to do that.
#cta-visual-pb#<cta-title>Customize your Shopify store to fit your brand<cta-title>Make your store look and feel as unique as your brand by customizing with the best page builder for Shopify.Start building for free

Sean Flannigan
Sean is one of Shogun's tireless content marketers. When he isn't creating exciting ecommerce content, he's probably biking or at the park.

