The Ultimate Guide to BigCommerce QuickBooks Integration

With over 2 million users, QuickBooks Online is one of the most popular cloud-based accounting programs in the world.
It’s easy to see why QuickBooks Online and other QuickBooks products are so popular. This software makes it easy to keep an accurate set of books, which is necessary for some of your most important responsibilities as a business owner, such as securing financing and filing your taxes.
By integrating QuickBooks with your BigCommerce store, you’ll be able to automate accounting tasks instead of entering information manually. That means you can spend more time and energy on everything else you need to manage to make your online store successful.
#cta-visual-fe#<cta-title>Fast and Flexible CMS For BigCommerce<cta-title>Gain full control over your site without sacrificing page speed with Shogun Frontend.Learn more
QuickBooks Apps for BigCommerce
QuickBooks integration is not a native BigCommerce feature, so you’ll need to use a third-party app to connect QuickBooks to your BigCommerce store.
The three apps listed below stand out as your best options for this purpose:
1. QuickBooks Online by OneSaas
QuickBooks Online by OneSaas is free, and it provides you with all the basics for integration with QuickBooks Online.
You can use this app to sync your BigCommerce orders, products, customers, taxes, discounts, refunds and shipping charges with QuickBooks Online, and you can set it up so that these synchronizations are run as frequently as every hour.
2. QuickBooks & NetSuite Accounting Sync
At a price of $249 per month (and that’s with an annual plan), QuickBooks & NetSuite Accounting Sync is certainly pricier than QuickBooks Online by OneSaas.
The key difference here is that, unlike QuickBooks Online by OneSaas, this option allows for integration with QuickBooks Enterprise and QuickBooks Point of Sale in addition to QuickBooks Online. Keep in mind that while the $0 price tag of QuickBooks Online by OneSaas is attractive, for a BigCommerce QuickBooks desktop integration you’re simply not going to be able to find a free solution.
QuickBooks & NetSuite Accounting Sync also provides you with an impressive amount of support. Each user gets a dedicated customer success manager and access to a team of over 25 QuickBooks experts. They also have live support available Monday through Friday from 8 a.m. to 5 p.m. PST.
3. QuickBooks by Autofy
In terms of cost, QuickBooks by Autofy represents a middle ground option between QuickBooks Online by OneSaas and QuickBooks & NetSuite Accounting Sync. It’ll run you $99 per month after a 30-day free trial.
This app allows you to integrate BigCommerce with both the online and desktop versions of QuickBooks, and it also makes it especially easy to find and fix errors in your synchronizations.
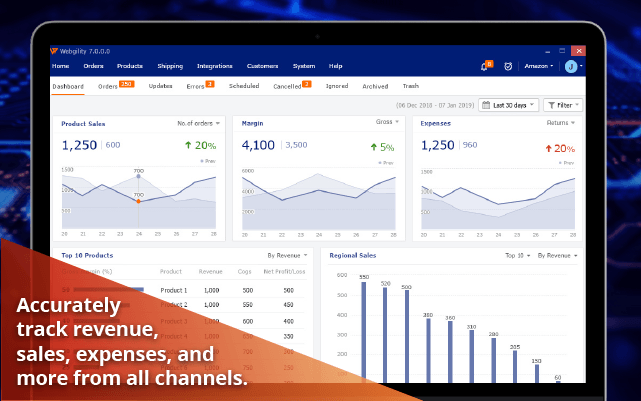
The Autofy dashboard shows you how synchronizations are performing, email alerts are sent to you whenever there’s an issue and you can even preview how your records will look after they’ve been synced. Accounting errors can really cost you, so these features are quite valuable.
How to Set Up a BigCommerce QuickBooks Integration
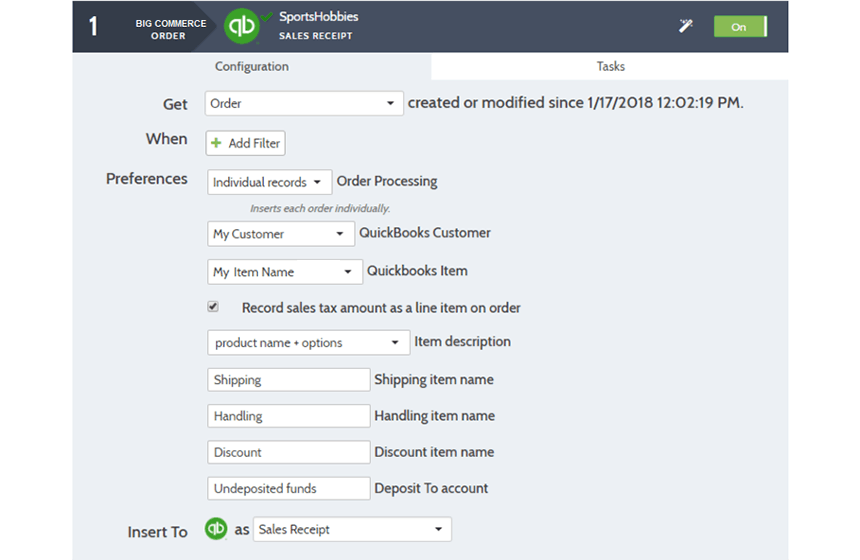
In the example below, we’ll use the BigCommerce-recommended QuickBooks Online by OneSaas app:
1. Before you connect your BigCommerce store to QuickBooks, make sure that you have the following options configured in your BigCommerce account:
- Set up your payment methods (you will need to resync the app whenever you add new payment methods in the future).
- Set up your taxes settings (QuickBooks Online by OneSaas supports both manual and automatic taxes).
- All products and variants will need to have unique SKUs. You can match up existing SKUs in your BigCommerce catalog to the SKU field in QuickBooks Online by OneSaas when you’re setting up the app, and there’s also an option that allows you to automatically generate SKUs in QuickBooks Online by OneSaas.
And the following options should be configured in your QuickBooks account:
- Set up your tax settings.
- Set up your Chart of Accounts.
- Enable “Shipping” and “Discounts.”
- Enable “Track Quantity by Hand.”
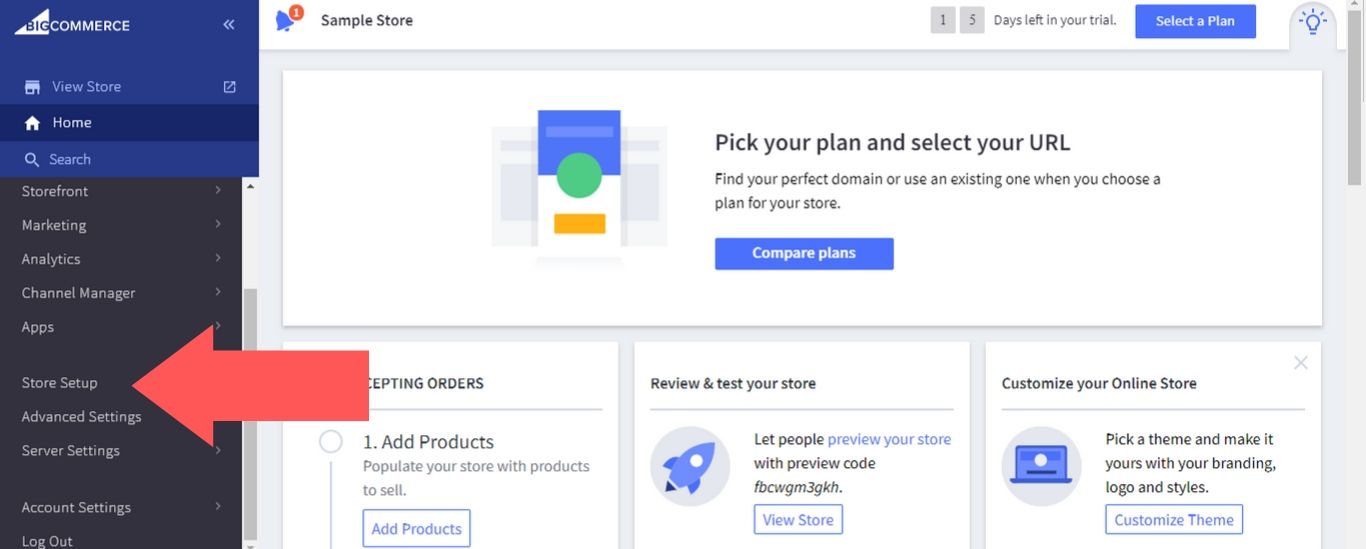
2. From your BigCommerce dashboard, select “Store Setup.”
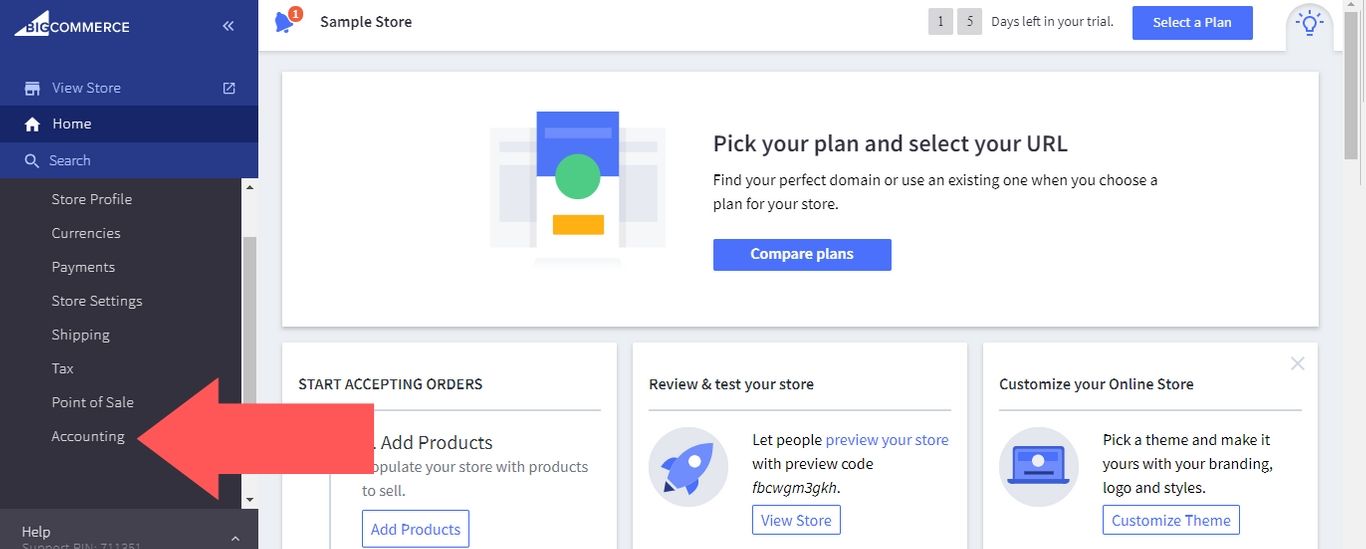
3. Select “Accounting.”
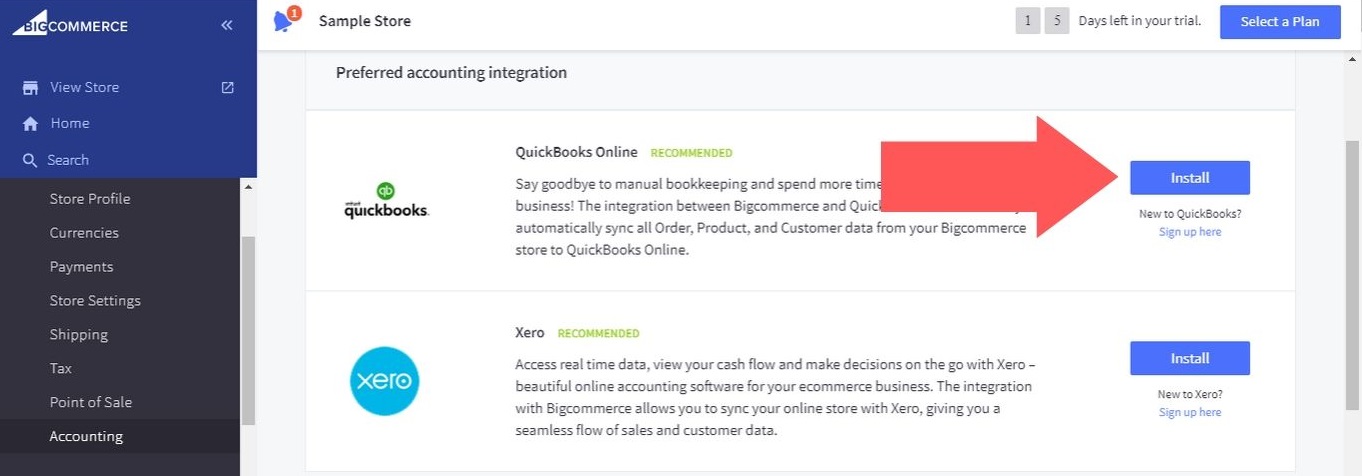
4. Click on the “Install” button next to “QuickBooks Online.”
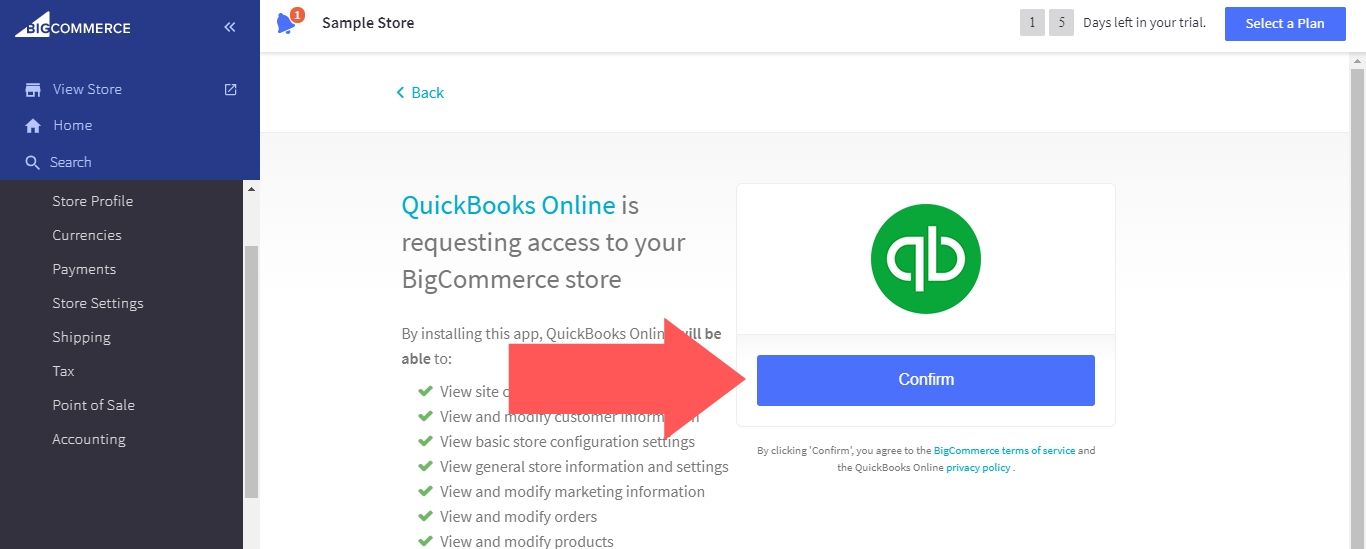
5. Select “Confirm.”
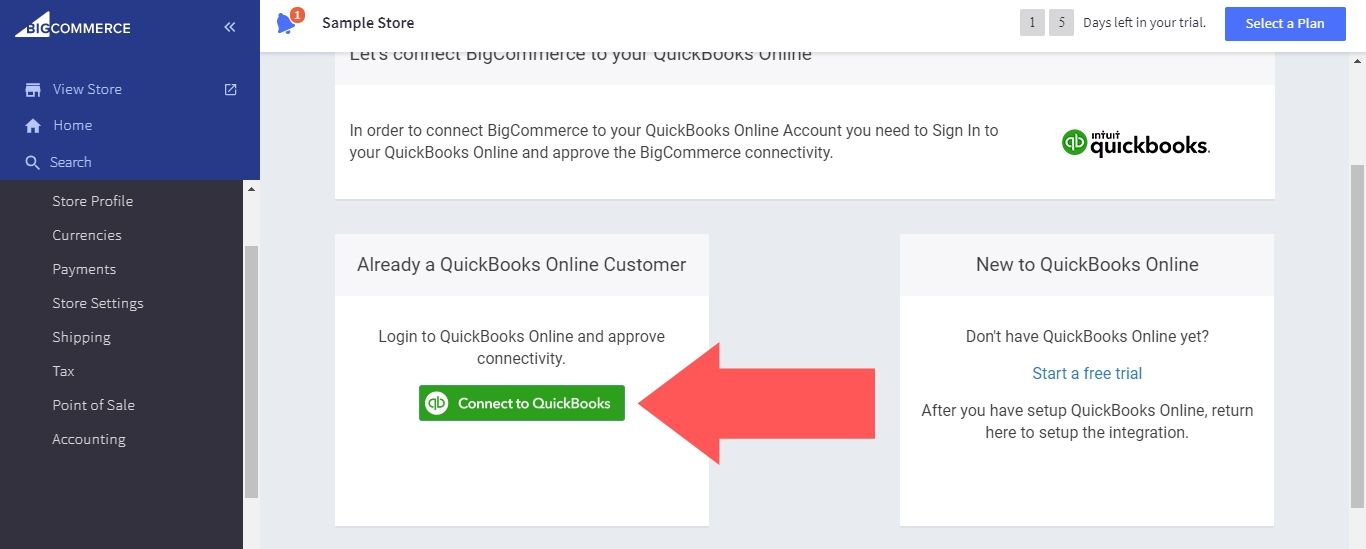
6. Select “Connect to QuickBooks” (if you don’t have a QuickBooks Online account, you can sign up for a free trial through this page).
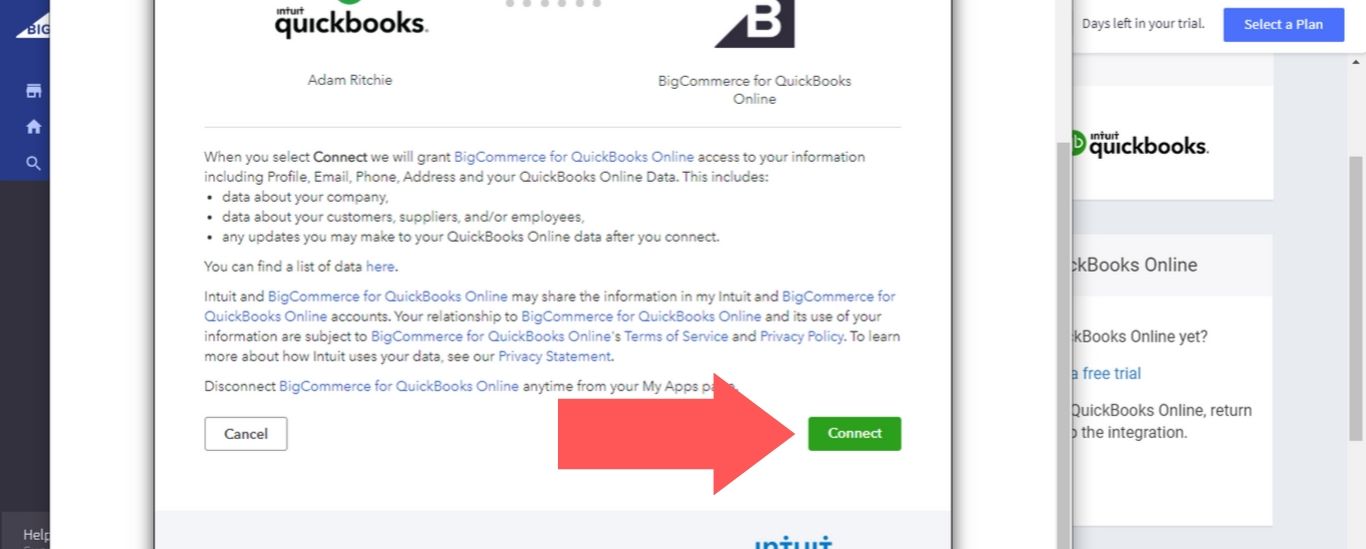
7. Select “Connect” to finish the setup.
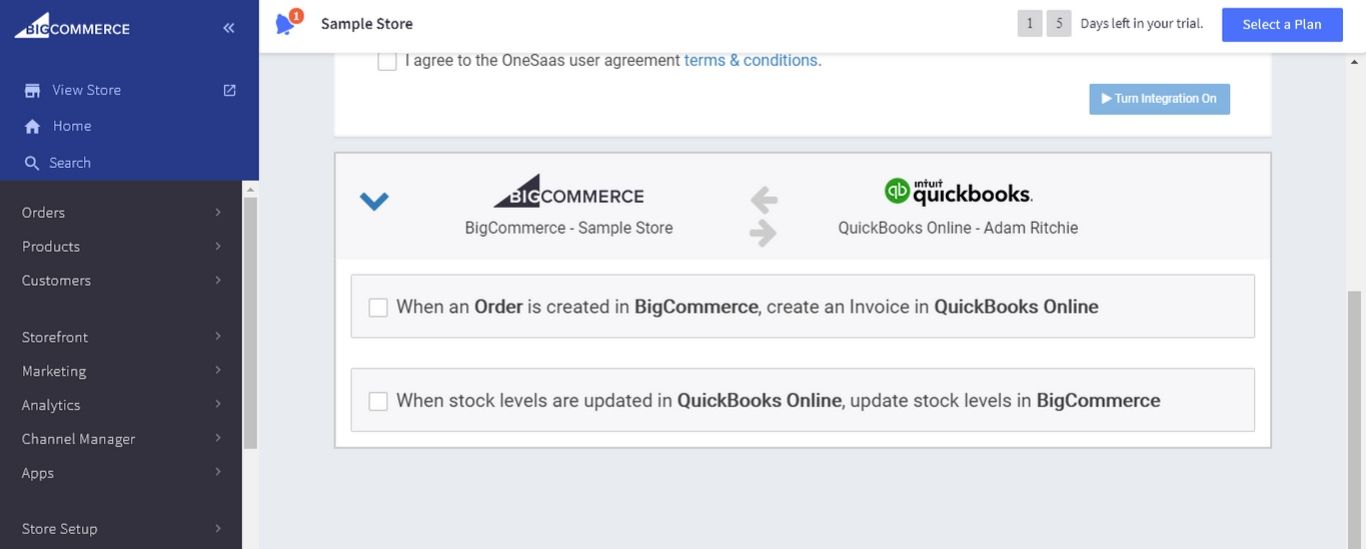
After you’ve logged in to your QuickBooks Online account from BigCommerce for the first time, you’ll see two options available for your first workflow: “When an Order is created in BigCommerce, create an Invoice in QuickBooks Online” and “When stock levels are updated in QuickBooks Online, update stock levels in BigCommerce.”
#cta-visual-fe#<cta-title>Fast and Flexible CMS For BigCommerce<cta-title>Gain full control over your site without sacrificing page speed with Shogun Frontend.Learn more
Importing BigCommerce Orders to QuickBooks Online
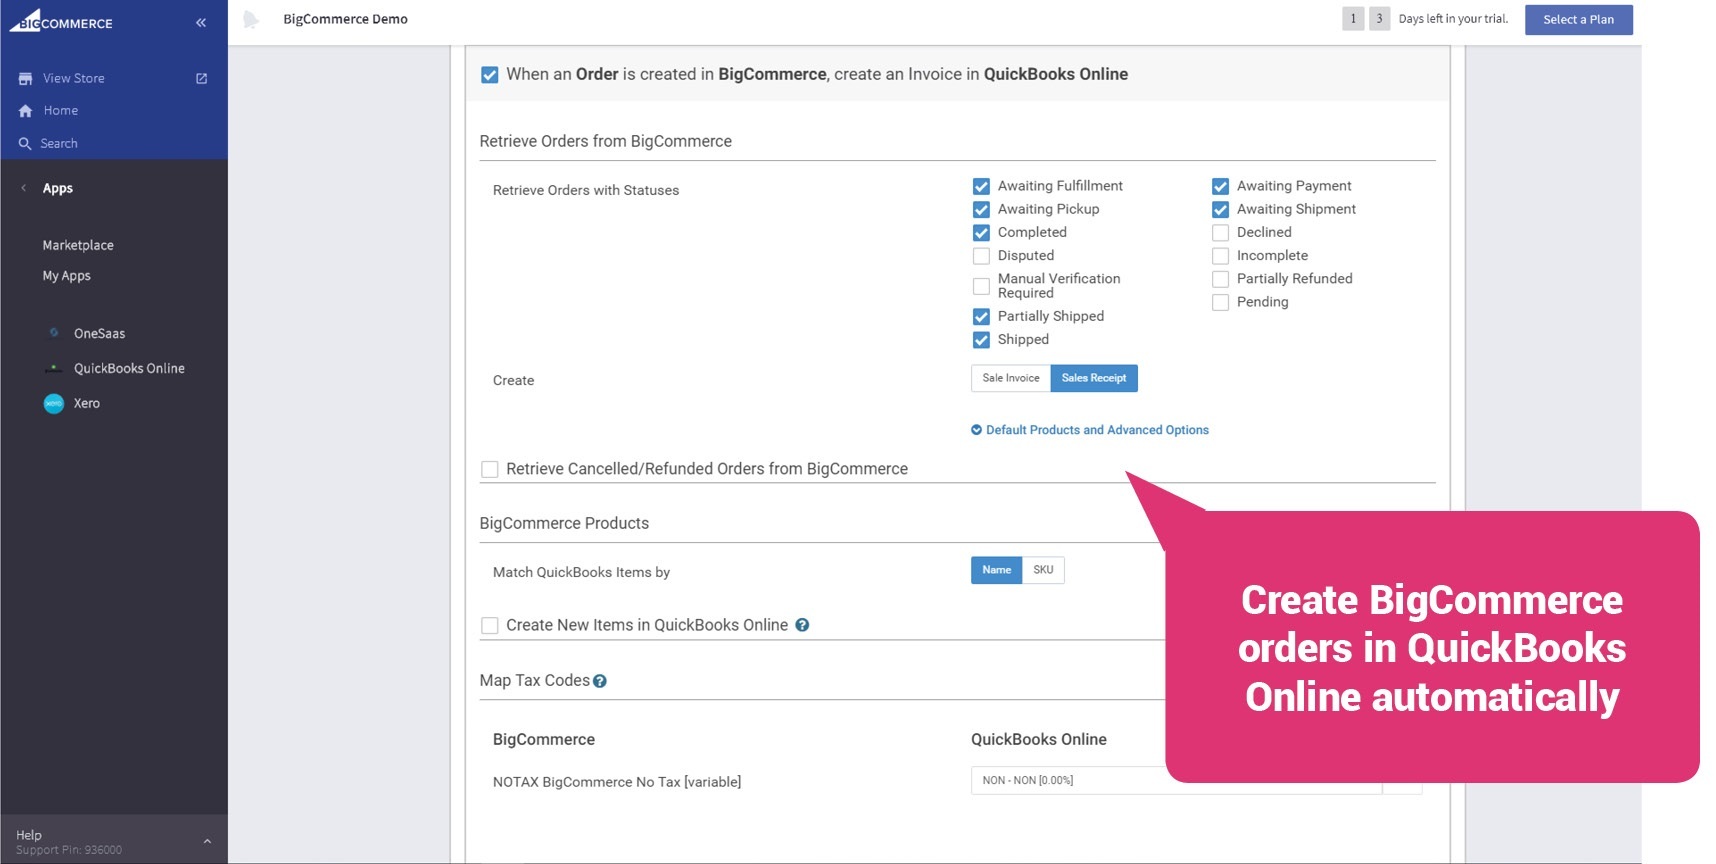
In the “When an Order is created in BigCommerce, create an Invoice in QuickBooks Online” workflow, you have the following options:
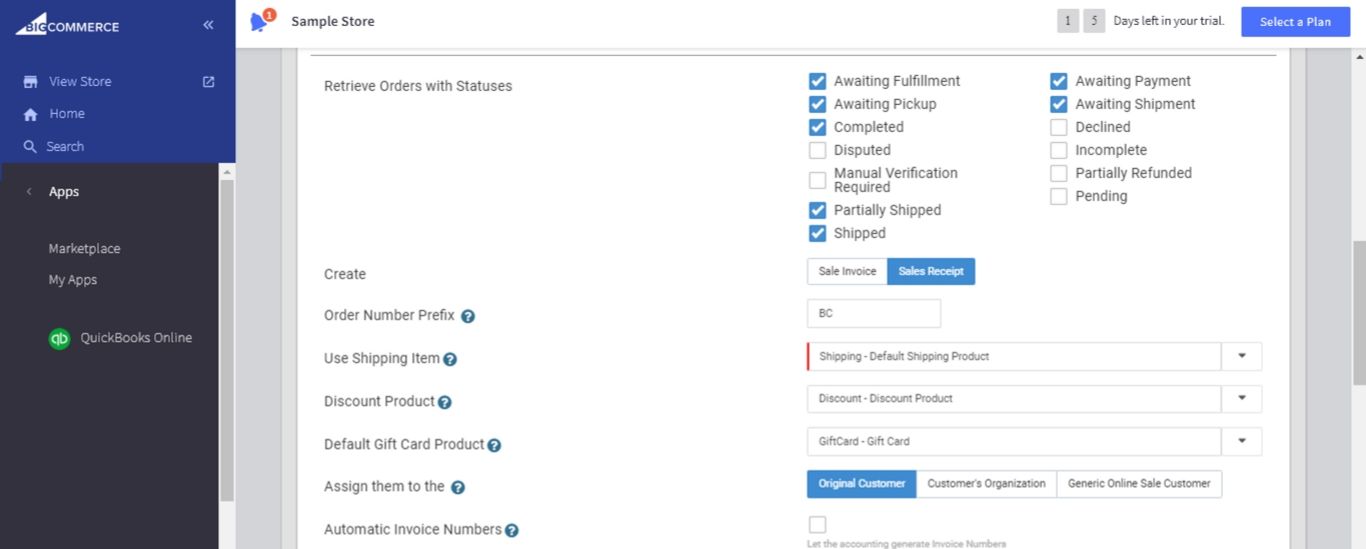
- Retrieve Orders with Statuses: Select the order statuses that will be synced to QuickBooks Online and whether they will appear as a Sales Invoice or Sales Receipt.
- Order Number Prefix: This prefix will be added to all of the orders that are imported to QuickBooks Online from your BigCommerce account. For example, you could use the prefix “BC-” (this would turn the order number “123” into “BC-123”, “124” into “BC-124”, etc.) to distinguish your BigCommerce orders from your other orders.
- Use Shipping Item: You can specify a “product” for your shipping line item, which will help you track your shipping charges.
- Discount Product: Specify a “product” for discount line items to keep track of discounts.
- Default Gift Card Product: Specify a “product” for gift card line items to keep track of gift cards.
- Assign them to the: Specify the type of customer record that is created in QuickBooks Online. “Original Customer” will assign the Sale Invoice to the person who placed the order, “Customer’s Organization” will assign the Sale Invoice to the company of the person who placed the order and “Generic Online Sale Customer” will assign all Sale Invoices to the same placeholder.
- Automatic Invoice Numbers: Enabling this option will generate sequential invoice numbers in QuickBooks Online rather than using invoice numbers from BigCommerce.
- Retrieve Canceled/Refunded Orders from BigCommerce: Determine whether refunds will be generated in QuickBooks Online when orders are canceled, refunded or partially refunded in BigCommerce. Note that the partial refunds will initially be registered as full refunds in QuickBooks Online — you’ll need to go in and manually change them to the correct amount.
- Refund Order Number Prefix: As with standard order numbers, you can set a prefix for refund order numbers as well.
- Match QuickBooks Items By: If you have existing products in QuickBooks Online, you can determine whether they’re matched to products in BigCommerce by name or SKU.
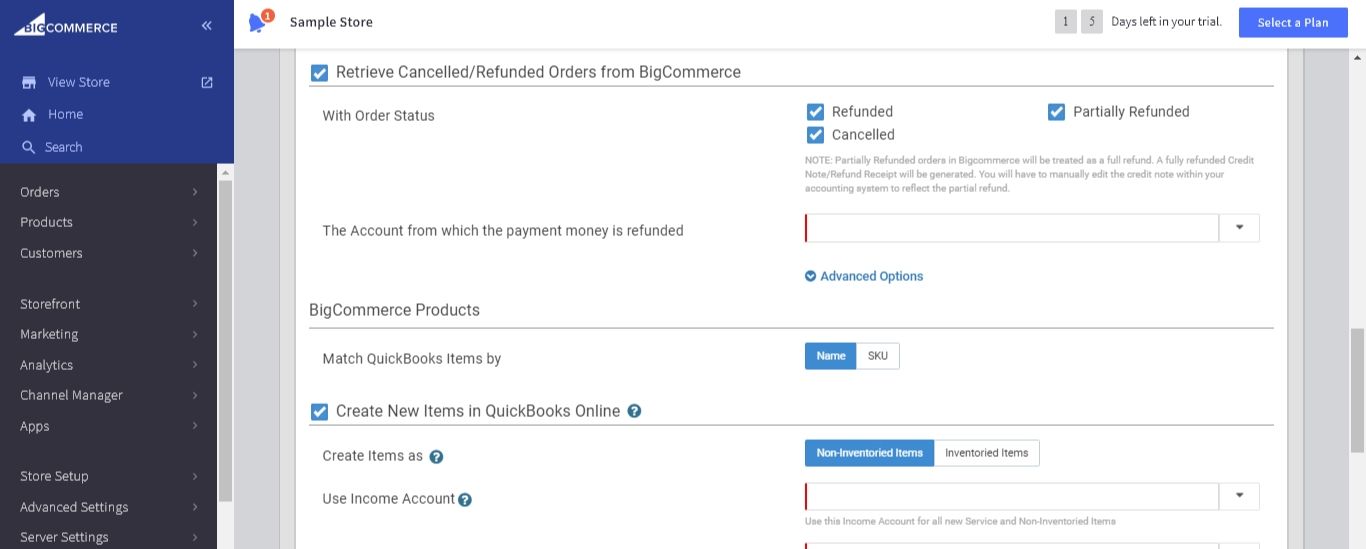
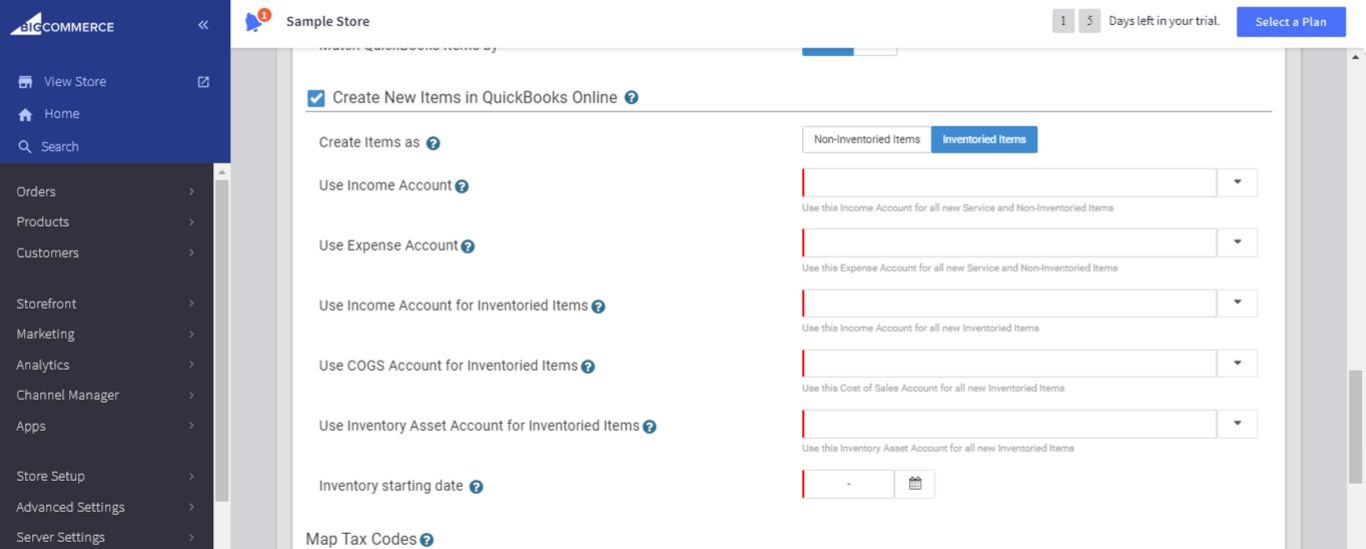
- Create New Items As: If you would like new items in BigCommerce to be automatically created in QuickBooks Online, you’ll need to choose whether they’re created as “Non-Inventoried Items” or “Inventoried Items.” Non-Inventoried Items will not assign Income, COGS or Asset Accounts information, while Inventoried Items will assign this information.
- Use Income Account: The account chosen here will be assigned as the default income account for all items that are sold.
- Use Expense Account: The account chosen here will be assigned as the default expense account for all items that are purchased.
- Use Income Account for Inventoried Items: The account chosen here will be assigned as the default income account for all items.
- Use COGS Account for Inventoried Items: The account chosen here will be assigned as the default Cost of Goods Sold account for all items.
- Use Inventory Asset Account for Inventoried Items: The account chosen here will be assigned as the default Inventory Asset account for all items.
- Inventory Starting Date: The date you start tracking the quantity on hand of Inventoried Items in QuickBooks. Be sure to set this at least one day before the current date so that sales can be generated against items created by the integration.
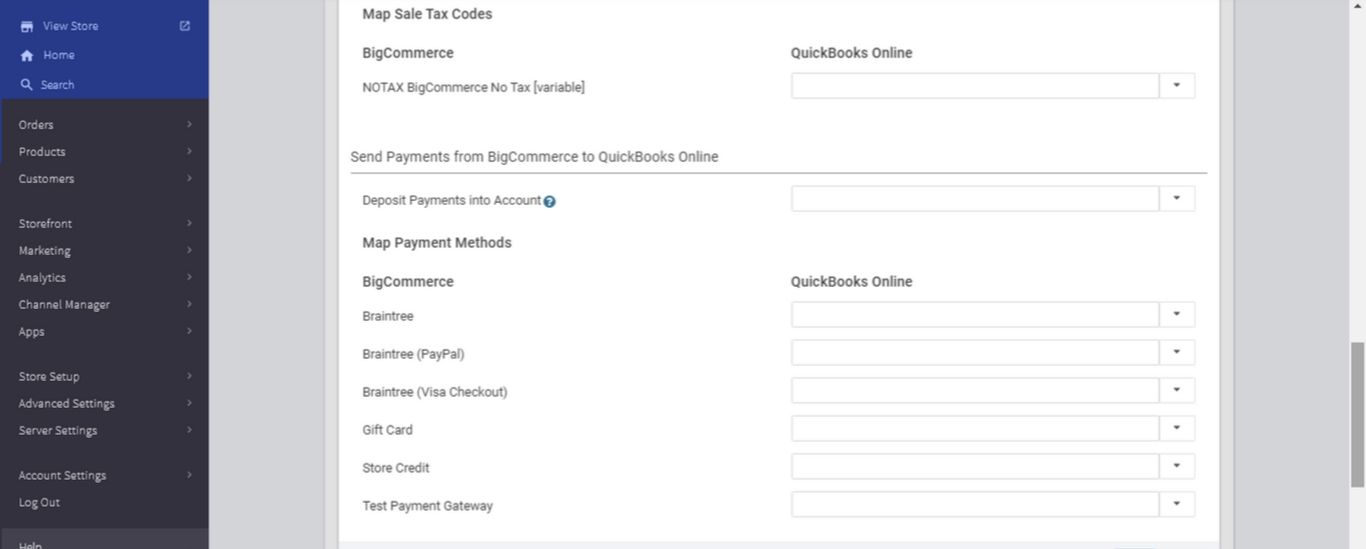
- Map tax codes: Select matching QuickBooks Online tax codes for your tax codes in BigCommerce. If you can’t find the matching tax code in the corresponding dropdown menu, you’ll need to create it in QuickBooks Online and then refresh the app. But if you have the “Automated Sales Tax” setting enabled in QuickBooks Online, no mapping is required.
- Deposit Payments into Account: All payment methods that are not individually mapped will be sent to the account chosen here by default.
- Map Payment Methods: Use the dropdown menus to match BigCommerce payment methods to individual accounts in QuickBooks Online.
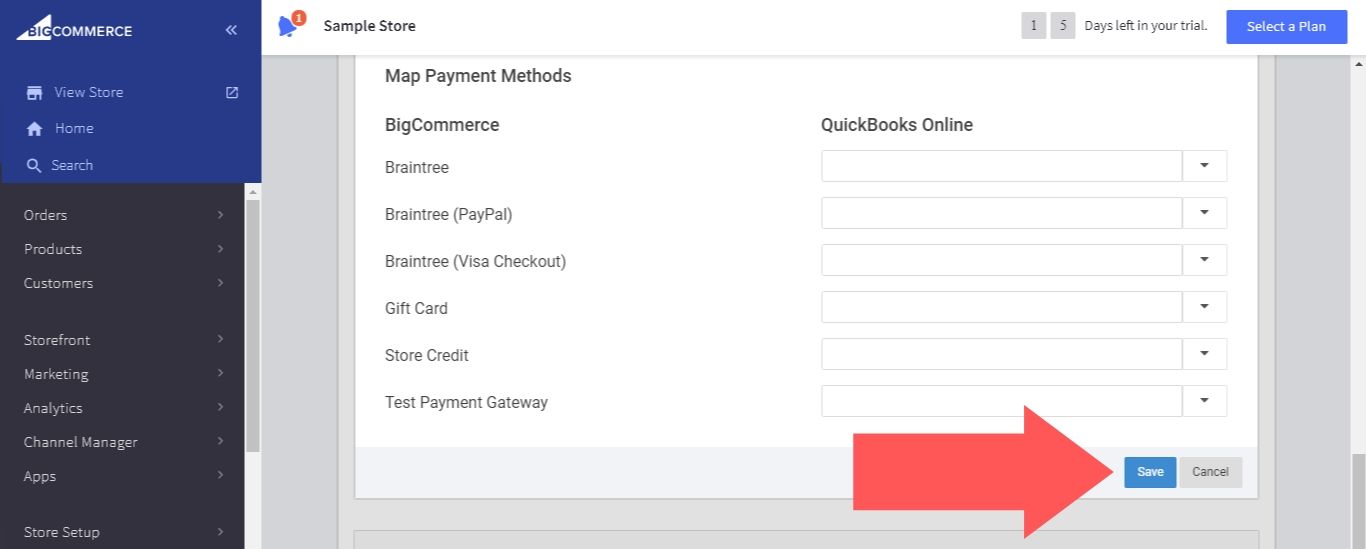
When you’ve finished setting up your settings, select “Save.”
Updating BigCommerce Stock Levels with QuickBooks Online
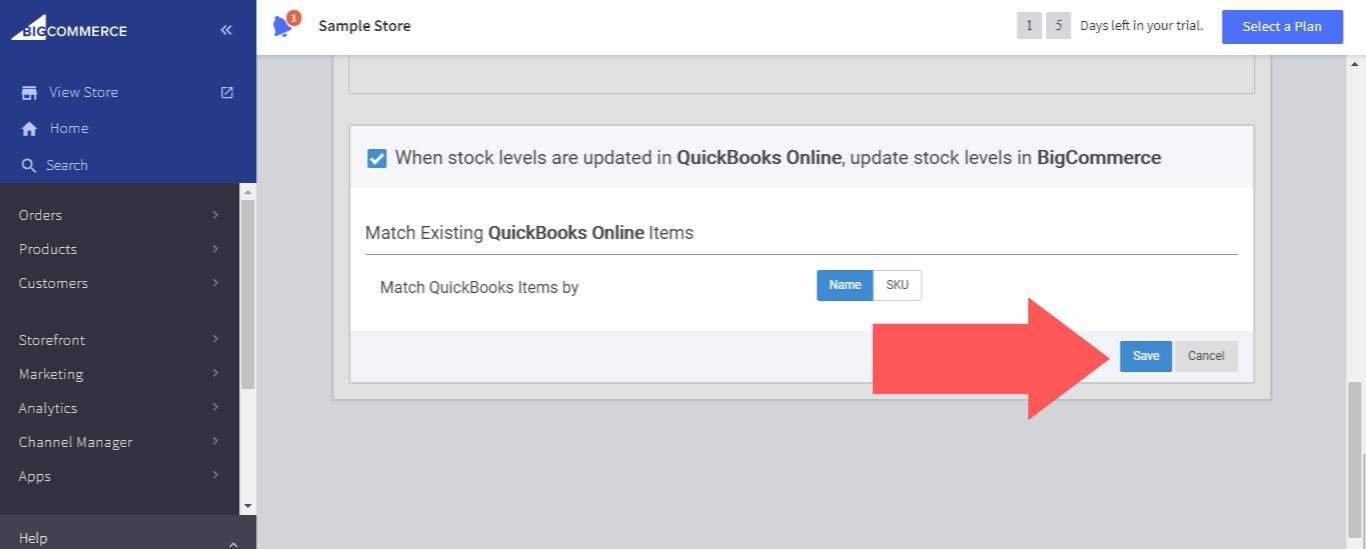
The “When stock levels are updated in QuickBooks Online, update stock levels in BigCommerce” workflow should only be enabled if your products were created manually in QuickBooks Online with stock levels that match your BigCommerce stock levels.
Even in that case, it’s recommended that you only use the “When an Order is created in BigCommerce, create an Invoice in QuickBooks Online” workflow for your first synchronization or two. That way, you won’t need to manually create products or update their stock.
If you do want to use this workflow, the next step is to choose whether you want to match existing QuickBooks Online items by name or SKU. Then, select “Save.”
Setting Up Your Sync Settings
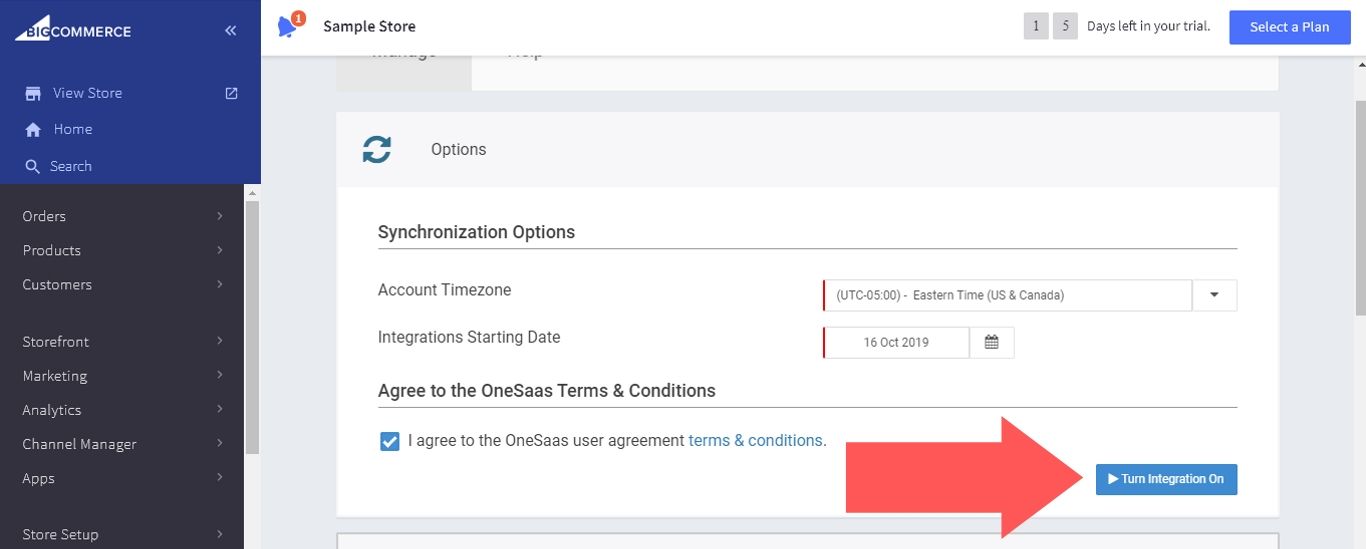
After you set up your workflows, set your time zone, choose an integration start date and check the box to agree to the OneSaas user agreement terms and conditions.
The only remaining step is to click on the “Turn Integration On” button.
How to Set Up QuickBooks Payments
In addition to using QuickBooks Online for BigCommerce bookkeeping, you may also want to use QuickBooks Payments as a payment gateway.
PayPal Powered by Braintree is the default BigCommerce payment gateway, but QuickBooks Payments is an excellent option if you’re looking for an alternative. It accepts Mastercard, Visa, American Express, Discover and Apple Pay, and it includes premium features such as invoicing tools and fraud protection.
While BigCommerce will not charge you any fees for using a third-party payment gateway, you should note that QuickBooks Payments carries its own fees. If you’re using QuickBooks Online, those fees are as follows:
- ACH bank transfers: 1% (maximum charge of $10)
- Card (Swiped): 2.4% + $0.25 per transaction
- Card (Invoiced): 2.9% + $0.25 per transaction
- Card (Keyed): 3.4% + $0.25 per transaction
The fees are different if you’re using a desktop version of QuickBooks:
- ACH bank transfers: $1 per transaction
- Card (Swiped): 2.4% + $0.30 per transaction
- Card (Invoiced): 3.5% + $0.25 per transaction
- Card (Keyed): 3.5% + $0.25 per transaction
Another option for desktop users is to pay $20 per month in exchange for lowering your fees to the following rates:
- ACH bank transfers: $1 per transaction
- Card (Swiped): 1.6% + $0.30 per transaction
- Card (Invoiced): 3.3% + $0.25 per transaction
- Card (Keyed): 3.3% + $0.25 per transaction
To set up QuickBooks Payments as a payment method for your BigCommerce store, follow these steps:
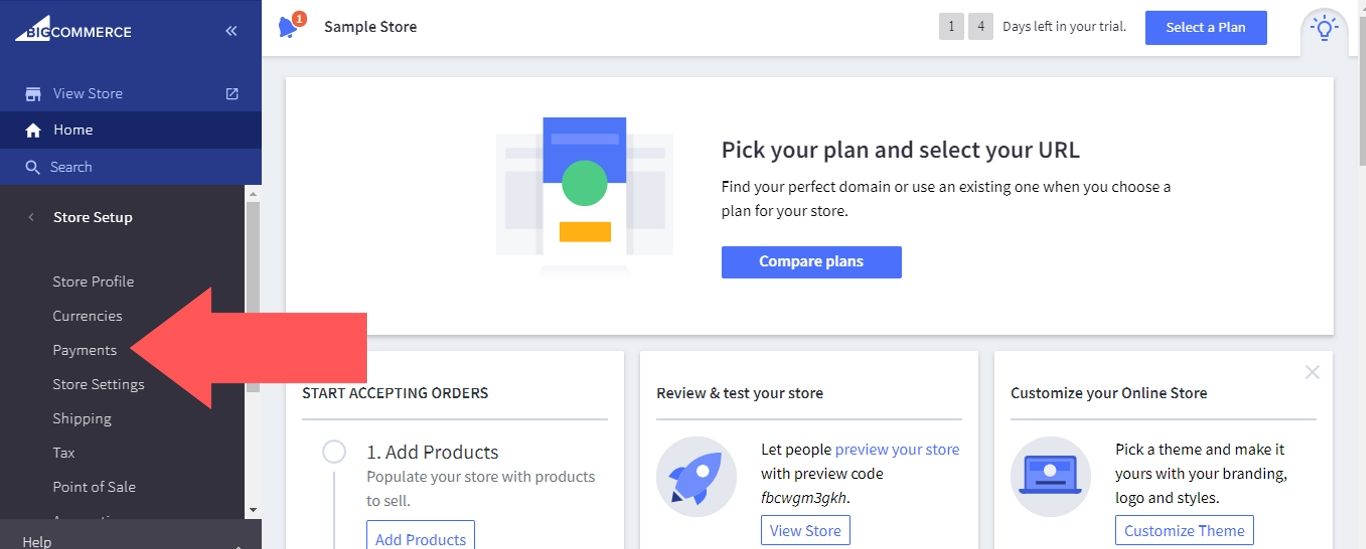
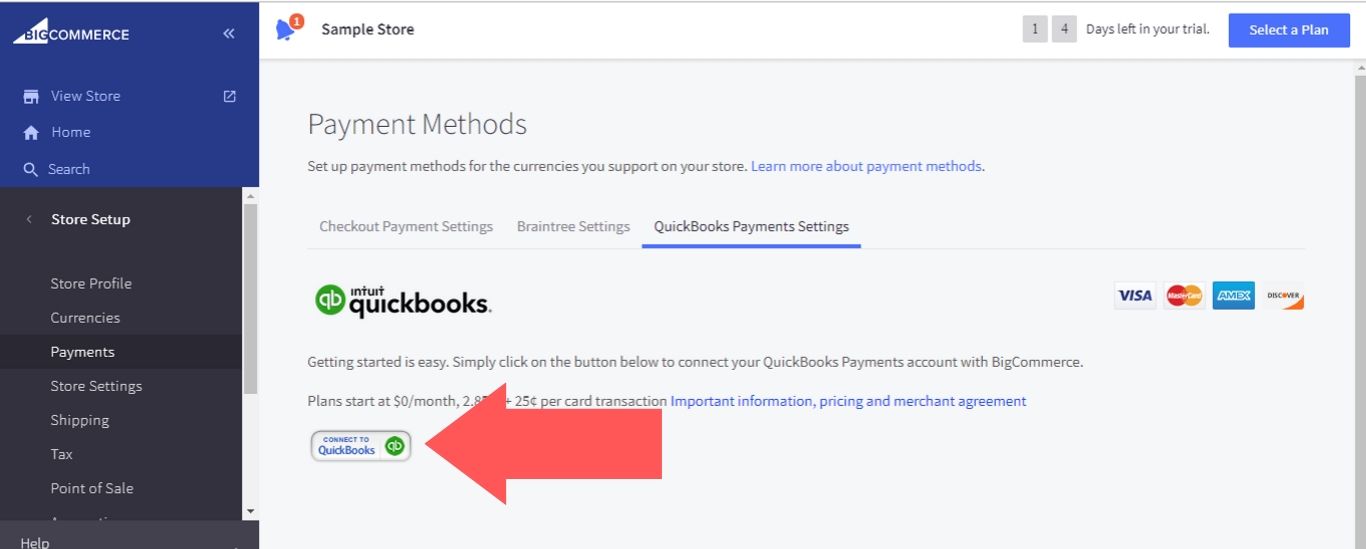
1. From your BigCommerce dashboard, go to “Store Setup” and select “Payments.”
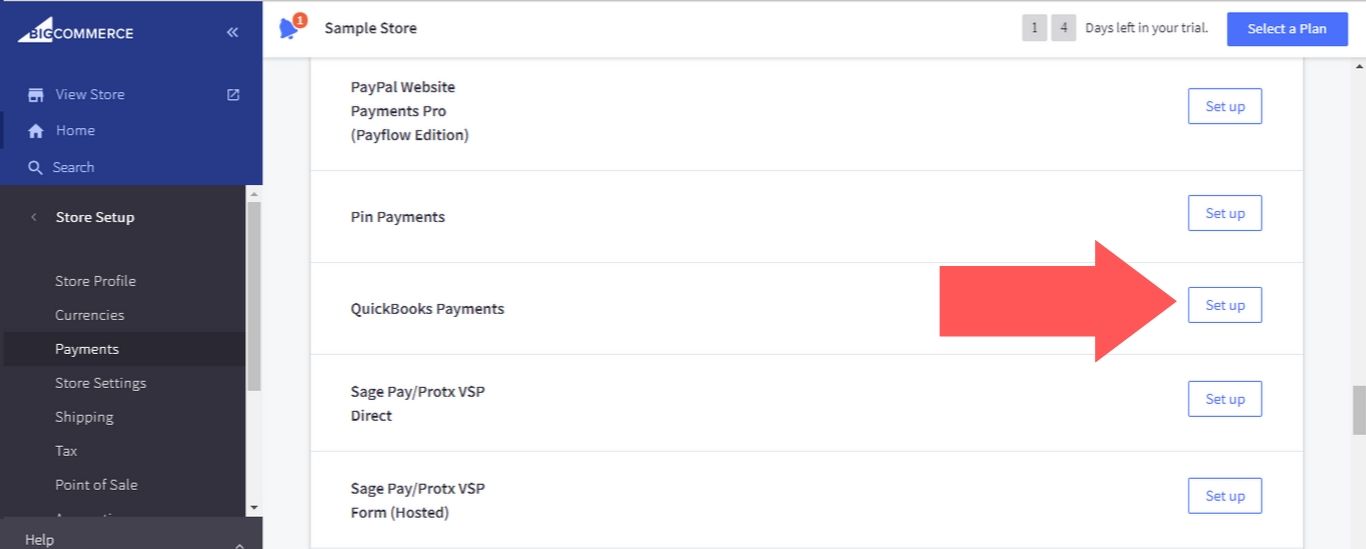
2. Expand the “Online Payment Methods” section and click on the “Set up” button next to “QuickBooks Payments.”
3. Click on the “Connect to QuickBooks” button.
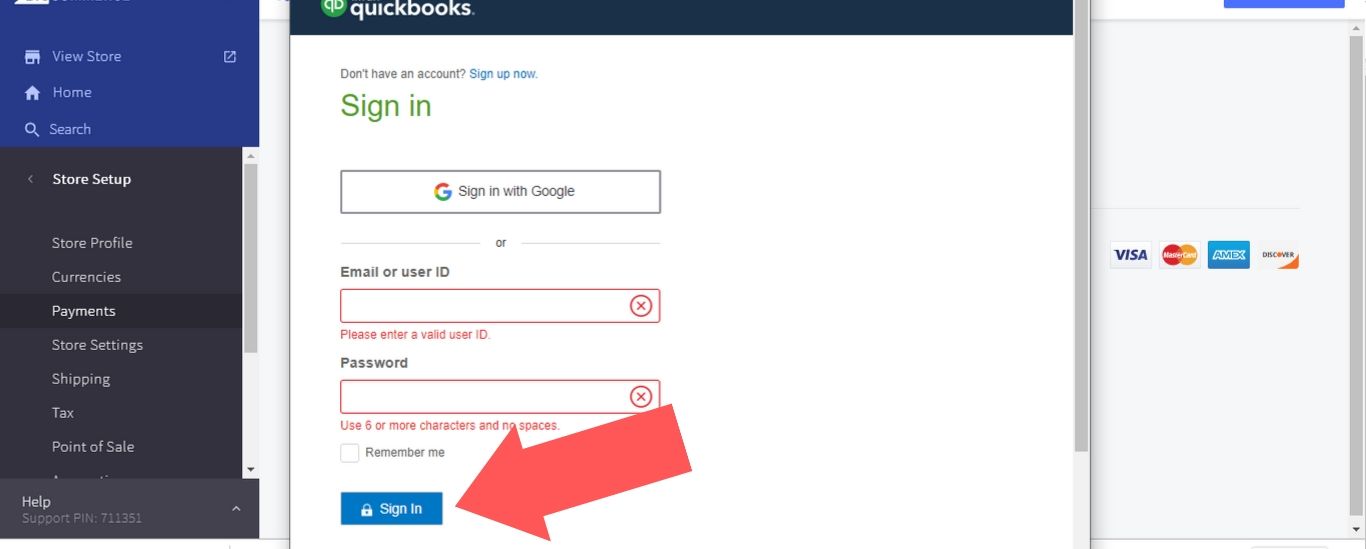
4. A pop-up window will open, prompting you to sign in with your QuickBooks account. Enter your credentials and select “Sign in” to finish setting up the integration.
The aforementioned QuickBooks integration apps aren’t the only BigCommerce add-ons that are able to save you time with automation. For example, the Shogun page builder has a Sync feature that you can use to copy pages from one store to another. If you have multiple online storefronts, this feature allows you to complete a process that would take hours to do manually with just a couple clicks.
Take advantage of additional apps to save time, so you can focus on making money.
#cta-visual-fe#<cta-title>Fast and Flexible CMS For BigCommerce<cta-title>Gain full control over your site without sacrificing page speed with Shogun Frontend.Learn more

Adam Ritchie
Adam Ritchie is a writer based in Silver Spring, Maryland. He writes about ecommerce trends and best practices for Shogun. His previous clients include Groupon, Clutch and New Theory.


