How to Quickly Add Pages on Shopify to Build Out Your Perfect Store
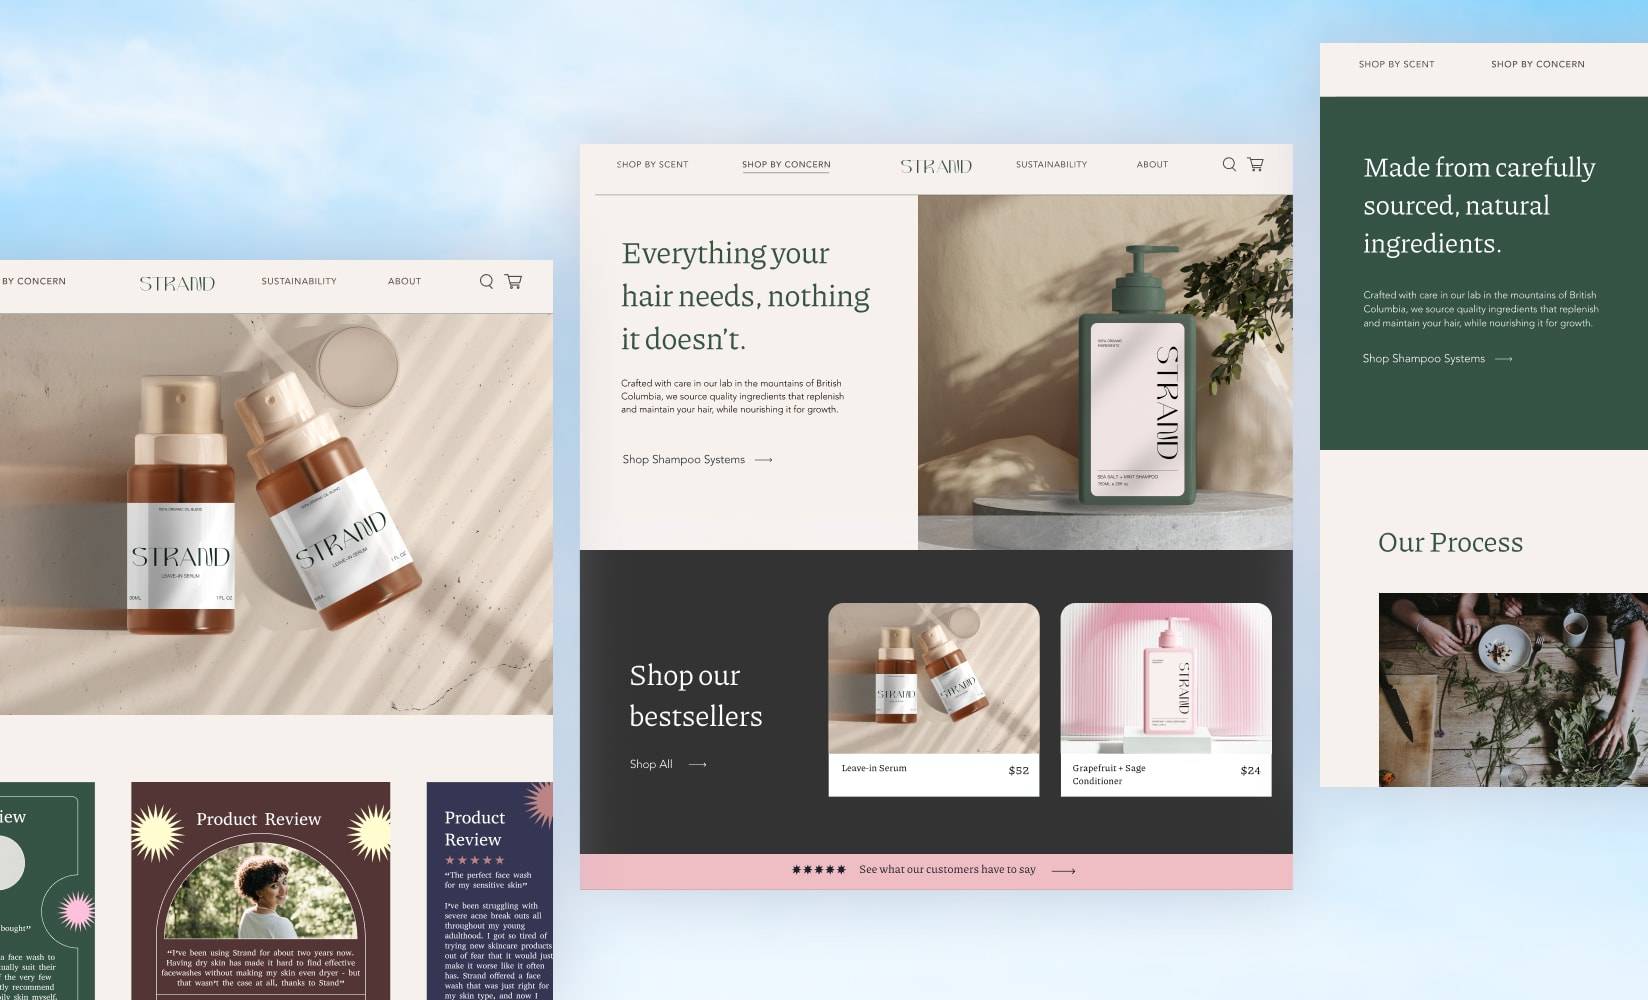
No matter the size of your Shopify store—be it a vast catalog of products or simply a tidy one product store—you’ll need to create some pages.
There are certain pages that every store needs—a homepage, an About Us page, a Contact page, a page detailing your return policies, an FAQ page, various collection pages, and of course, product pages.
Your pages represent significant milestones in your customer’s sales journey.
Along the way, they learn more about your brand, your products, and why it might be the right fit for them.
New Shopify stores come with a few standard pages ready to be edited for your needs, but they don’t anticipate what every store needs, and you will definitely need to start adding your own pages as you build out your store so you can start selling.
Once you have all your necessary pages in place, you’ll want to customize them to fit your brand and to help drive conversions for your store.
That’s where Page Builder comes in. But, we’ll talk more about that later.
In this post, we’ll cover:
- The types of Shopify pages you should be creating
- How to create new pages in Shopify
- How to add product pages on Shopify
- How to build Shopify collection pages
- How to create custom Shopify pages with Shogun
First, let’s talk about all the pages you’ll be creating.
#cta-visual-pb#<cta-title>Customize your Shopify pages with Shogun<cta-title>Start creating store pages that drive conversions and increase sales by using Shogun Page Builder, no code required.Start building for free
Types of Shopify pages for your store
There are many types of pages that Shopify merchants need to create to make their customer experience complete. Let’s look at some of the main pages you’ll want to add to your Shopify store.
- Homepage. This is your Grand Central Station, essential for giving all types of customers directions to the product or information they are looking for.
- Product pages. Another absolutely essential page that gives all the details about a product, including images, videos, descriptions, features, specifications, and persuasive copy.
- Collection pages. These pages group products together in intuitive ways so that shoppers can easily navigate to what they are looking for—categories like sweaters, women’s, gifts for dad, seasonal sale items, etc.
- About Us page. Many shoppers want to learn about the brand they shop with, so this page allows brands to tell their story and earn the trust of their audience.
- FAQ page. Unanswered questions can drive shoppers elsewhere, so it’s important to gather top queries and answer them completely to keep people shopping.
- Contact page. You also need to ensure that customers can get in touch with any issues they have lest they write you off completely for bad customer service.
- Policy pages. Making sure that your customers have the full picture of what your terms are is key to cutting down on support tickets, so clearly lay out your refund, return, exchange, and shipping policies.
- Landing pages. On the opposite end of the spectrum from homepages, landing pages target specific audiences with messaging that matches where they came from—such as paid ads, emails, social media, or partner sites.
With these pages, you can provide your potential and existing customers with exactly the information they need for whatever stage of their sales journey.
Now, let’s get into how to start adding these pages to your Shopify store step-by-step.
How to add new pages on Shopify
To start building out your store, you need pages. All types of pages.
Let’s start with the most basic of pages before moving on to product and collections pages.
Here’s how to create a page in Shopify—be it your FAQ page, your Contact Us page, or your policy pages—in a few simple steps.
Step 1: Log in to your Shopify dashboard
First things first, let’s get into the cockpit. If it isn’t already in your bookmarks, just go to shopify.com and click Log in.

Step 2: Go to Online Store > Pages
Now that you are in your Shopify dashboard, go to Online Store along the left side to expand your options. Then click Pages.
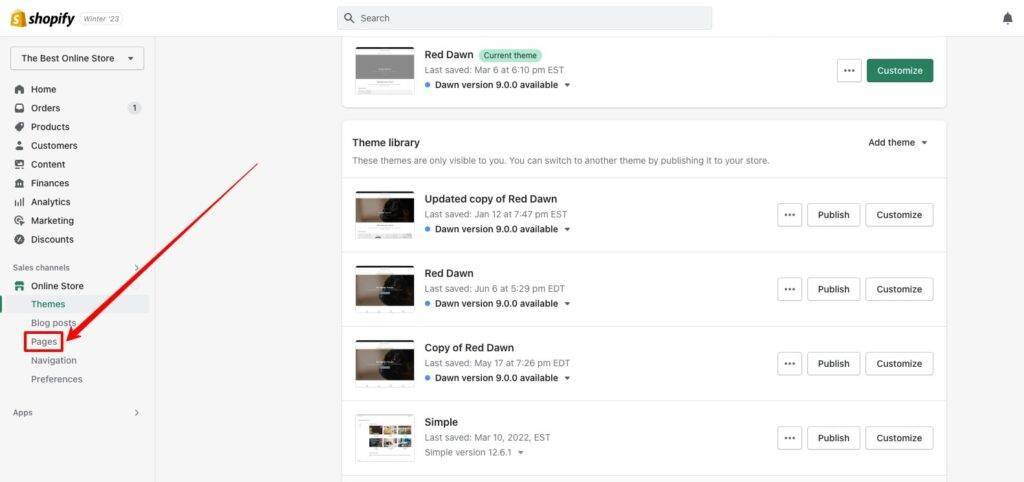
If you’ve already got some pages created, this is where they’ll show up.
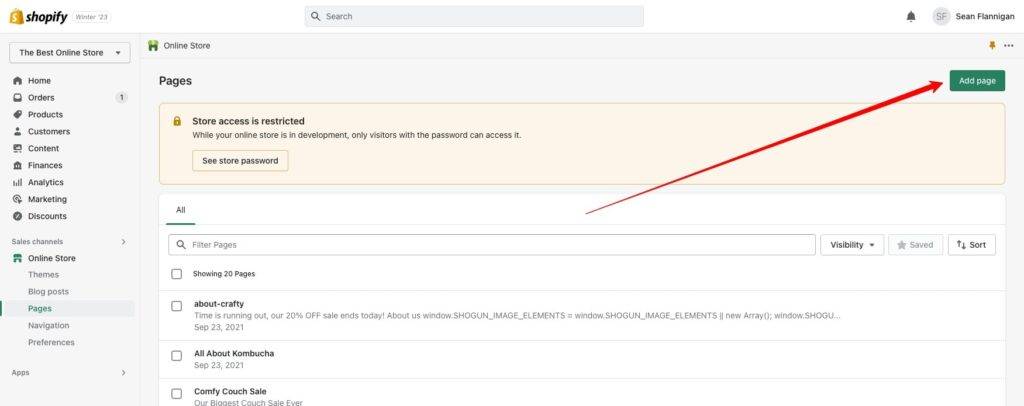
Step 3: Click the “Add page” button
In the upper right corner of the page, you’ll find a handy little button beckoning you to Add page.
Click that button, and you’ll find yourself on the page creation screen.
Step 4: Title your new page and start adding content
Now you can start creating your new page. Add your title and start inserting the page content in the fields below.
By this point, you should know what page you are creating, but Shopify gives a few helpful suggestions in the empty title field (“e.g. Contact us, Sizing chart, FAQs”).
You can also choose the theme template you want to use for the page based on your current Shopify theme and any apps that produce templates (like Shogun Page Builder).
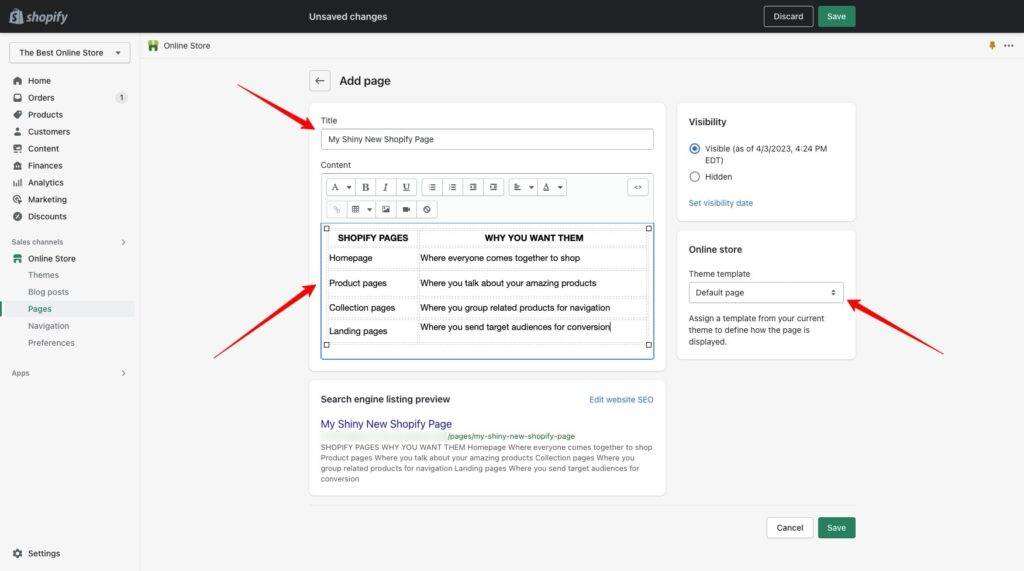
Once you’ve added these details, you can also edit how your page will show up on search engines like Google.
Automatically, it’ll pull in your title and page content, but this allows more control of your SEO by letting you edit the title, meta description, and URL handle. You should edit these for better optimization.
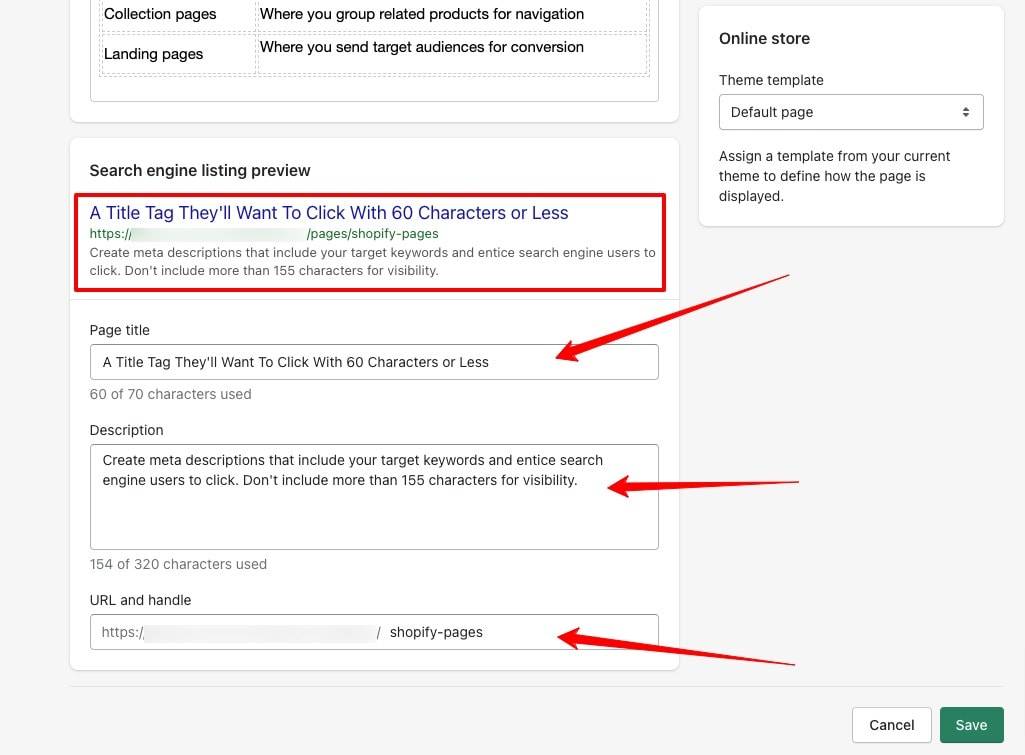
Shopify does include guidelines here for length of title tags and meta descriptions, but I’ve provided character limits in the screenshot that can help you avoid having your metadata cut off or rewritten by Google.
Learn more about what you should do in our Shopify SEO best practices post.
Step 5: Set page visibility
Finally, you can set whether your page is Hidden or Visible on your store.
Automatically, it’ll become visible once you save your page, but you could also set it to go visible later by clicking Hidden and adding the date you want it to go up.
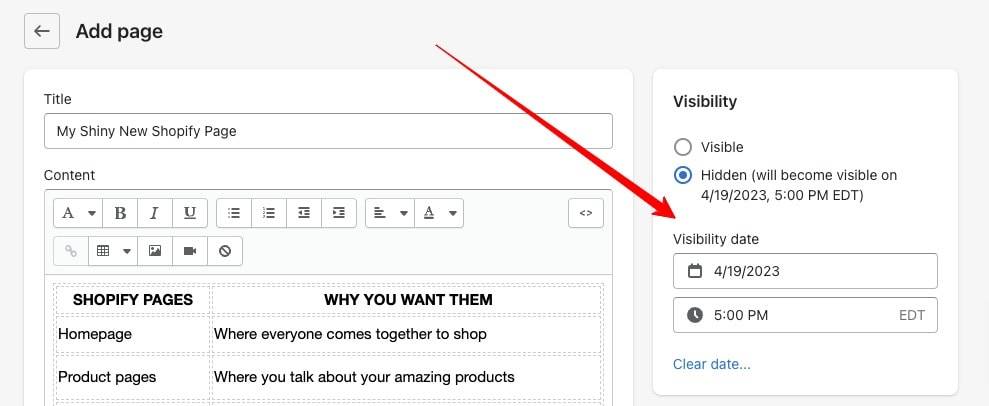
Once finished, click Save. You’ve created a page, congrats!
How to add a product page on Shopify
Your product pages are where it all happens—your lovely images, thoughtful copy, and design decisions either persuade shoppers to buy or they move on.
On Shopify, each product you create gets a page automatically. So, creating product pages happens differently than your basic pages (covered above).
Here’s how you create a product page on Shopify, step-by-step.
Step 1: Go to Products on the lefthand dashboard menu
On your Shopify dashboard, go to Products in the menu along the left.
This is where all product data is kept and where you can keep track of inventory. For our purposes, we’ll just be adding a product and filling out its details.
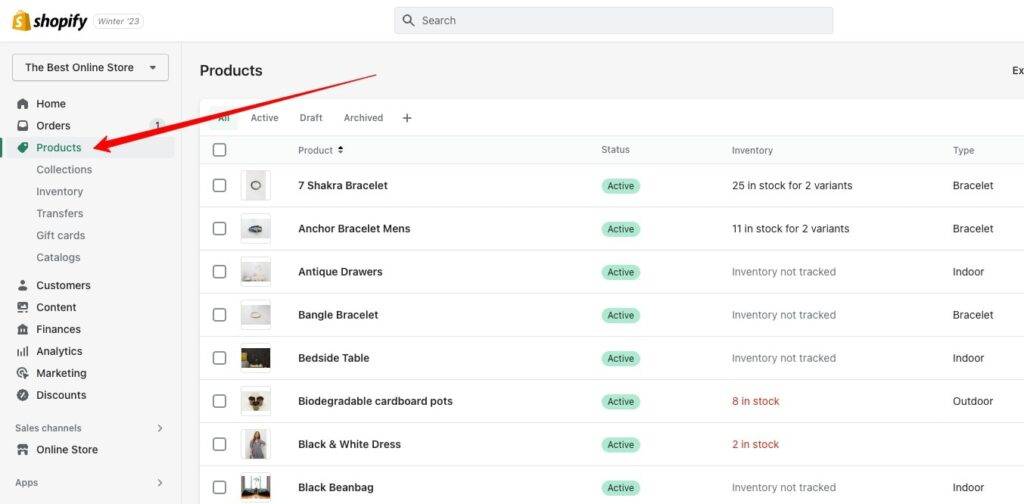
Step 2: Click the “Add product” button
In the upper right corner, you’ll find the Add product button. Click that thing, and you’ll be transported to the world of minute product details.
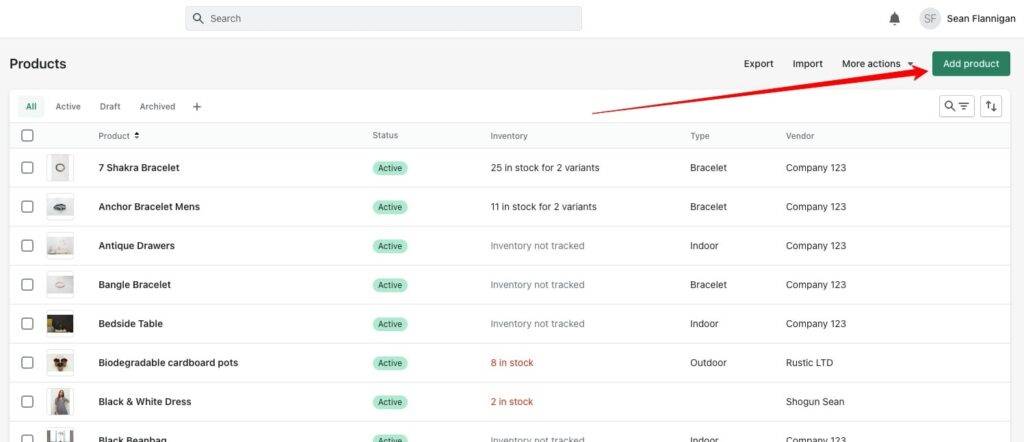
Step 3: Add product title, description, and images
When you get to the product detail page, the first things you see are Title, Description, and Media.
Add in the name of your product for the title, build out a powerful product description, and add gorgeous product photos and other media that’ll drive them to click the buy button.
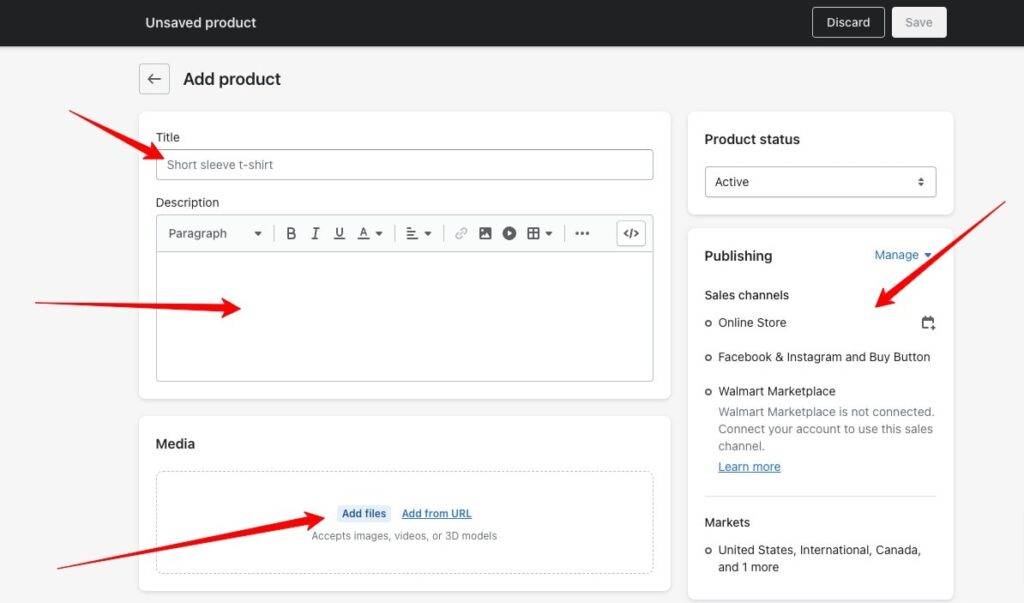
You can also define the channels that this new product will appear on if you are using multiple sales channels (such as Facebook, Instagram, Walmart, Amazon, or the Buy Button)
Now that you have added the info that’ll make up most of your product page, it’s on to the little details about your product.
Step 4: Enter all your product details
You can’t sell your products if you haven’t laid out all the little details. They help you organize your products, track your inventory, determine shipping costs, and much more.
Here are all the things you can add to your product data so you can start selling:
- Pricing, compare-at price, and cost per item
- SKU number, barcode, and inventory tracking
- Product attributes like category, type vendor, collections, and tags
- Shipping weight and customs information
- Product variants (like size and color)
- Theme template and SEO details
- Metafields (like ratings details)
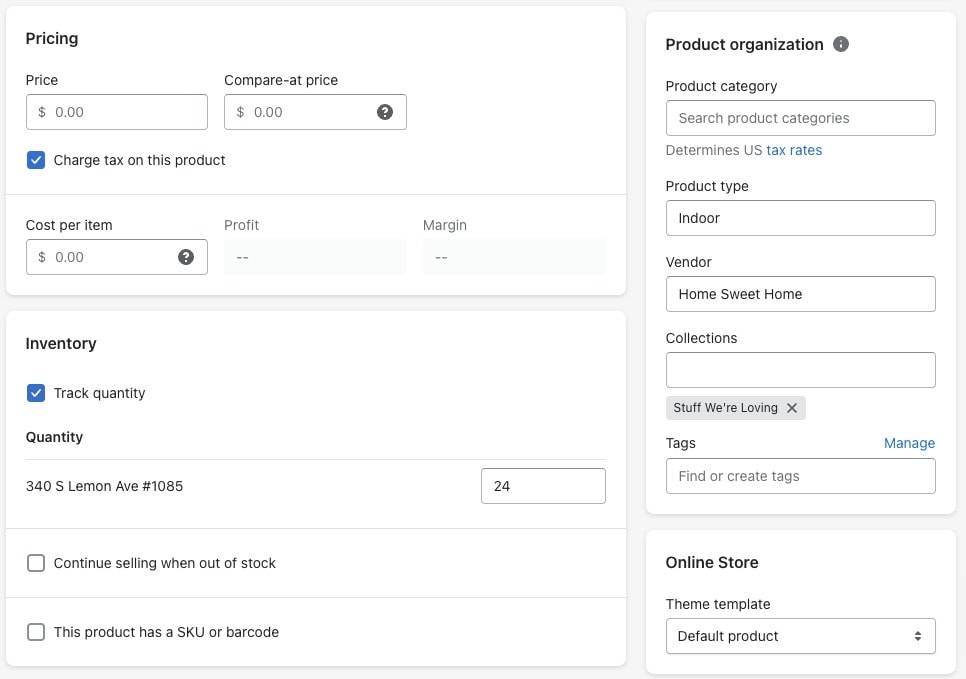
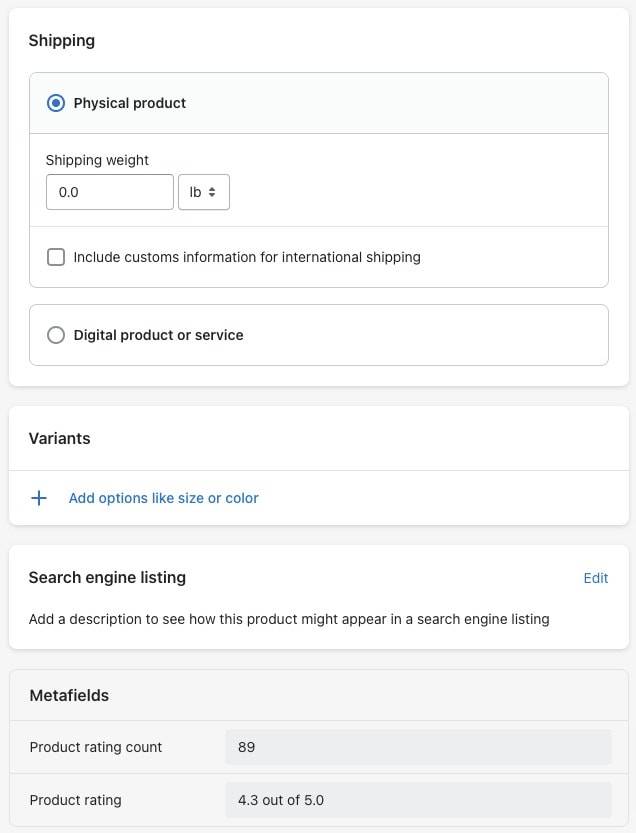
With all your product details added, click Save to add the product and its page to your store. Now, do this for all your products, and you’re set!
#cta-visual-pb#<cta-title>Build better product pages with Shogun<cta-title>Start creating store pages that drive conversions and increase sales by using Shogun Page Builder, no code required.Start building for free
How to add a collection page on Shopify
Just like with product pages, collection pages are created through the creation of a new product collection.
Collections are groups of products assembled based on your own criteria. That may be all products with the product tag “knits,” all your giftable products that are $50 or less, or a newly launched line of products.
Whatever you want.
They can be created by manually adding the products one by one or by automating the process based on certain rules you create.
Collection pages on Shopify show off a particular product collection. They include a title, a description, and an optional image (which acts as the background for the title in the header).
Instead of individually assessing numerous product pages, shoppers can look through your collection pages to narrow down what they want.
Adding a collection page on Shopify is easy, and we cover it in detail in our deep dive guide to Shopify collections.
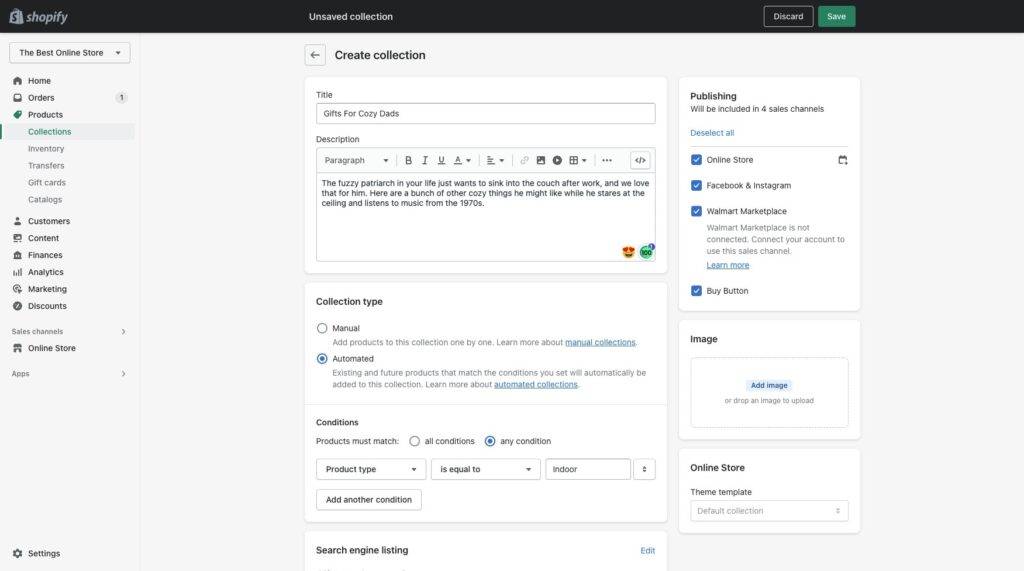
In short, here are the steps:
- Step 1: Go to Products > Collections and click Create collection
- Step 2: Add collection title, description, and image
- Step 3: Edit collection page SEO
- Step 4: Choose your collection type (manual or automated)
- Step 5: Add your products
- Step 6: Click Save
When you’re finished, your initial page could look something like this.
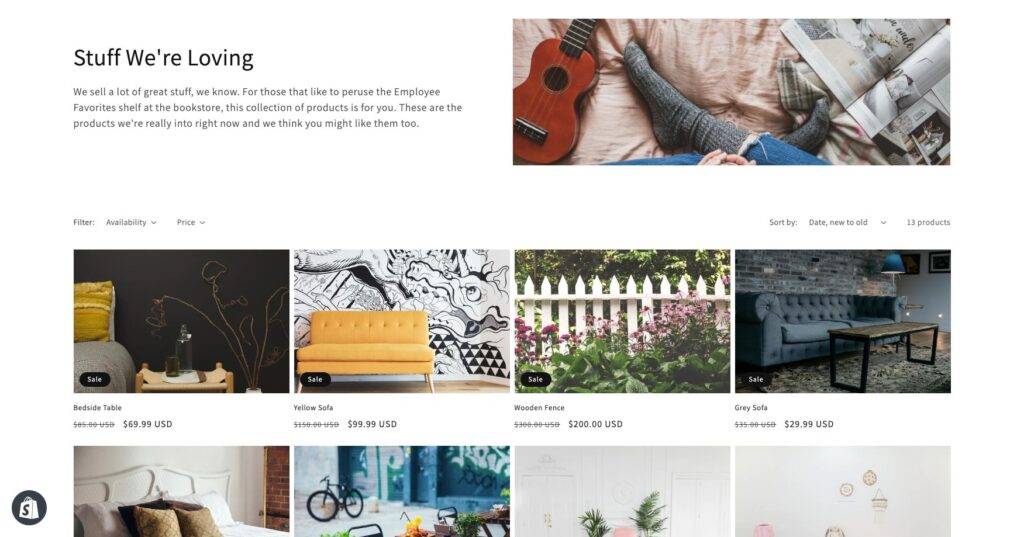
Of course, you can make it look so much better by customizing it to reflect your brand.
For instance, PANGAIA’s collection pages manage to be stunning and user-friendly while remaining rather minimalistic.
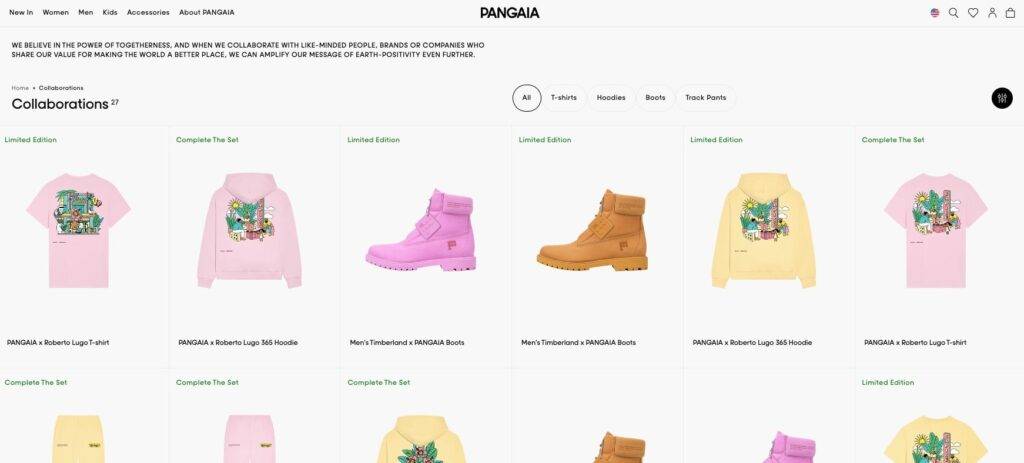
It fits their brand and makes it easy to navigate straight to a desired product.
How to add custom Shopify pages with Shogun Page Builder
Adding pages to your Shopify store is simple with Shogun. If you don’t have Page Builder yet, it’s so easy to get started.
You can add products and collections to specific Shopify pages with an intuitive drag-and-drop visual editor and customize any page for maximum conversion potential.
Now, here’s how to add pages and customize them with Shogun Page Builder.
Step 1: Navigate to your Page Builder app from Shopify
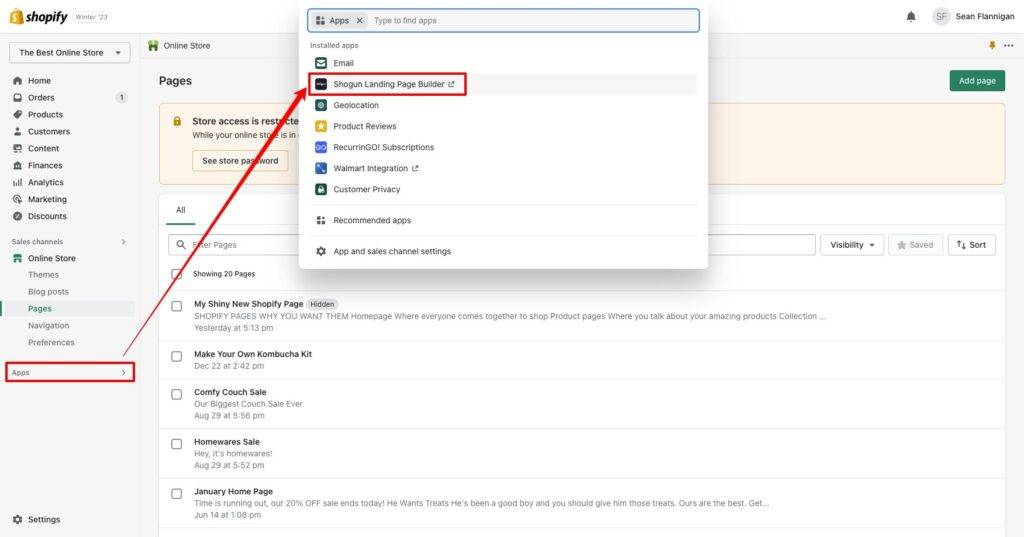
With Page Builder added to your store, just go to Apps on your Shopify dashboard, and you’ll find all of your Shopify apps.
Click on Shogun Page Builder.
Step 2: Click “Create new”
From your Page Builder dashboard, you’ll click the Create new button and select Page. This will take you to the template menu.
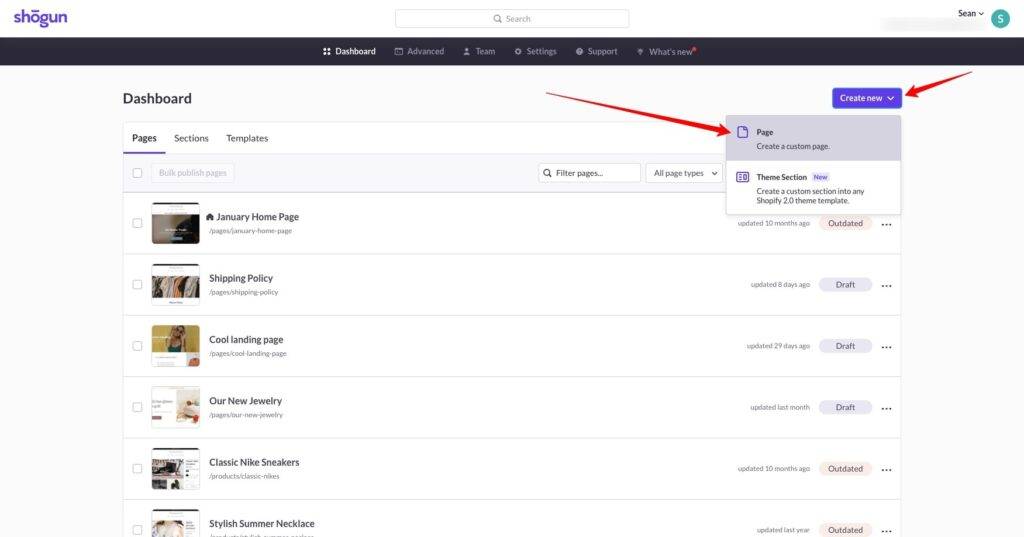
You can also create Shopify theme sections with Page Builder that are accessible directly from the Shopify theme editor.
Step 3: Choose your page template or start from scratch
Shogun has over 70 pre-made templates that you can use, for homepages, About Us pages, Contact pages, collection pages, product pages, blog posts, and more.
You can choose to go with a template or create a brand new page from scratch.
If you want to build a particular product or collection page, you just need to navigate to the Product or Collection tabs to import those pages to Shogun directly from Shopify.
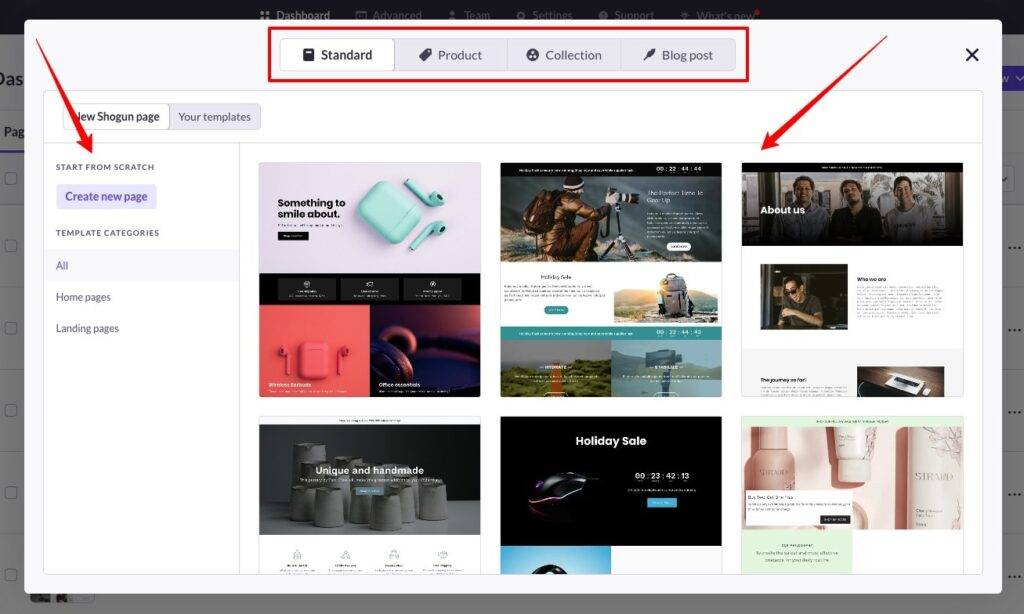
Whatever you choose, you’ll define your page name and URL slug before you are taken you to the editor page.
Step 4: Start customizing your Shopify page
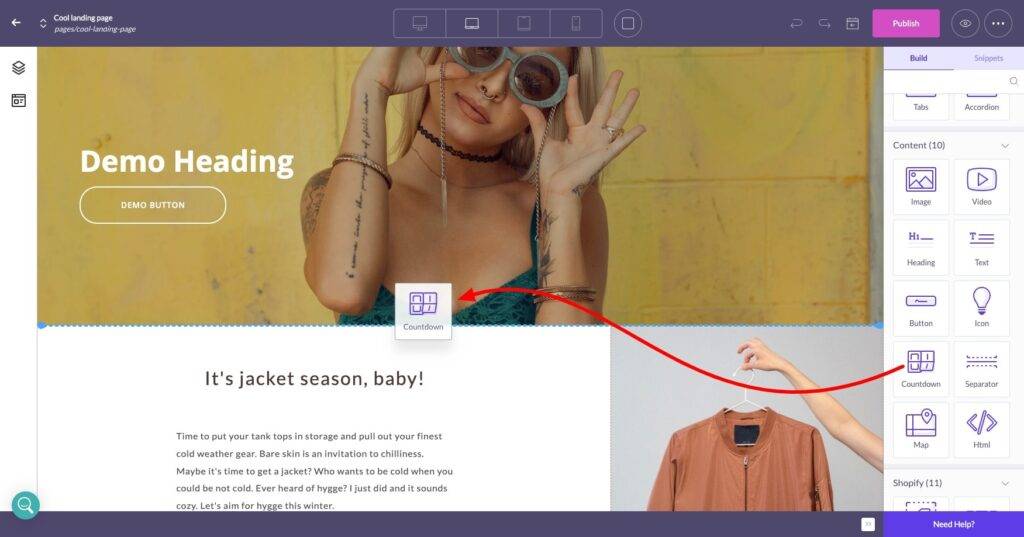
In the editor, you’ll have full access to a library of page elements that you can use to build store pages that’ll drive conversions.
Bonus step: How to add a product on Shopify
Your Shopify products are built into Shogun, so they can be quickly added to any page you want.
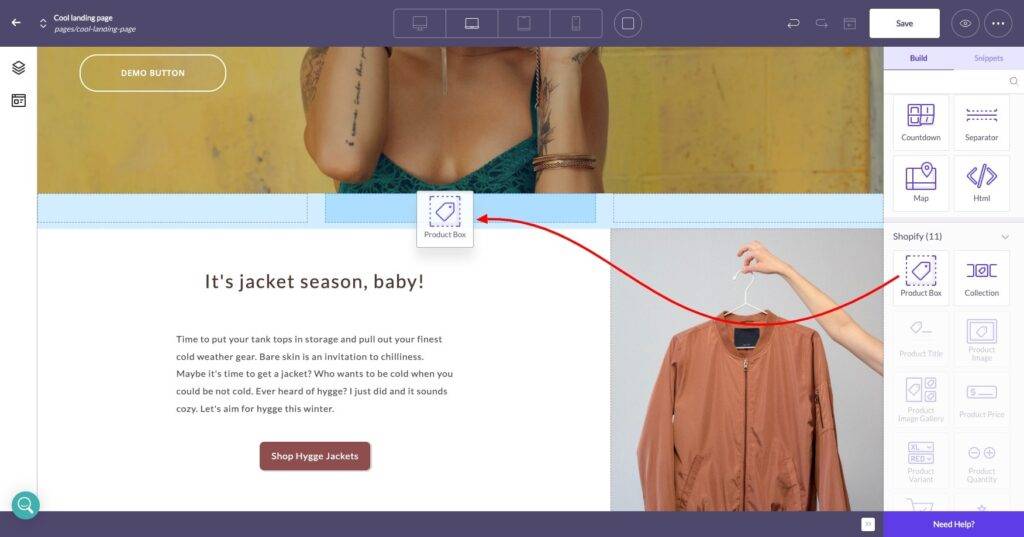
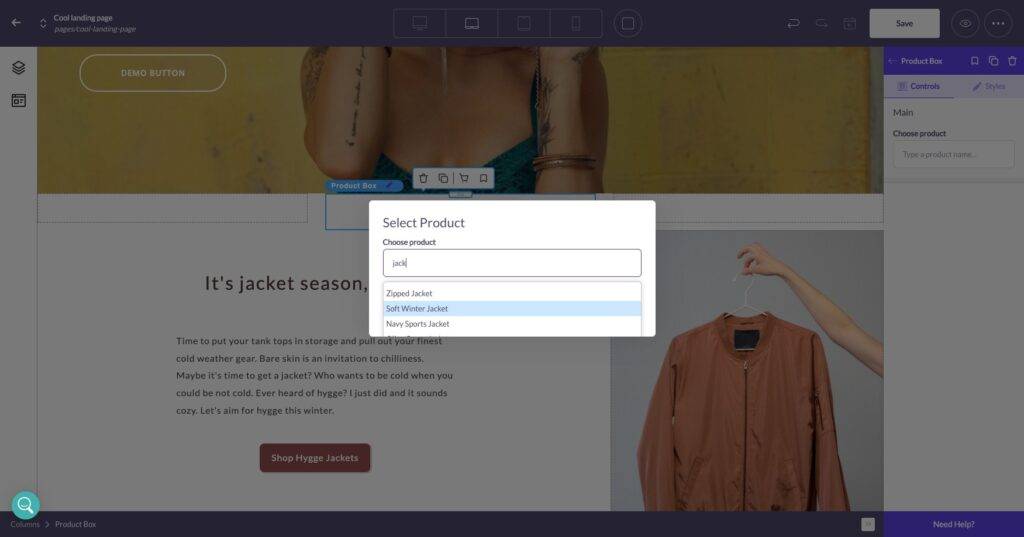
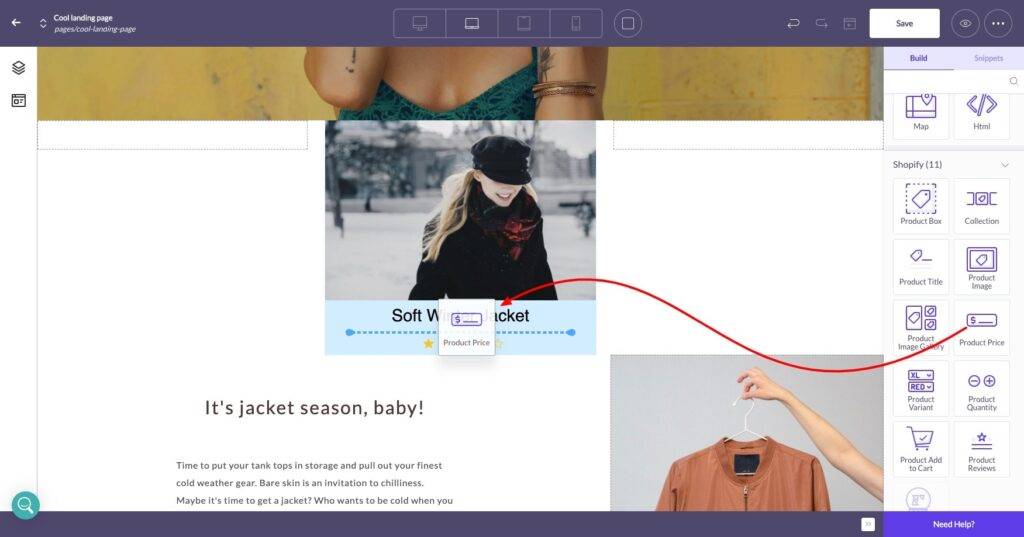
Just drag the Product Box element wherever you want, select the product you want to feature, then start pulling in the attributes you want—such as product images, product title, product price, and product reviews.
Customizing your Shopify pages with Shogun
Along the right side of your editor, you’ll find page elements to use for structuring your page, adding lush content, pulling over Shopify product details, driving lead capture, and more.
Drag any element directly onto your page and see what it looks like as you build.
Once you add the product box to a page (as you saw above), you have access to all the Shopify elements that allow you to quickly add a collection to a page or specific product elements like images, titles, prices, variants, reviews, add to cart button, and more.
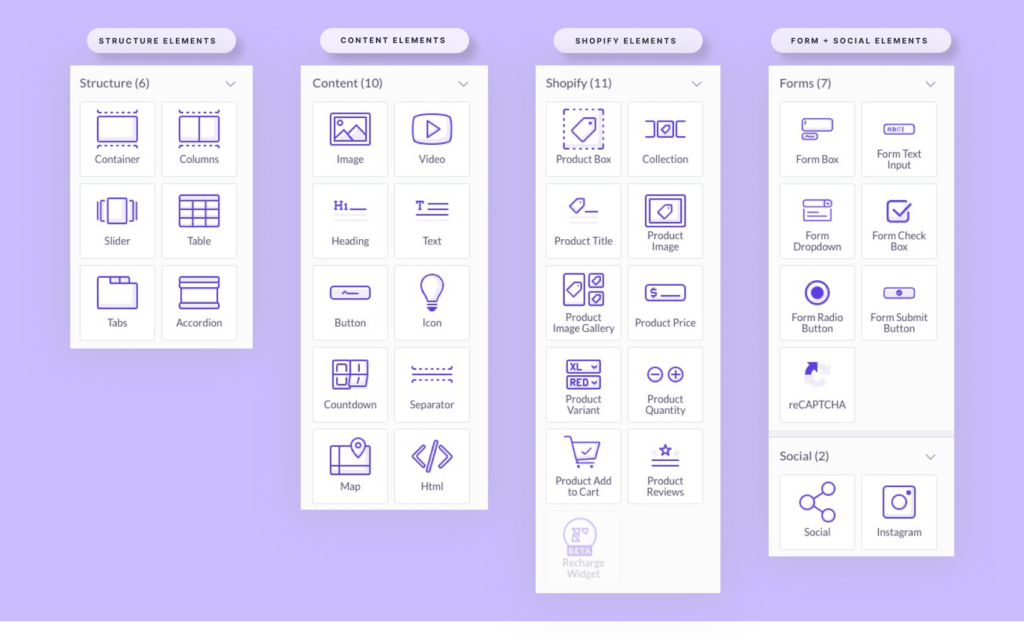
With each element, you get complete control of how it functions and looks on the page.
No matter what Shopify theme you are using, you can make it look exactly how you envision it.
Convert better with custom Shopify pages
Creating new pages on Shopify is simple, whether you do it on your Shopify admin dashboard or go the more custom route with Shogun Page Builder.
Building from Shopify, you’re limited by the theme you’ve chosen and the capabilities of their editor. To take your page to the next level, you can customize each page to create a unique experience for your customers.
With Shogun Page Builder, you have total control over how your store pages look and feel in less time and without having to bother with code.
Your store will be looking incredible in no time.
#cta-visual-pb#<cta-title>Customize all your Shopify pages with Shogun<cta-title>Start creating store pages that drive conversions and increase sales by using Shogun Page Builder, no code required.Start building for free

Sean Flannigan
Sean is one of Shogun's tireless content marketers. When he isn't creating exciting ecommerce content, he's probably biking or at the park.

