How To Install Google Tag Manager On Your BigCommerce Store
Online retailers commonly use Google Analytics for tracking visitor information and eCommerce sales. Unfortunately, visitor data and customer sales tend to be underreported in Google Analytics which can lead to confusion as to which conversion rates are accurate… and where did those sales go?
Thankfully, Google offers an alternative that can more accurately and more consistently report customer behaviors in eCommerce stores. Google Tag Manager, like Google Analytics, is free to use and easy to install. In this article you’ll find the steps to create your Google Tag Manager account and then how to install Google Tag Manager on your BigCommerce store.
#cta-visual-fe#<cta-title>Fast and Flexible CMS For BigCommerce<cta-title>Gain full control over your site without sacrificing page speed with Shogun Frontend.Learn more
What Is Google Tag Manager
It should be clarified that Google Tag Manager (GTM) is a completely different tool used for storing and managing other code and data. It is not a reporting tool, but it does integrate with Google Analytics.
When you setup GTM, you configure various triggers associated with different conversion events on your site. When those events happen, the GTM code “fires” and the event is registers and can be tracked using Google Analytics.
For example; after setting up GTM you create a trigger for a customer clicking a call to action to opt into your email list. When a customer completes the desired action, the event registers as a conversion/goal in your Google Analytics.
You can track just about any kind of behavior in GTM, like:
- Link clicks
- File downloads
- Adding products to the cart
- Removing products from the cart
- Form or cart abandonment
- Video plays and more
- Tracking which article elements get the most conversion or longest time on page
You can enable eCommerce tracking in Google Analytics but GTM gives you far more control if you want to track a wide range of specific events to better understand the behavior driving conversions as well as things like cart abandonment.
Setting Up Your Account
To get started you’ll first need to create a Google Tag Manager account.

- Go to https://tagmanager.google.com
- Either create a new Google account or login to your existing account
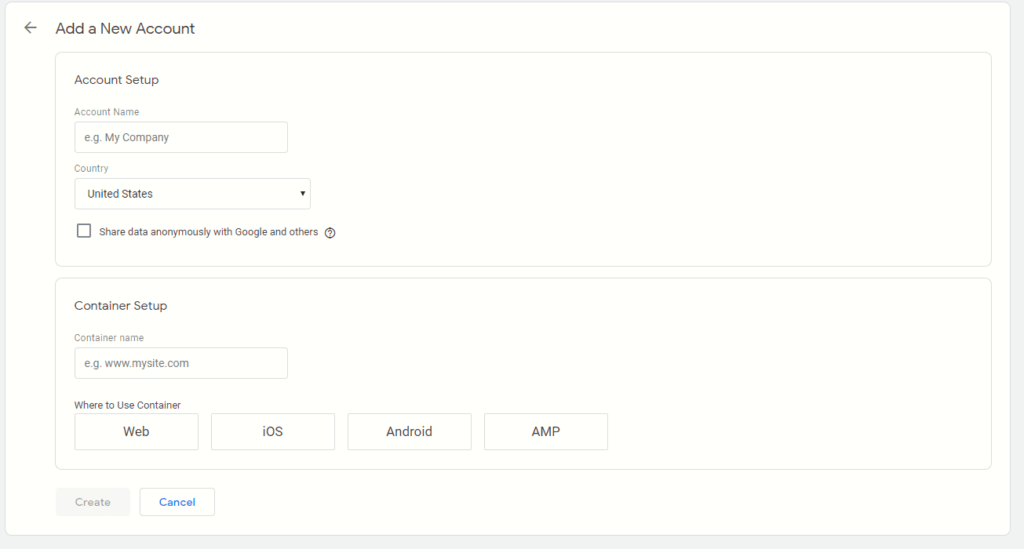
- Create a new GTM account and enter your account/business name, your country, and click continue
- Name your Google Tag Manager container by putting the URL for your online store, choose “Web”, and click “Create”
Once you click create, you’ll need to agree to Google’s Terms of Service. After you click “agree” you’ll be given the window to “Install Google Tracking Manager” with instructions to copy the code shown. This code snippet is a script that needs to placed in your BigCommerce store.
You’ll see two fields to copy; the first field instructs you to copy the code and paste into the <head> of your site. The second box has instructions to paste the code after the opening of the <body> tag on your site.
We’re only going to work with the code from the first box.
Adding Google Tag Manager Code to BigCommerce
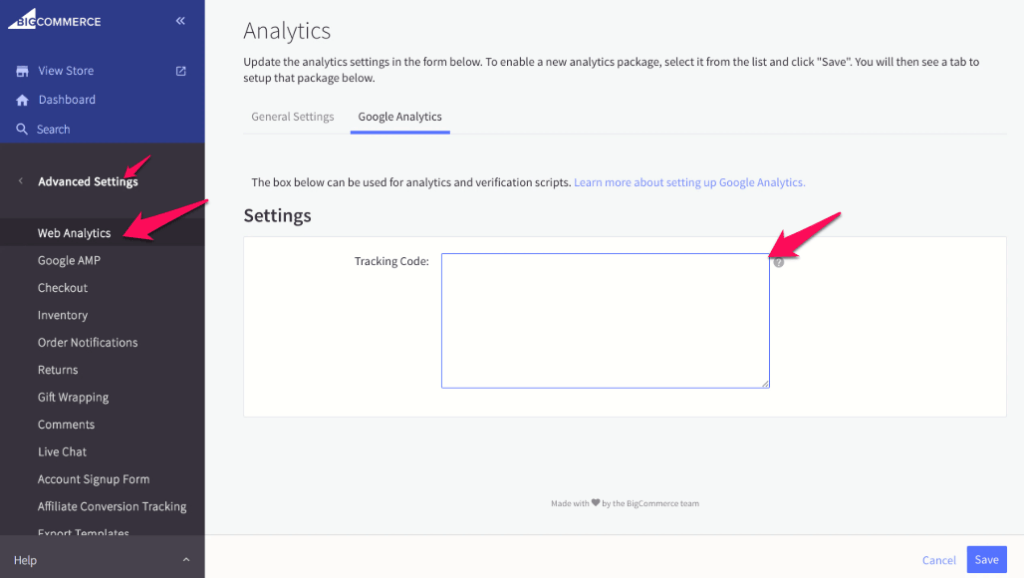
There’s two ways you can insert the GTM code snippet in your BigCommerce store. The easiest method is to copy the GTM code and paste it into the Google Analytics field in your BigCommerce menu. You can do this by:
- Logging into your BigCommerce dashboard
- Navigate to Advanced Settings
- Select Web Analytics
- Switch to the Google Analytics tab
- Insert your GTM code in the text box
- Click save

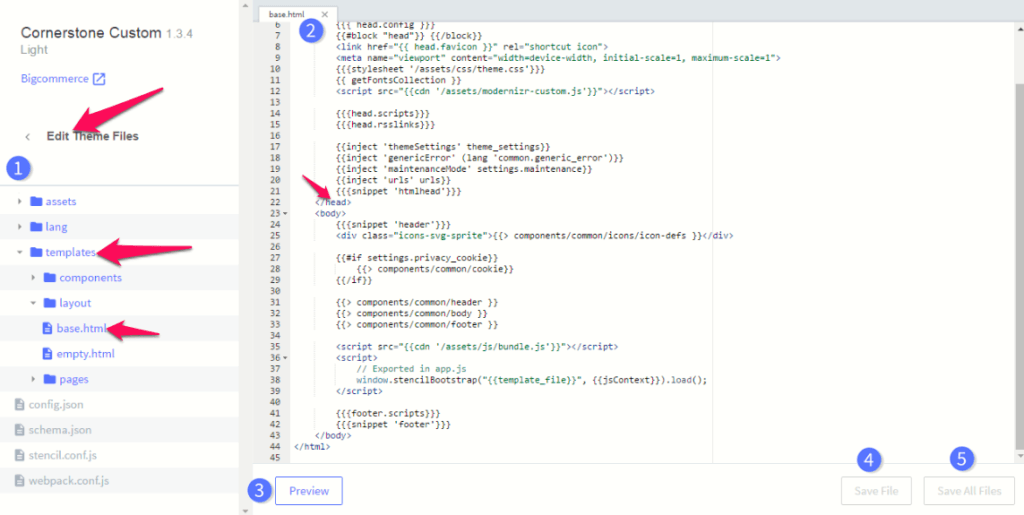
Alternatively, you can also insert the code directly into the template files within the <head></head> tags manually. This is likely the best way to ensure the code is accurately triggered for every page that loads on your site. You can do this by:
- Logging into your BigCommerce dashboard
- Navigate to Edit Theme Files > Templates > Layout > base.html
- Paste the GTM code within the <head> tags, as high as possible.

Properly Collecting Data with Google Tag Manager
Google Tag Manager can help you track a variety of events on your store with little difficulty, save for the actual customer transaction. Google Tag Manager works by creating a data layer and using that data layer to collect the data. Because of this, you’ll need to push transaction data into that data layer in order for it to register.
Don’t worry, it’s not pushing any sensitive customer data. In fact, it’s only going to push the data you specify.
You can copy the javascript code below and paste it before the Google Tag Manager code you previously copied and placed.
<script type=”text/javascript”>
var dataLayer = new Array();
// console.log(dataLayer);
function trackGTMEcommerce() {
this._addTrans = addTrans;
this._addItem = addItems;
this._trackTrans = trackTrans;
}
var transaction = {};
transaction.transactionProducts = [];
function addTrans(orderID, store, total, tax, shipping, city, state, country) {
transaction.transactionId = orderID;
transaction.transactionAffiliation = store;
transaction.transactionTotal = total;
transaction.transactionTax = tax;
transaction.transactionShipping = shipping;
// console.log(11)
}
function addItems(orderID, sku, product, variation, price, quantity) {
transaction.transactionProducts.push({
‘id’: orderID,
‘sku’: sku,
‘name’: product,
‘category’: variation,
‘price’: price,
‘quantity’: quantity
});
// console.log(‘a’)
}
function trackTrans() {
transaction.event = ‘bcTransactionComplete’;
// console.log(transaction);
dataLayer.push(transaction);
}
var pageTracker = new trackGTMEcommerce();
Once you have the script in place be sure to save your changes in BigCommerce.
Setting Up Your Transaction Tag in Google Tag Manager
In order to monitor transaction data you’ll need to create the appropriate tag in your GTM. It’s time to head back to your Google Tag Manager dashboard to create your first tag.
- In your GTM dashboard click into the “Workspace” tab
- Click on “Add a New Tag”
- Click on “Tag Configuration”
- Select “Universal Analytics” for the tag type
- Under the Track Type dropdown, select “Transaction”
- Under the Google Analytics Settings dropdown select “New Variable”
- Enter your Google Analytics tracking ID in the “Tracking ID” field and click “Save”
- Click the “Triggering”
- Click the “+” icon to create a new trigger
- Enter the trigger name as “Purchase Complete”
- Click “Trigger Configuration” and choose “custom event” for the trigger type
- Enter “transactionsuccess” under the “Event Name” field
Once completed you can save your changes to finish setting up the new tag then publish changes in your Google Tag Manager dashboard.
Turn on eCommerce Tracking in Google Analytics
In order to see eCommerce related data in your Google Analytics you’ll need to enable eCommerce tracking for your reporting view. To turn this on at the view level, follow these steps:
- Log into your Google Analytics dashboard
- Navigate to the “Admin” tab by clicking the gear “admin” icon in the menu
- Click the “eCommerce Settings” option
- Switch the toggle for “Enable eCommerce” to the On position and click save.
Be sure to test your eCommerce tracking with Google Tag Manager. You can do this by running a test transaction through your store. You’ll need to wait one to two hours after completing the transaction for the data to appear in your Google Analytics.
Track Conversions and More with Shogun
The Shogun page builder app, with its drag-and-drop interface and extensive library of elements, makes it easy to create custom pages for your BigCommerce store.
Also, Shogun allows you to do more than just create pages. You can track the performance of your pages as well, without using any tracking code snippets,
For each page, Shogun collects information on sales conversions, add to cart conversions, total sessions, bounce rate, top clickthrough destinations, and top outside referrers. With all this data,you’ll be able to make more informed decisions regarding your store.
#cta-visual-fe#<cta-title>Fast and Flexible CMS For BigCommerce<cta-title>Gain full control over your site without sacrificing page speed with Shogun Frontend.Learn more

Derek Cromwell
Derek is the founder of Thunder Bay Media and lover of everything related to content writing and copywriting. He has 15+ years of copywriting, content writing, and digital marketing experience and is a featured guest blogger published by more than 30 marketing publications.


