Shopify Buy Button: How to Seamlessly Sell Your Goods From Any Website

Practically everything is a sales channel—social media, search engines, even your favorite VR game. It’s crucial for merchants to be aware of these opportunities, so they hit as many potential buyers as possible.
One clever tactic is to employ buy buttons, which allow shoppers to purchase an item they see using another platform.
The Shopify Buy Button is a powerful tool that leverages the ecommerce giant’s technology to streamline checkout—no matter what website your customer is on.
In this article, we’ll cover:
- What the Shopify Buy Button is
- Where to use the button
- The benefits and challenges of Shopify’s Buy Button
- How to add the Buy Button to your channels
- The right way to add buttons to Shopify
#cta-visual-pb#<cta-title>Build seamless buyer experiences<cta-title>Use Shogun to create on-brand landing pages, product detail pages, and more.Start building for free
What is the Shopify Buy Button?
Shopify’s Buy Button is a feature that lets you sell using Shopify’s technology from different platforms, whether or not you have set up a Shopify website.
That means merchants can trigger checkouts from other sales channels, such as a WordPress, Squarespace, or even BigCommerce website if you so desire.
You can create custom buy buttons for a single product or a collection, then embed them directly in your store. You can add product photos, write descriptions, and set prices within your buy button setup.
Upon clicking, you can set a buy button to perform a variety of actions leading to purchase:
- Add the product to the shopper’s cart. This option allows shoppers to add the item to their cart and seamlessly continue shopping. We recommend this setting if you have an extensive catalog and shopper behavior indicates they may add more items.
- Go directly to checkout with the product. This option brings shoppers directly to checkout, pushing them toward purchase. We recommend this option if you typically sell one large item at a time, such as mattresses, or if you are a one-product store.
- Open the product details, which displays as a “View product” button. This option allows shoppers to view different product variants, select their preferred option, then add the product to their cart. This is recommended if you have items that have different variations, such as sizes or colors.
As a result, customers can purchase products with minimal clicks and redirects to enjoy a faster, smoother checkout process.
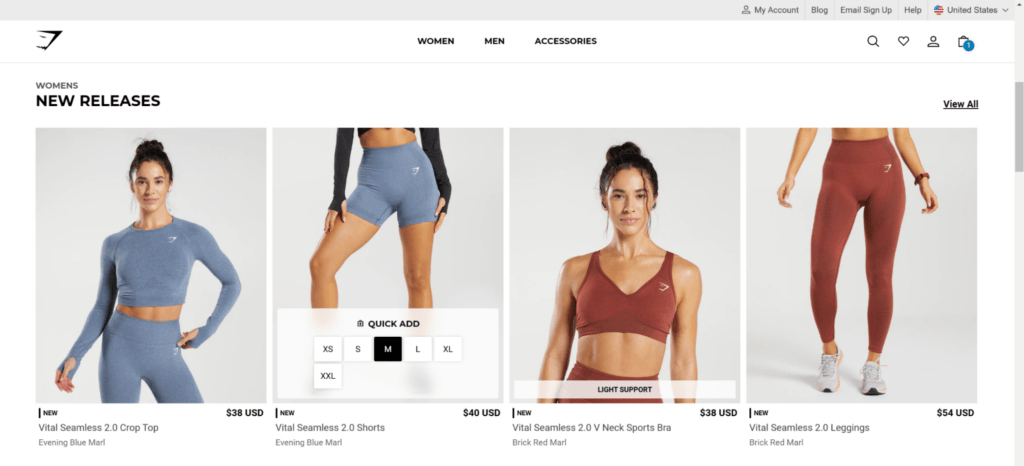
Gymshark applies this in the form of a QUICK ADD feature on their website. Clicking on a chosen size adds the selected product to the cart instantly.
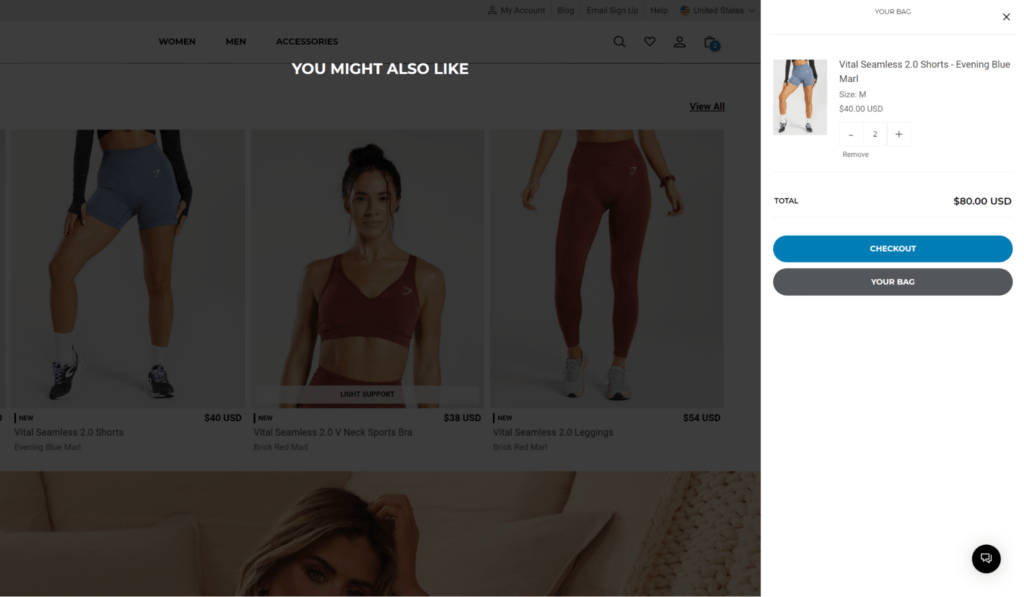
After, shoppers can go directly to checkout and complete their purchase, making for a seamless experience.
For merchants not using Shopify, you can choose from the various other payment processors that the Shopify Buy Button supports.
Where to use the Shopify Buy Button
You can integrate the Shopify Buy Button on multiple platforms and channels, making it easy to showcase your products and reach customers in multiple places.
A significant advantage is the ability to customize the button to fit the look and feel of the platform, so you maintain a consistent brand image.
Let’s look at the various channels where you can use this button and see some Shopify Buy Button examples.
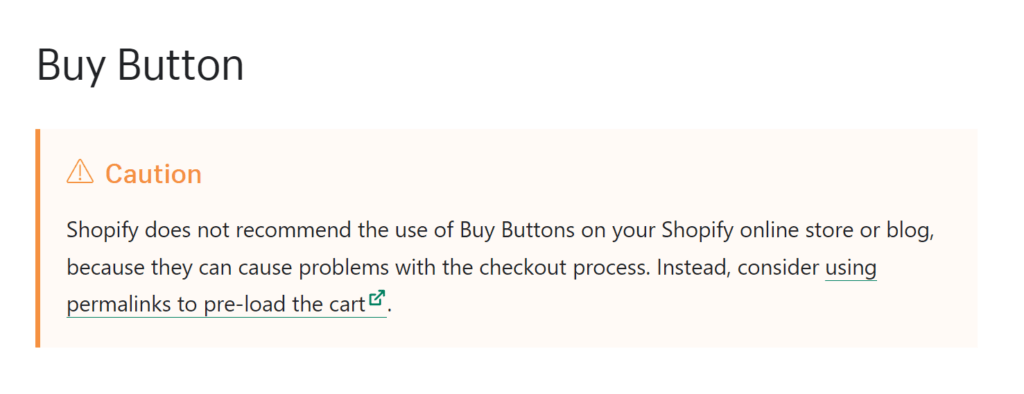
Note: According to their help center, Shopify does not recommend using the Buy Button directly on a Shopify website.
Your website or blog posts
Embed your Shopify Buy Button in your web pages or blog posts for easy exposure.
Customers are already engaging with your site, so leaving low-hanging fruit—such as a buy button at the end of an interesting blog post—is an effective way to entice them to purchase.
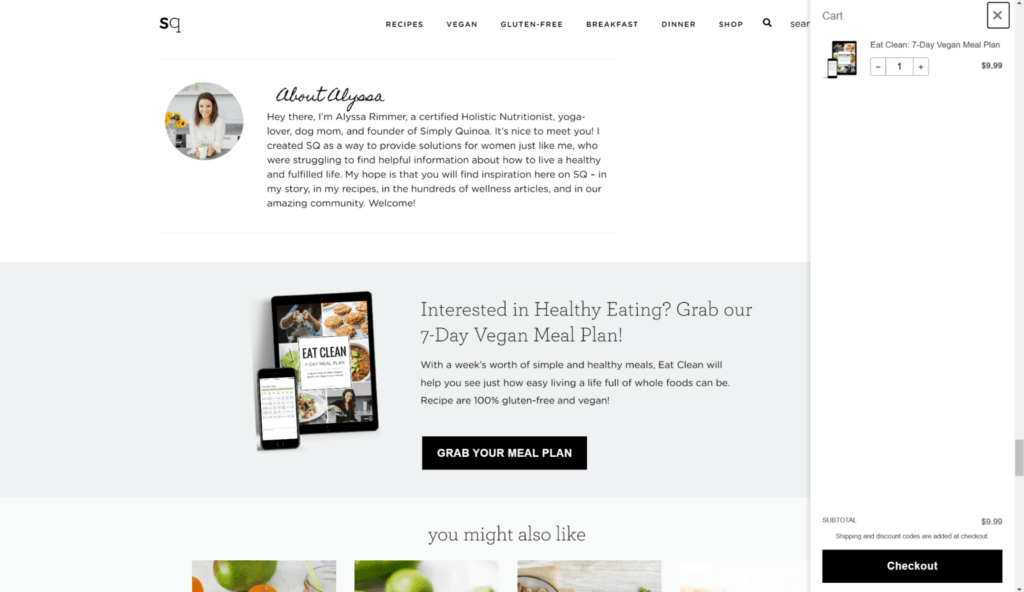
Simply Quinoa, a brand by Certified Holistic Nutritionist Alyssa, incorporates the Buy Button through a CTA at the end of every blog and recipe.
When someone clicks the GRAB YOUR MEAL PLAN button, a meal plan is added to their cart on the spot. They can then head straight to checkout.
Landing pages for ad campaigns
Simply clicking on your ad campaign expresses a customer’s interest and intent, and incorporating the Buy Button on landing pages can nurture that into a closed sale.
It also results in a more streamlined shopping experience, which further encourages a purchase.
For example, if you run a paid search campaign, you can use buy buttons to populate the landing page of the ad.

The fashion brand Rebecca Minkoff, for instance, uses the Shopify Buy Button on landing pages for their Google ad.
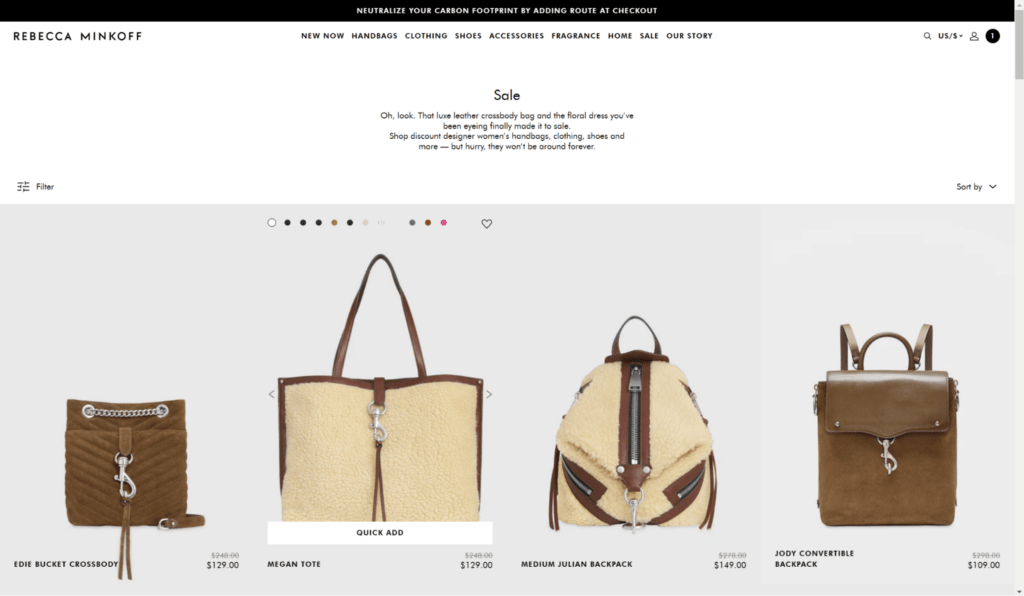
Clicking on the Shop New Markdowns webpage on the SERP takes consumers to the above page, which shows a selection of items currently on sale.
Meanwhile, the Buy Button manifests as a QUICK ADD button that appears when they hover their mouse cursor over a product.
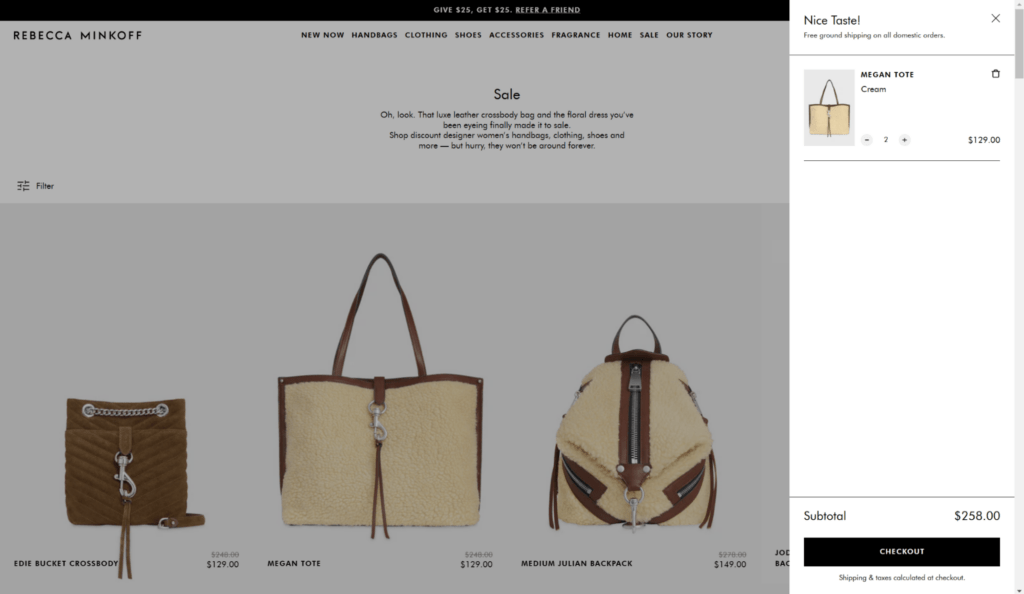
Clicking on it automatically adds the item to their cart, from which they can move directly to checkout.
Email marketing campaigns
With 77% of marketers enjoying an increase in email engagement over the last year, current newsletter subscribers are a rich source of customers you can entice with the Shopify Buy Button.
Use it to promote specific products, new releases, or sales, then redirect customers to their shopping carts or your checkout page.
In the example below Hawthorne uses a buy button to allow email subscribers to purchase their final batch of a certain scent.

To do this, however, you’ll need tools to create HTML emails, such as Mailchimp and Klaviyo.
Pop-ups
Website pop-ups have an average conversion rate of 11.09%, while the top 10% of the best-performing ones enjoy a 42.35% rate.
This indicates the potential profit to be gained from embedding a Buy Button in your pop-ups.
You can pique a shopper’s curiosity by displaying a new product or something on sale. Then, if you grab their attention, they can instantly add an item to their cart and complete the purchase.
Partner sites
If you’re starting small, working with renowned brands that possess similar audiences can help you establish a larger customer base.
And, with 71% of consumers liking co-marketing or co-branding partnerships, this is a rich opportunity to attract even more leads.
Collaboration can take the form of developing a product or creating content together.
If your partner willingly spotlights you in their marketing, such as through a blog post, you can ask them to include a Shopify Buy Button to make your website and products more accessible.
Benefits of the Shopify Buy Button
Now that you know where you can incorporate it, here’s a quick breakdown of why you should use the Shopify Buy Button.
Seamless checkout on any platform
Besides Shopify stores, the Buy Button works on websites run on WordPress, Wix, and similar hosting platforms.
As such, one of its greatest advantages is it provides a smooth checkout process for customers, no matter what platform they use.
This gives you the freedom to lean on tried-and-tested Shopify technology while using your preferred content management system (CMS)—you don’t even have to use a Shopify site for it (you just need to have your products set up in Shopify).
Showcase your items easily
Merchants can embed their products and collections directly from Shopify.
So, they don’t have to rebuild their listings, re-upload their images, reconfigure collections, or face other merchandising inconveniences on their WordPress, Squarespace, or Wix sites.
This plug-and-play functionality makes it easy for merchants to highlight their products and sell them directly from their websites and other channels. This improves visibility for specific items they want to sell more of.
Updated inventory levels
Since your goods and buy buttons are from Shopify, you can also rely on Shopify’s inventory management features.
They’re directly connected to your Shopify store, meaning your inventory levels are automatically updated in real-time.
As a result, you avoid adding or removing your items manually as they sell out or come back in stock. Likewise, you don’t have to log an inventory update in Shopify after every sale.
This helps prevent overselling and stockouts, as well as simplifies inventory management.
Manage your omnichannel experience
The Shopify Buy Button allows you to manage your sales across multiple channels.
You can customize it to match your brand, upload your assets, and more—ensuring a consistent and seamless experience for customers wherever they shop.
Shopify Buy Button challenges
Despite the upsides, there are still some disadvantages you’ll have to deal with if you use the Buy Button.
Singular function

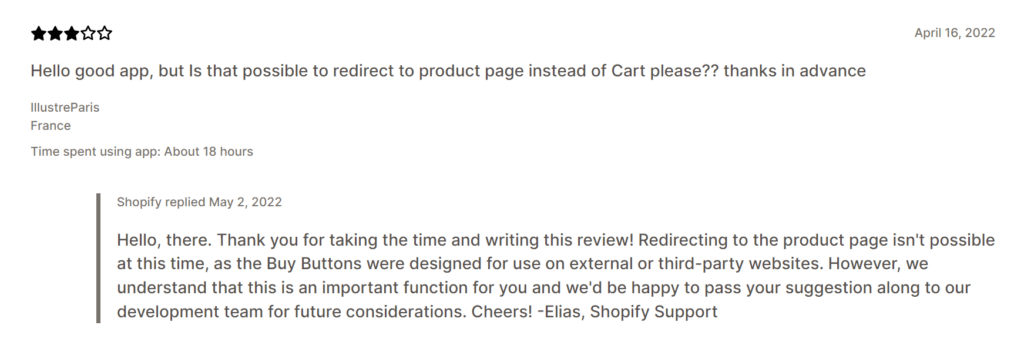
The Shopify Buy Button is limited in its functionality, designed only for selling products on third-party or external sites.
In fact, Shopify recommends against using the buy button for Shopify stores.

Shoppers may find learning more about an item difficult since the button takes them directly to checkout rather than a product listing or details page.
This means businesses may need other tools or platforms to direct their visitors to relevant pages.
No alternative currencies
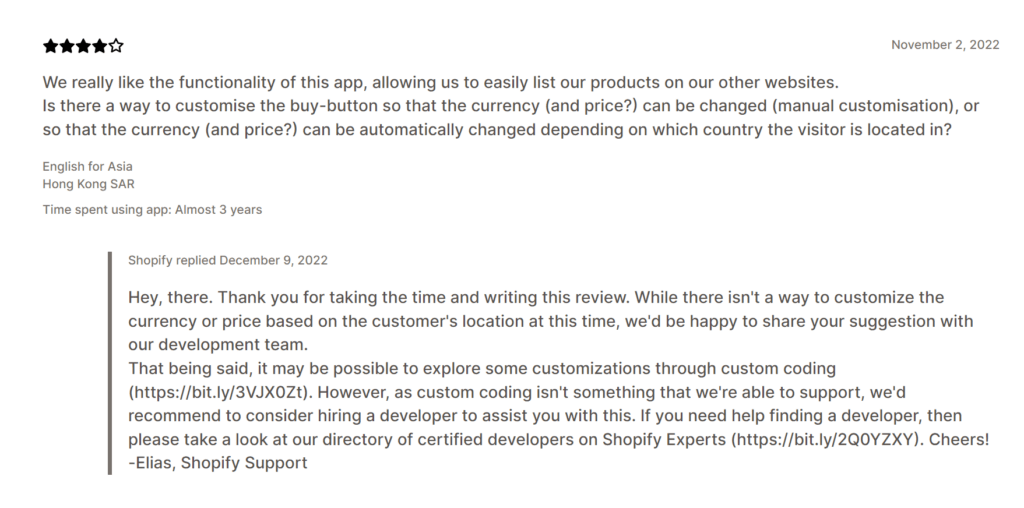
As of December 2022, there’s no way to update the currency or price based on shopper location.
So, if you have a broad international shopper base, everyone will, by default, see your items in a single currency, not their own.
And, because the Shopify Buy Button currently supports only one currency, serving customers in other regions can be challenging.
Limited payment options
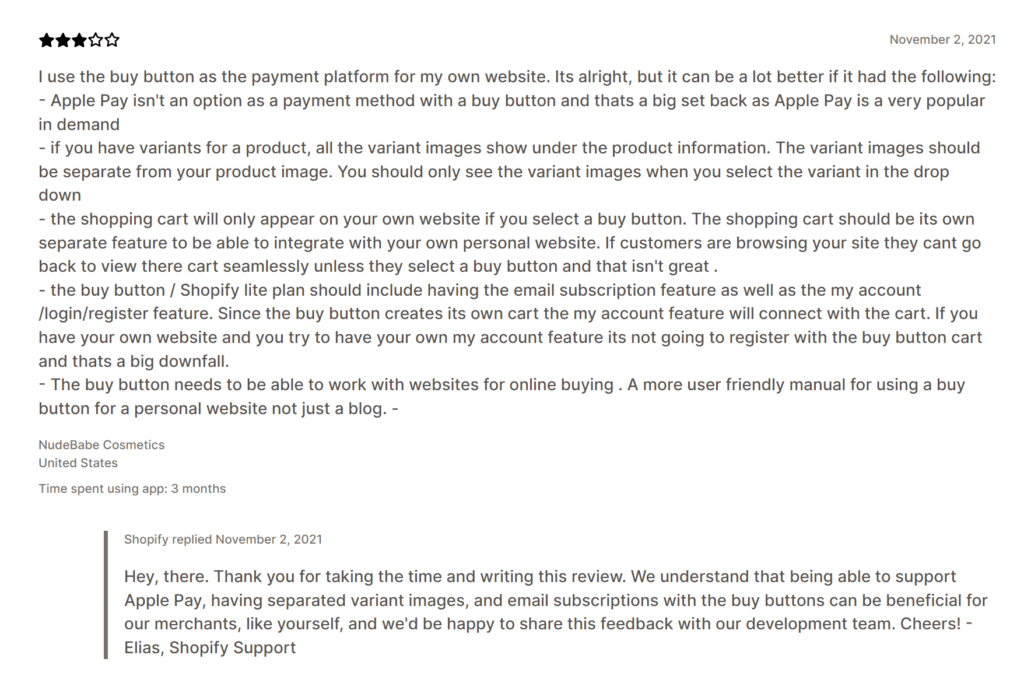
Shopify’s Buy Button currently has few payment options.
As of this article’s writing, it’s limited to the payment gateways the platform supports (which don’t include Apple Pay). Depending on your business and your target markets, this limitation may be unacceptable.
#cta-paragraph-pb#Learn more about Shopify Payments, the native gateway on Shopify with lower fees and access to features like Shop Pay.
How to create a Buy Button on Shopify
It only takes a few clicks in Shopify’s admin; then all that’s left is to customize and incorporate the button on your desired platform.
Here’s a step-by-step walkthrough of the process.
#cta-paragraph-pb#Tip: If you run your website on Shopify, instead of using the Shopify Buy Button, you can simply add the Add to Cart button in Shogun Page Builder to any page.
Step 1: Add the Buy Button sales channel
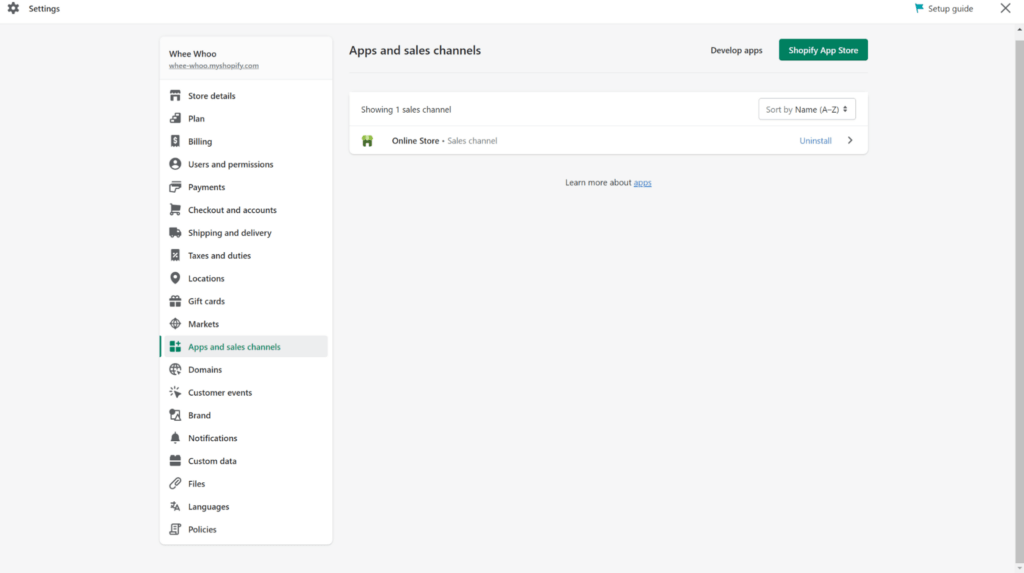
1. Go to your Shopify admin.
2. Navigate to Settings on the bottom left.
3. Then, click on the Apps and sales channels section.
4. Click the Shopify App Store button on the upper right.
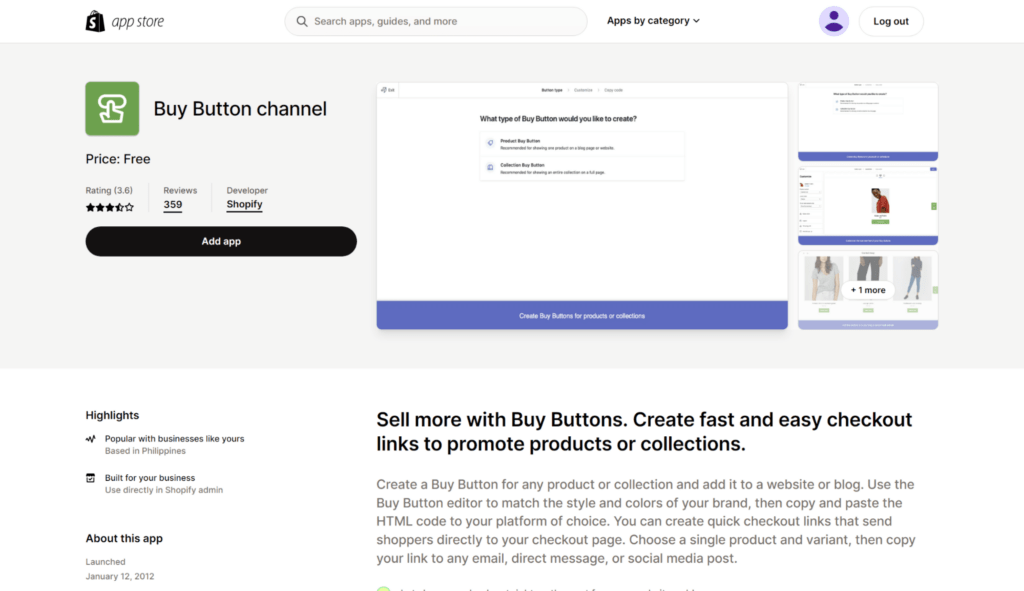
5. Search for the Buy Button channel.
6. Then, click on Add app.
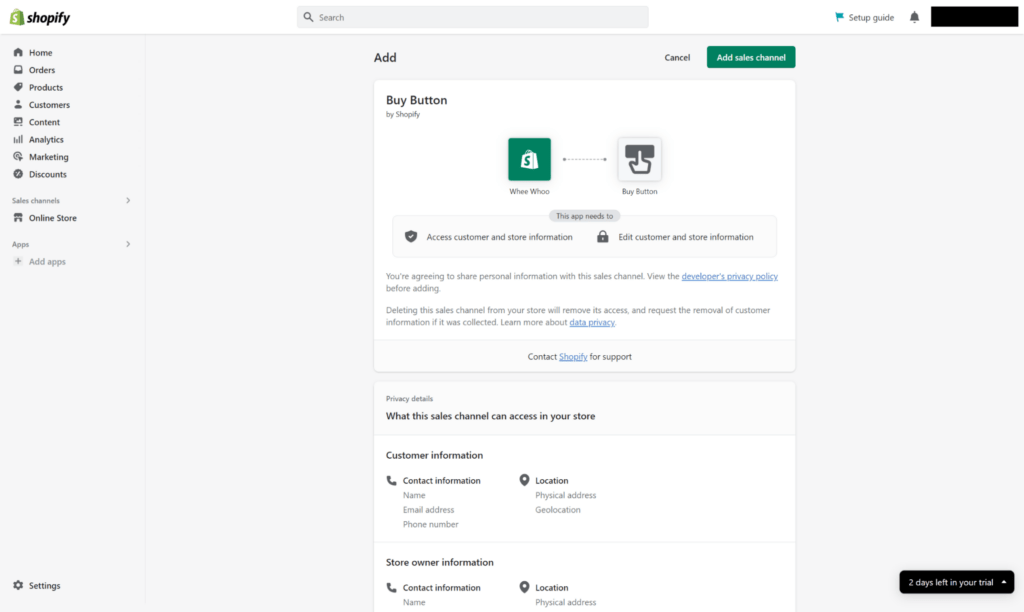
7. After being redirected to your Shopify admin, click on Add sales channel on the upper right.
Step 2: Create a Buy Button
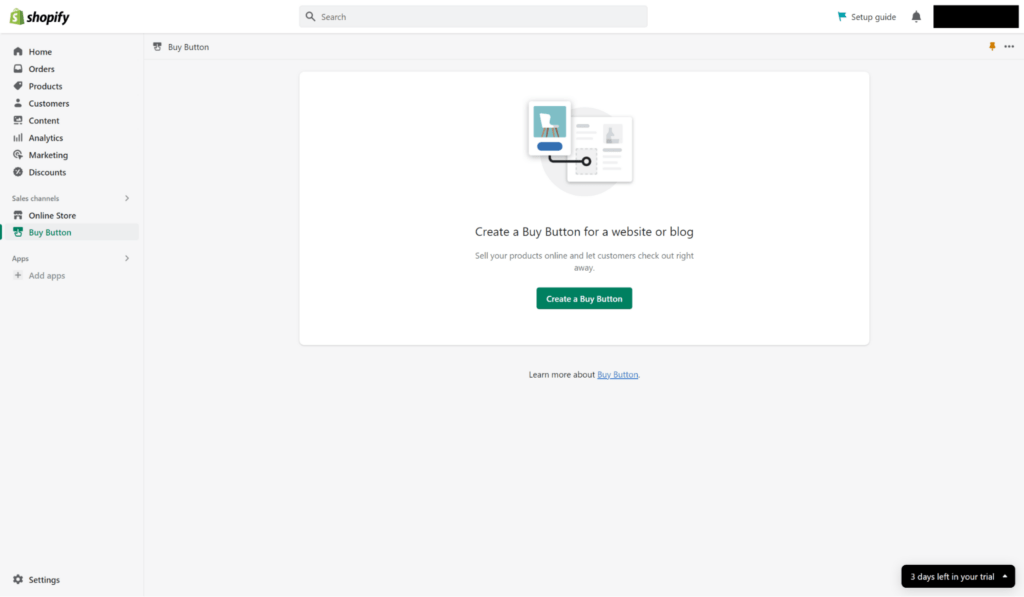
1. Return to your Shopify admin.
2. Then, navigate to Buy Button on the left.
3. Select Create a Buy Button.
4. Lastly, click Product Buy Button.
Step 3: Choose the appropriate product
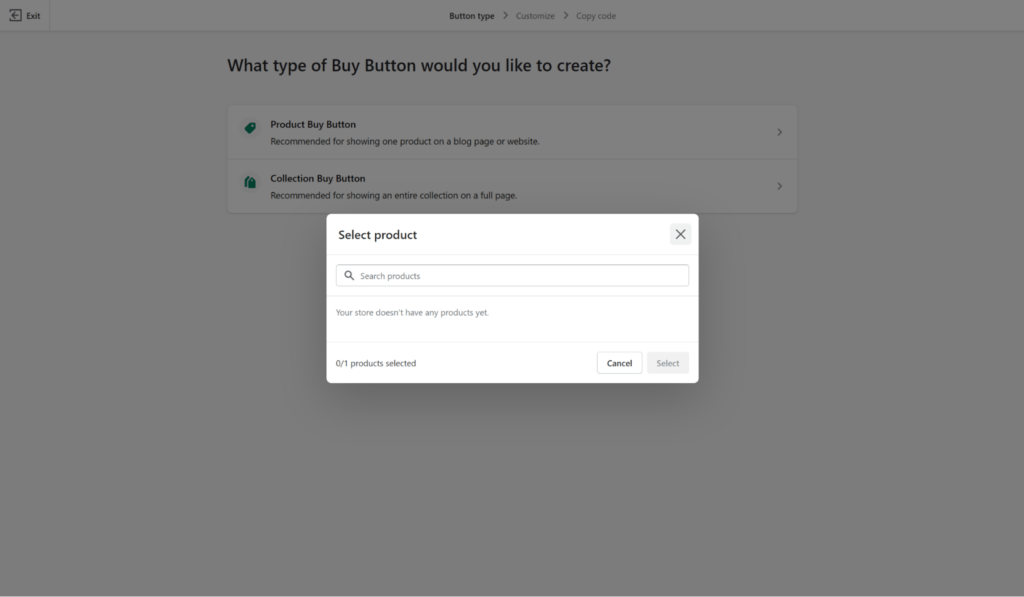
1. All you have to do is select a product from your catalog or use the search function.
2. Then, click Select.
Step 4: Customize Shopify Buy Button
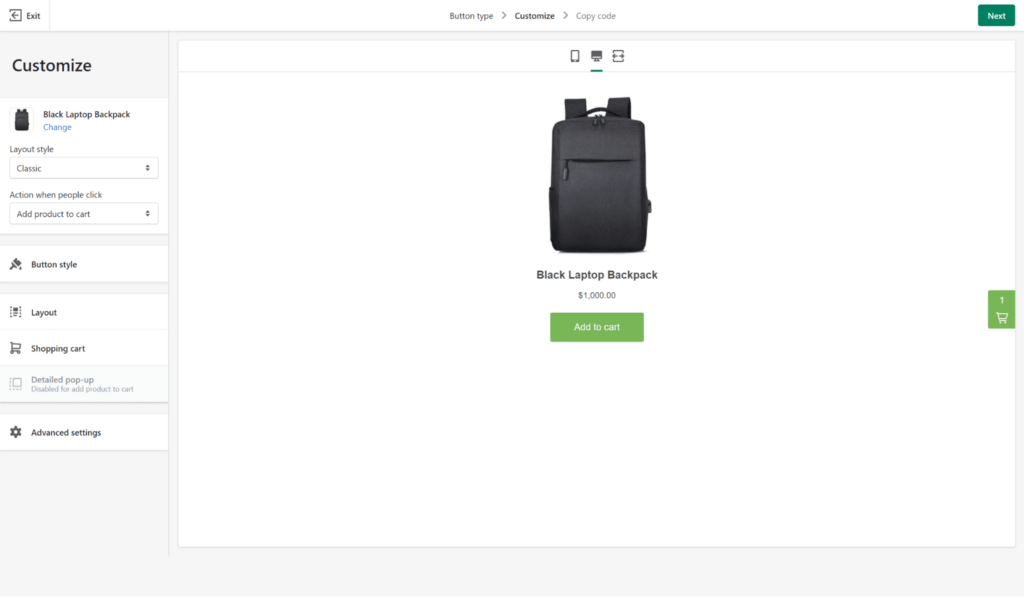
1. Now, customize your button’s product variants, layout style, checkout behavior, and other features.
2. Then, click on Next.
Now you have a Buy Button locked and loaded for your different channels. And, since it’s linked to your Shopify account, it syncs seamlessly with your Shopify catalog.
How to add the Shopify Buy Button to your channels
We’ve gone through the channels, benefits, and challenges of the Shopify Buy Button. If you’ve decided to try it out, here’s how to incorporate it wherever you sell.
For brands using Shopify
Adding this button to your Shopify blogs and pages is pretty simple, even if not recommended.
1. Click the Copy code button.
2. Then, make your way back to Shopify’s admin.
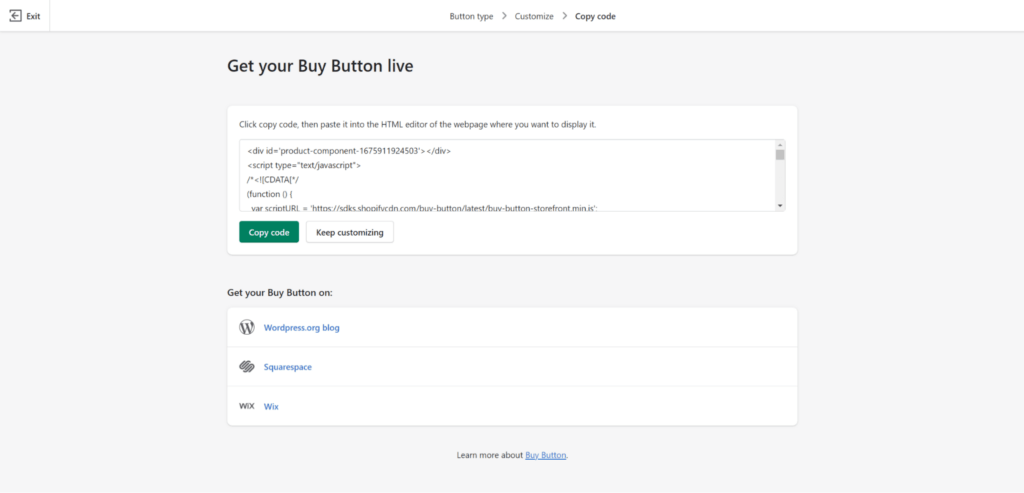
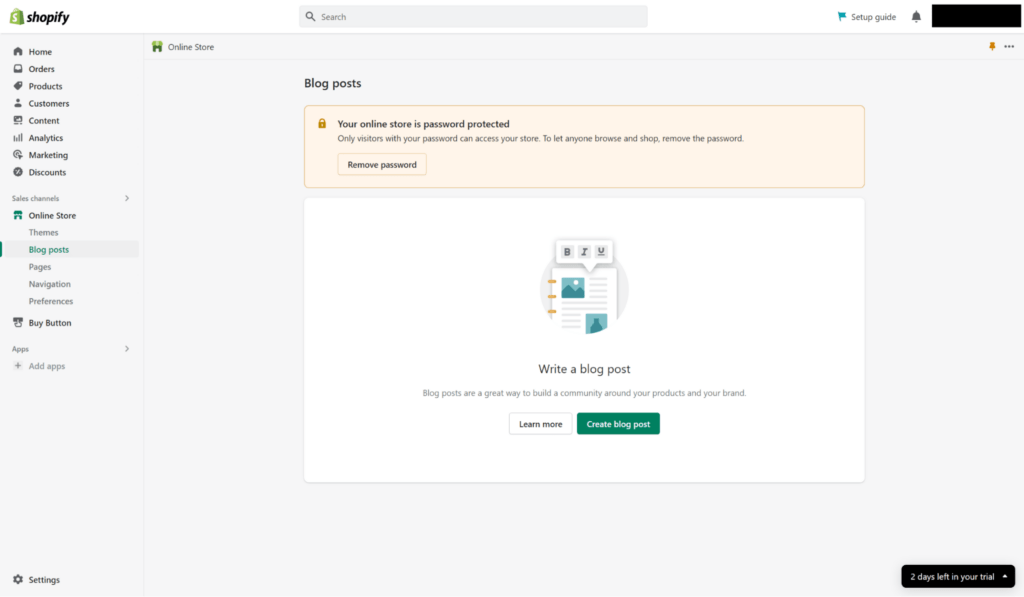
3. Navigate to Online Store > Blog Posts.
4. Next, click either the title of a post you wish to edit or Add blog to make a new one.
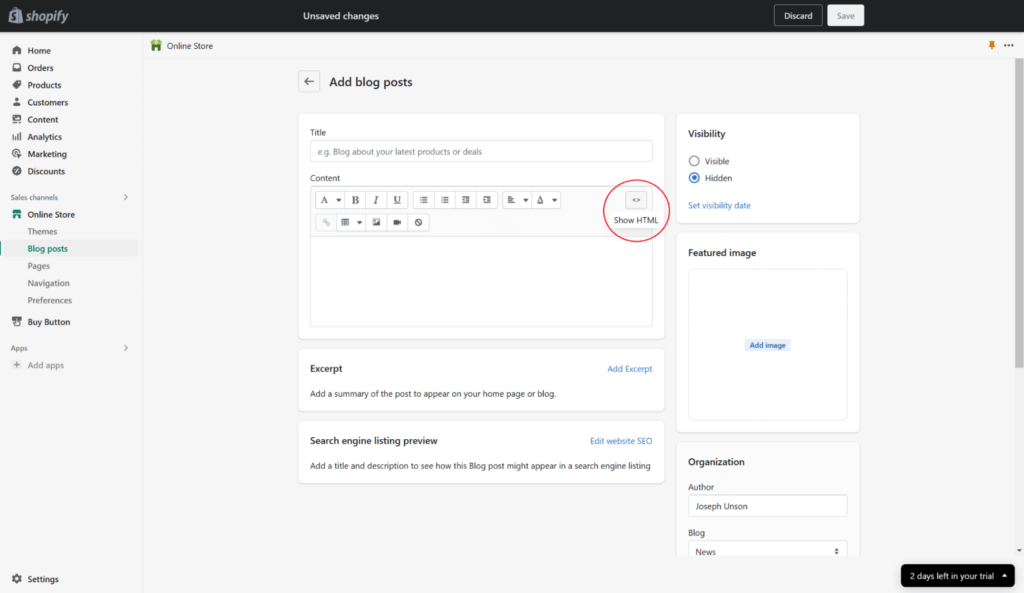
5. In the Content section, select Show HTML.
6. Afterward, paste your embedded code in the main text field.
7. Lastly, save your changes. This process also works when adding a buy button to your other pages.
For brands on other platforms
If you sell on other platforms, you can add the Shopify Buy Button using the code snippet.
All you have to do is create your button and, based on your platform, proceed with the steps below.
Add Shopify Buy Button to WordPress site
You can apply the Shopify Buy Button to either a post/page or a template on WordPress.
Embedding to a post or page
- Go to your WordPress dashboard.
- Navigate to your posts or pages.
- Either edit an existing one or create something new.
- Click the + button inside the block editor.
- Search for Custom HTML and click it to insert a custom HTML block.
- Then, paste the embedded code into the provided text field.
- After, you can either move the block to a new location by dragging it or clicking the arrow buttons or click Preview on its toolbar to get a glimpse.
- Once finished, click the Save Draft, Preview, or Publish button.
Note: With WordPress’s Classic Editor Plugin, you can simply change the text editor from Visual to Text mode, then paste the embedded code.
Embedding to a template
If your WordPress theme supports the site editor, embed the Buy Button in your site’s templates.
- Navigate to Editor in your WordPress dashboard.
- Choose the template you wish to edit.
- Then, follow items 4 to 7 of the Embedding to a post or page section above.
- Afterward, click Preview or Save.
Add the Shopify Buy Button to Squarespace
With Squarespace, you can add the embedded code to individual posts and menus on your homepage. Before you do, however, you’ll need to take note of a few things:
- Squarespace disables JavaScript in its dashboard, so you’ll have to preview your page with the embedded Buy Button or cart separately.
- If your Buy Button doesn’t load, you may need to disable Ajax loading.
- A cart embedded in a menu on your homepage receives orders from buy buttons on individual posts.
- Some advanced customizations are theme-specific, meaning Shopify doesn’t support them.
Embedding your Buy Button
Here’s the step-by-step embedding guide for Squarespace:
- Go to your Squarespace dashboard.
- Open the webpage where you want to incorporate your buy button.
- Choose the page element where you want your button or cart to appear.
- Place your cursor over the Page Content area.
- Click EDIT.
- Select the point where you want to insert the embedded code.
- In the Content Blocks dialog, navigate to the More section.
- Select Code.
- Set the text field to receive HTML.
- Paste the embedded code you copied earlier from Shopify into the CODE dialog.
- On the EDIT CODE dialog, select APPLY.
- Then, on the page editor, click SAVE.
Add the Shopify Buy Button to Wix
Like with Squarespace, there are some considerations to think about before embedding your Buy Button on Wix:
- When creating one for a cart, make sure its tab appears in the right place.
- When embedding buttons for multiple products or collections, edit the code before pasting it in the widget. If you don’t, people buying more than one product will see separate carts for each one.
- Embed a collection if you want to present multiple products without editing the embedded code. Click here to see how you can create a new one in your Shopify admin.
- Wix’s limitations prevent you from using the Redirect in the same tab option.
Embedding your Buy Button
Incorporating your Buy Button onto Wix requires the use of its Website Editor:
- Navigate to the My Sites section of your Wix account.
- Choose the site you want to edit and click Edit Site.
- Select the + button in Website Editor.
- Hit More.
- Then, add an HTML code widget to the page by selecting HTML Code.
- Press Enter Code.
- In the Add your code here field of the HTML Settings dialog, paste the embedded code you copied from Shopify.
- Click Update.
- Then, to fit its contents, resize the widget.
- Click Save once finished.
For multiple products or collections
- First, repeat the instructions under the How to create a Buy Button in Shopify section to build the buttons you need.
- You’ll need to paste each of their codes into Wix’s website builder or a code editor.
- Align them by editing the embed codes.
- Then, follow the steps previously outlined for Wix, making sure to paste the codes for all your buttons.
Tip: If you’re embedding the Buy Button in platforms other than the ones covered above, refer to this resource for additional guidance.
An easier option: Build your website in Shopify with Shogun
If incorporating the Buy Button seems too complex, not customizable enough, or insufficient for your needs, consider building your website in Shopify instead.
Through that approach, you can use tools like Shogun to insert an Add to Cart button on any page.
Let’s look at some easy ways to add buy buttons when you build in Shopify.
Use permalinks to pre-load your cart
If you want to use the buy button functionality that adds a product to cart…
You can set up permalinks to take shoppers to the checkout screen with pre-loaded items.
These permalinks can be set up to apply discounts, set up reorders, and even attribute sales to a certain marketing channel.
Use dynamic checkout buttons
If you want to use the buy button functionality that takes shoppers to checkout…
Shopify has dynamic checkout buttons that take a shopper straight to checkout, skipping the cart.
These buttons are commonly seen with “Buy it now” CTAs since it goes directly to the checkout page using any of Shopify’s supported payment processors.
You can even use accelerated checkouts from providers such as Apple Pay and Amazon Pay to further speed up the purchase process.
Use the Add to Cart button from Shogun
If you want more flexibility and an easy way to switch between the options above…
You can use Shogun Page Builder to add an easily customizable buy button in just one step.
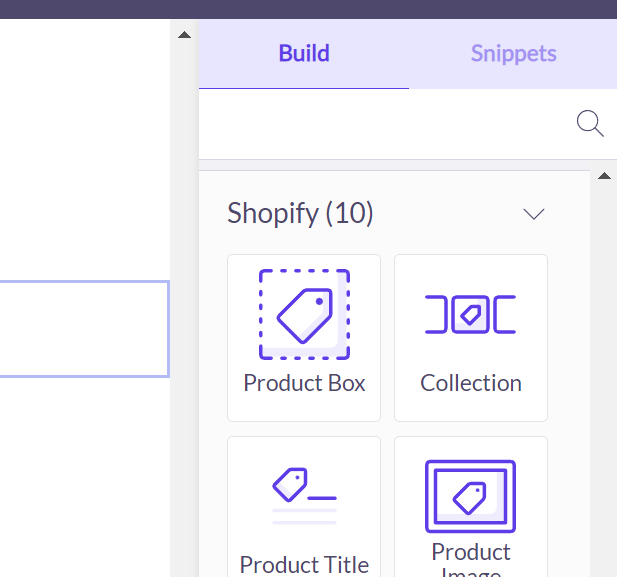
From your Shogun Page Builder UI, add a “Product Box” wherever you’d like to showcase your item.
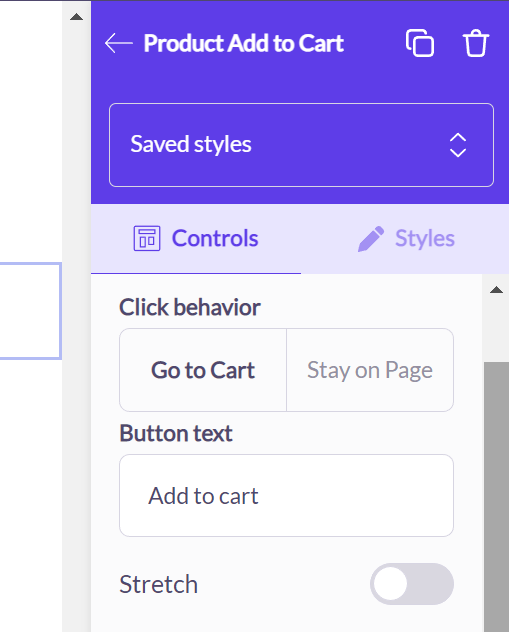
You can then adjust your button details, including font, weight, size, alignment, CTA text, and what happens when someone clicks the button.
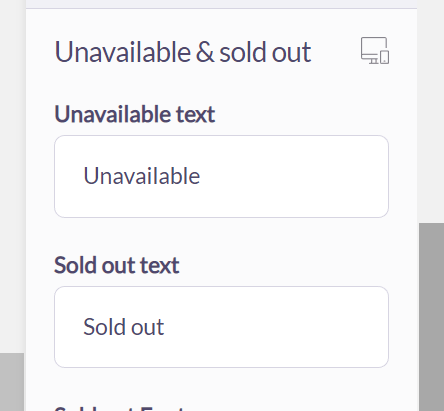
You can even set hover styles, what to do when a product is sold out, and how to display items that are sold out or active.
Updates are made automatically, and you can preview how they look directly in the editor.
Building a website in Shopify is a straightforward process and offers a number of benefits, including the ability to manage sales, inventory, and more all in one place.
#cta-visual-pb#<cta-title>Streamline your DTC sales channels<cta-title>Use Shogun to build a blog, landing pages, homepages, product pages, collections, and more in Shopify.Start building for free
Streamline customer experiences across channels with the Shopify Buy Button
The Shopify Buy Button lets you easily present products and sell directly to customers across various channels.
Clicking it lets people complete their purchase quickly on a secure checkout page powered by Shopify, so they enjoy a seamless visit to your website.
The process to add a Shopify Button on your preferred platform may seem tedious for such a small element.
However, incorporating it into your third-party channels is worth it, as it contributes to a more positive customer experience and, in turn, increased sales. Remember:
- You can use it on other platforms and channels besides Shopify, but you’ll need a Shopify account.
- Customize your buttons to match the look and feel of your website.
- Each platform has a different way of embedding a Buy Button.
- If the Shopify Buy Button doesn’t fit your needs, consider leveraging Shopify as a full-fledged sales channel to access their complete ecommerce tools.
For easy customization of all your store pages, Shogun Page Builder can get you up and running in just a few clicks and without a line of code.
#cta-visual-pb#<cta-title>Build a seamless buyer experience<cta-title>Use the Buy Button or Add to Cart button in your Shopify stores.Start building for free

Rachel Go
Rachel is a remote marketing manager with a background in building scalable content engines. She creates content that wins customers for B2B ecommerce companies like MyFBAPrep, Shogun, and more. In the past, she has scaled organic acquisition efforts for companies like Deliverr and Skubana.

