Shopify Collections: How to Add Product Collections & Why They’re So Important
You can have the flashiest, speediest, loveliest looking online store in the history of stores, but if your shoppers can’t find what they are looking for, they will quickly head for the next store.
Getting the award for the most fabulous storefront won’t help you sell more stuff.
Now, that doesn’t mean you can’t have both because you most definitely can. But, before you get preoccupied with all the pretty things, you should focus on designing the customer experience.
If you start by understanding how to get shoppers from homepage to checkout with minimal friction, your amazingly gorgeous online store design can naturally sprout forth in support of that noble goal.
In the world of UX (short for user experience), this is called information architecture. Yes, even you can be an architect (of sorts).
Essentially, information architecture is about creating a user-friendly structure for your online store, consisting of logical hierarchies, helpful navigation, and clear categorization.
This creates an ideal user flow through your site, helping them find what they need quickly and helping you get more out of your promotional offers.
Your Shopify store benefits significantly from this pre-work. And, what we’ll cover in this post is the categorization of your products, which on Shopify is called ‘collections.’
Here’s what we’ll be talking about:
To get started, let’s dig a little deeper into what Shopify collections are and how you interact with them in other stores.
What are Shopify collections?
On Shopify, collections are their version of product categories.
These collections of products are defined by the stores that create them. They can be organized by product type, gender, material, color, size, season, sale status, whatever you want.
Some examples of collections might be:
- Women’s tops
- Kid’s bikes
- Headphones
- Earrings
- Cleaning supplies
- Haircare
- Halloween costumes
- Gifts for dad
- Clearance items
The possibilities are nearly endless.
And, while it may not serve any purpose for your store, you can create a totally random collection of products too. It’s your store, after all.
The point of collections is that your shoppers can more easily find the type of thing they want to purchase without having to keep clicking around.
Starting from your homepage, shoppers have so many options to lead them through your site. With a clear set of collections to choose from in your navigation bar and throughout the page, they can find the right category of products for them.
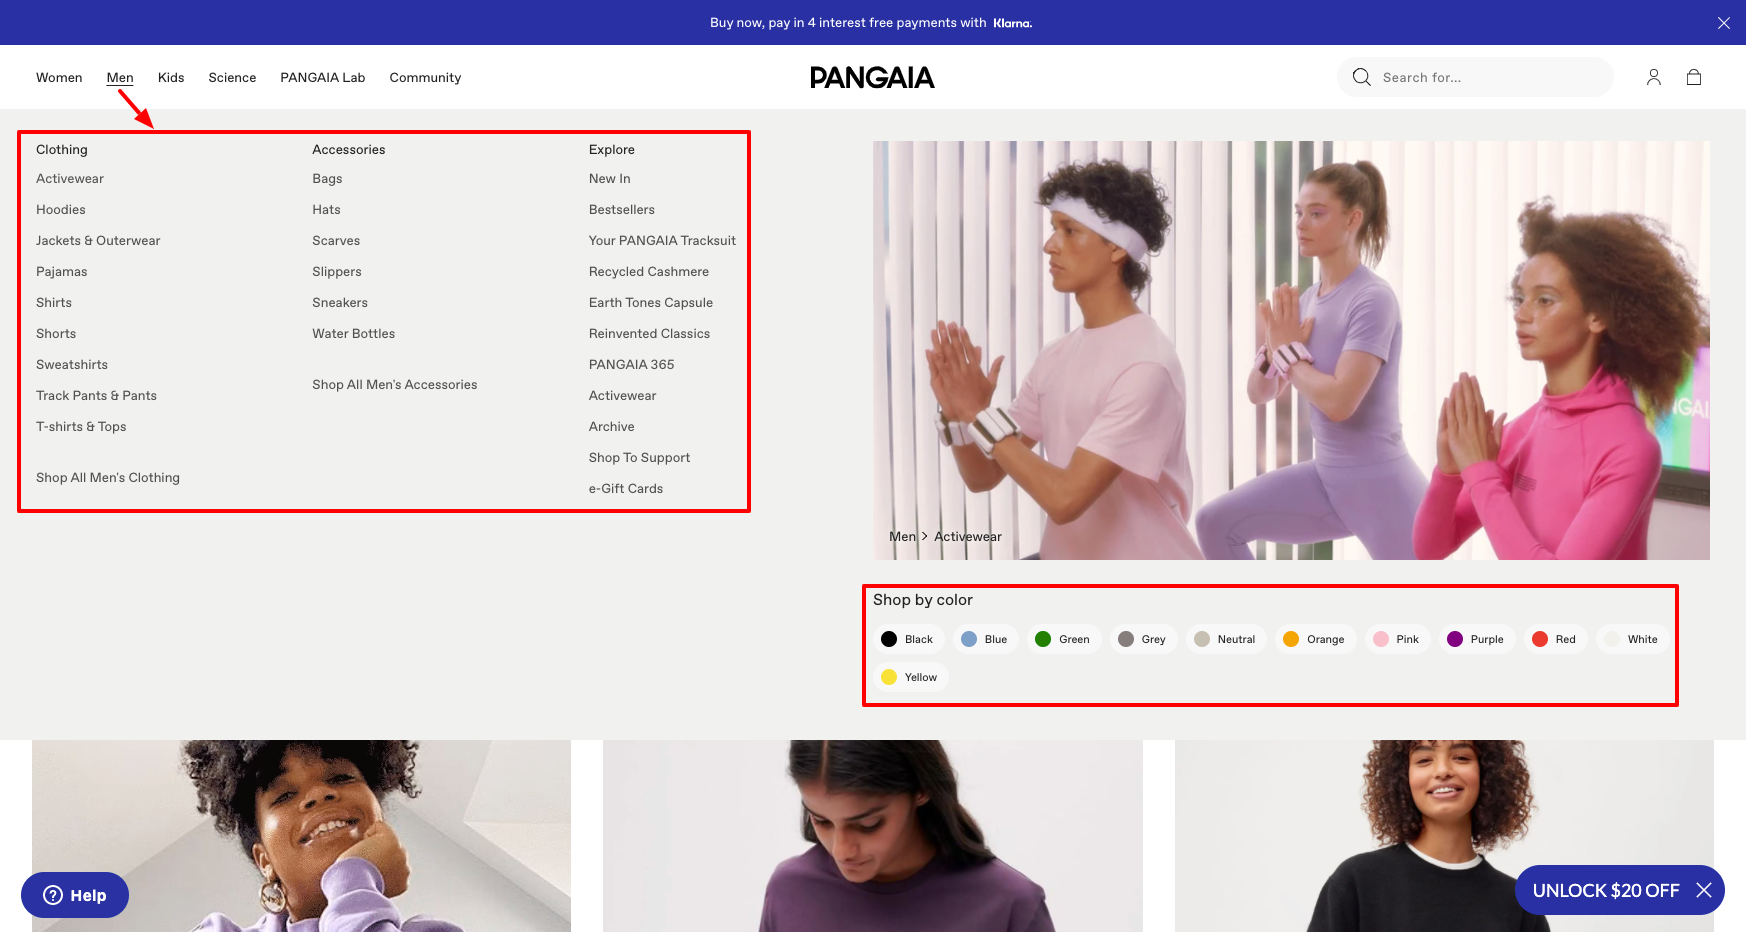
#cta-paragraph-pb#PANGAIA is just one example of a Shopify store that really knocks it out of the park. Check out our big list of top Shopify stores and get inspired to follow in their footsteps.
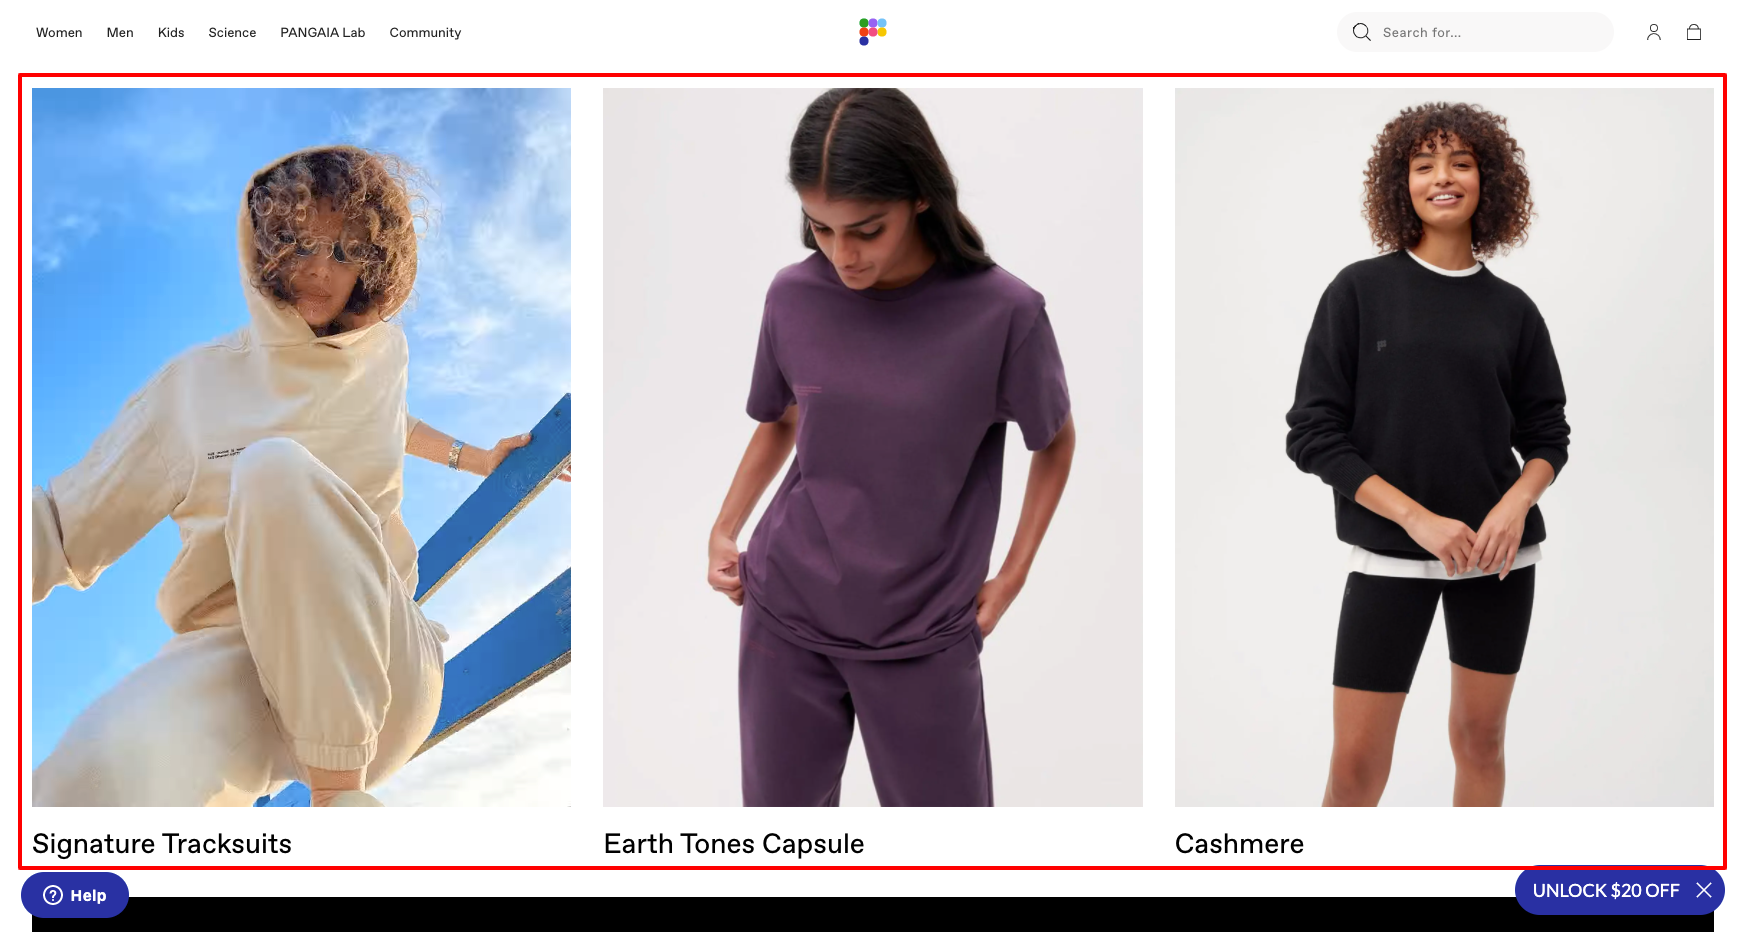
Basically, collections are quick and effective sales funnels to your stunning product pages.
#cta-mini-pb#Build incredible collection pages with the help of Shogun. Start for free today
Automated vs manual collections
There are two types of collections in Shopify: automated or manual.
If you choose to create a manual collection, you simply pick all the products you want to include by hand. These are useful for creating very specific collections that couldn’t be made with automation.
The drawbacks to manual collections are that they are fixed lists and take more work to create and upkeep. Products can only be removed or added manually.
An automated collection is more complex and versatile. These collections automatically add products based on one or more rules you set.
Set rules based on:
- Product types
- Product title
- Product vendor
- Product price
- Product tag
- Weight
- Inventory stock
- Compare at price
- Variant’s title
Even as you add new products to your store, automated collections will pull them in if they fit the conditions set. The only drawback is that it can sometimes be difficult to exclude certain products if they match your base conditions.
The trick to making automated collections more versatile is to tag your products to create unique individualized category structures that you can draw from.
What is a collection page on Shopify?
When you create a fancy new collection (or boring old collection, if you prefer), a new page is added to your store. This is your collection page (hi, collection page).
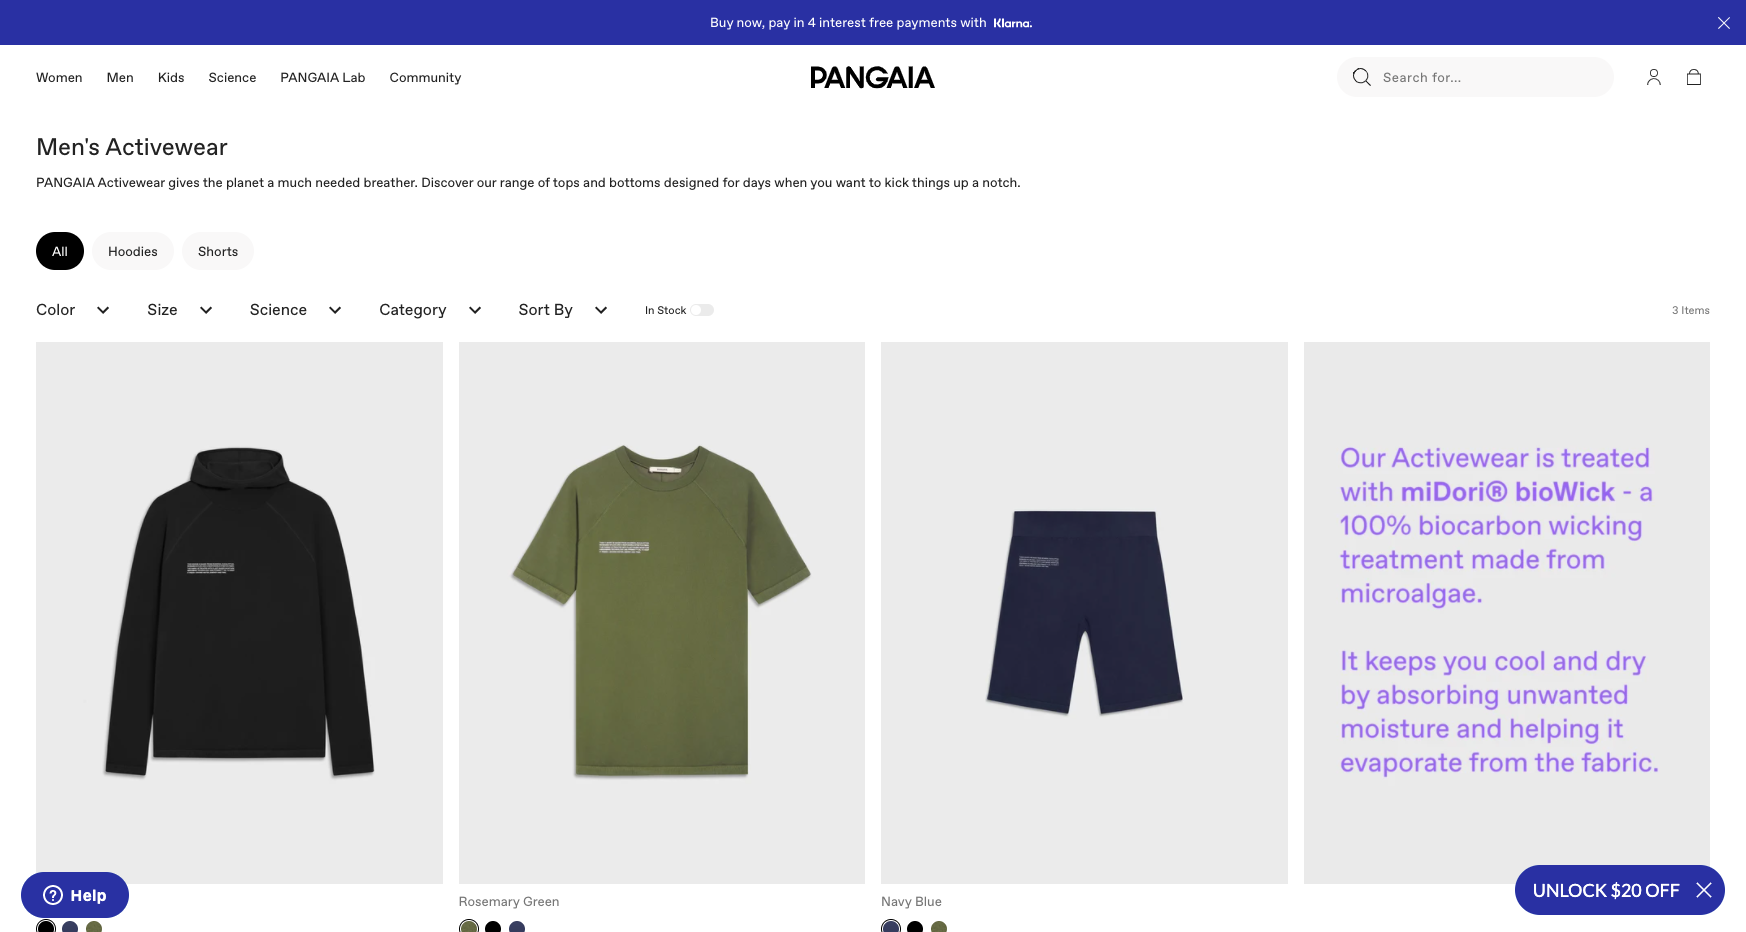
This page simply displays as a gridded assemblage of the products included in that particular collection styled based on your Shopify theme.
Whatever you named the collection will become the page title, and the description paragraph (if you included one) will show below that.
Shoppers can use filters along the top to filter the products in a few ways:
- Featured
- Best selling
- Alphabetically
- Price
- Date
- Product tags
But, you can customize your collection pages further with Shogun for an even better customer experience.
#cta-visual-pb#<cta-title>Your collection pages could look this good<cta-title>With Shogun Page Builder, you can create totally customized collection pages that drive conversions.Get started now
Core components of a Shopify collection page
Before you begin creating custom collections in Shopify, it’s helpful to understand what the shopping experience will look like.
There are five key components that buyers will see when browsing collections pages.
1. Category name
The main navigation menu prominently displays the top-level category, a crucial part of the site structure.
For instance, on the Chubbies website, the top-level categories—shorts, pants, tops, and others—distinguish a broad product range.
These top-level categories cascade into more specific subcategories, reflecting a well-structured and logical hierarchy.

From a top-level category like ‘Tops,’ you’ll find subcategories such as ‘All Men’s Tops,’ ‘Casual Shirts,’ or ‘Formal Shirts.’ Each of these subcategories, in turn, has its dedicated collection page, further refining the browsing experience for customers.
For clothing retailers, arranging categories by gender or garment type is a good play because it forms a coherent navigational flow.
2. Breadcrumbs
A new element appears once a customer clicks into a relevant collection—breadcrumbs.
Think of breadcrumbs as a map of your journey on the website. They show you the path you’ve taken from the first page you landed on to the page you’re on now.
In the example image below, the breadcrumbs are the short text that reads:
Tops > All Men’s Tops > Button Ups.
This breadcrumb shows you started at “Tops,” moved to “All Men’s Tops,” and ended up at “Button Ups.” It’s like a trail showing how you’ve gotten to where you are.

3. Sort menu
Next, you’ve got the sort menu.
This allows the shopper to determine how they want to see the items ordered. For instance, if they see best-selling items first, they’ll select the menu item titled “Best Selling.”

If you don’t want to spend a lot, you can also choose to sort by “Price: High to Low.”
4. Page name
On the opposite side of the page, you’ll see the various page names, which signify the sub-collections (collections within collections) that buyers can dig into.

For instance, on this collections page from Chubbies, the shopper is prompted to “Shop By Styles,” where they can narrow down the types of products they’re interested in browsing.
5. Filters
Lastly, you’ve got filters, which help customers filter products by criteria like color, size, or price.

A good filter menu allows shoppers to select multiple options at once, like a black garment in size M.
Some pages even allow customers to narrow down by product tags. For instance, one might select the tag “casual” for a more laid-back look.
How to create collections on Shopify
First thing for creating a collection is to find yourself on your Shopify admin dashboard.
You there? Perfect.
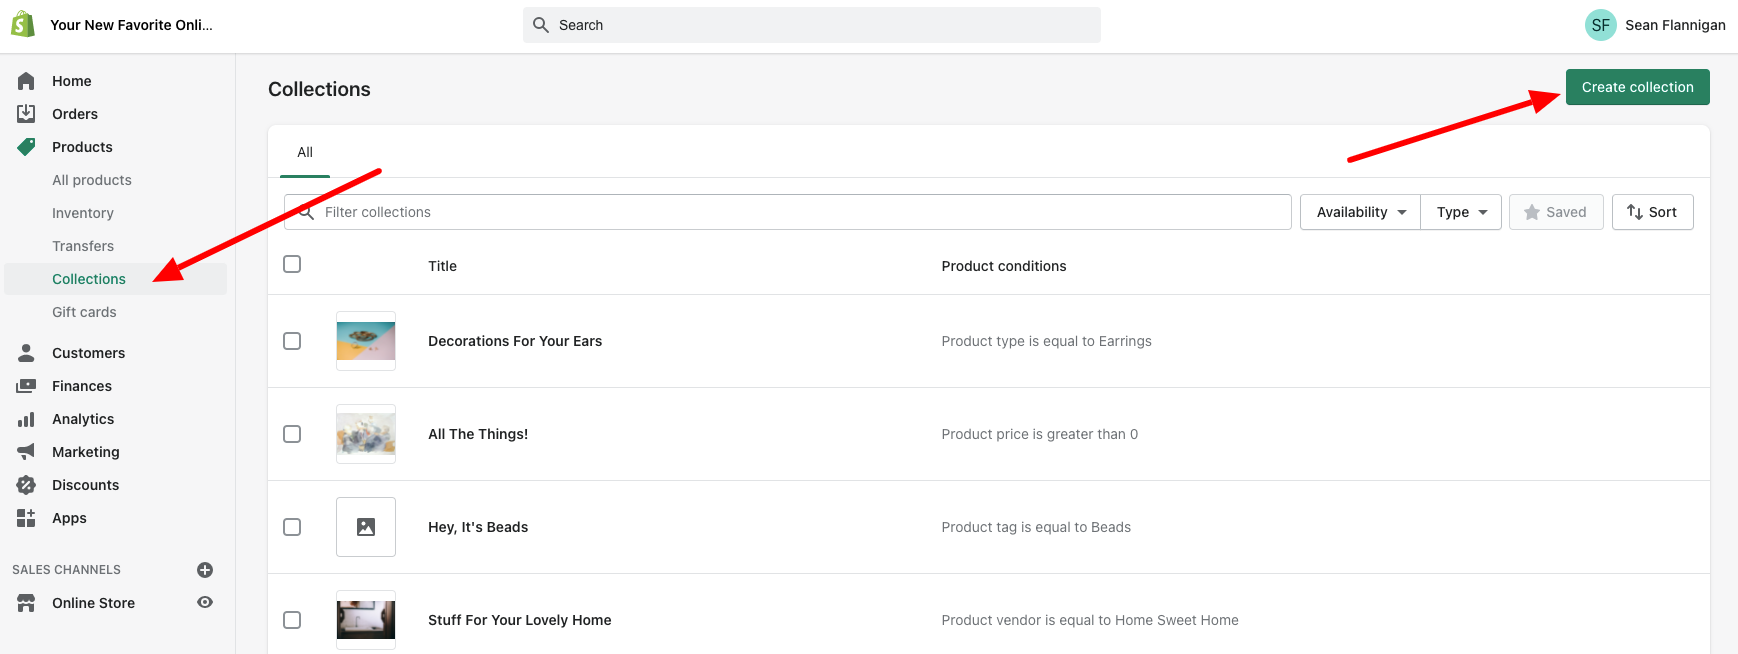
Step 1: Go to Products > Collections and click “Create collection”
Now, in the menu along the left side, go to Products > Collections. This is where you will find all collections you create.
If just starting out, you may see a collection called ‘Home page.’ Once you begin creating your collections, this one can be deleted (or silently ignored for all time).
To create your first collection, go to the upper right corner and click the Create collection button.
Now you can start cobbling together your brand new collection!
Step 2: Add collection title, description, and image
On this page, you will be able to title your new product collection, add a description, include an image, change how the page shows for search engines, and decide how products will be added to the collection.
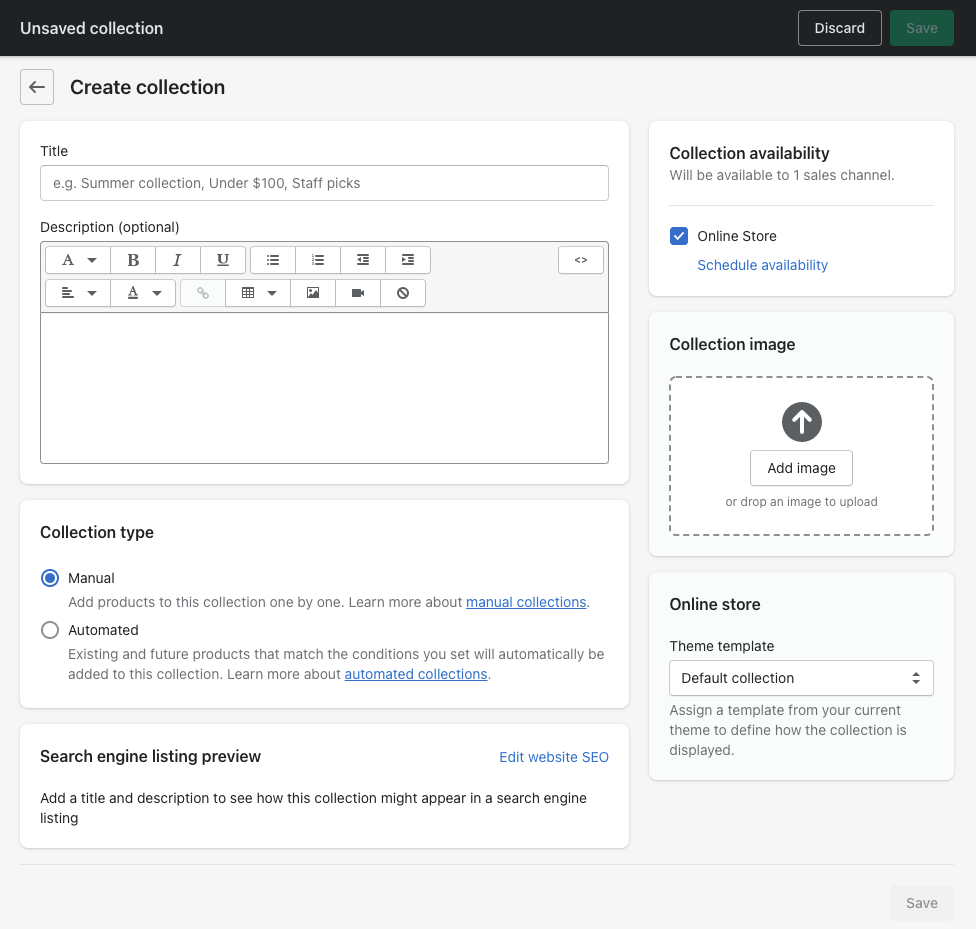
Your title is vital as it will be the headline of your collection page and show up wherever you add your collection throughout your store.
Adding a high-quality image here will provide some visual flare for your collection page (behind the title in the header) and other pages where the collection is added.
The collection description is optional but can help define the category of products included in your collection.
The description will show up on your collection page below the header. It’s also great for SEO to include a description that further explains your products (search engines love extra context).
To get a sense of what your collection page looks like with and without the addition of a description and image, here’s my plain old Stuff We’re Loving collection page with just the title and the same page with the addition of an image and description.
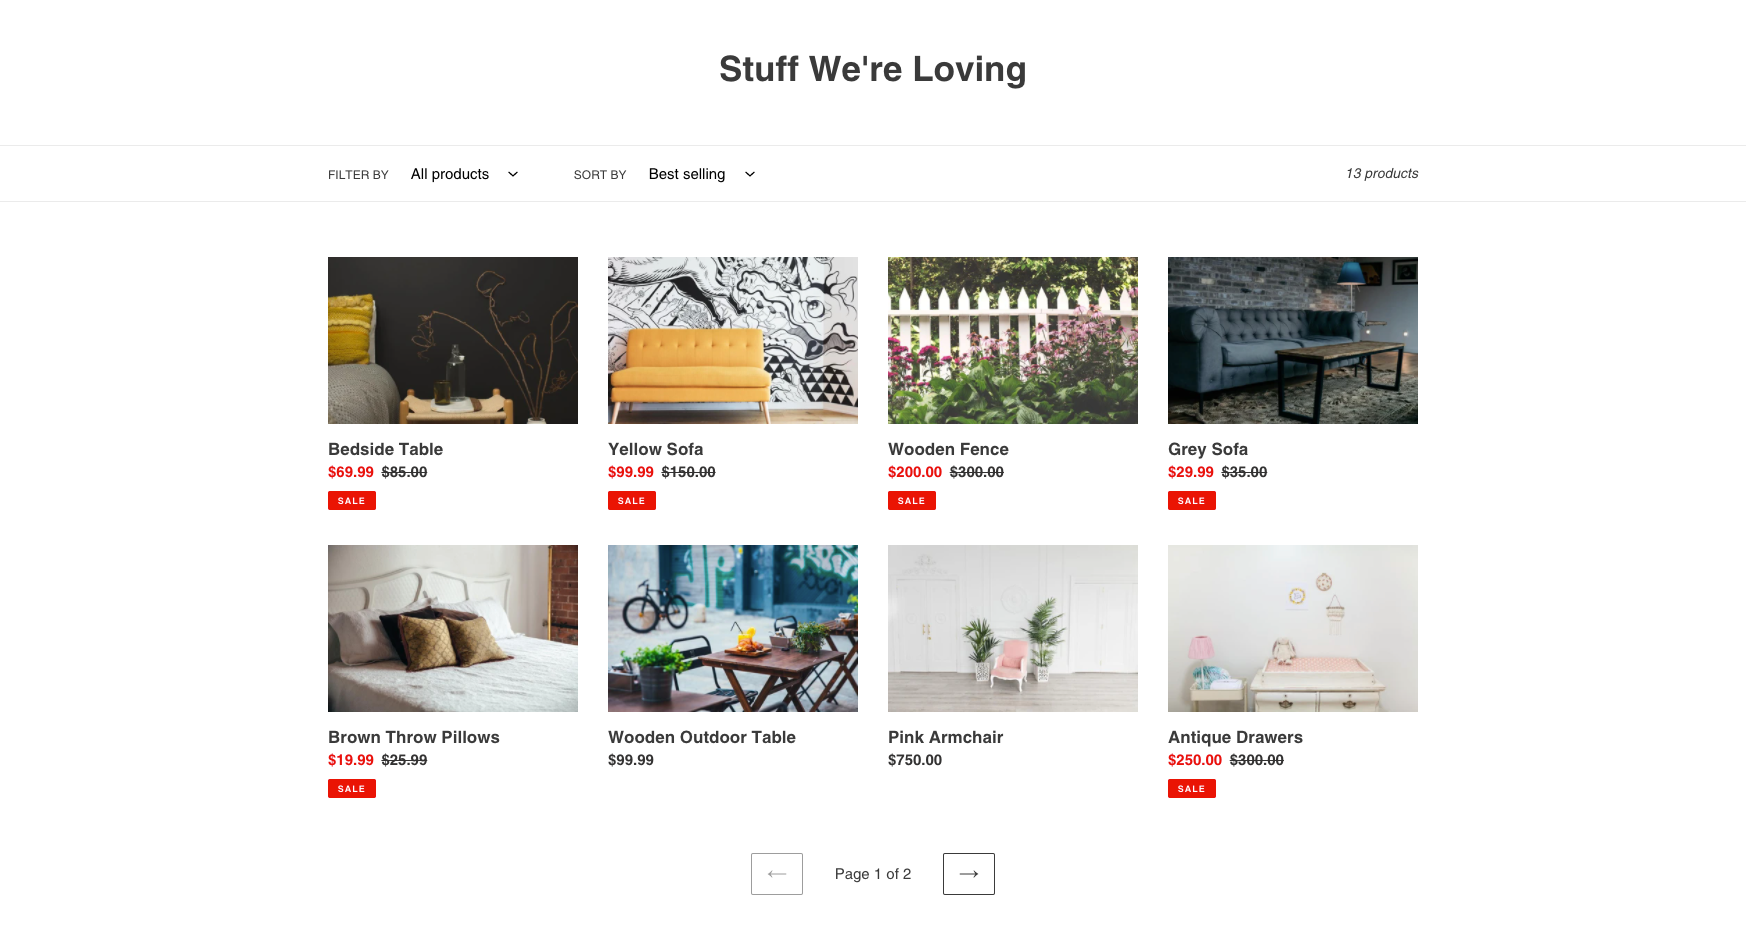
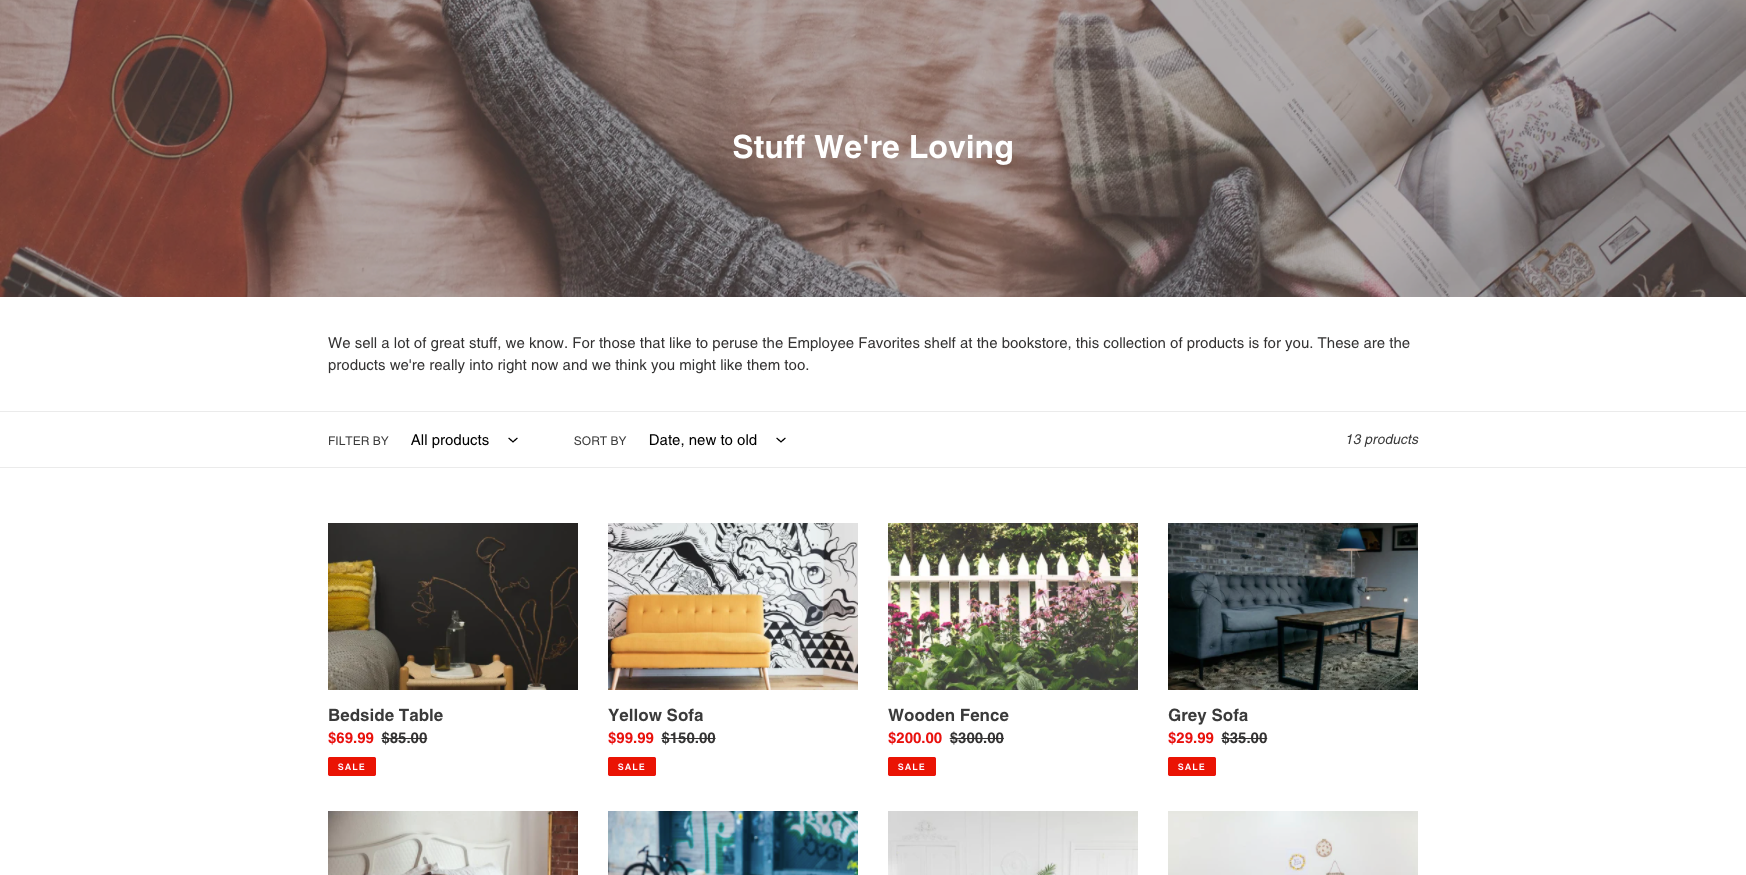
The page not only looks better, but it includes an SEO-friendly block of text that helps inform visitors on what the page is all about.
Step 3: Edit collection page SEO
Speaking of SEO, you can edit exactly how your collection page will show on search engines with the last setting on this page.
Just click Edit website SEO and go on to edit the title, description, and URL slug. What searchers will see displays at the top of the section as you make changes.

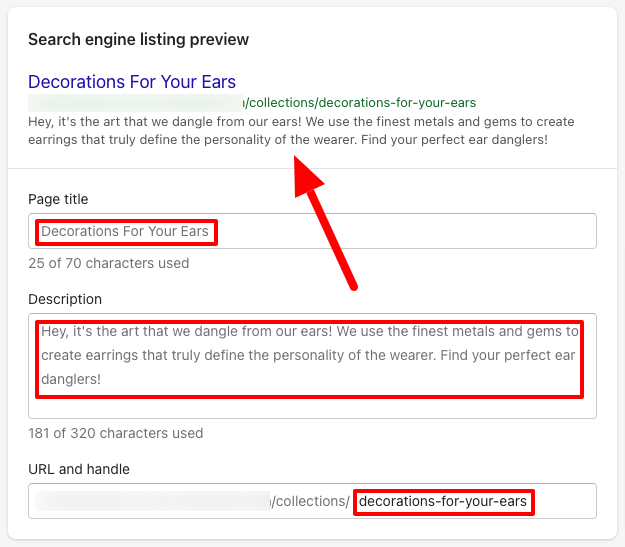
Altering the title and description in the SEO settings won’t change the collection title and description, only how it shows on Google and other search engines.
#cta-paragraph-pb#If you are just getting started with Shopify, our ultimate guide to selling on Shopify can help you learn all the ins and outs of starting a business on one of the biggest ecommerce platforms out there.
Step 4: Choose your collection type and save
You can choose between an automated and a manual collection, which we’ll cover in more detail next.
Once you’ve chosen your collection type, save your progress and get ready to start adding products to your collection.
How to add products to Shopify collections
Now to get to the bread and butter—adding products to collections.
You can add a product to collections in one of two ways: manually or automated through rules.
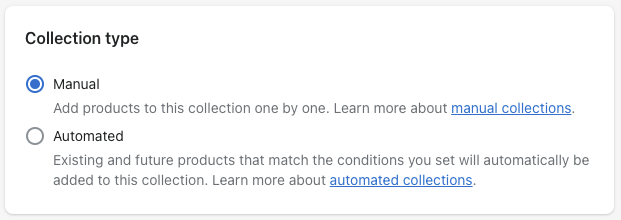
Once you save your collection, your collection type cannot be changed. Luckily, it’s easy to create a new one.
Manual collection
You’ll first have to save your collection with the Manual radio button selected to build a manual collection.
Then, click the search field to find particular products or click browse to select from all products. From there, simply choose the products you want included and click Add when finished.
You’ll be able to add more products to this collection whenever you want.
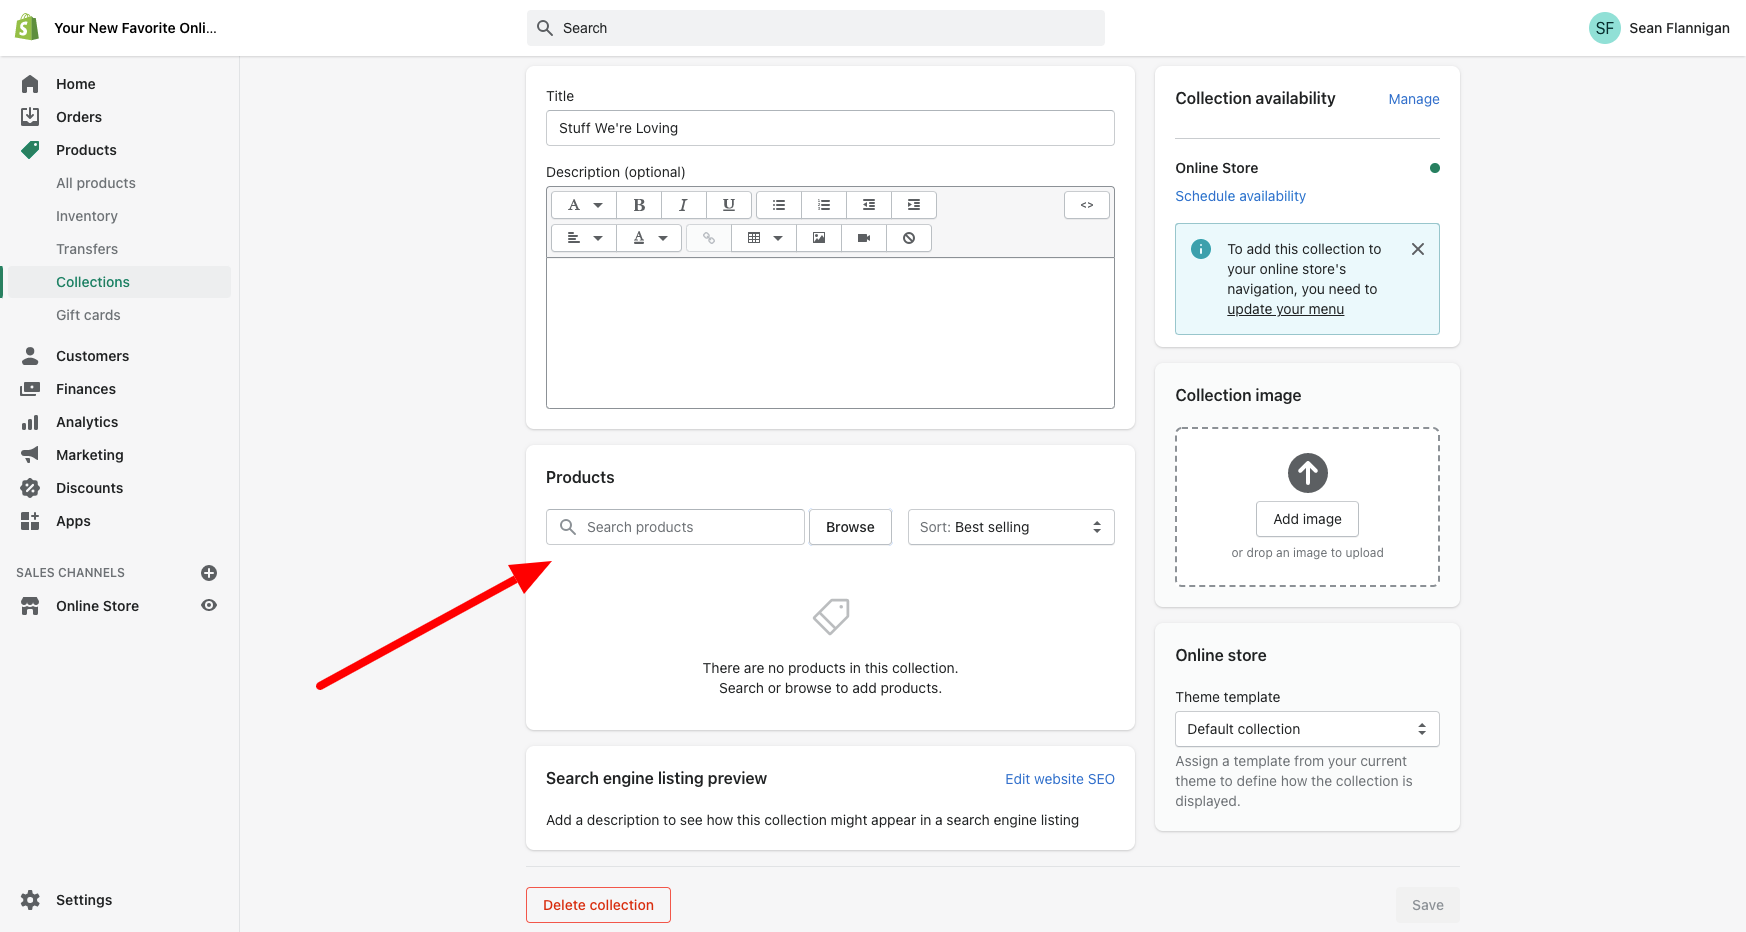
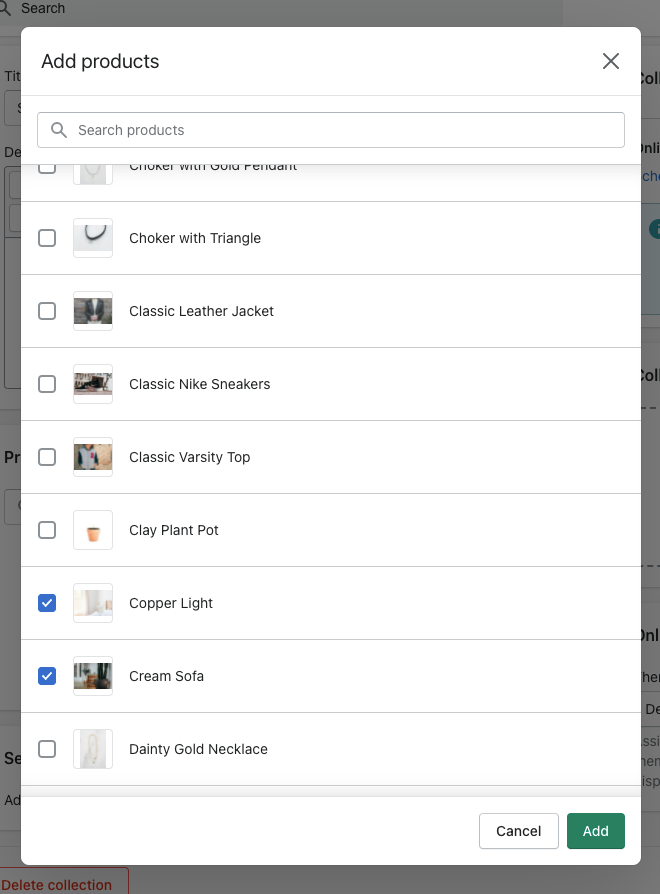
Once you’ve added your products, you can change how they will be organized on the page by choosing from the Sort: dropdown field.
You can sort by best selling, alphabetically, newest, oldest, highest price, lowest price, or manually.
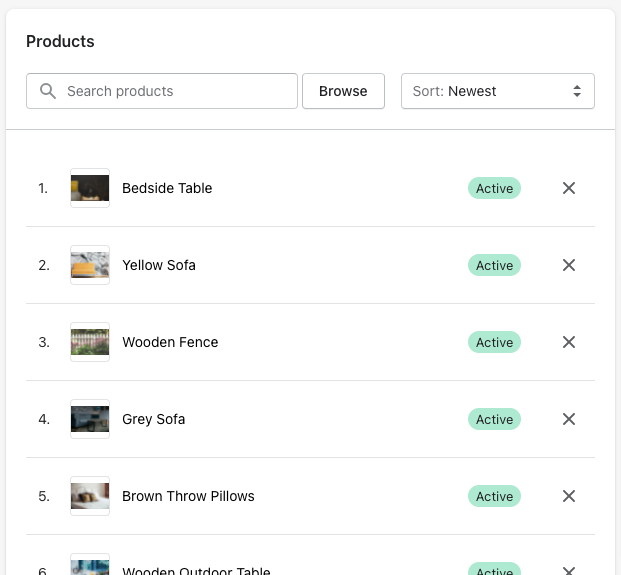
Click Save at the bottom of the screen, and your first collection is officially in the books!
Products can only be added or removed manually, so stay on top of editing this collection.
Automated collection
If you want a collection that maintains itself, an automated collection is the way to go.
When you click the Automated radio button, a Conditions section will appear. This is where you will set your rules for how products are added to your new collection.
The products can match all conditions you set out, or they can match just one of the laid-out conditions.
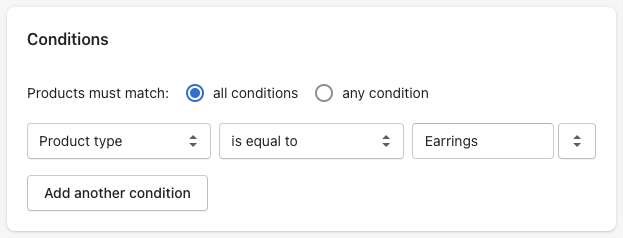
As I mentioned before, these conditions can be based on product type, product title, product tag, vendor, price, weight, stock level, compare at price, and variant’s title.
In our post about featuring products on your Shopify homepage, I dig deeper into how you can use automated collections to capture your whole product catalog—setting the product price condition to greater than $0.
You can automate collections based on product types to only show earrings (as in the example above) or bedroom furniture. Or based on pricing less than $50 and with the product tag of “gift” to capture unique collections for bargain gift buyers.
There are so many ways to create your perfect collection. I’ll leave that up to you.
However you chose to do it, you’ve now created your first collection and, in so doing, your first collection page! Great work.
Now on to adding those collections and links to those collection pages throughout your store.
How to add a collection to a page on Shopify
In Shopify, you can add collections to your homepage in two ways—as a featured collection or as a collection list.
Adding featured collections
Featured collections allow you to showcase your products from particular collections on your store’s most visited page in a grid (or a collage, depending on your theme).
You can add multiple featured collections to your homepage to show off your excellent product line.
Note that featured collections have a product limit that depends on the theme you are using. Using multiple collections can help you get around these limits when you want to feature your whole catalog on the homepage.
To add featured collections, follow our detailed step-by-step guide to adding all products to your Shopify homepage.
Adding collection lists to Shopify
You can add a collection list to your homepage too. Instead of showing the individual products, this will display blocks that link to your collection pages themselves.
Step 1: Go to the theme customization editor
First, in your Shopify dashboard, go to Online Store > Themes and click Customize on your current theme.
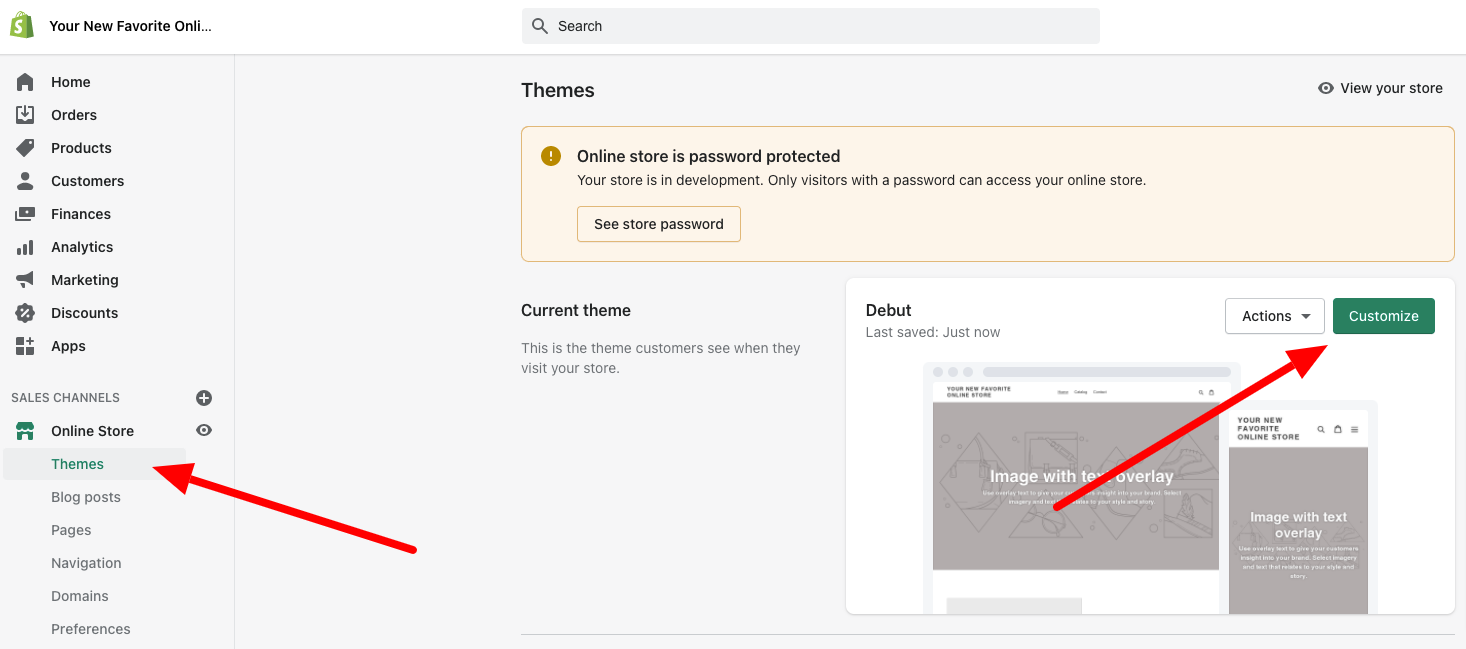
Step 2: Add section and choose “Collection list”
In the theme editor, you’ll automatically be on your homepage.
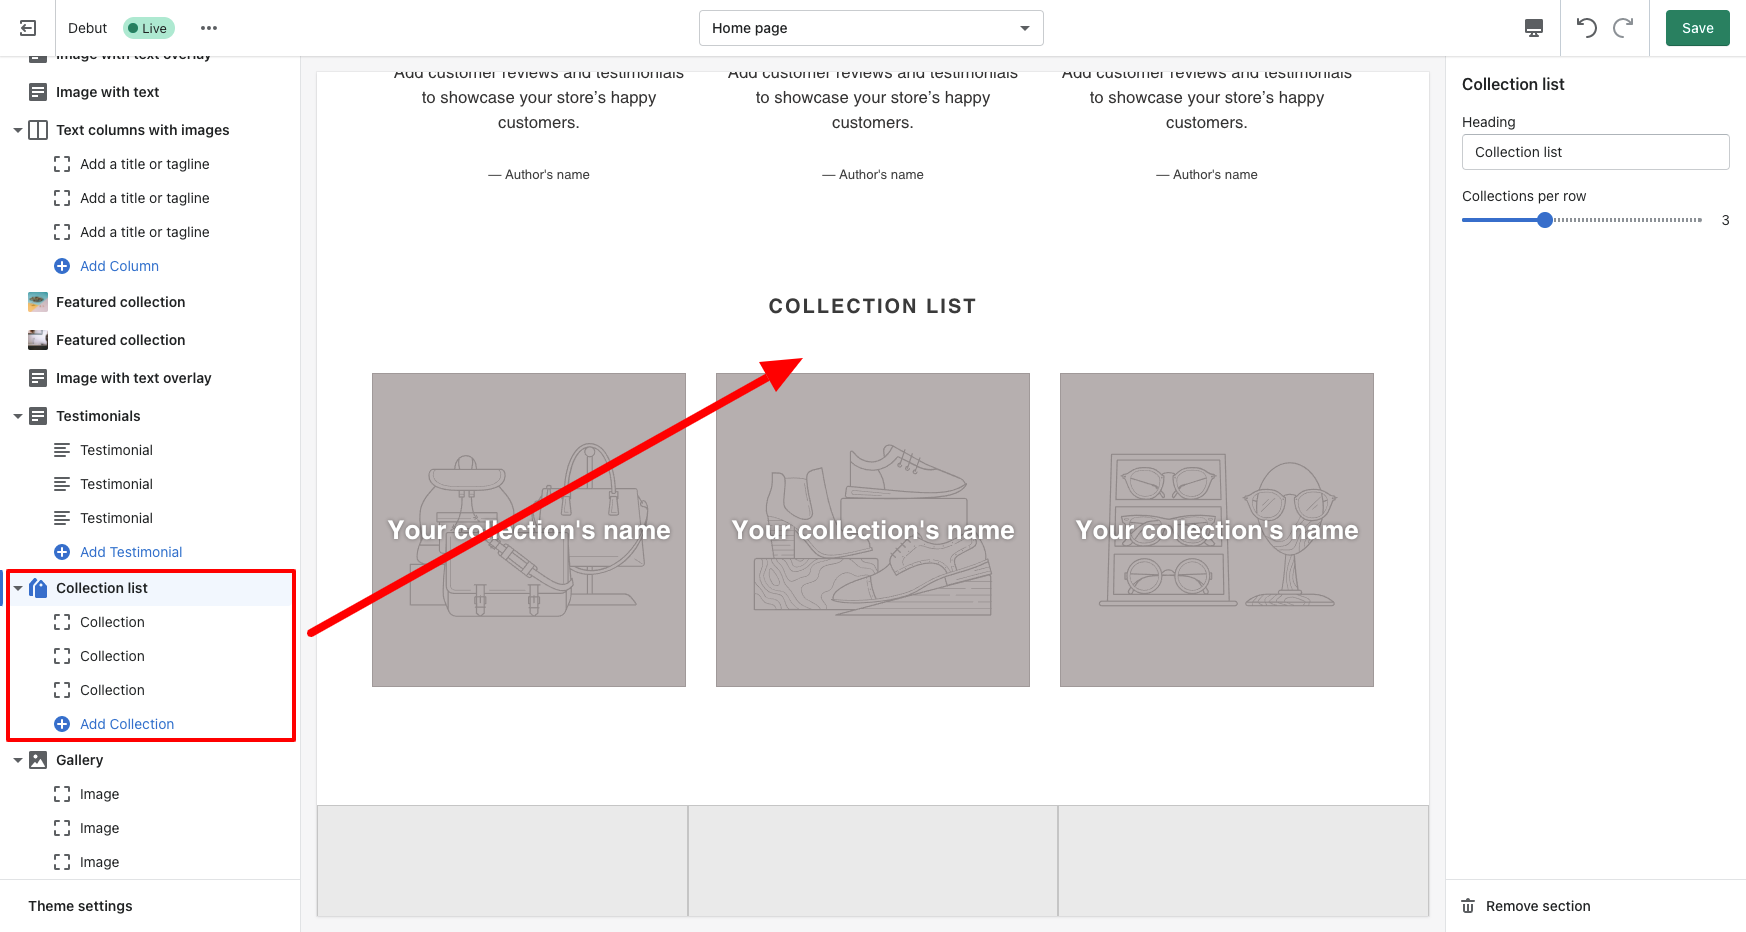
On the section menu along the left side, go to the bottom and click Add section. In the menu that pops up, you’ll select Collection list.
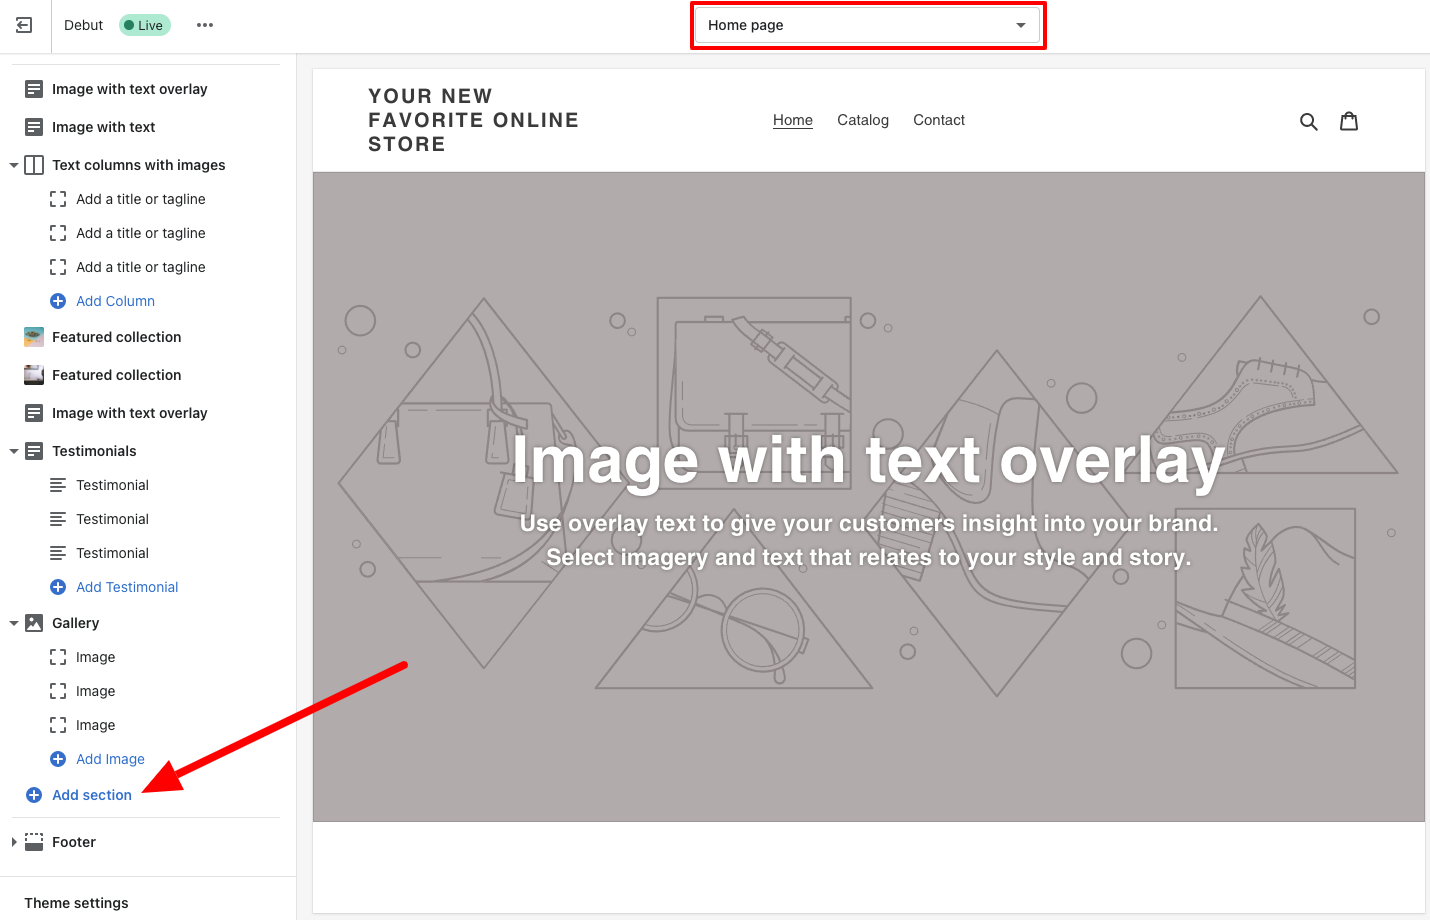
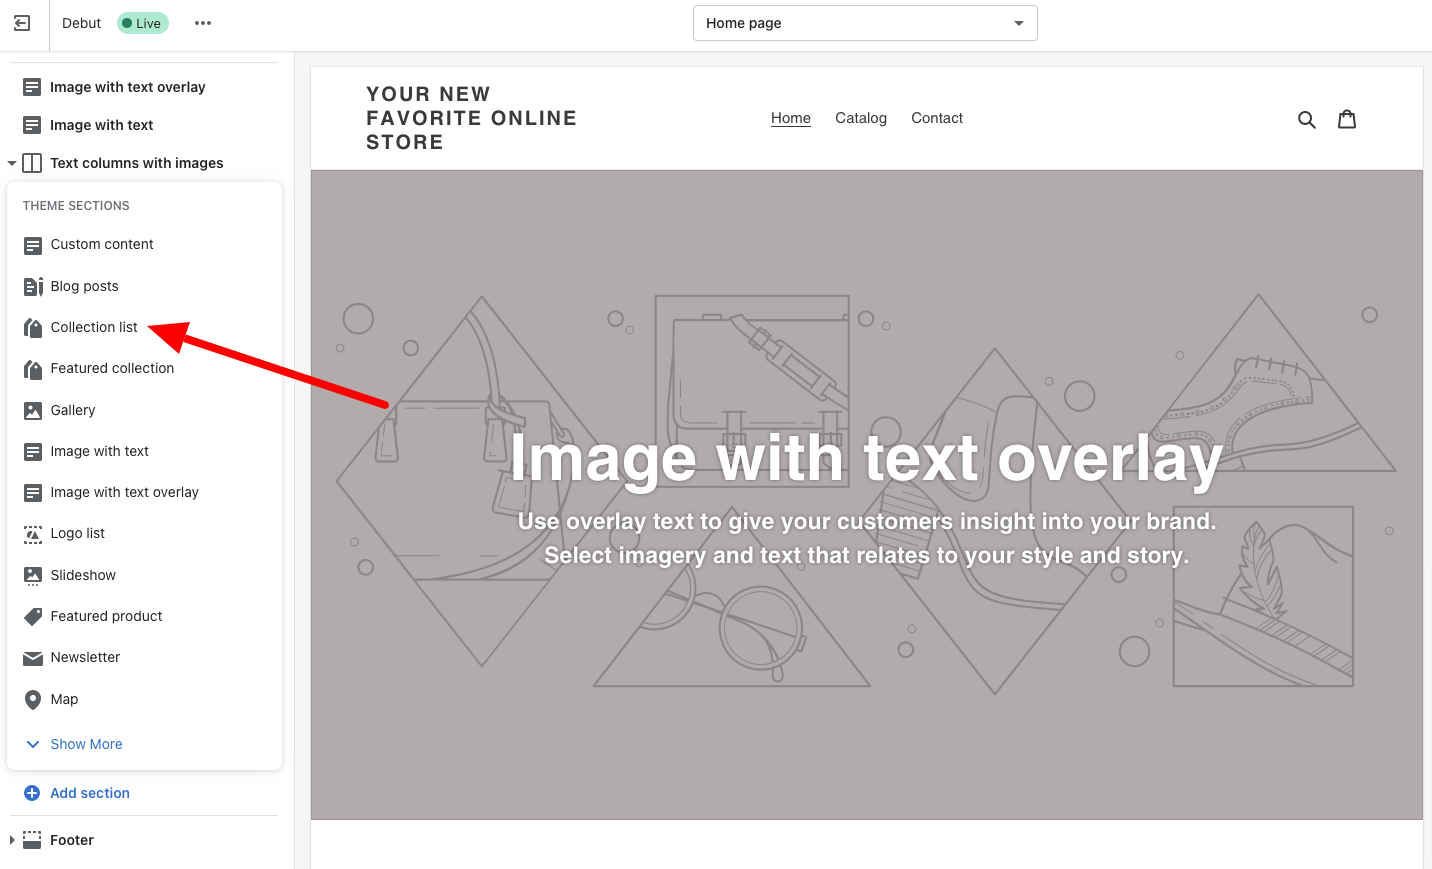
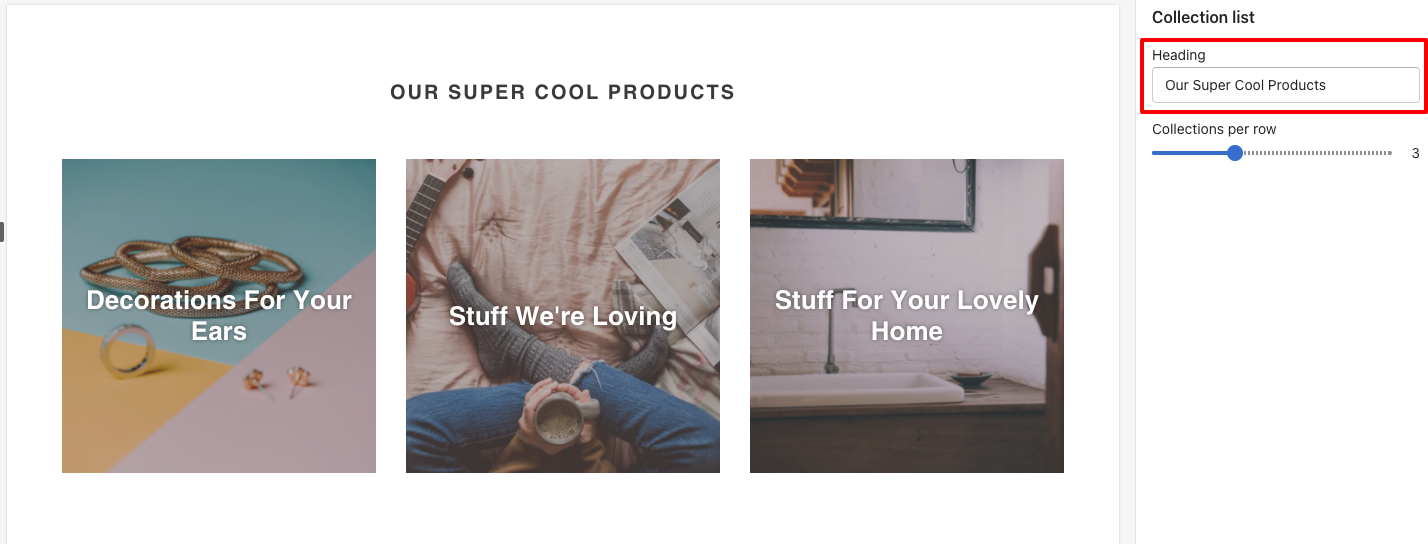
A new section will appear on your page with a heading and three blocks.
Step 3: Click a collection block and add your product collection
By clicking on one of the Collection options in the menu on the left, you’ll be able to choose the collection you want to add.
Click Select collection.
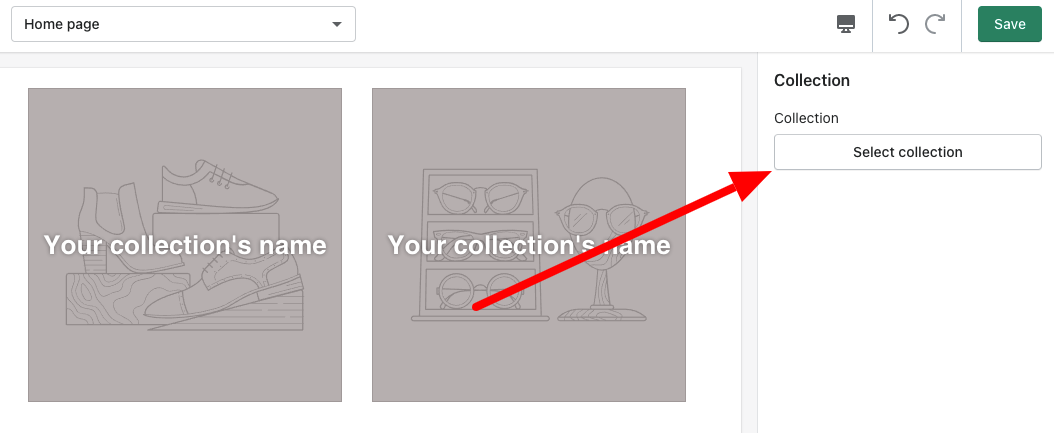
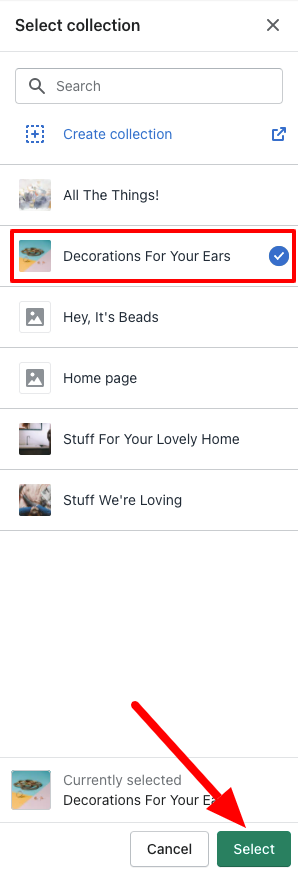
The collections you’ve already created will show up as options. Choose your desired collection and click Select.
Step 4: Repeat for remaining collection blocks
Repeat this process to fill up all three blocks.
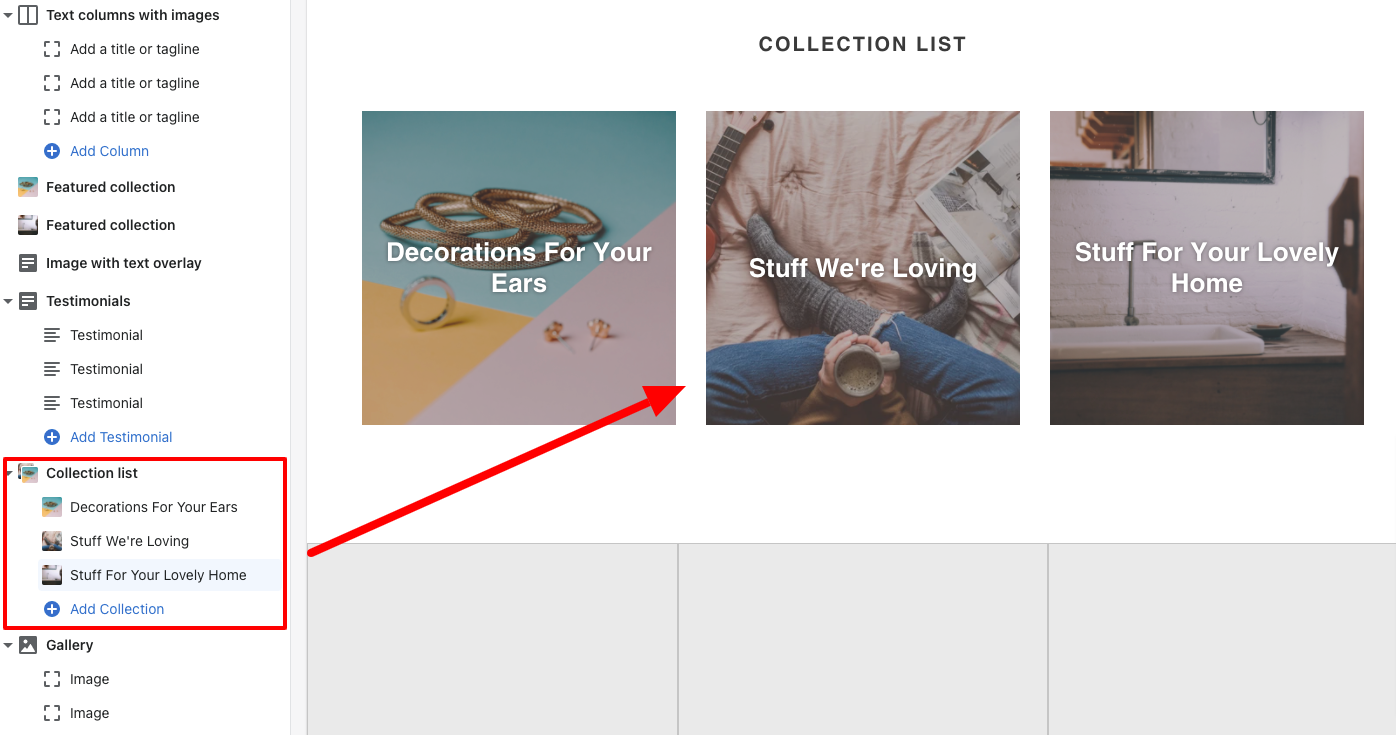
With that, you’ve created a collection list on your homepage that will bring visitors straight to your collection pages (and then on to your product pages).
Step 5: Edit your heading for collection list section
To edit the heading for your collection list, click on the section on the left and update the heading as desired. Save your changes and you’re done!
How to create a customized Shopify collection page with Shogun
It’s easy to make your collection pages do more with the help of Shogun Page Builder.
From your Page Builder dashboard, click Add page, go to the Collection tab, search for a collection, and click Import to Shogun.
On your Page Builder dashboard—left-hand side of your page, click the Products < Collections tab.

You’ll then navigate to your Shopify Collections page. Once you arrive, you’ll see a ‘Create Collection’ tab. Click on it.

You can quickly enter your store information, like title, description, and collection type.
Once you’ve done that, you can begin adding products to your collection. Then for complete control of what appears on your shop, tick the “manual” tab, and choose from a selection of sales channel options, which include Online Store, Buy Button, and Facebook & Instagram.
Hit save to return to your collections page, where your new collection awaits.

Once you’ve done that, begin adding products to your collection.

Now, you can view your store to get an idea of its appearance before moving on to the next stage. It’s looking good!

This is where things get interesting. Go back to you shop dashboard and click on the “More actions” button.
This will open up a dropdown menu with multiple options. See where it says, edit with Shogun? Click that.

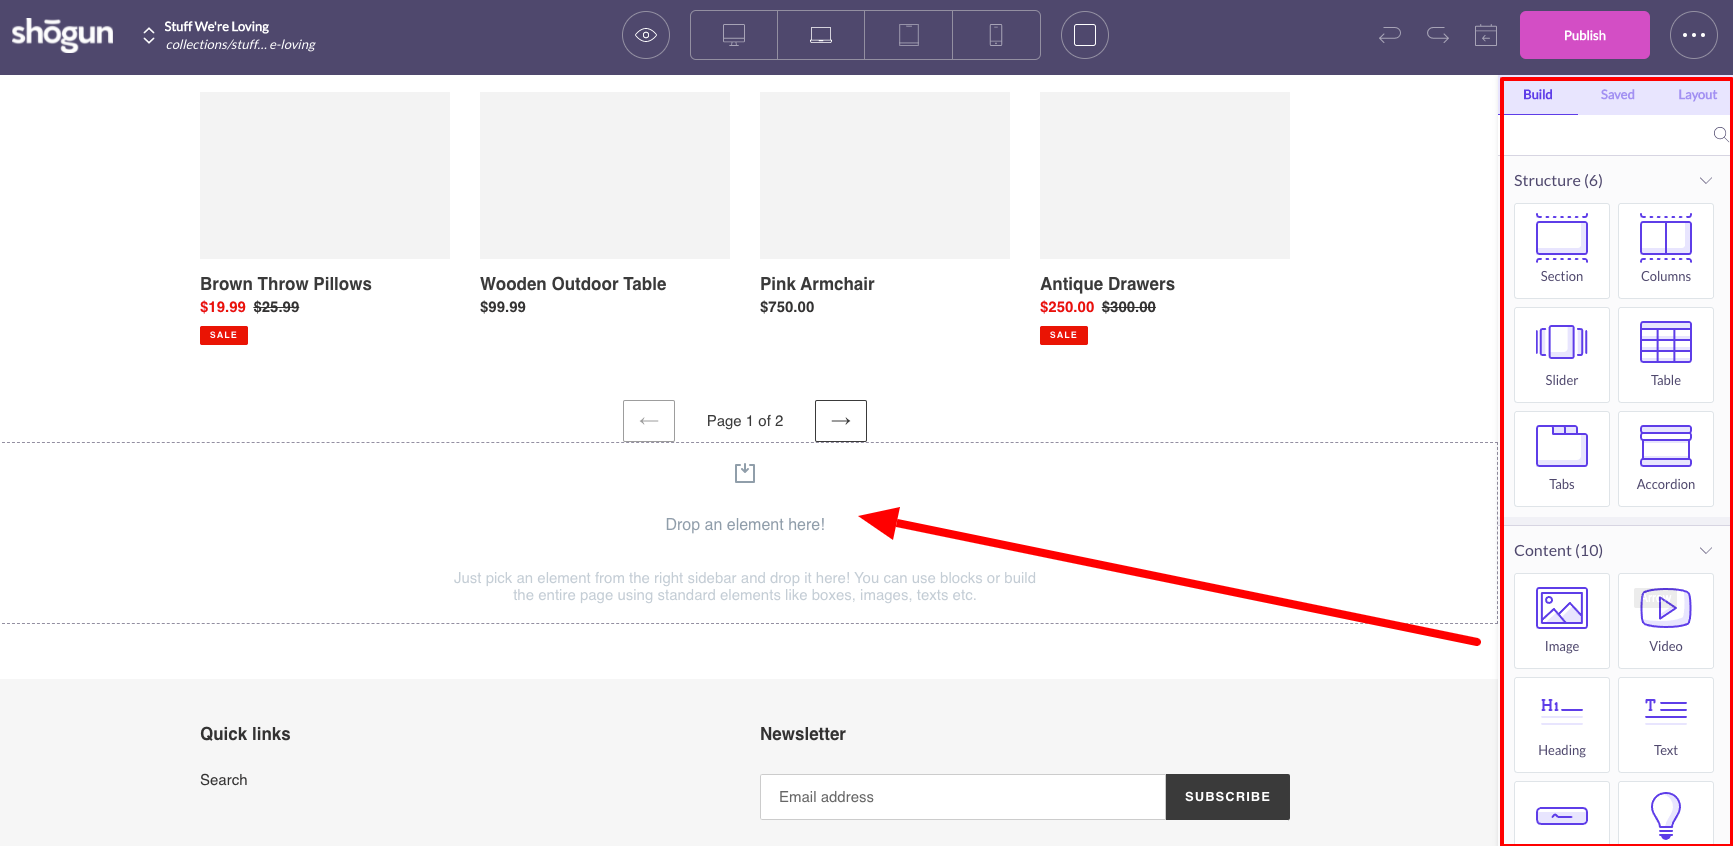
Shogun will pull in your Shopify collection page, and you can start customizing elements in the editor.
You’ll see empty blocks begging you to “Drop an element here!” Choose your desired elements from the menu on the right and drag them into place. The collection page is your oyster!
What will you add to your collection pages?
#cta-visual-pb#<cta-title>Start building better collection pages today<cta-title>With Shogun Page Builder, you can create totally customized collection pages that drive conversions.Get started now
How to add collections to Shopify pages with Shogun
You can also add product collections throughout your store by using the Collection element in Page Builder.
Just drag and drop the Collection element where you want it on your page and search for the collection you want to add.
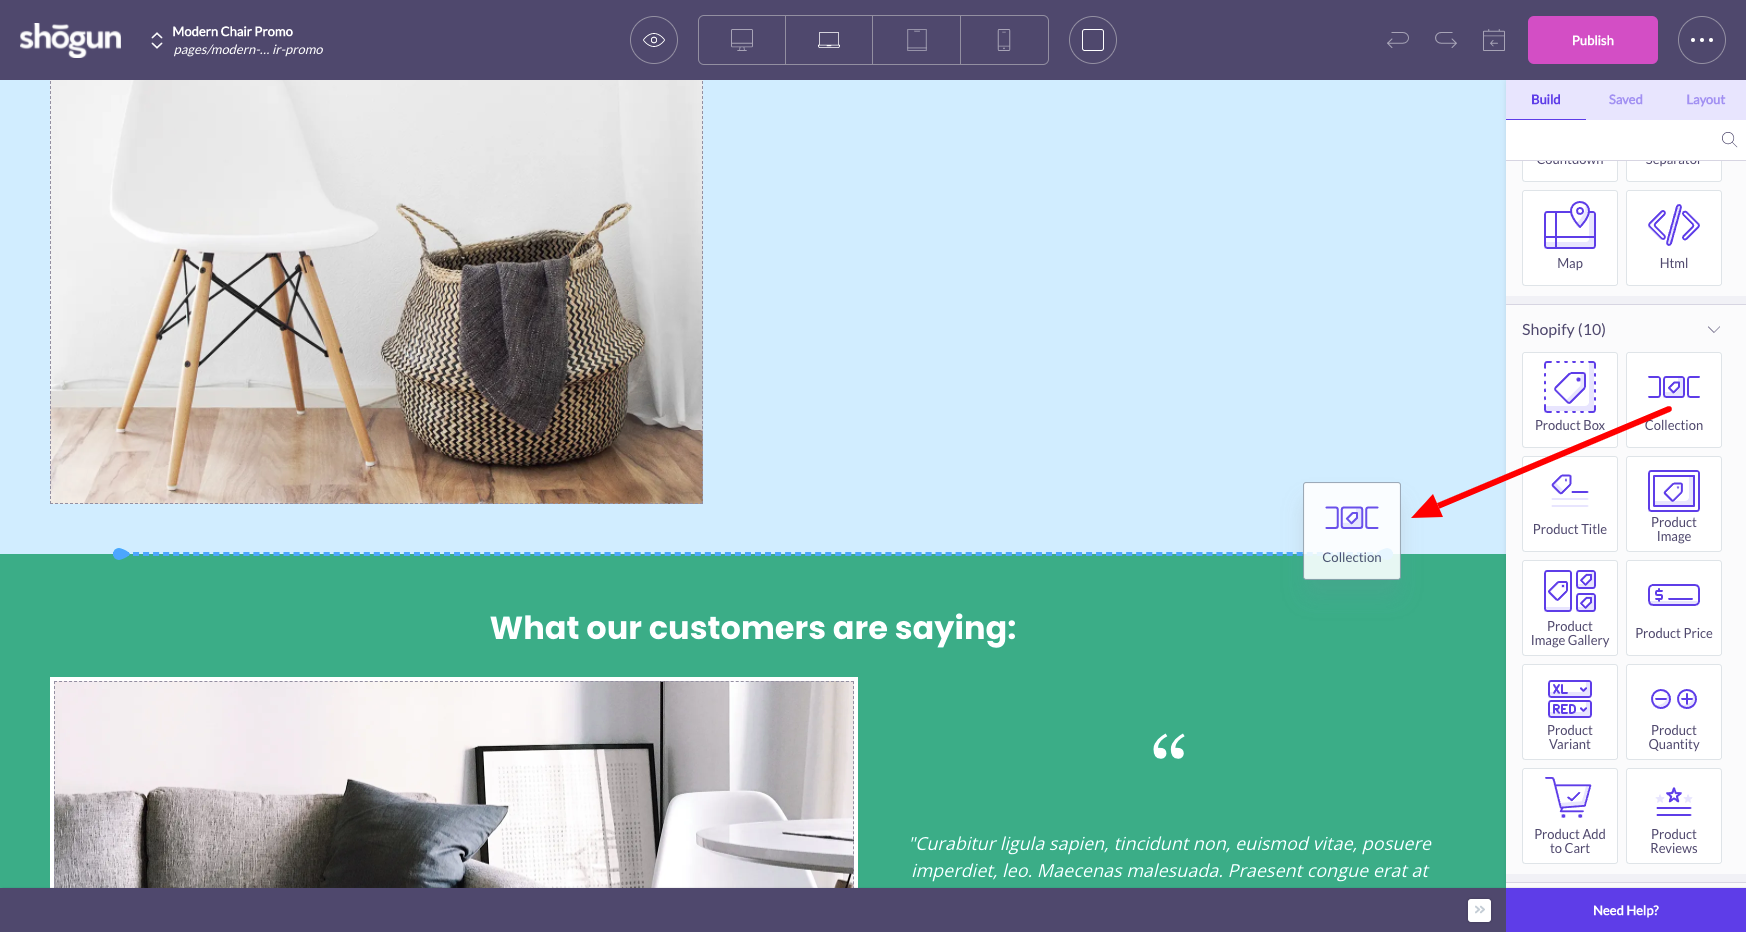
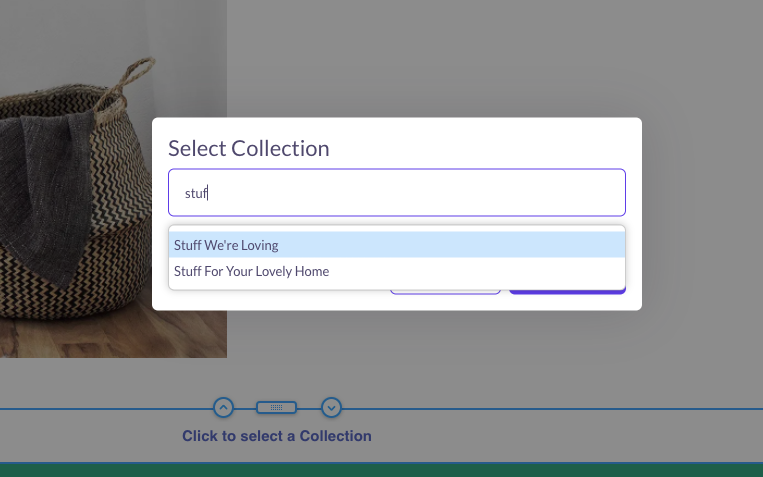
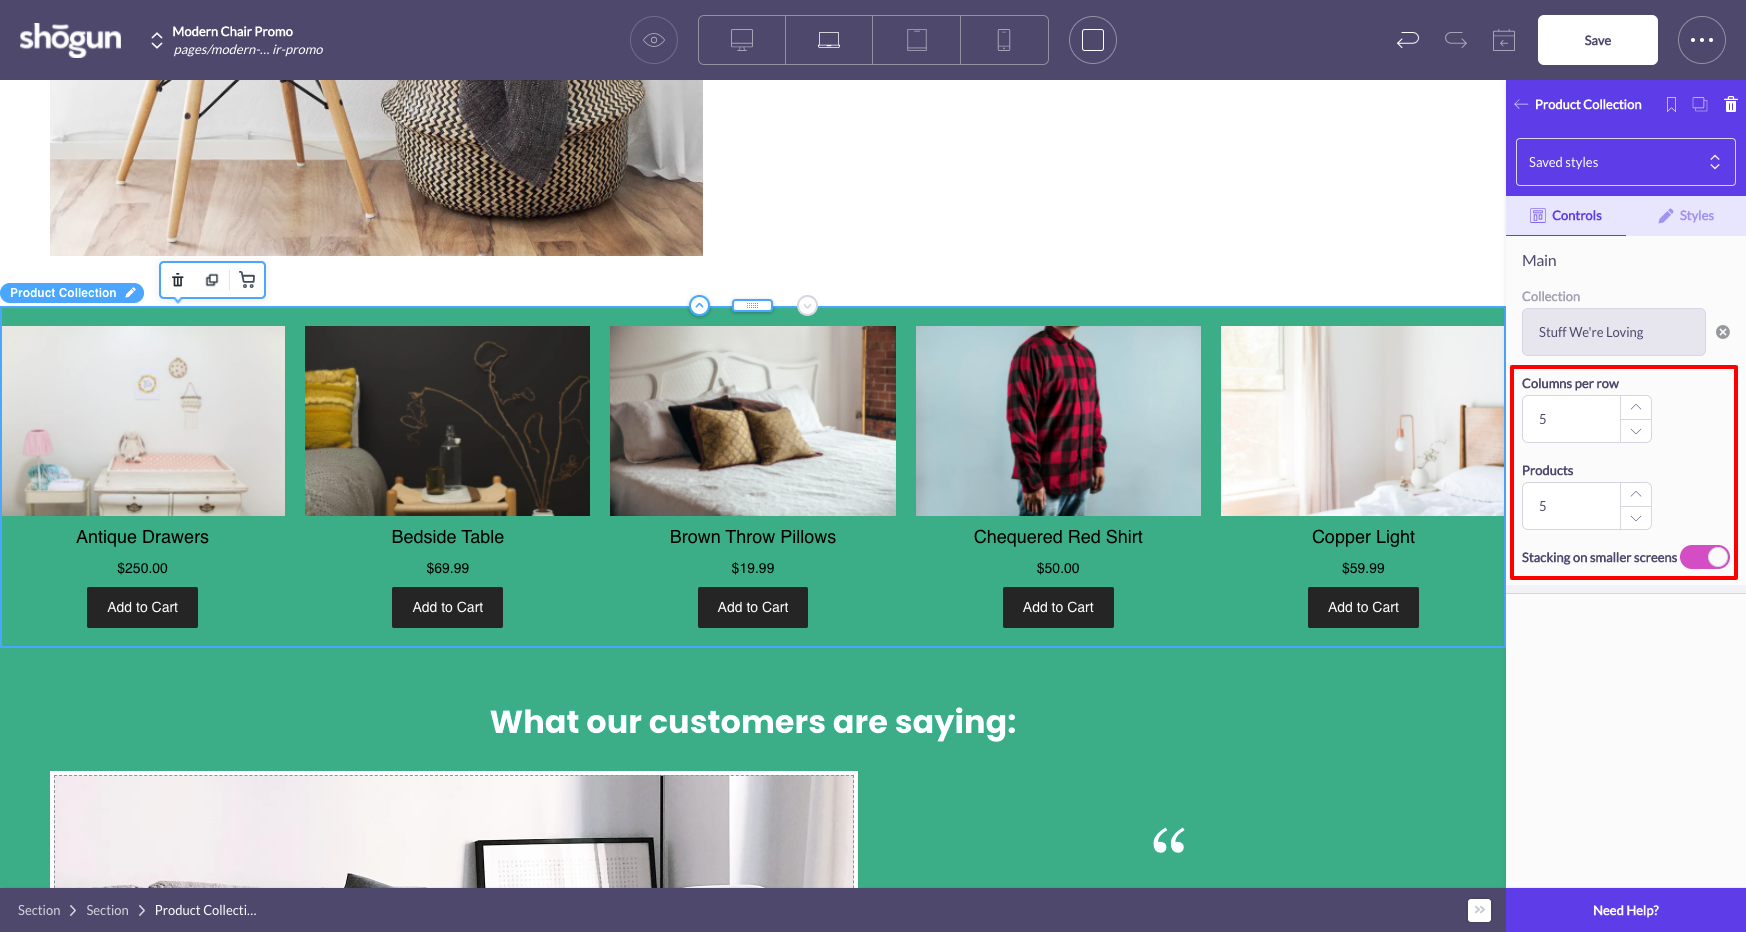
Once added, you can edit the columns per row, the number of products, and whether you want it to stack on smaller screens (for a great mobile experience).
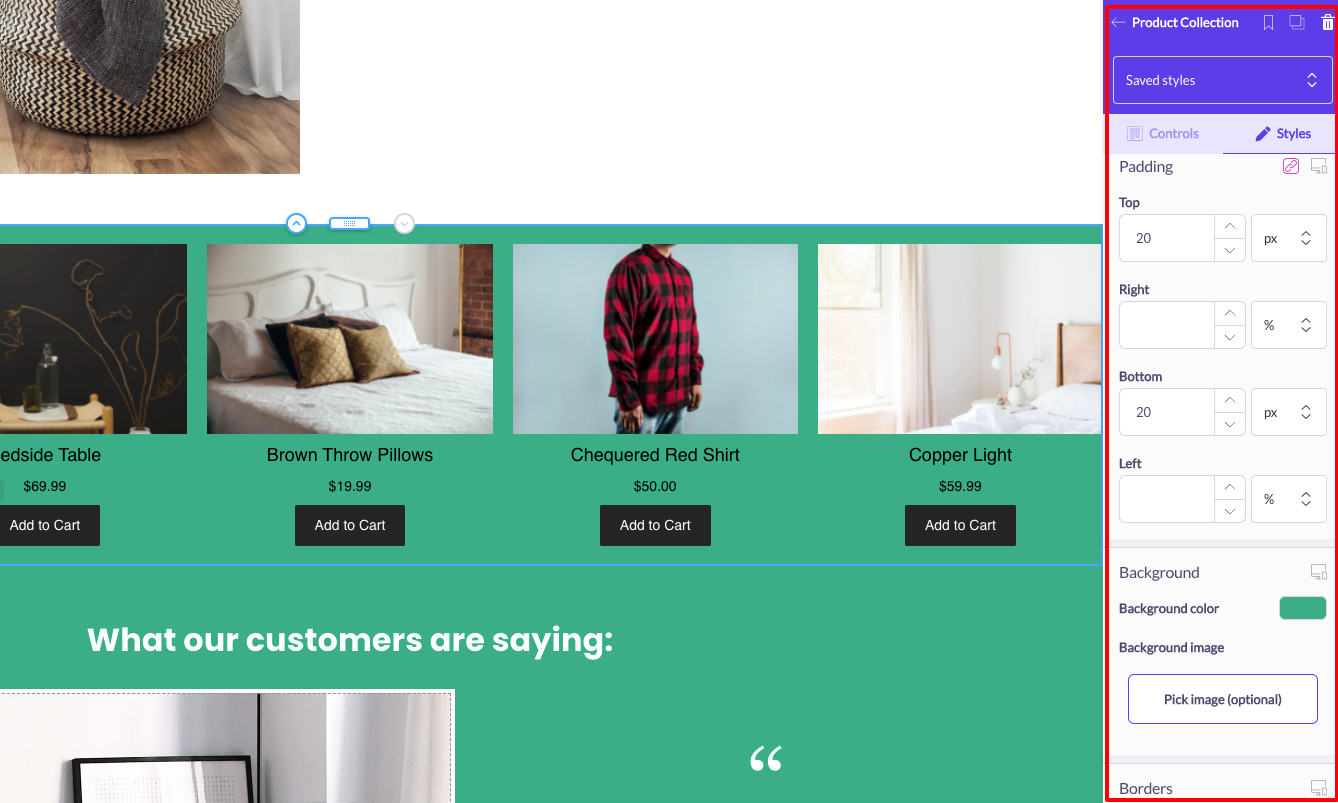
As with other elements on Page Builder, you can also easily edit the look and feel of your collection element by making changes in the Styles tab along the right side of the screen.
Making your store look exactly the way you want is as easy and dragging and dropping the right elements into place.
Best practices for building a high-converting Shopify collection page
Creating Shopify collections is only half the job—now, you’ve got to get customers to convert.
Here are six expert tips for creating a high-performing Shopify collection page.
1. Leverage collection-relevant promotions and CTAs
Your collection pages should be unique and leverage design elements directly related to the browsed category.
Take this example from Free Fly.
When customers click through to the Sale collection, the system displays a hero image at the top of the page, specifically tailored to the collection they’re viewing.
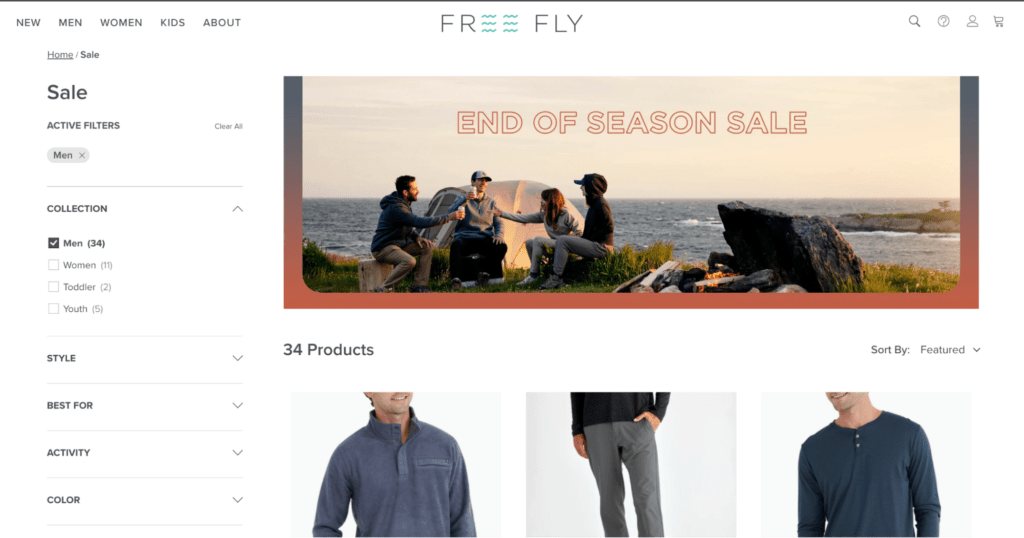
Maximize conversion opportunities by using the space to display promotions and encourage the purchase of sales items.
For example, suppose you have a “Buy one, get one at half price” deal on women’s jeans.
An excellent way to let people know about this offer could be to put it in a big banner at the top of your website’s ‘Women’s Clothing’ page.
2. Use precise terminology
When naming your Shopify collections, it’s generally a good idea to stick to titles immediately obvious and commonly used rather than trying to get overly creative.
It’s akin to making a road sign: we don’t want travelers getting lost because of an intricate and fancy sign that’s hard to decipher. We want them to understand where they’re heading immediately.
Similarly, avoid confusing your customers with quirky collection names.
Stick to standard naming conventions for category names (think “Winter sale” over “Cold cuts”), and save the creative stuff for your product descriptions.
3. Consider how products will look when displayed together in a collection
Online retailers often labor hours over how individual items appear on a website.
They invest thousands in top-quality photography equipment, edit photos to perfection, and choose creative settings to model their apparel, all in search of a better visual experience.
But what about how a product collection looks when displayed alongside one another?
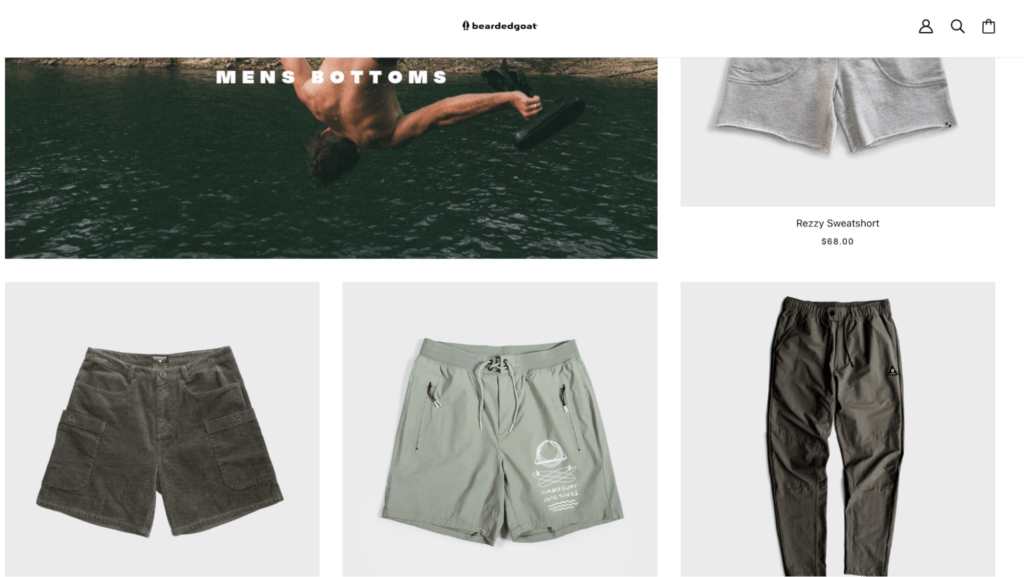
While visuals shouldn’t significantly influence the product choice for a collection—meaning it’s preferable to have all your men’s dress shirts in one collection, even if some colors clash—you should still consider the default display order of the products.
For example, this “Men’s Bottoms” collection from Beardedgoat has carefully curated a selection of products with an alluring color palette.
4. Don’t neglect short-term collections
One great thing about Shopify collections is that they don’t have to be permanent.
Sure, you’ll want to keep some of them around for good, especially those that categorize products by gender or garment type.
But you can also build custom collections for seasonal products (like a holiday collection) or products related to a current event (for instance, if a percentage of sales from a selection of products goes towards supporting disaster relief).
And, of course, seasonal collections are a great way to promote any products on sale currently, helping you clear out dead stock and improve your inventory management.
5. Use filters and sorting to enhance shopper engagement
Providing shoppers with various options is an easy way to improve engagement while helping customers navigate your website.
Consider offering these sorting options:
- Price: low to high (or reverse)
- Biggest discounts
- Best-sellers
- Newest products
- Alphabetically: A-Z (or Z-A)
As far as filters go, the options are endless, though you should make it easy to access commonly used filters by putting them up top.
Color and size are likely the most common choices here.
6. Display best sellers first
While you want to provide customers with a way of sorting and filtering products within a collection to their taste, every page will have a default display, and you want to maximize conversion opportunities here.
One of the best strategies for doing this is to organize the page to display best-sellers first.
Your best-selling products are most likely to convert (based on their track record), so by putting them front and center, you’ve got a better shot at turning that potential customer into an actual buyer.
Consider supplementing these products with customer ratings (star ratings are an excellent way to stay clutter-free) from previous purchases to add a little social proof to the mix.
Shopify collections FAQs
We’ve gone through a ton of information here, but for anything that didn’t quite fit, there are FAQs.
Why should you use Shopify collection pages?
Using Shopify collection pages benefits both you as the seller and site owner and your customer, the end user of your site. Shopify collection pages help guide product selection.
Rather than browsing through every product on your site, many of which aren’t relevant to the shopper’s immediate needs, they can quickly narrow down to items that fit within their shopping preferences.
Naturally, this will have a powerful impact on important metrics like conversion rates. When shoppers find it easier to navigate, they’ll likely stay on the site longer. And probably find something that suits their needs.
Of course, you can then use Shopify collection pages for short-term promotions, such as a flash sale.
Here, you can create a collection and drive traffic through paid ads or banners on your website, enhancing your sales from any promotion.
What’s the difference between collection vs type in Shopify?
A collection is a customer-facing group of products with similar features (for example, clothing items for kids).
The point of a collection is to help shoppers navigate easily through your site and narrow down the products they see to only the most relevant items.
A product type is more about helping you categorize products in the back end of Shopify, so it’s about something other than helping the customer.
Types can be standardized labels (shirts, dresses, pants), but you can also create custom types in Shopify if it helps you organize the back end of your store more effectively.
What is the difference between collections and product catalogs in Shopify?
A collection is a group of products defined by a category name (such as women’s rings in a jewelry site). In contrast, a catalog is a list of products designed only to be published in a narrow context (for example, only for Canadian shoppers).
What are Shopify sub-collections?
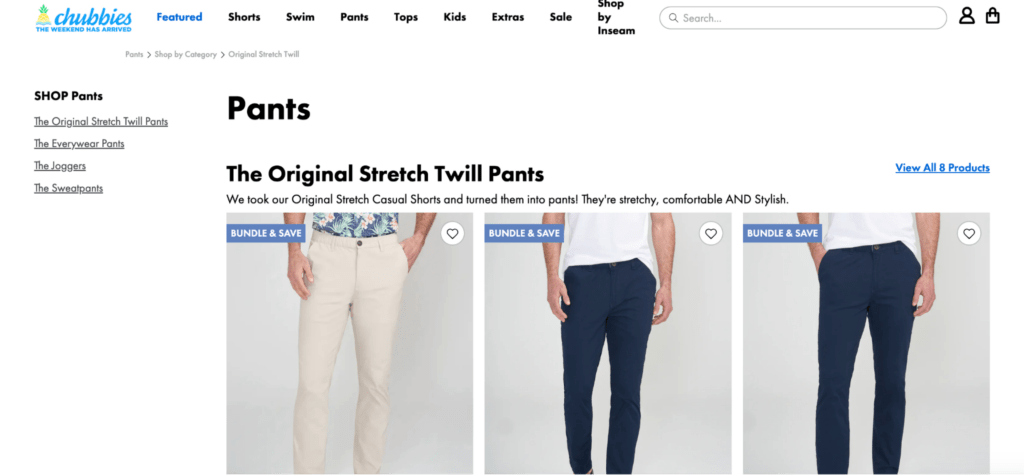
A sub-collection in Shopify is a collection that sits within another, broader collection.
Take this collection from Chubbies.
The primary collection is “Pants,” but customers can narrow down and choose a sub-collection (such as “The Joggers”) if they want to get more specific.
That’s the point of Shopify sub-collections: to improve site navigation and help customers find the exact product they’re looking for.
Can a product be in two collections in Shopify?
Yes, a product can be in multiple Shopify collections simultaneously. For instance, a pair of shorts might be listed in a “Women” and a “Summer Sale” collection.
You can include a single product in hundreds of collections if you wish.
Get your customers to checkout faster with collections
Create a clear path from homepage to checkout by creating awesome collections that will help your customers find the products they love.
Shopify makes it easy to assemble your perfect set of products into clear collections. Shogun helps you put those collections wherever you like in your store.
#cta-visual-pb#<cta-title>Make your product collection pages look so good<cta-title>With Shogun Page Builder, you can create totally customized collection pages that drive conversions.Get started now

Sean Flannigan
Sean is one of Shogun's tireless content marketers. When he isn't creating exciting ecommerce content, he's probably biking or at the park.

