Shopify Liquid Tutorial: A Beginner’s Guide to Coding on Shopify

Your Shopify theme defines your brand. It decides how your customers interact with your store and has limited options for customization.
Unless you choose to go beyond the UI and dig into the code.
Doing so can allow you to change design elements or add functionality that your theme does not include.
By manually editing Shopify’s template code—called Liquid—you can customize your store to your liking. You may start feeling more powerful but know that you’ll also have the power to break your store.
If you are dead set on editing your Shopify store’s Liquid code, you’ll want to know how it works first.

Luckily, you don’t need to be a coder to tinker with your store’s Liquid code.
This Shopify Liquid tutorial is meant for beginners, avoiding technical jargon where possible and including definitions as needed throughout.
In this post, we’ll cover:
So, buckle up. It’s time to learn about Liquid!
#cta-visual-pb#<cta-title>Edit your Shopify store the simple way<cta-title>Customize your Shopify store with Shogun Page Builder’s powerful drag and drop editor, with custom code blocks and 30+ free templates.Start building for free
What is Shopify Liquid?
Shopify Liquid is an open-source template language that serves as the framework for all Shopify themes. In short, it is the language Shopify is written in.
However different all of Shopify’s themes look, each boils down to this central codebase.
Liquid is purposely more limited than other programming languages, acting as a simple bridge between store data and HTML.
For this reason, it is also described as a template engine or syntax instead of a language. But, just like any other coding language, it uses if/then statements, logic, and loops.
Originally created by Shopify co-founder and CEO Tobias Lütke and written in Ruby, Liquid is now used by other major platforms such as Salesforce and Zendesk.
Static content vs. dynamic content on Shopify
When looking at a website, you won’t be able to tell the difference between static and dynamic content.
Simply, static content is hard-coded into the page, whereas dynamic content is pulled into a page from a database.
Web developers use template languages to seamlessly combine static content with dynamic content on a page, so you can’t tell the difference.
Static content stays the same from page to page but dynamic content changes. In your Shopify store, static elements are written in HTML, and dynamic elements are written in Liquid.
The Liquid code is essentially a placeholder.
It’s used to retrieve specific referenced data from your Shopify store—like your store name, product details, images, etc.—when the code is compiled and sent to the browser. Then, the browser grabs assets like your Javascript and CSS files to display your customized theme.
This allows Shopify themes to be agnostic, meaning the same code can work for many stores without adjustments.
This makes changing your Shopify theme a rather painless process.

Liquid delimiters
Liquid is an easy language to recognize.
Beyond its very identifiable .liquid file extension, Liquid also uses two unique delimiters—characters used to separate independent parts in a piece of code—to define objects and tags within template files.
- Objects, which are outputs, are indicated by double curly braces: {{ … }}
- Tags, which create logic and control flow, are indicated by a curly brace and a percentage sign on each side: {% … %}
Filters can be used within the double curly braces to alter the output of an object.
Objects, tags, and filters in Liquid
Liquid is characterized by three key parts: objects, tags, and filters.
Objects (also known as variables) represent one or more values. They can stand in for anything from titles to numbers to calculation results to database query results.
In Liquid, objects (wrapped in double curly braces) output pieces of data onto the page.
A single object can support many different properties, and a dot syntax system separates the object from its property.
For example, in the object {{ page.title }}, the term before the dot is the object, and the term after the dot is the property. So, this would output the title property of the page object.
This simple Liquid syntax makes using it super user-friendly.
Tags (wrapped in curly braces and percentage signs) are used to create logic for templates.
While tags are themselves not rendered on the page, they determine how objects are displayed on the page or whether they are displayed at all.
For example, a tag could instruct your store page to show the price of an item if it’s available and if it isn’t available, to display a “sorry, this item is currently sold out” message.
Filters are used to modify outputs. Indicated by the pipe character, filters can do many things to change how an object is displayed on the page.
For example, to maintain sentence case for certain objects, you could use the capitalize filter like so: {{ “a badly CAPITALIZED Title” | capitalize }} outputs A badly capitalized title.
Liquid code example: Shopify contact page template
To bring all these concepts together, let’s look at the Liquid code for the pre-formatted contact page of Shopify’s Debut theme.
Objects and tags are bolded to show the Liquid code more clearly.
———————————————
<div class=”page-width”>
<div class=”grid”>
<div class=”grid__item medium-up–five-sixths medium-up–push-one-twelfth”>
<div class=”section-header text-center”>
<h1>{{ page.title }}
</div>
{% if page.content.size > 0 %}
<div class=”rte”>
{{ page.content }}
</div>
{% endif %}
<div class=”contact-form form-vertical”>
{%- assign formId = ‘ContactForm’ -%}
{% form ‘contact’, id: formId %}
{% include ‘form-status’, form_id: formId %}
<div class=”grid grid–half-gutters”>
<div class=”grid__item medium-up–one-half”>
<label for=”{{ formId }}-name”>{{ ‘contact.form.name’ | t }}</label>
<input type=”text” id=”{{ formId }}-name” name=”contact[name]” value=”{% if form[name] %}{{ form[name] }}{% elsif customer %}{{ customer.name }}{% endif %}”>
</div>
<div class=”grid__item medium-up–one-half”>
<label for=”{{ formId }}-email”>{{ ‘contact.form.email’ | t }} <span aria-hidden=”true”>*</span></label>
<input
type=”email”
id=”{{ formId }}-email”
name=”contact[email]”
autocorrect=”off”
autocapitalize=”off”
value=”{% if form.email %}{{ form.email }}{% elsif customer %}{{ customer.email }}{% endif %}”
aria-required=”true”
{%- if form.errors contains ’email’ -%}
class=”input–error”
aria-invalid=”true”
aria-describedby=”{{ formId }}-email-error”
{%- endif -%}
>
{%- if form.errors contains ’email’ -%}
<span id=”{{ formId}}-email-error” class=”input-error-message”>{% include ‘icon-error’ %} {{ form.errors.translated_fields[’email’] | capitalize }} {{ form.errors.messages[’email’] }}.</span>
{%- endif -%}
</div>
</div>
<label for=”{{ formId }}-phone”>{{ ‘contact.form.phone’ | t }}</label>
<input type=”tel” id=”{{ formId }}-phone” name=”contact[phone]” pattern=”[0-9-]*” value=”{% if form[phone] %}{{ form[phone] }}{% elsif customer %}{{ customer.phone }}{% endif %}”>
<label for=”{{ formId }}-message”>{{ ‘contact.form.message’ | t }}</label>
<textarea rows=”10″ id=”{{ formId }}-message” name=”contact[body]”>{% if form.body %}{{ form.body }}{% endif %}</textarea>
<input type=”submit” class=”btn” value=”{{ ‘contact.form.submit’ | t }}”>
{% endform %}
</div>
</div>
</div>
</div>
—————————————
We can see examples of the three Liquid features throughout this piece of code:
- Object: The {{ page.content }} object is a stand-in for the page’s body content, which is defined in the Shopify user interface.
- Tag: The {% form %} tag is used to insert a form into the page, and the {% endform %} tag is used to close it out (this structure for opening and closing is used for all tags).
- Filter: A filter is used for capitalization in the object {{ form.errors.translated_fields[’email’] | capitalize }}
This is what the code translates to on the front end:
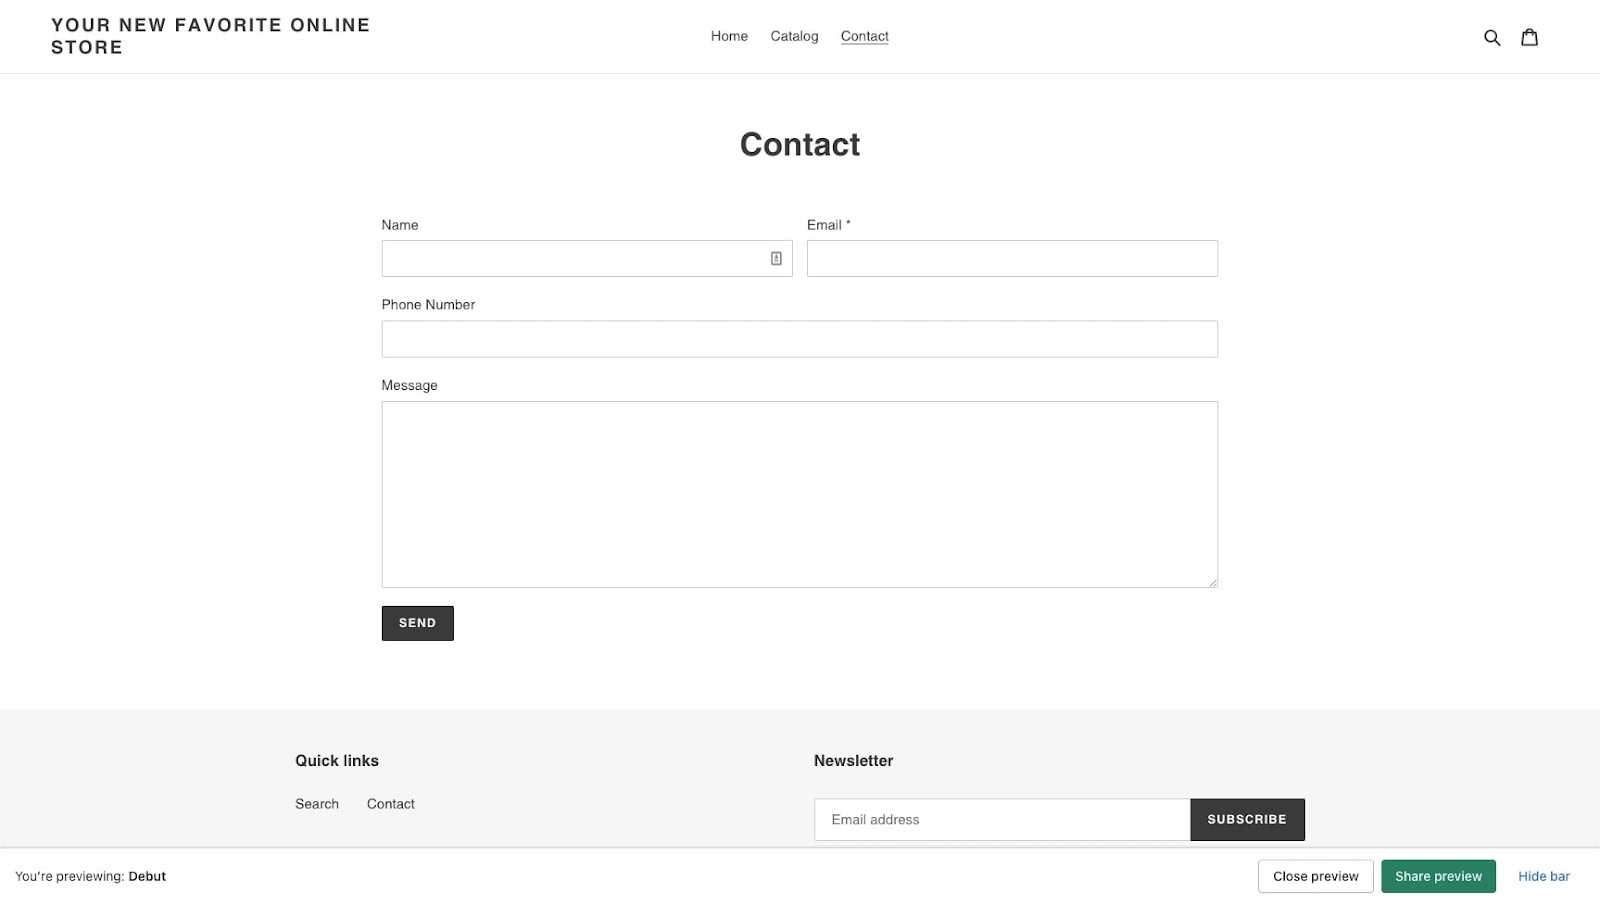
Using Liquid to customize pages
To show how your store’s front end is affected by your theme’s Liquid code, let’s replace the form on this contact page with some text.
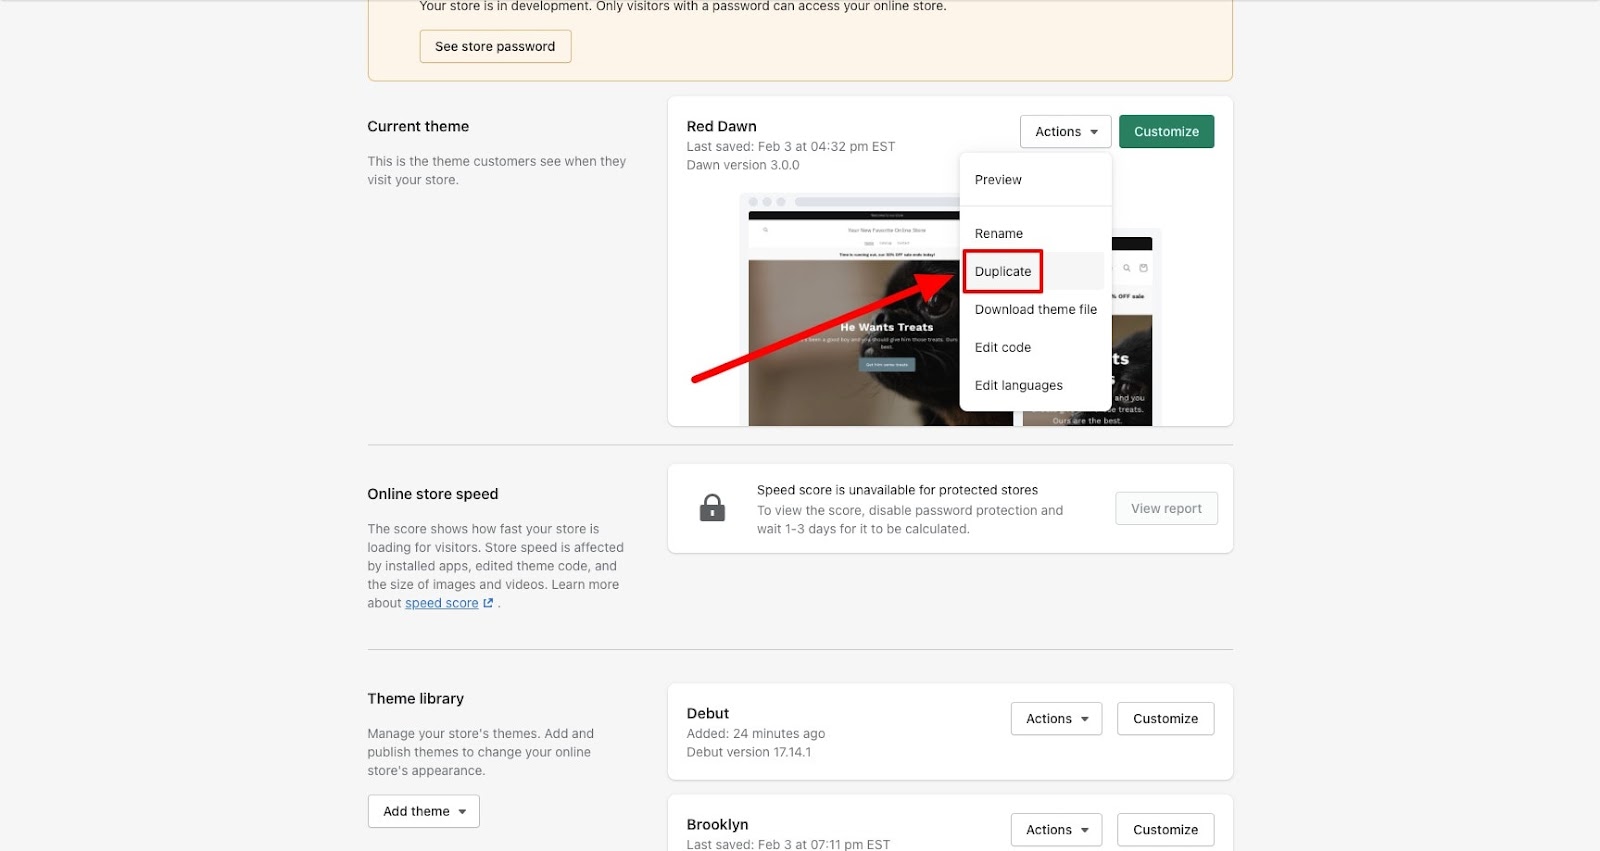
Step 1: Duplicate your theme
Before you edit your theme code, duplicate your theme and make your changes in the duplicate version.
That way, any mistakes you make can be easily reversed.
Just click “Actions” on the theme and choose “Duplicate” from the dropdown menu.
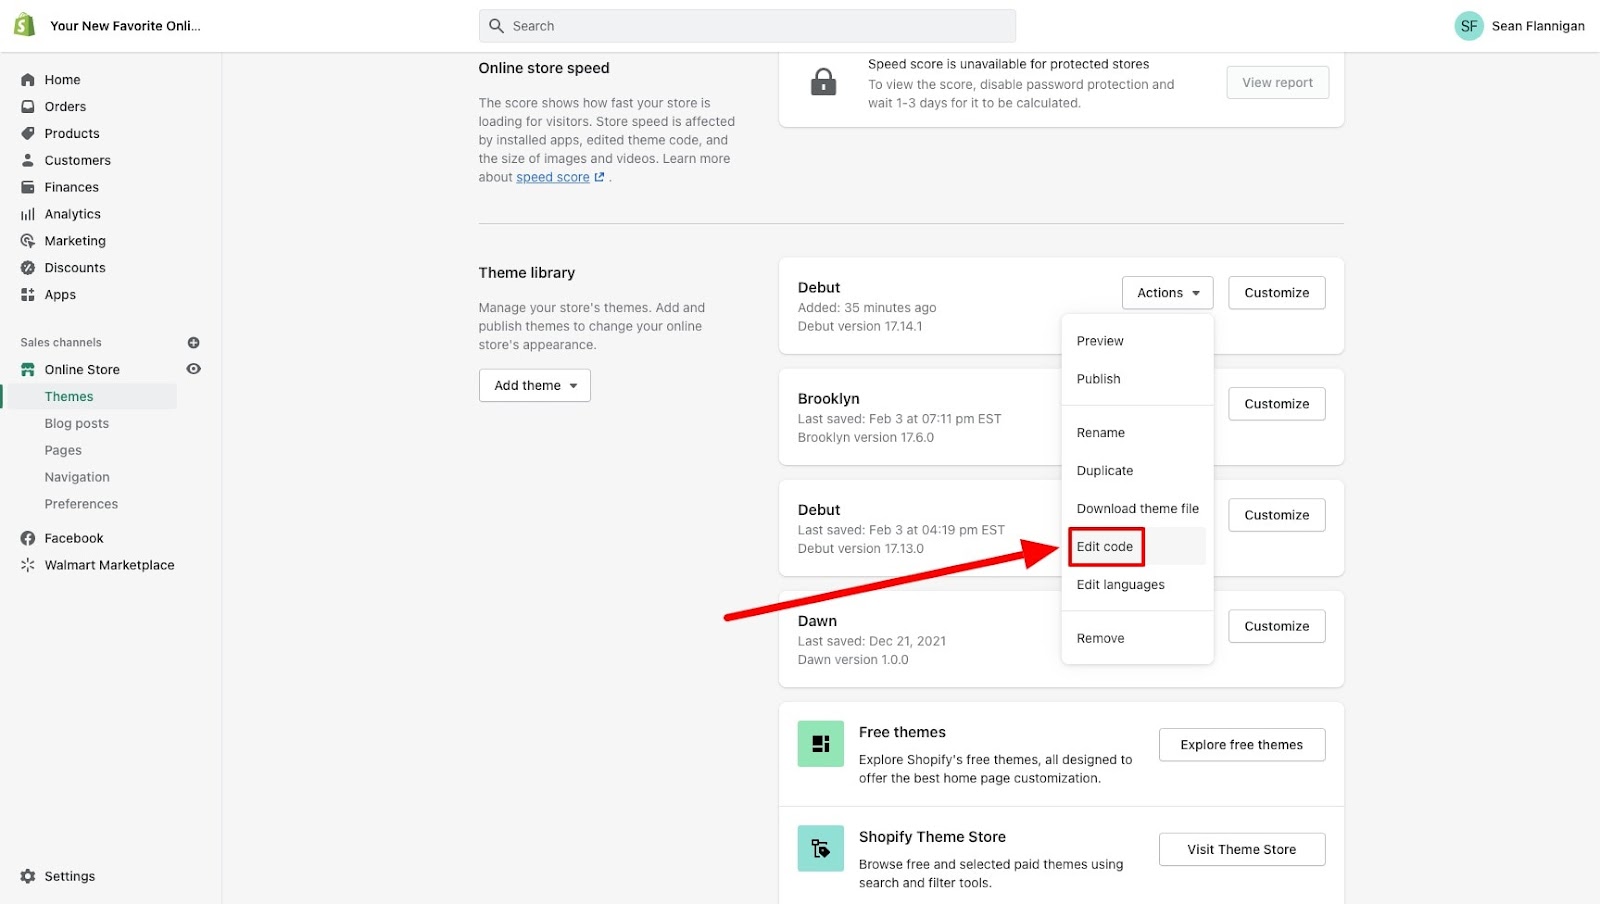
Step 2: Navigate to the code editor
Open the “Actions” menu on your duplicate theme and select “Edit Code” to open the Shopify code editor.
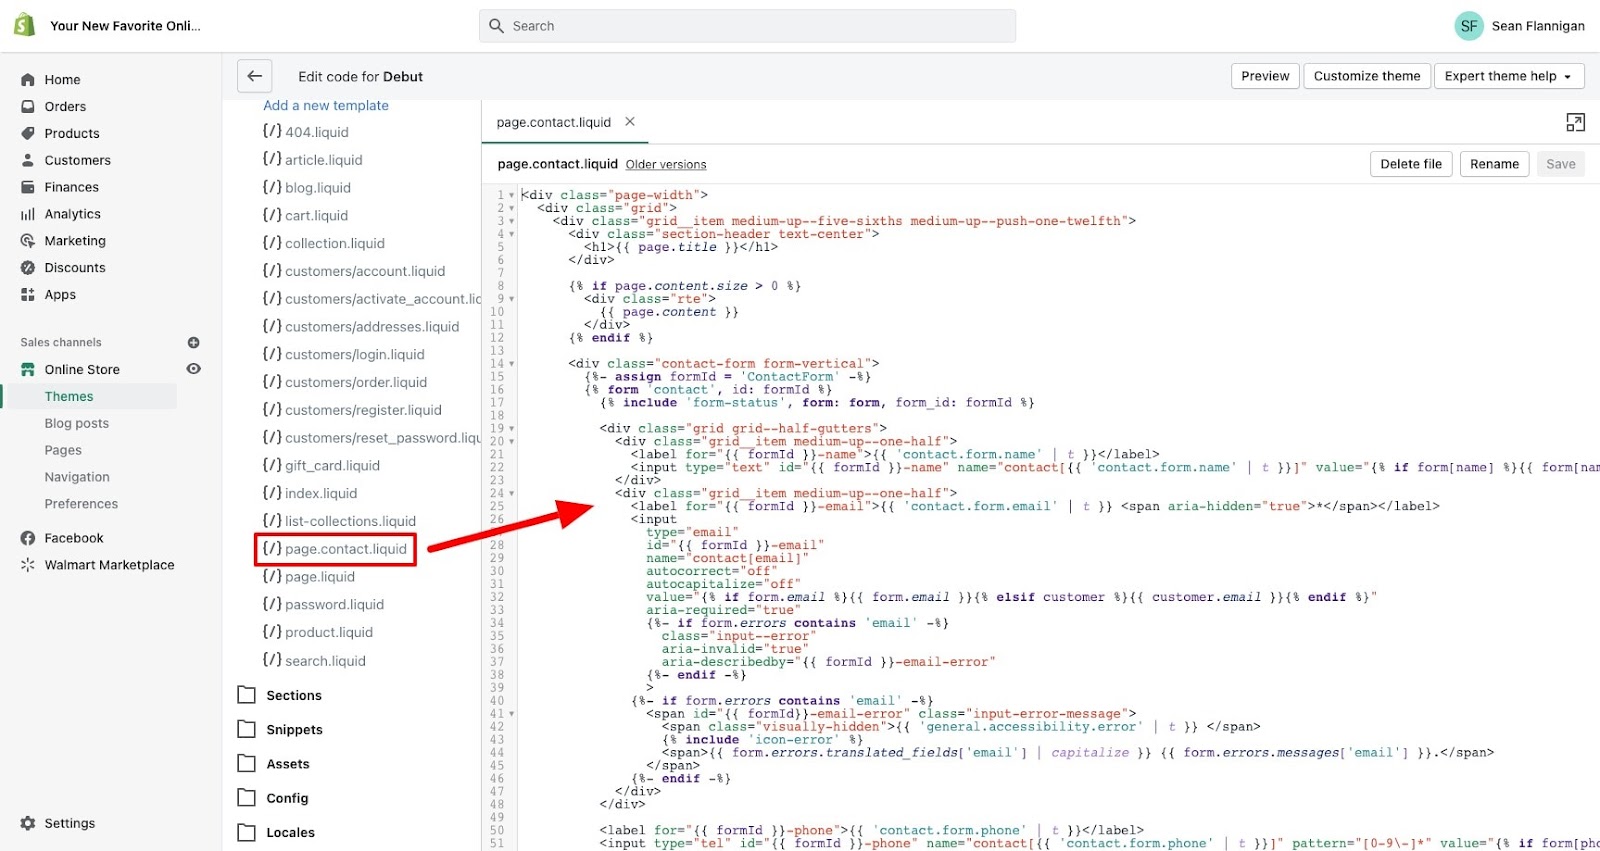
Step 3: In your page.contact.liquid file, highlight the contact form code section
In the code editor, open the page.contact.liquid file.
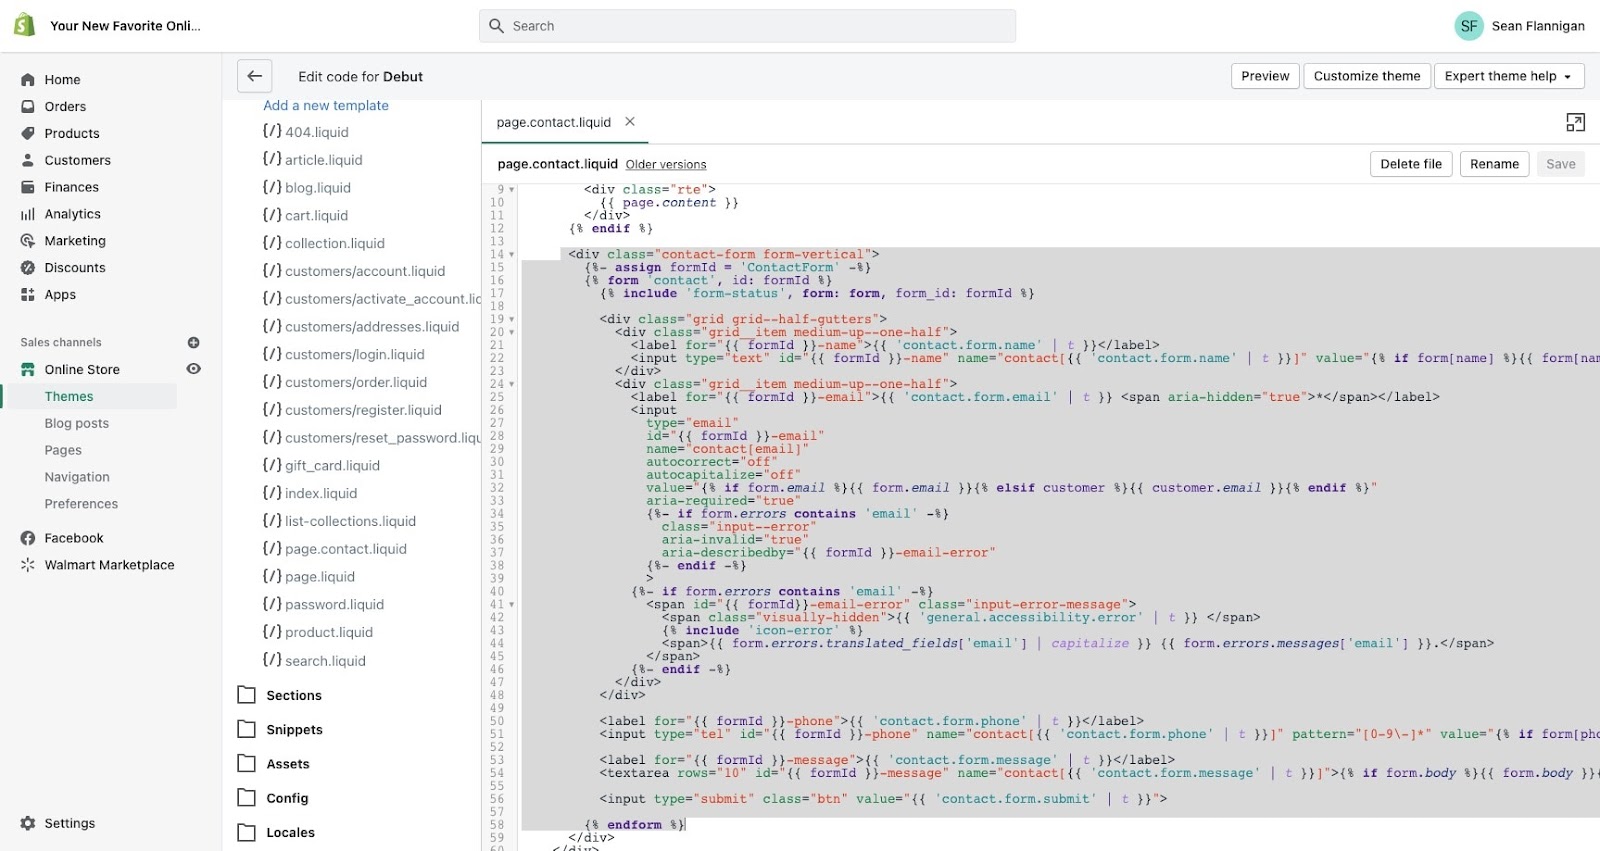
Highlight the portion of the code that creates the form. It begins with a div and ends with an endform tag.
Step 4: Delete the code block and save your changes
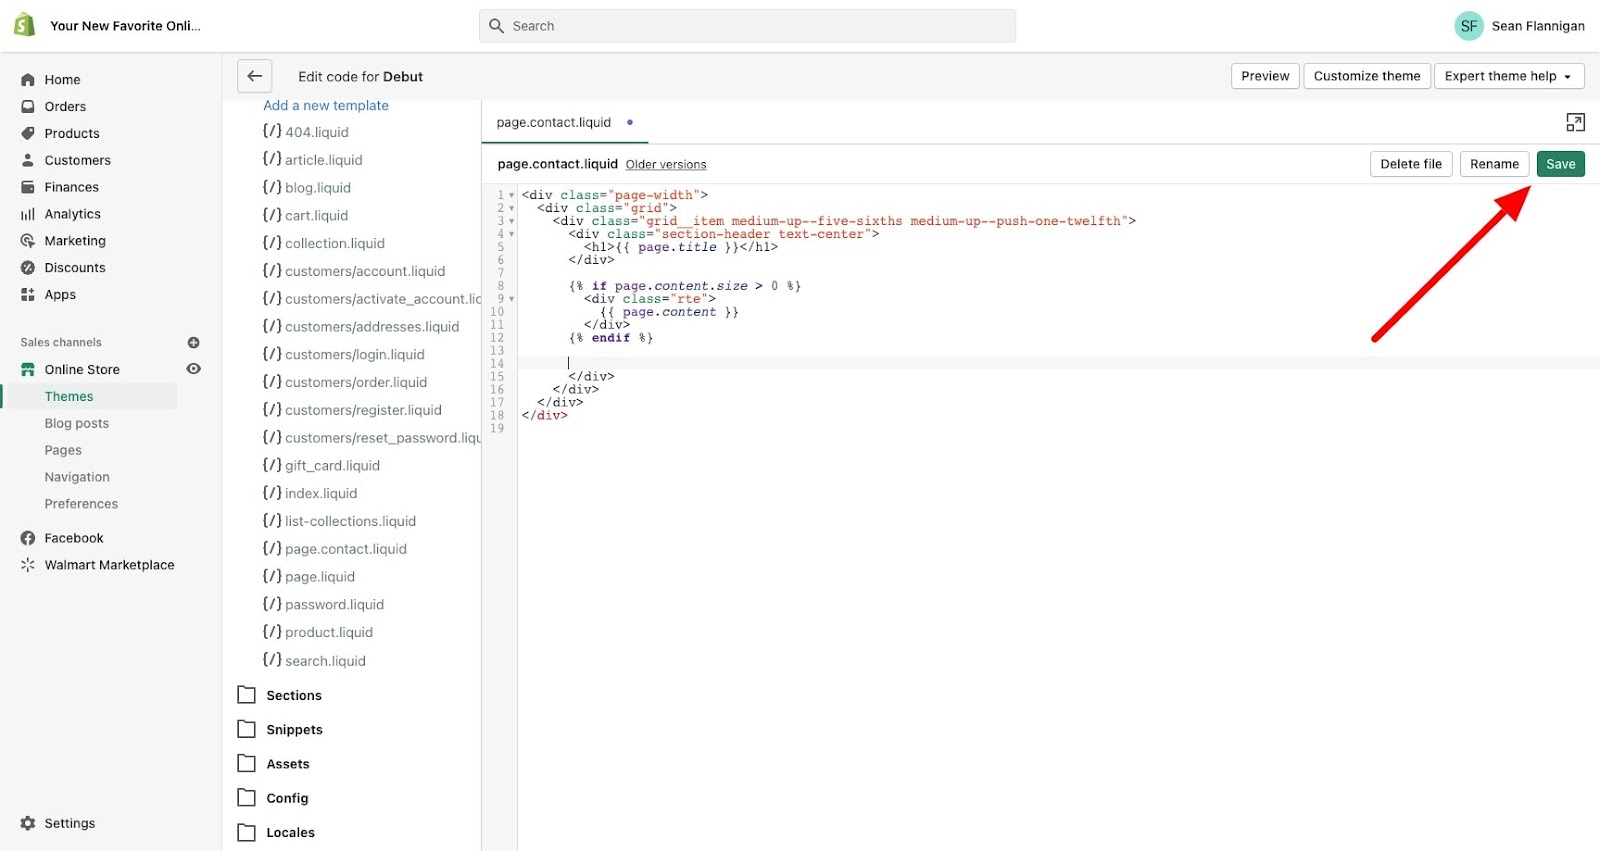
Ensure you’ve highlighted the correct code and delete it. Save your changes.
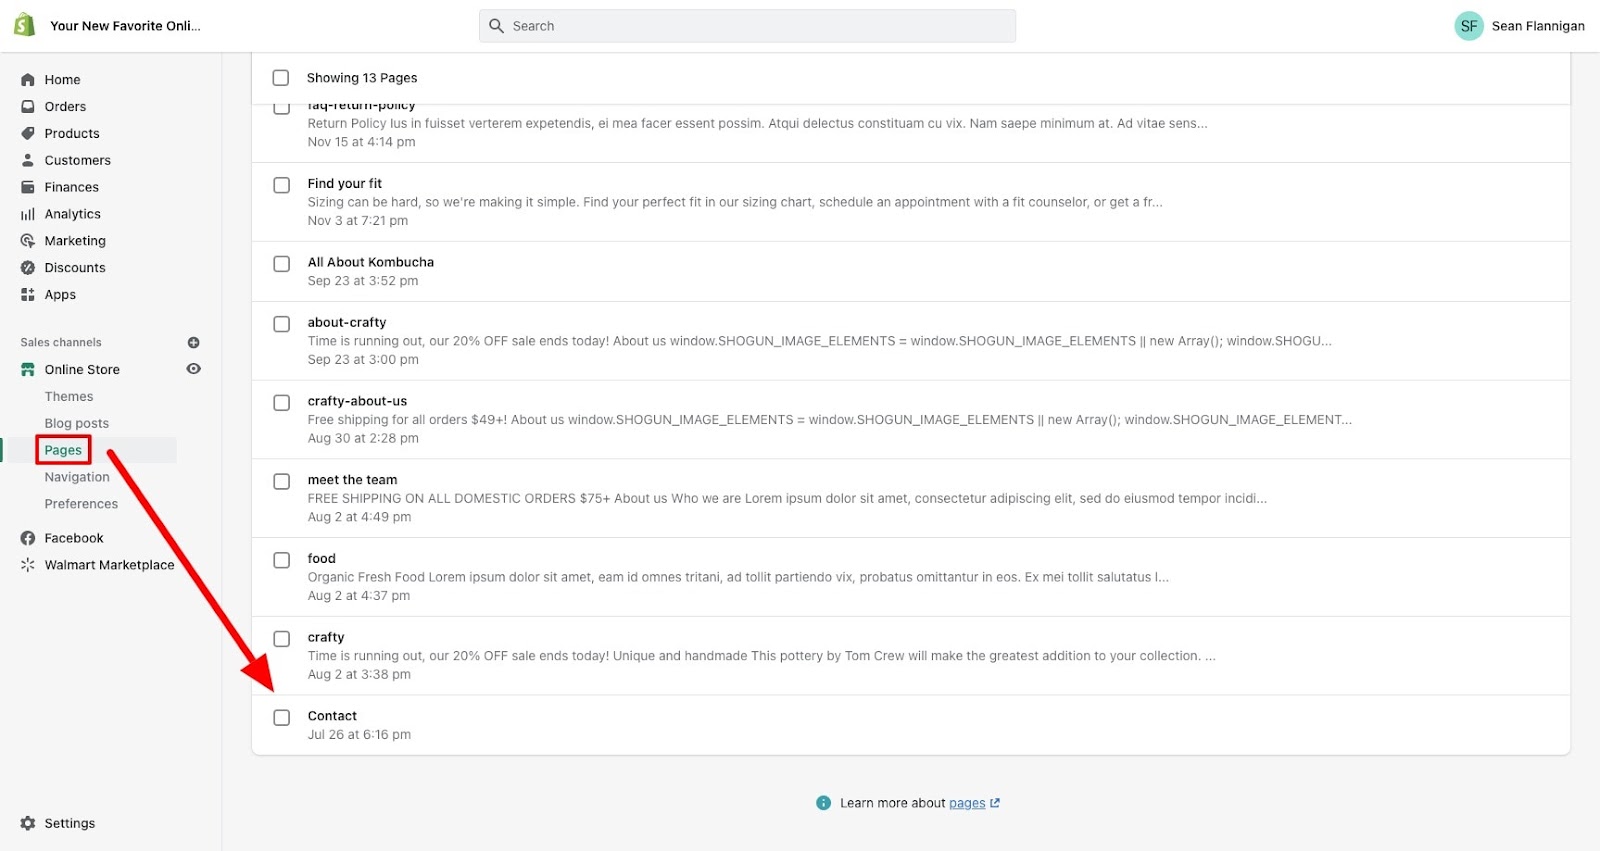
Step 5: Go to Online Store > Pages and find your Contact page
Back in your dashboard, navigate to your Contact page.
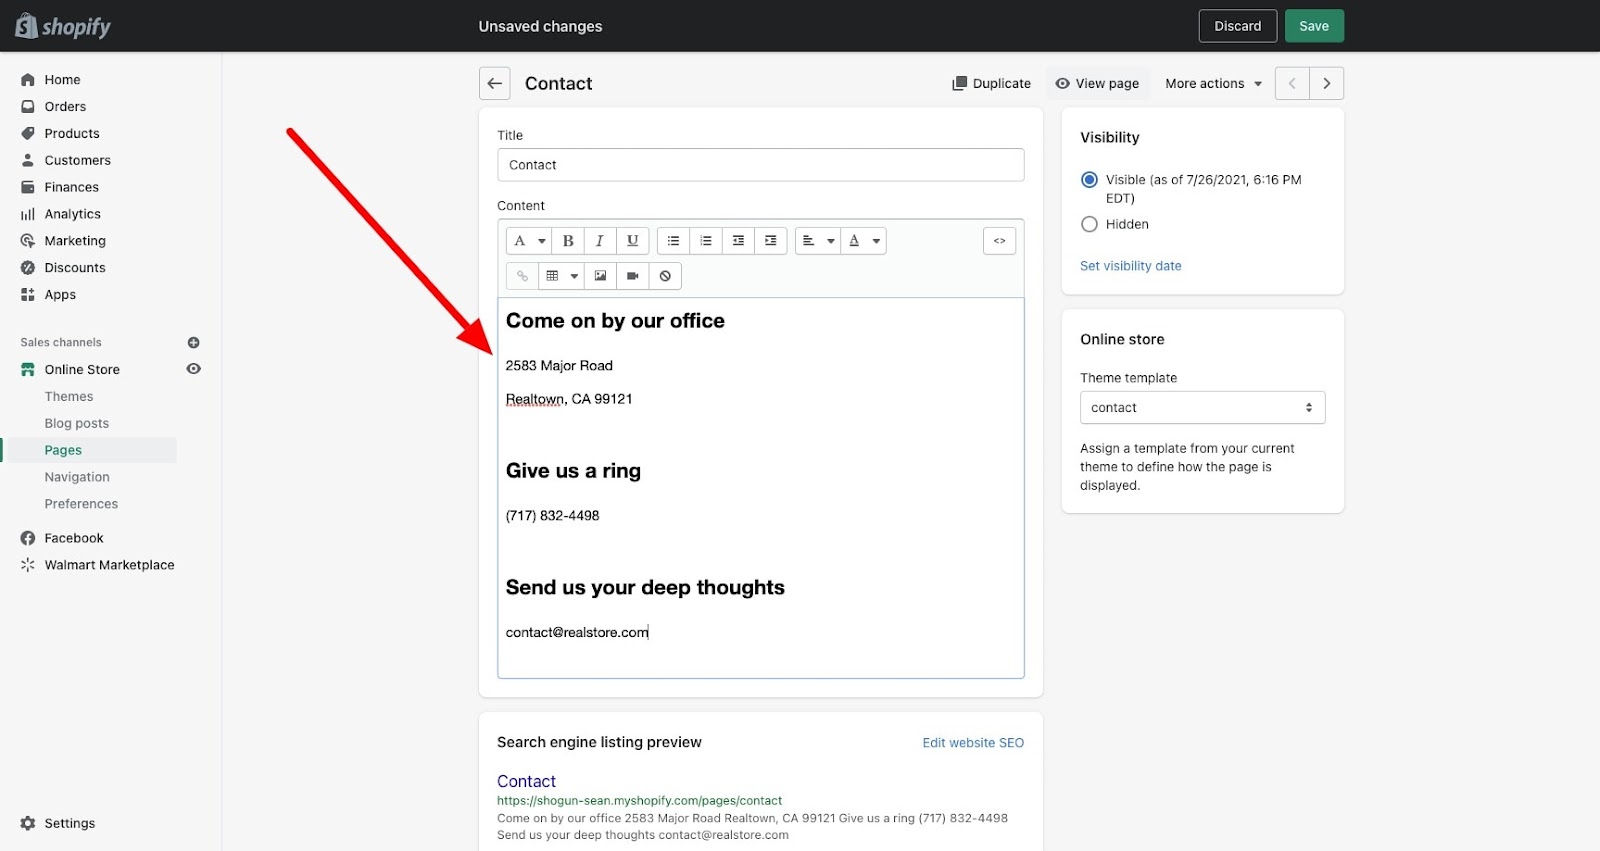
Step 6: Add your contact details to your Contact page
In the body section of your Contact page, add in the details that will replace the form.
The page.contact.liquid file will pull this info with the {{ page.content }} object.
Click “Save.”
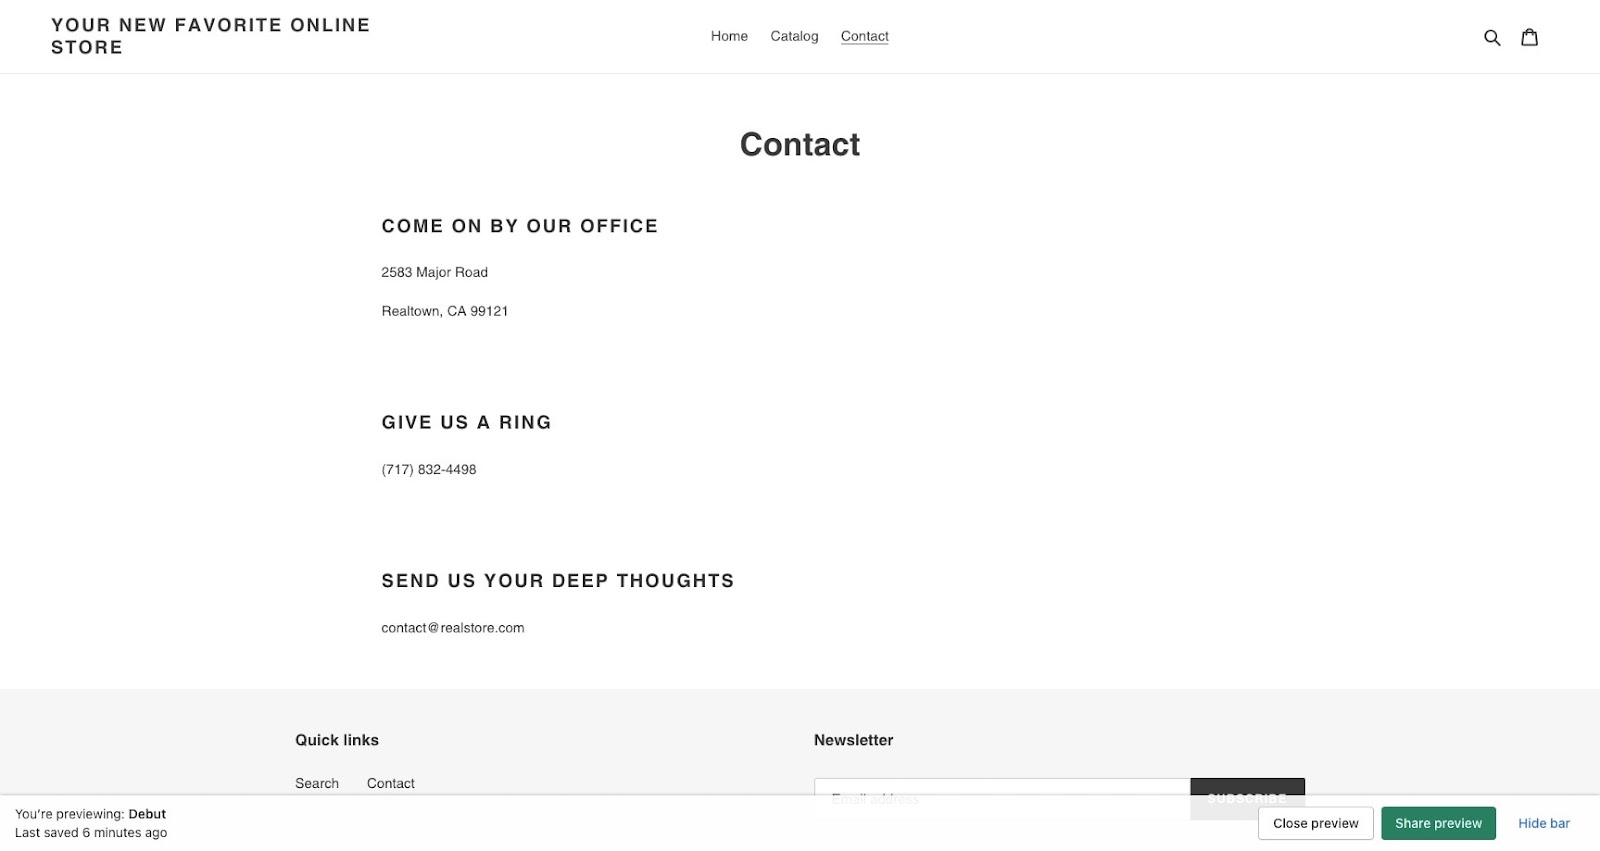
When you preview the page, you’ll see that the form is gone and your new information has been added in its place.
#cta-visual-pb#<cta-title>Customize Shopify themes without code<cta-title>Build your Shopify store with Shogun Page Builder to create on-brand and powerful store pages without all the fuss.Start building for free
Shopify Liquid objects: A closer look
Objects are the foundation of Liquid.
After all, they are the feature that determines what visitors to your store can actually see.
Content objects
Content objects output template and section file content for your Shopify store, plus any stylesheets or scripts created by Shopify or apps.
- {{ content_for_header }} – This object must be included in theme.liquid, which functions as the master template file in Shopify (all themes are rendered in theme.liquid). It’s located inside the HTML tag and loads all the scripts required for Shopify apps, including Shopify analytics and Google Analytics.
- {{ content_for_layout }} – This is another object that must be included in theme.liquid. It retrieves content from other templates.
- {{ content_for_index }} – This object must be included in templates/index.liquid. It retrieves the sections that are to be rendered on your homepage.
Global objects
Global objects (AKA global variables) are accessible from any Liquid file in your theme.
They are used to pull the following pieces of data from your store:
- {{ all_products }} – A list of all the products in your store (up to 20).
- {{ articles }} – A list of all the articles on your site.
- {{ blogs }} – A list of all the blogs on your site.
- {{ canonical_url }} – The URL of the current page with all parameters removed.
- {{ cart }} – Your store’s cart.
- {{ collections }} – A list of all the collections in your store.
- {{ current_page }} – The number of the current page (used for paginated content).
- {{ current_tags }} – A list of tags (the specific tags retrieved depends on the template you’re using).
- {{ customer }} – The customer that is logged in (if the customer is not logged in, nothing is retrieved).
- {{ linklists }} – The menus and links in your store.
- {{ handle }} – The title (also known as a handle) of the current page.
- {{ images }} – Access an image with its filename.
- {{ pages }} – A list of all the pages in your store.
- {{ page_description }} – The description of the current page.
- {{ page_title }} – The title of the current page.
- {{ recommendations }} – Product recommendations.
- {{ shop }} – Information about your store.
- {{ scripts }} – Information about all active scripts. To access information about a particular script, add the type of script to this object as a property in dot syntax (script.type).
- {{ settings }} – A list of the settings in your current theme.
- {{ template }} – The name of your current theme.
- {{ theme }} – Your current theme.
Remember that all of these objects have up to dozens of properties, which each have a function of their own.
Also, many objects aren’t considered content objects or global objects.
Shopify Liquid tags
Tags are a little more active than objects. They can create loops, run conditional if/then statements, and change how objects are displayed.
There are four types of tags:
- Theme tags: Output template-specific HTML markup, tell your theme which layouts and snippets (files containing chunks of reusable code) to use and break up arrays (lists of variables) into more than one page. For example: the {% form %} tag can be used to add a form to a page.
- Variable tags: Create new variables. For example: the {% assign %} tag allows you to create and name a new variable.
- Iteration tags: Repeat blocks of code. For example: the {% for %} tag will repeatedly execute a block of code. This is useful when you want to display a collection of products on a page, as it saves you from having to add code for each individual item. Note that these loops are limited to 50 results, so you’ll need to use pagination if you have more than 50 products.
- Control flow tags: Determine whether blocks of code are executed or not depending on the situation. For example: the {% if %} tag will only execute a piece of code if certain conditions are met.
Shopify Liquid filters
Filters live within an object’s curly braces, augmenting its output based on many different actions.
The different types of filters include:
- Color filters: Change, lighten, darken, saturate, or desaturate the color of objects.
- Font filters: Change text style (normal or italic/oblique) or text weight (light, normal, bold, and anything in between). With the font_face filter, you can also add custom fonts to your theme.
- HTML filters: Add HTML elements to objects, such as payment buttons and timestamps.
- Math filters: Incorporate math equations into your objects. One application of this filter is showing a visitor how much they could save (list price multiplied by percentage discount) by taking advantage of a specific deal.
- Money filters: Format currency as specified in your Shopify store’s settings.
- Date filters: Determine the date format used within objects.
- Highlight filters: Highlight text that matches search terms to improve the functionality of your search feature.
- String filters: Alters a given string (a sequence of characters within quotation marks) to produce a consistent result. This could be to change cases, prepend characters, append characters, remove words, truncate strings, etc.
- Array filters: Changes an inputted data array to output in a specific way. This includes reversing, concatenating, sorting, and more.
Some Shopify Liquid resources to learn more
By now, you have learned a lot about what Liquid is and how it works from this lovely Shopify Liquid tutorial.
If you would like to learn more about this subject, we recommend the following resources:
- GitHub: This page contains more Liquid code and information.
- Shopify Liquid code examples: See how different website elements can be written in Liquid.
- Learning Liquid: This series of articles published by Shopify covers many topics related to Liquid.
By understanding the code behind your Shopify theme, you’ll be able to turn your ideas for pages into a reality.
If you’d rather skip the code, you can always start customizing your Shopify store with Shogun Page Builder. Drag and drop page elements together—customize each one to your brand specifications—to elevate your current theme’s functionality.
You can even create custom code blocks to use across your Shopify store.
#cta-visual-pb#<cta-title>Want to edit your Shopify store the simple way?<cta-title>Customize your Shopify store with Shogun Page Builder’s powerful drag and drop editor, plus add your own custom code where you like.Start building for free

Adam Ritchie
Adam Ritchie is a writer based in Silver Spring, Maryland. He writes about ecommerce trends and best practices for Shogun. His previous clients include Groupon, Clutch and New Theory.

