The DIY Shopify Web Design Tutorial
What makes a Shopify store successful? You probably pay great attention to the prices of your products and the quality of your customer service so that you can keep up with competitors. But how much attention do you pay to the design of the store itself?
This isn’t an area that you can afford to ignore. With a better design, you’ll be able to make many more sales.
Your website is where potential customers will get their first impression of your business. There are plenty of other options out there for these customers to consider, so you need to make that first impression count.
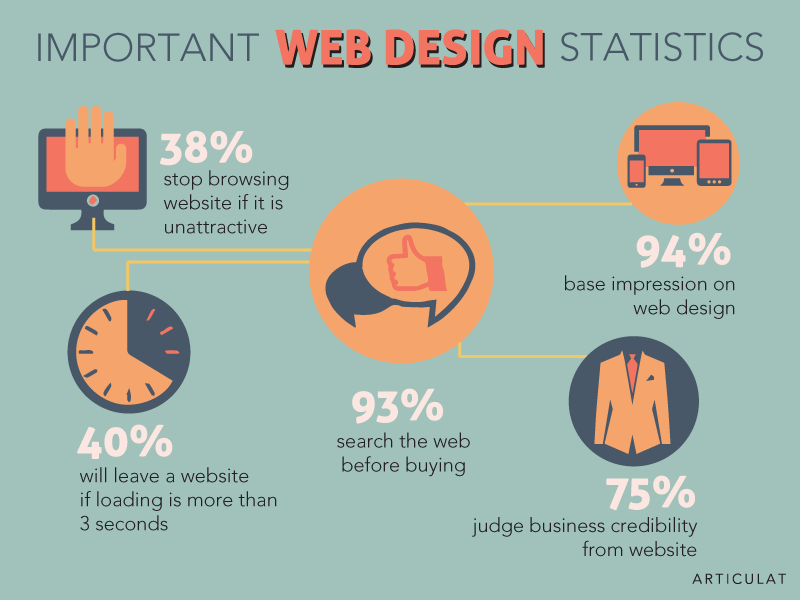
Research conducted by Stanford University found that “people quickly evaluate a site by visual design alone”. A good-looking site that’s easy to navigate will help you convince customers that you’re worthy of their time and money. Conversely, an amateur-looking site will turn people away.
#cta-visual-pb#<cta-title>Customize Shopify pages with Shogun<cta-title>Edit your Shopify site with the Shogun drag-and-drop editor.Get your free trial
Search engine optimization (SEO) is another factor at play here.
There’s more to SEO than just including keywords in your content. Search algorithms will also evaluate your average time on site (the amount of time visitors spend browsing your site) and bounce rate (the percent of visitors who back out after viewing only one page of your site) when determining your position in search engine results pages (SERPs).
These two stats are closely related to web design. Think about your own experience: if you land on a page and find it hard to use, you usually back out and try another site, right?
Some stores have takeout menu-like designs that overwhelm the visitor with dozens of links on each page. Another common problem is that product information is often displayed as dense walls of text.
The key issue here is that online stores have more pages than most sites, and depending on the products you sell, each page may need to contain a lot of information. That can make building successful Shopify stores a particularly difficult endeavor.
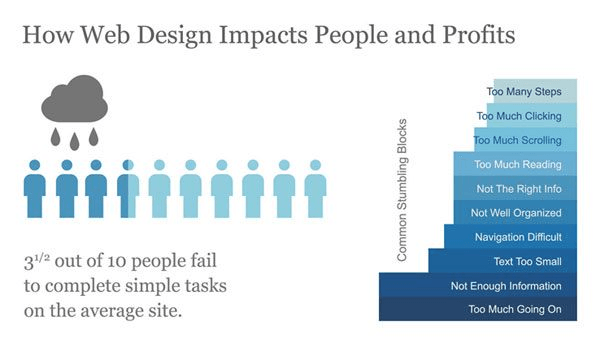
With good design, you can overcome these challenges. Dropdown menus, short paragraphs, bulleted lists, and a generous application of images and video are just a few of the techniques you can use to communicate information about your products while still pleasing the eye.
The better your store’s design, the higher you’ll rank on SERPs. That’s important, because the higher you rank on SERPs, the more traffic you’ll attract to your store. This leads directly to more sales.
Hiring a Designer vs. Using a Page Builder
Now that you understand the importance of web design, let’s get to the bottom line: how much is this going to cost you?
Even if you hire a web designer on a freelance, contractual basis instead of adding a new member to your staff, your web design expenses can still run into the thousands.
A more affordable option would be to use a page builder app like Shogun.
Shogun’s prices start at $39/month, which is less than you might pay for a single hour of work from a freelance designer. One case study showed that a store saved $250,000 by using Shogun.
The beauty of Shogun is that it allows anyone to produce web pages that look like they were designed by a professional. Without any firsthand design experience, you can create a Shopify store that makes a good first impression, gives you a boost in SERPs, and helps you convert more visitors into customers.
#cta-visual-pb#<cta-title>Customize Shopify pages with Shogun<cta-title>Edit your Shopify site with the Shogun drag-and-drop editor.Get your free trial
Shopify Web Design Tutorial (No Experience Required)
Shogun’s drag-and-drop interface and extensive library of elements give you all the tools you need to build your Shopify store. The next step is to learn how to use them.
In this Shopify web design tutorial, we’ll show you how to use Shogun to create product pages, landing pages, and FAQ/help center pages.
How to Make a Product Page
With the way web traffic flows these days, many visitors will end up bypassing your Shopify home page and going right to one of your product pages. And however visitors end up there, product pages are the most important part of your store. It’s where visitors will make their final decision regarding whether to purchase an item or not.
Make sure you include the following components in your product pages:
Call-to-Action (CTA) Button
Product pages are the most important part of your store, and the CTA button is the most important part of your product pages.
Your end goal, of course, is to convince the visitor to purchase your product. So, your “Add to Cart”, “Buy Now”, or whatever you call your main CTA button needs to be displayed prominently.
- Place your CTA button near the top of the page (at the very least, it absolutely must be above the fold, meaning that the visitor can see it without scrolling down).
- Use a button color that stands out in contrast to the background color and the rest of the page.
- Keep a decent amount of space between the CTA button and any text or images that are around it.
Featured Image
There are many advantages to shopping online. People love that instead of having to drag themselves to a store, physically browse through items, and stand in line, they can order items from the comfort of their own couch. You can’t beat that convenience.
But there are disadvantages to shopping online as well, foremost among them the fact that customers can’t try out products in-person before they buy.
The best way to compensate for the impersonal nature of online shopping is to emphasize the visual elements of your product pages.
Your featured image should be large, high-quality, and well-lit. There’s a practical reason for this: the customer will want to see the product in detail so that they can make an informed decision. There’s also a psychological reason: if you publish pixelated or poorly lit images, it makes your business look unprofessional as a whole.
Image Gallery
One image isn’t enough! Again, you must compensate for the fact that your customers don’t get a chance to look at your products in person.
You should include images that show your products from different angles so that your customers can get the full picture. Include some action shots that depict your products in use, too.
Key Details
If you can find a way, include all the key details about your product (price, features, customization options) above the fold.
Description
Try to make your descriptions as original as possible. If it fits with the tone that you’ve established in other marketing materials, you can use slang, humor, and pop culture references to accomplish this.
Social Proof
Displaying customer reviews that back up the claims you’ve made in your advertising copy proves to visitors that you deserve their trust.
To build a product page with Shogun:
1. After purchasing Shogun or starting a 10-day free trial, go to the “Apps” section of your Shopify dashboard and select Shogun.
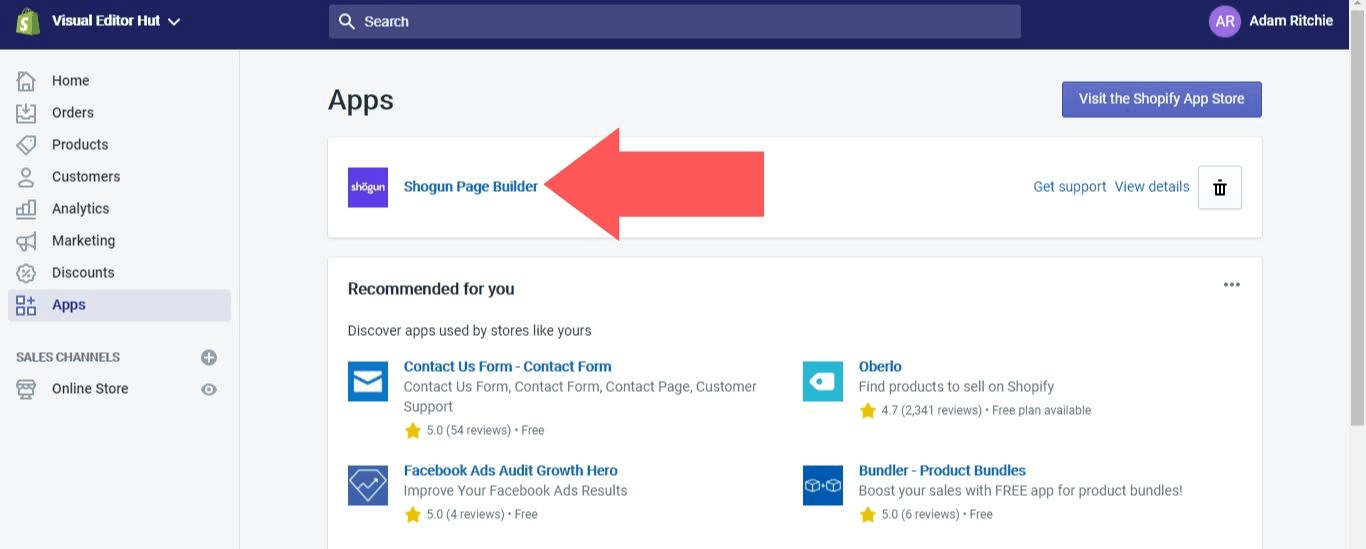
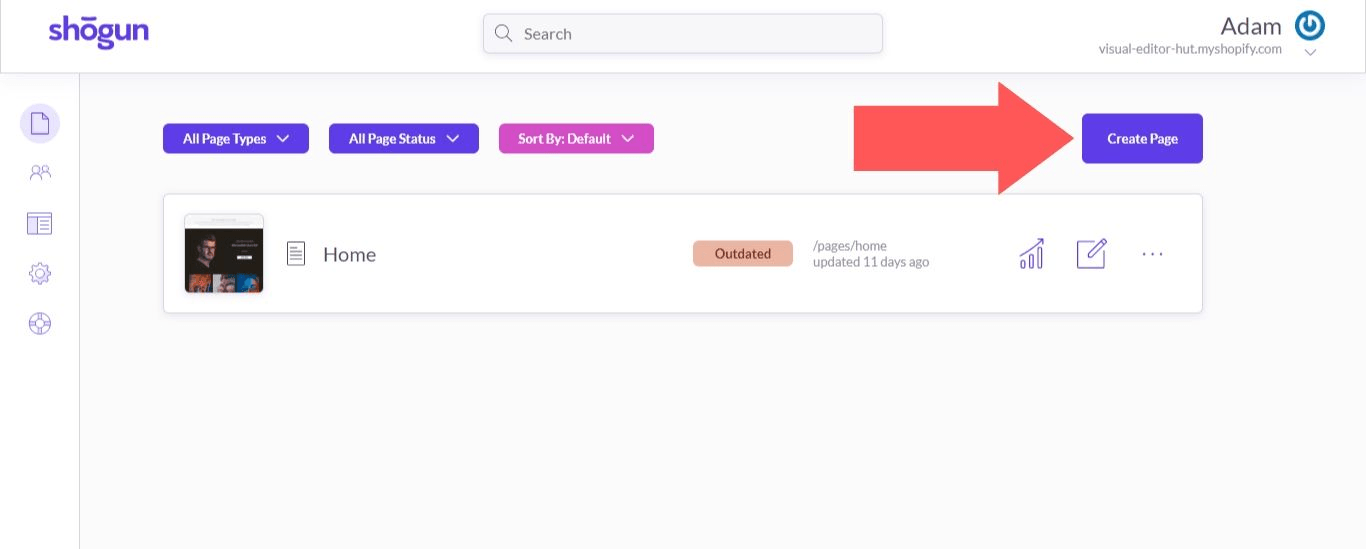
2. Select “Create Page”.
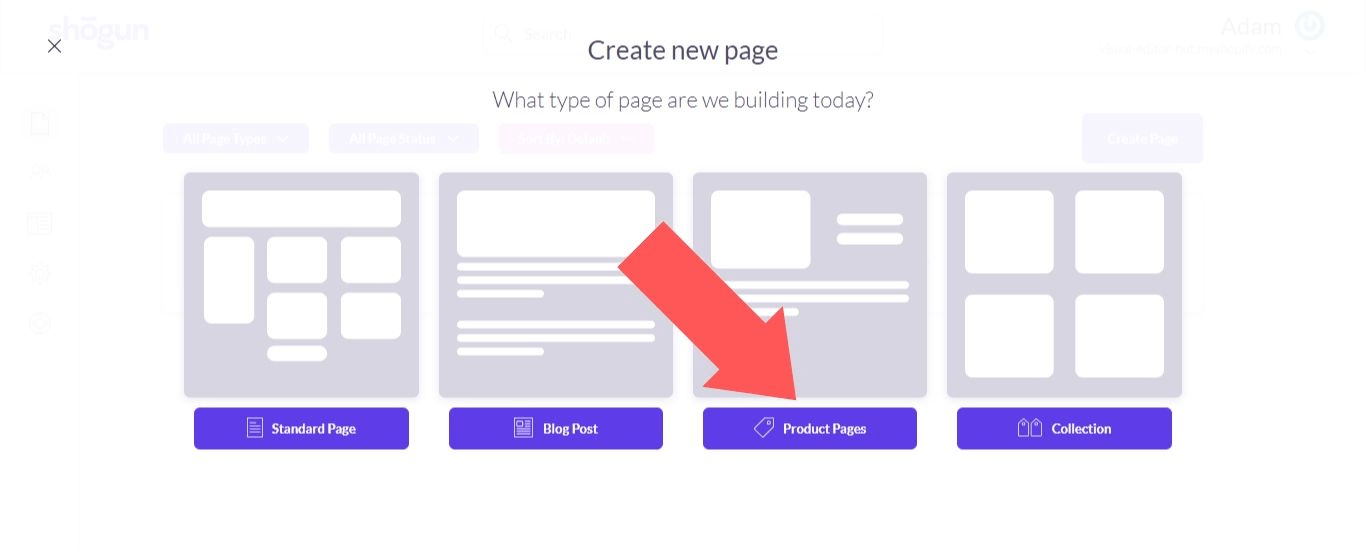
3. Select “Product Pages”.
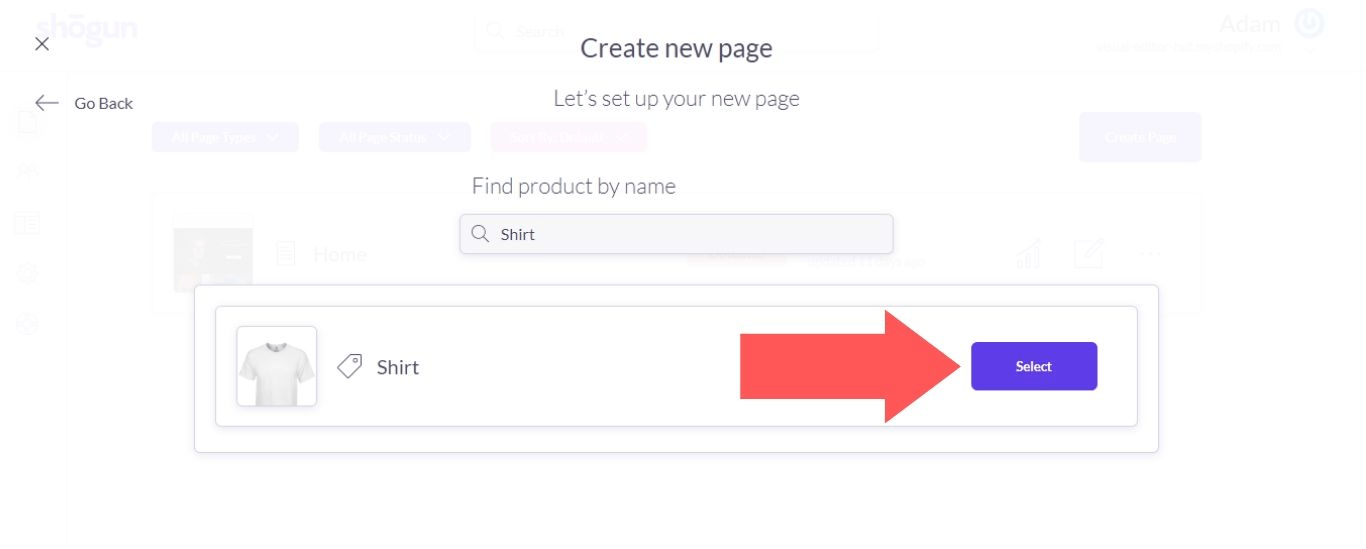
4. Enter the name of the product in your Shopify store that you’re making a page for. Then, click on the “Select” button.
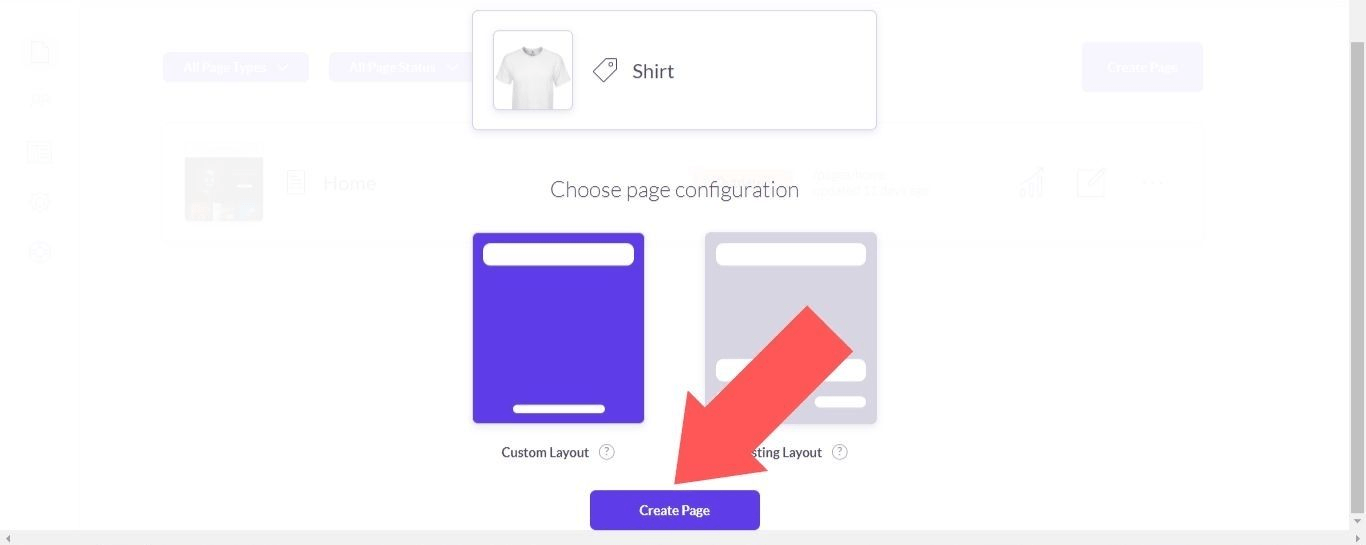
5. Choose between editing your existing Shopify theme’s layout or creating a custom layout (in this example, we’ll be creating a custom layout). Then, select “Create Page”.
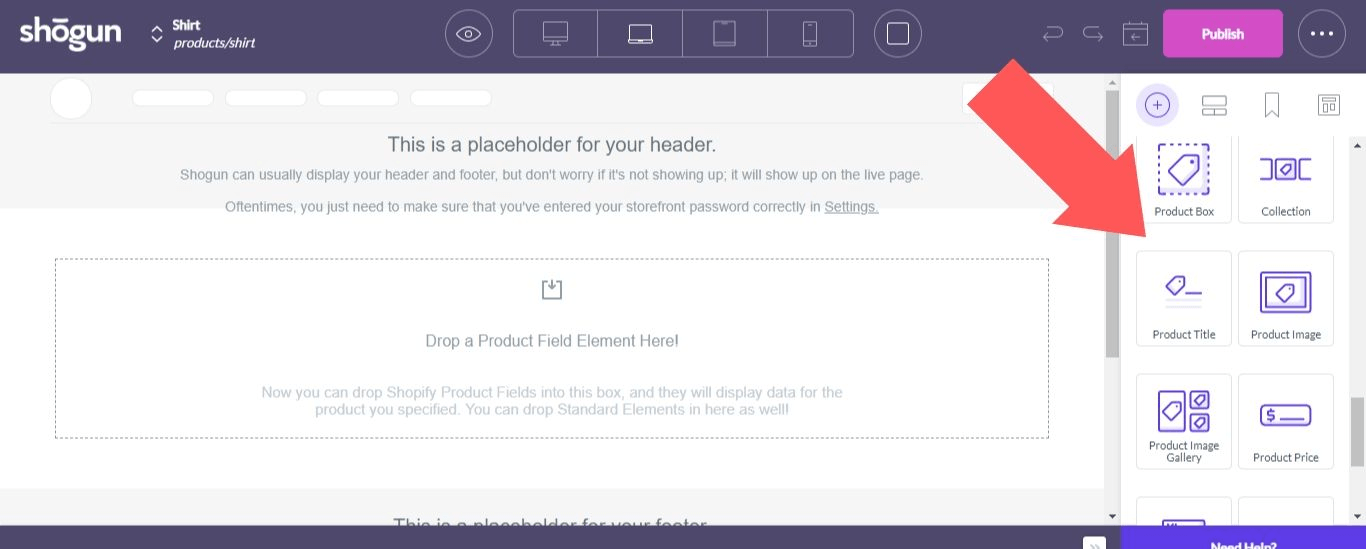
6. In the library of elements in the right sidebar, you’ll find the key components of a product page that we reviewed above.
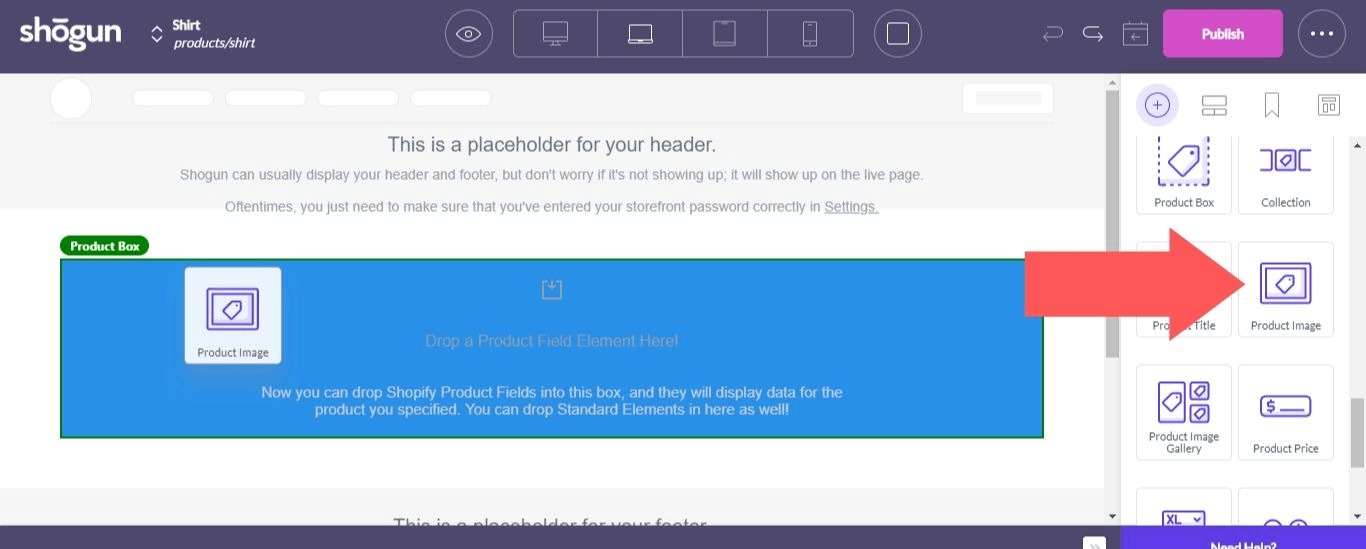
7. First, let’s drag and drop a “Product Image” element into the page (the featured image of the product that you established in the Shopify interface will automatically be filled in).
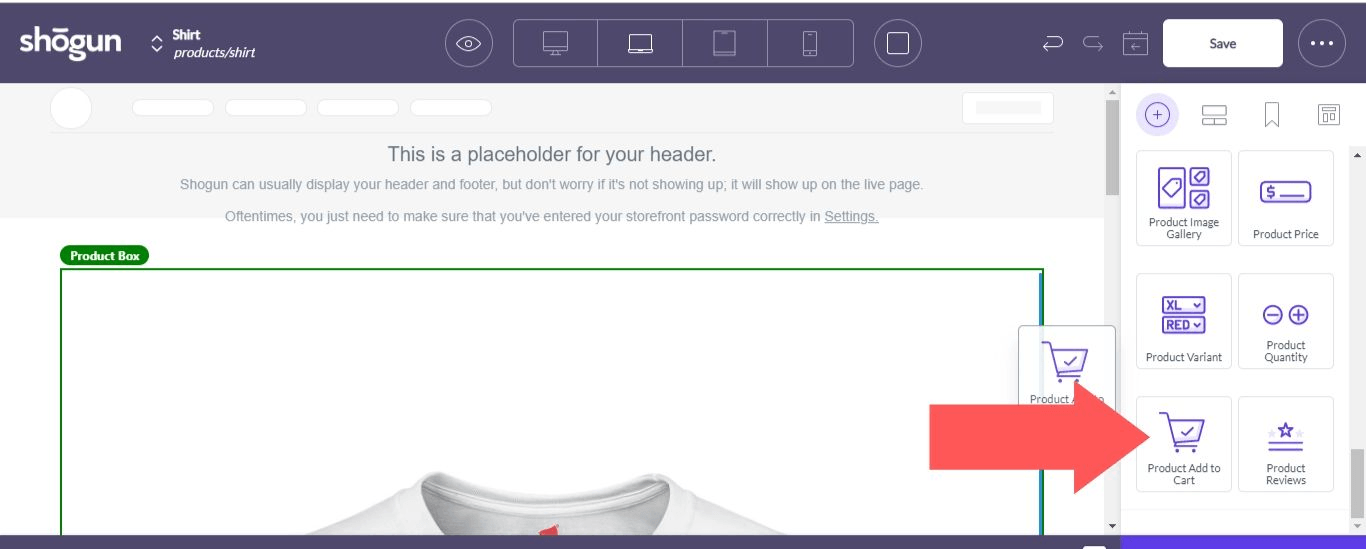
8. Next, we’ll add the premade “Product Add to Cart” button to the right of the featured image.
9. Use a “Heading” element above the “Product Add to Cart” button for the name of the product.
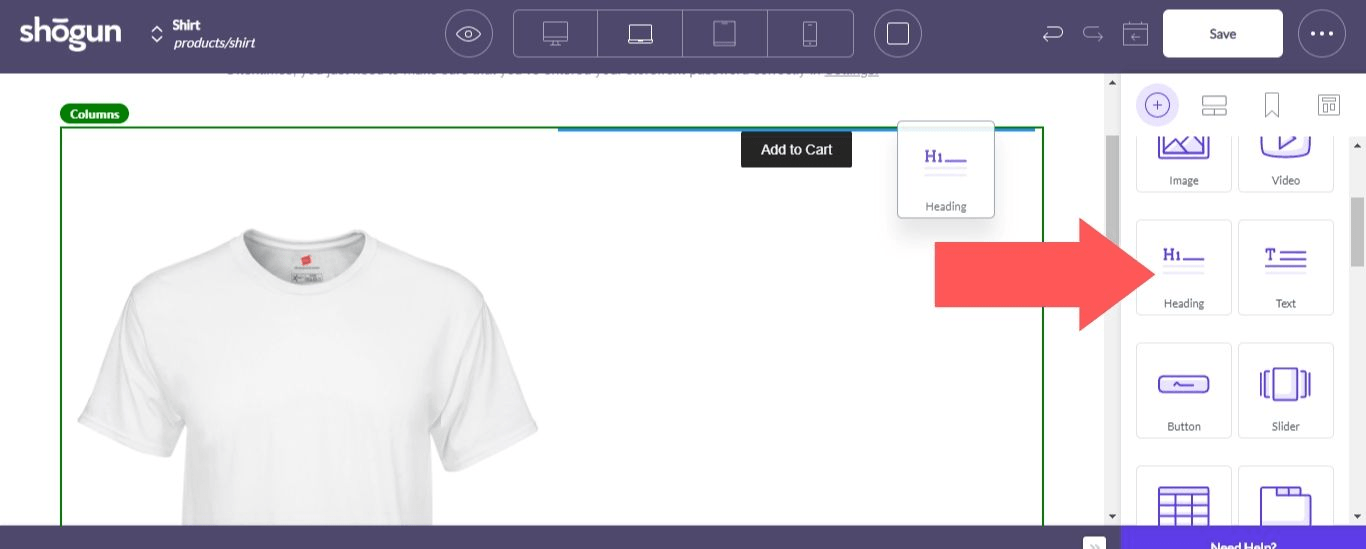
10. Use the “Product Price” element to add the price.
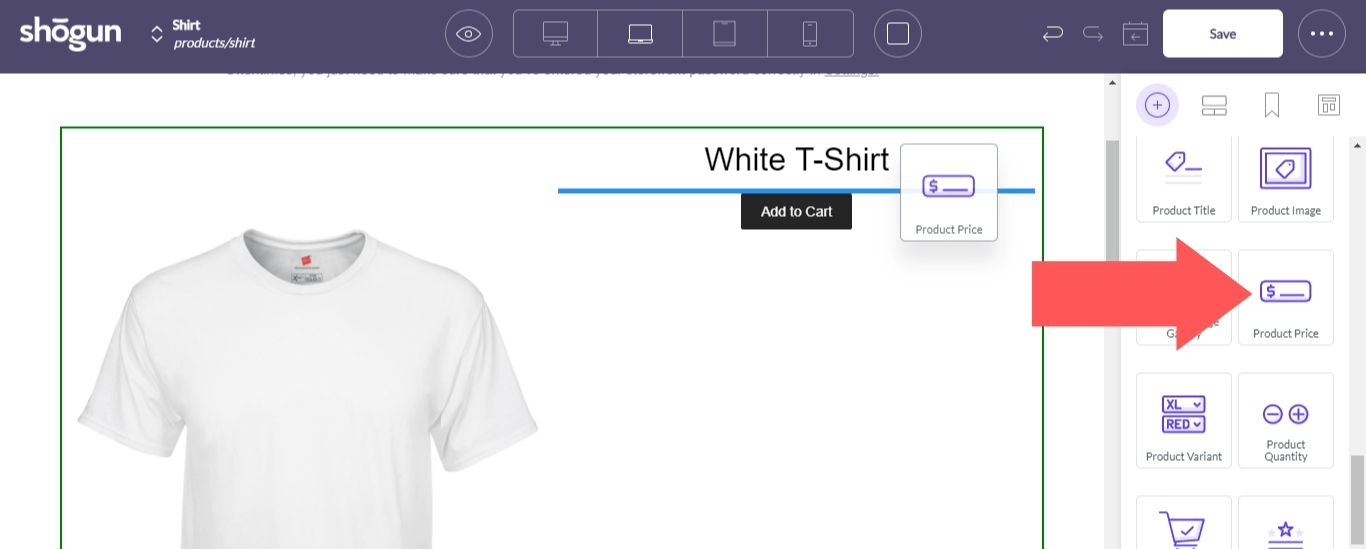
11. Use the “Product Variant” element to add customization options (this will also pull from the product information you set up in the Shopify interface).
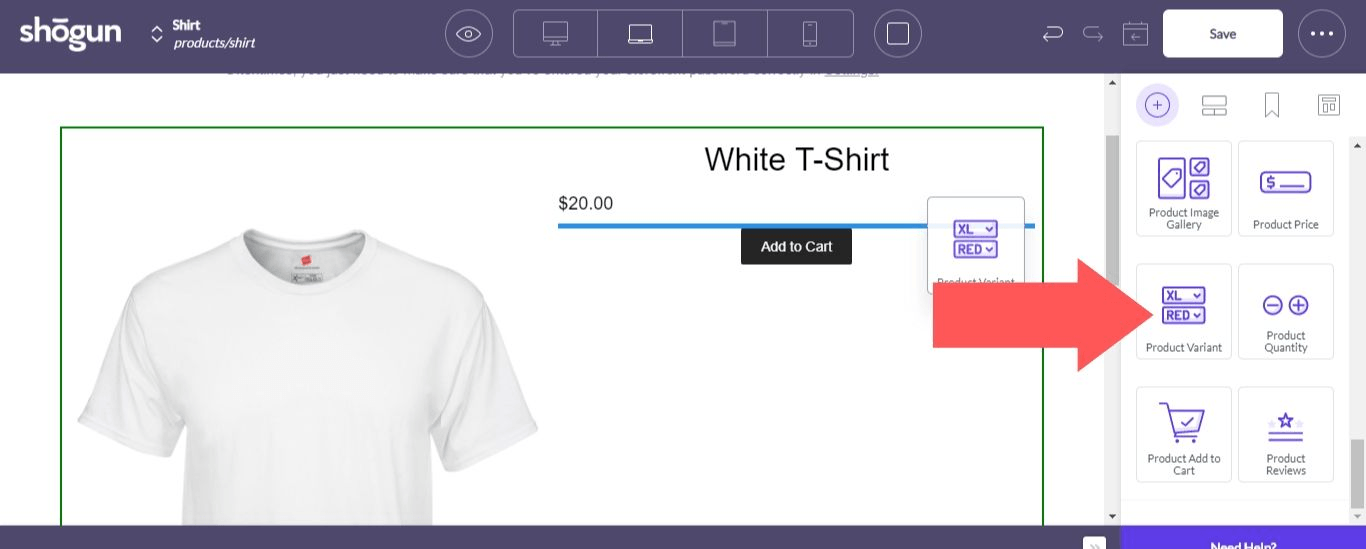
12. Use the “Text” element for your description.
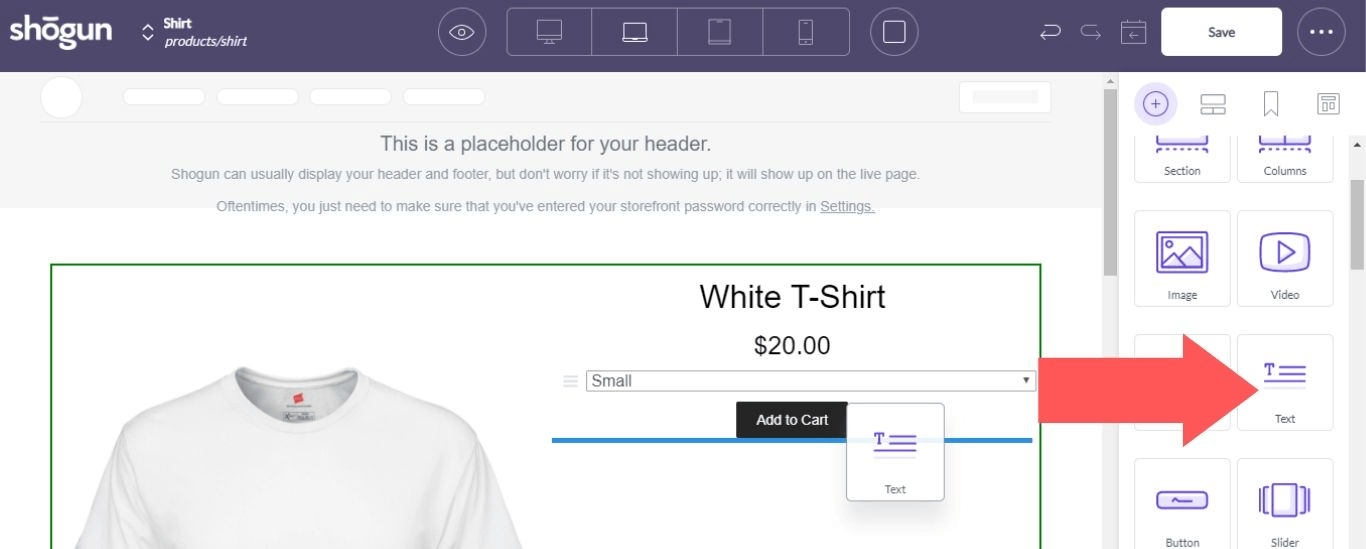
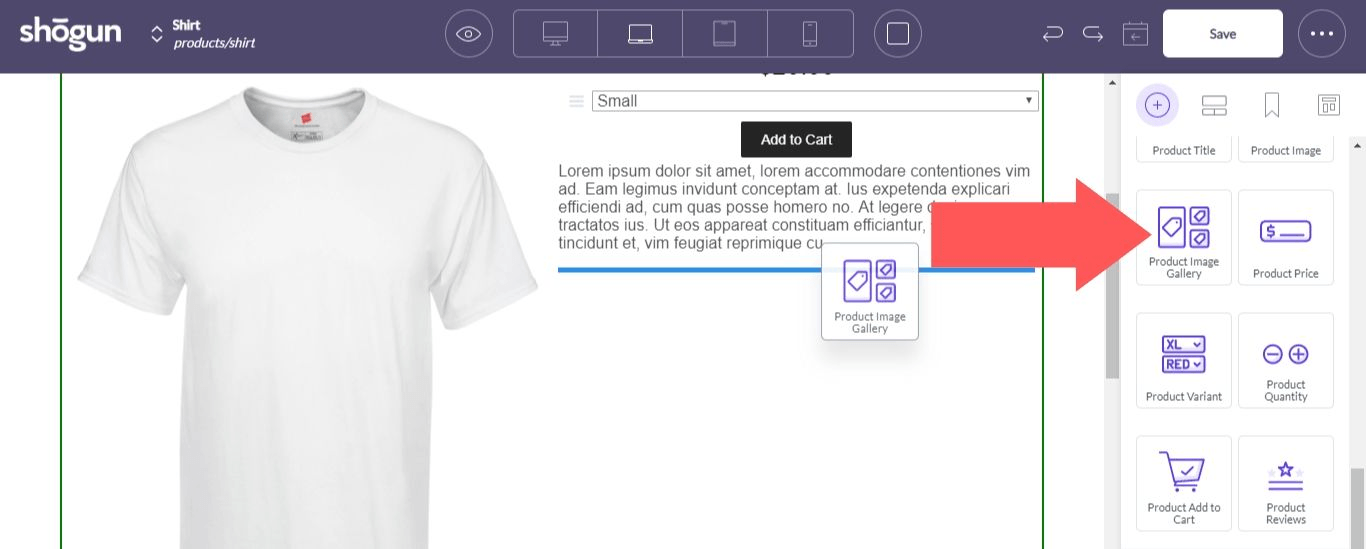
13. Use the “Product Image Gallery” element to add more images.
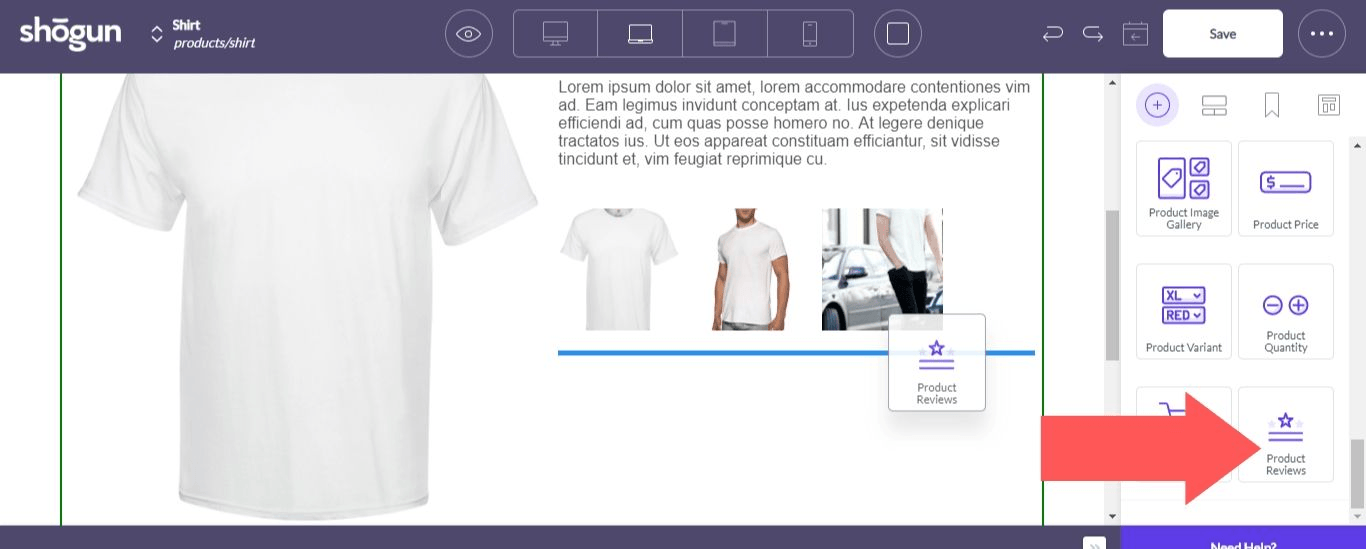
14. Use the “Product Review” element to add social proof.
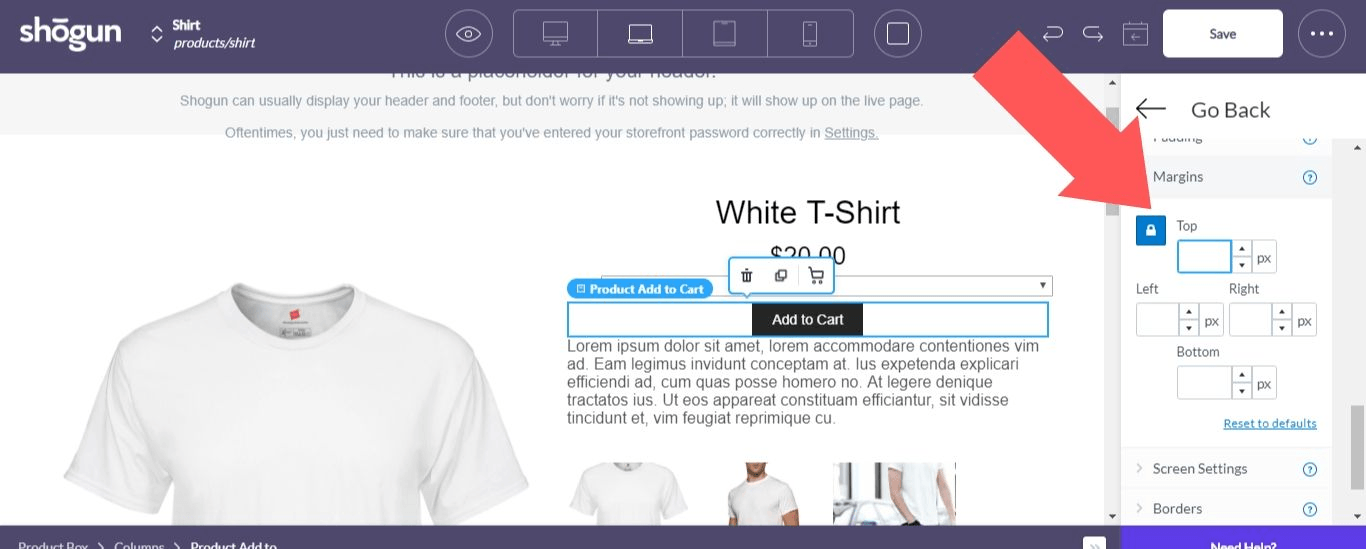
15. One last thing: let’s add some margins to the “Product Add to Cart” button to reduce the clutter around it (remember, this button needs to stand out).
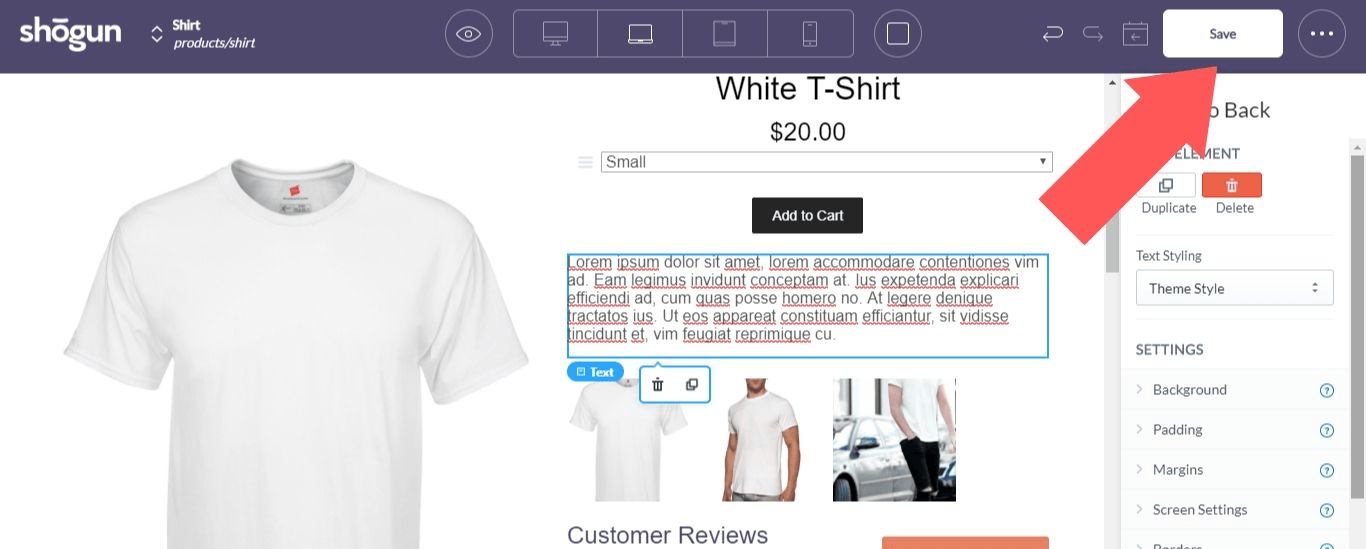
16. Whenever you’re done editing a page on Shogun, select “Save”.
17. To publish the page, select “Publish”.
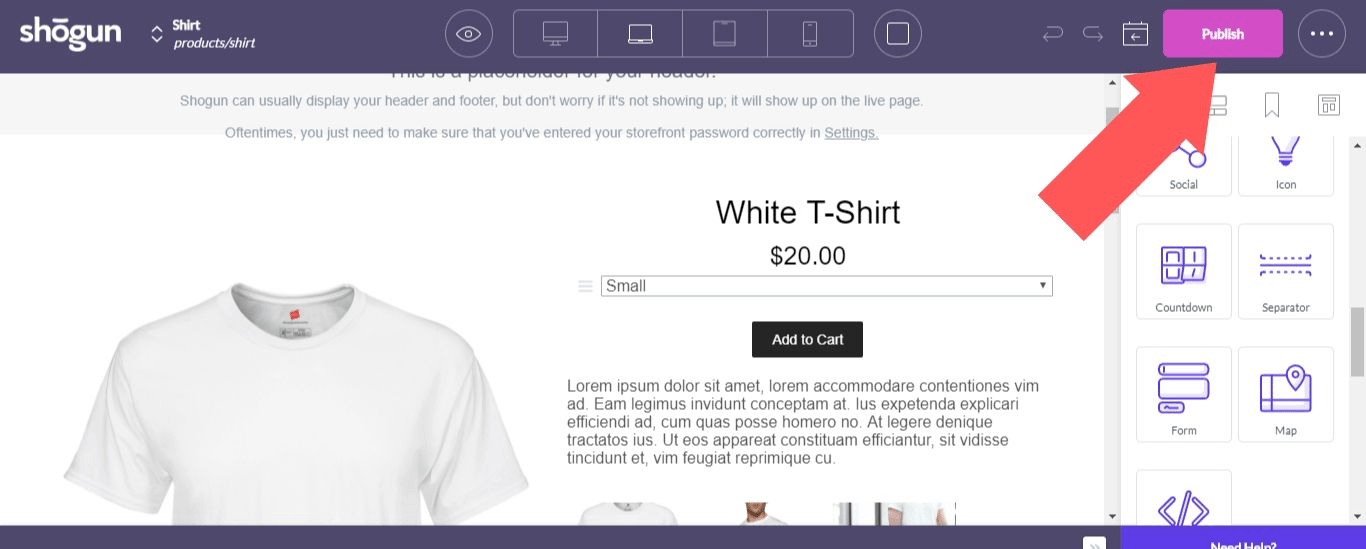
You can adjust these elements to match the colors of your brand and get the spacing just the way you want it. Each element has its own unique set of options as well (for example, clicking an image in the “Product Image Gallery” element can either make it the featured image or open it in a lightbox).
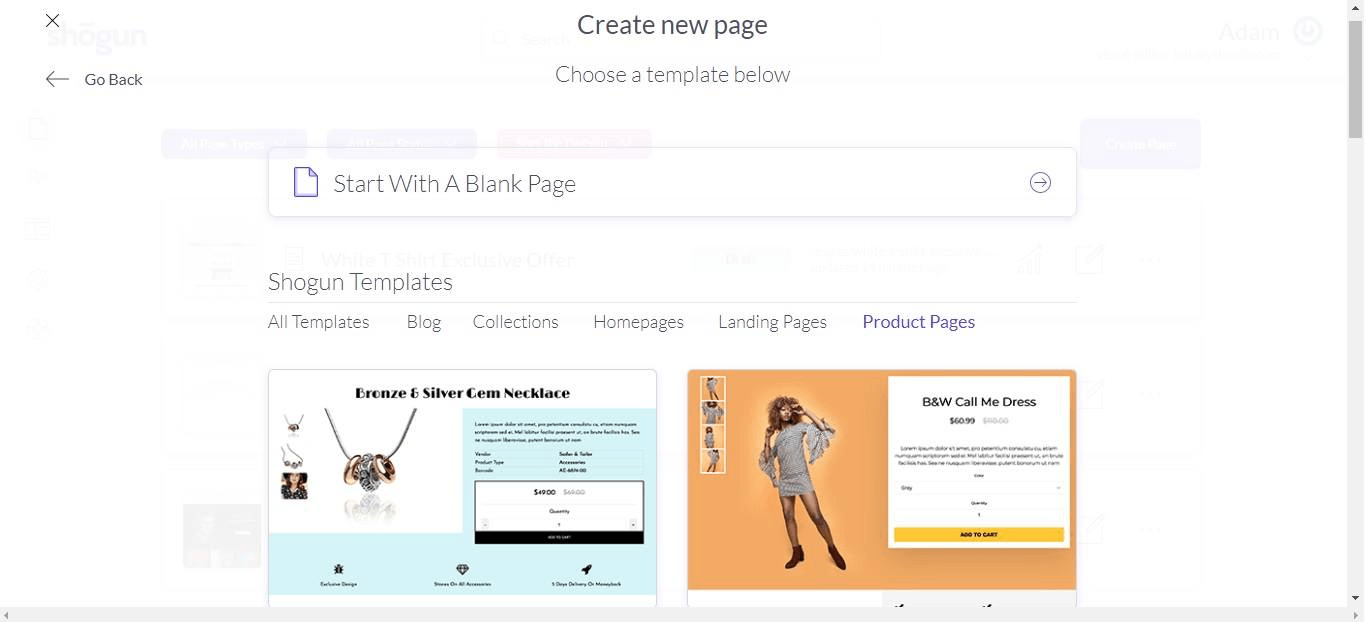
Also, instead of making a product page from scratch like this, you could have gone to “Create Page” > “Standard Page” > “Product Pages” when you were first setting up your page to start with a premade template.
How to Make a Landing Page
Just like with product pages, prominent images and CTA buttons will make your landing pages more successful.
To build a landing page with Shogun:
1. Select “Create Page”.

2. Select “Standard Page”.
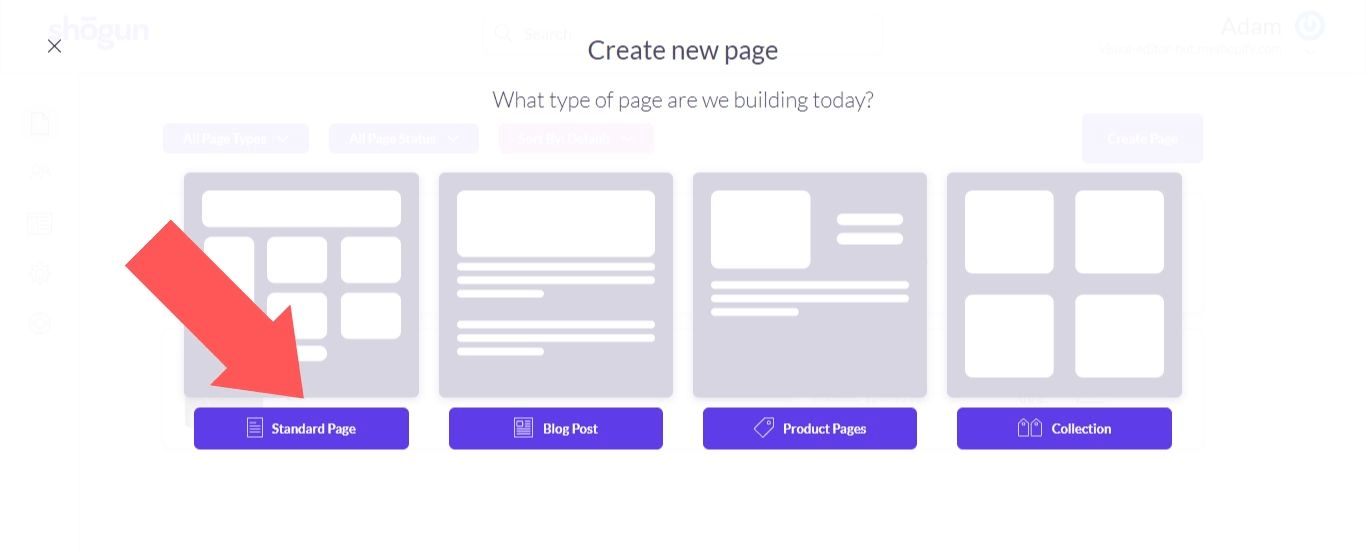
3. Under “Shogun Templates”, select “Landing Pages”.
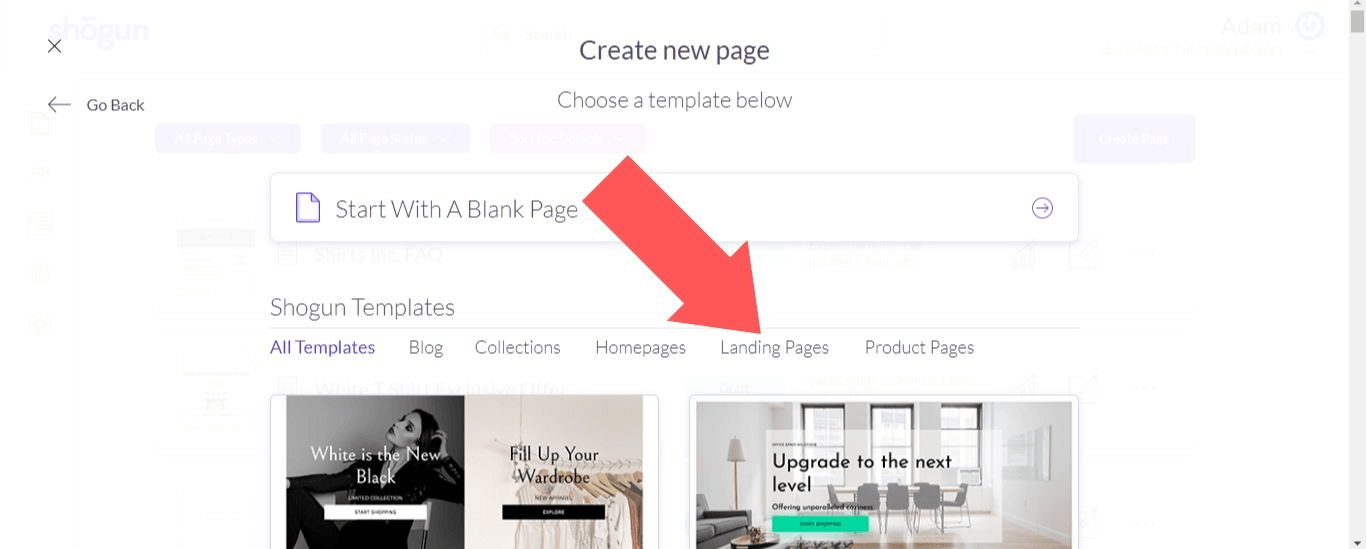
4. You’ll find that there are landing page templates available for many different purposes, from standard home pages to limited time offers to returns and exchanges pages. For this example, we’ll set up a landing page for a limited time offer.
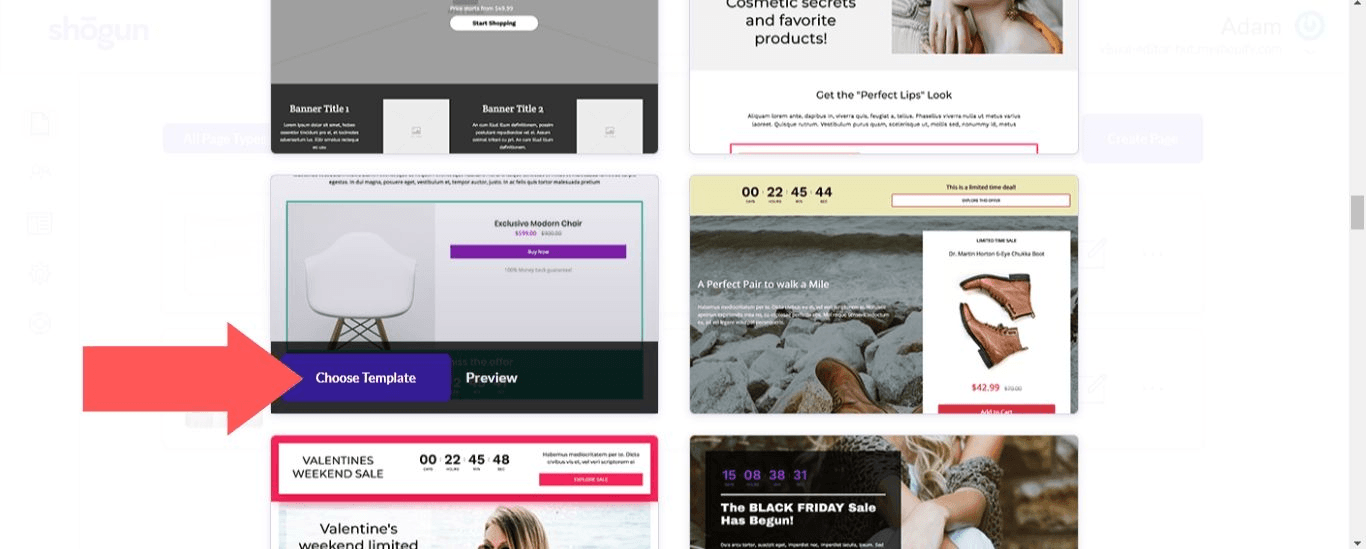
5. Add a name and URL for the page, choose whether you want to include your theme’s header and footer, and then select “Create Page”.
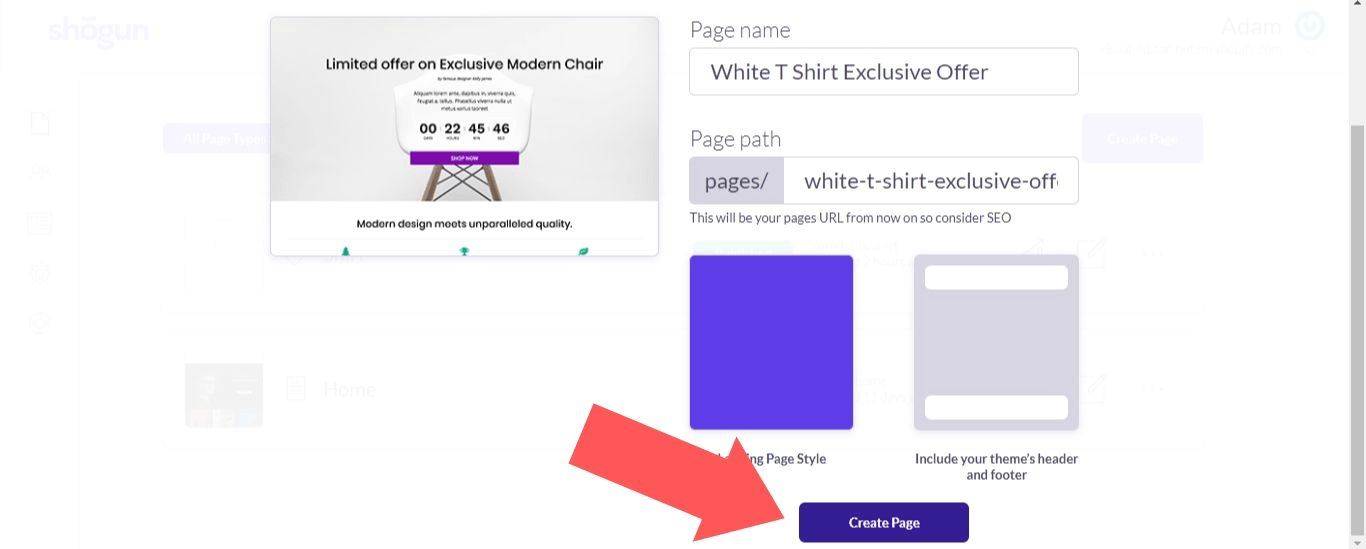
6. At this point, all you need to do is replace the default content in the template with content about your limited time offer. Save and publish the page when you’re done. Easy!
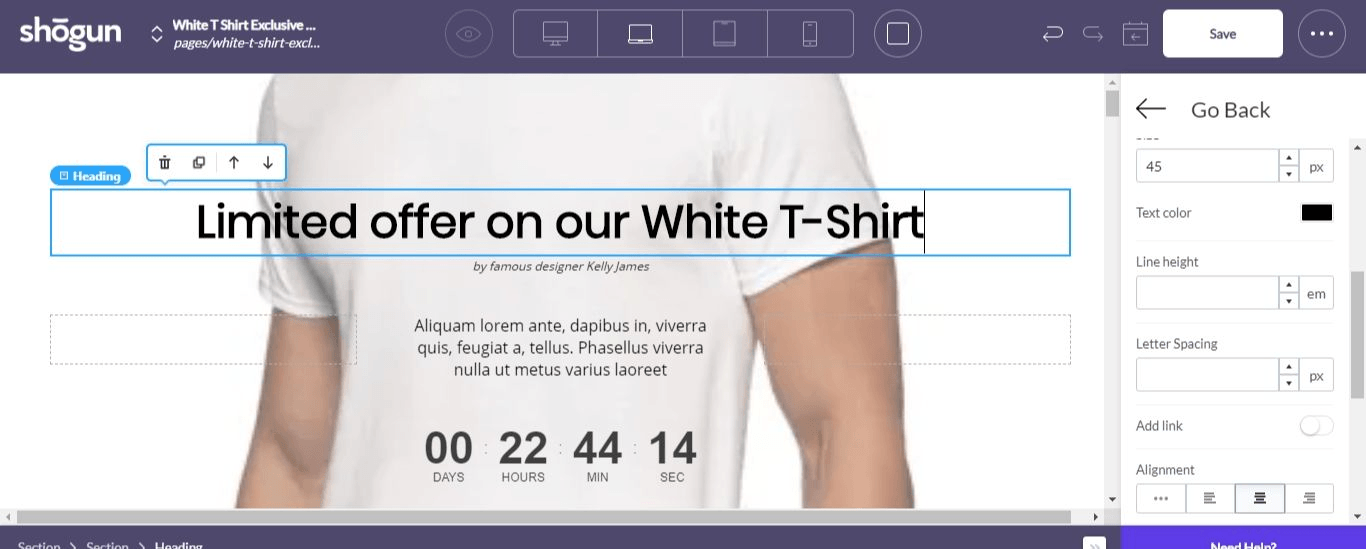
As with any other page, you could make a landing page from scratch instead of using a template. If you know that you’ll be tinkering with the layout a lot, it may be more convenient to just start from scratch. But in most cases, using one of the Shogun templates is a faster and easier way to build your page.
How to Make a Shopify FAQ Page
Have you ever considered adding a Shopify FAQ page/Shopify help center to your store?
Publishing this resource can provide you with many benefits, including:
- It’s a natural way to include more keywords on your site, which improves SEO.
- Allowing visitors to find answers in your store, as opposed to forcing them to back out and look elsewhere, will improve SEO by increasing your average time on site.
- You can build trust with potential customers by showing off your expertise and establishing yourself as an authority.
- If you have a customer service team in place, publishing FAQs will reduce the number of support requests that they have to deal with. This gives them more time to dedicate to other tasks.
An FAQ page doesn’t need to be visually engaging like your product pages and landing pages. It’s all about the information.
To build an FAQ page in Shogun:
1. Select “Create Page”.

2. Select “Standard Page”.

3. Scroll down and you’ll see multiple templates for FAQ pages near the bottom of the page. Choose one.
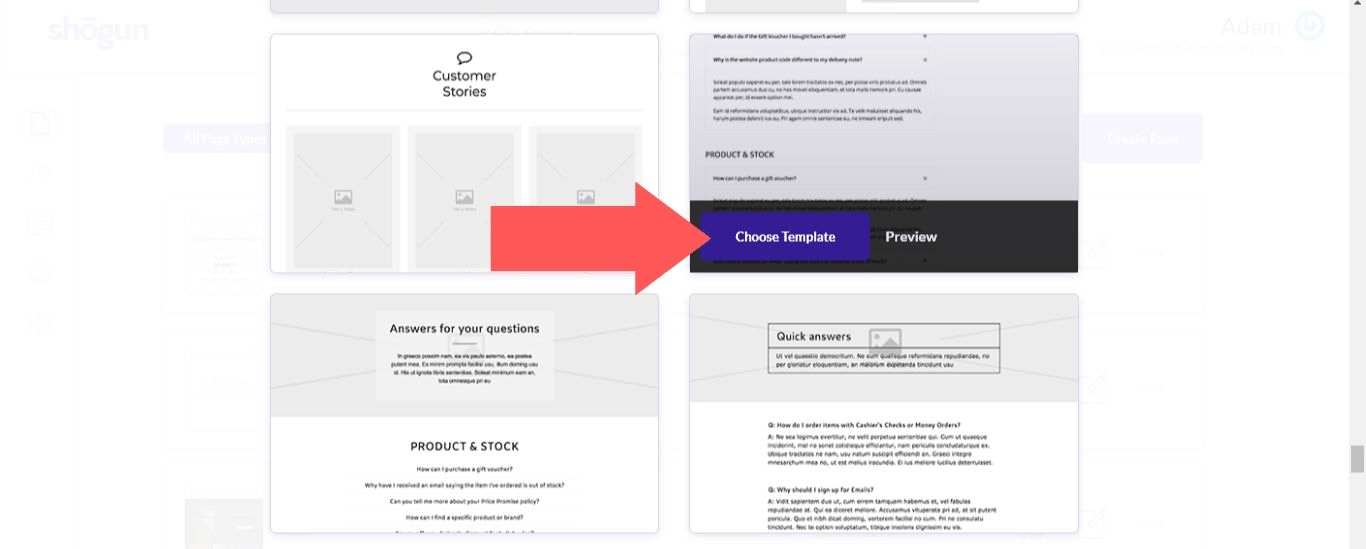
4. Again, to continue you’ll need to add a name and URL for the page, choose whether you want to include your theme’s header and footer, and select “Create Page”.
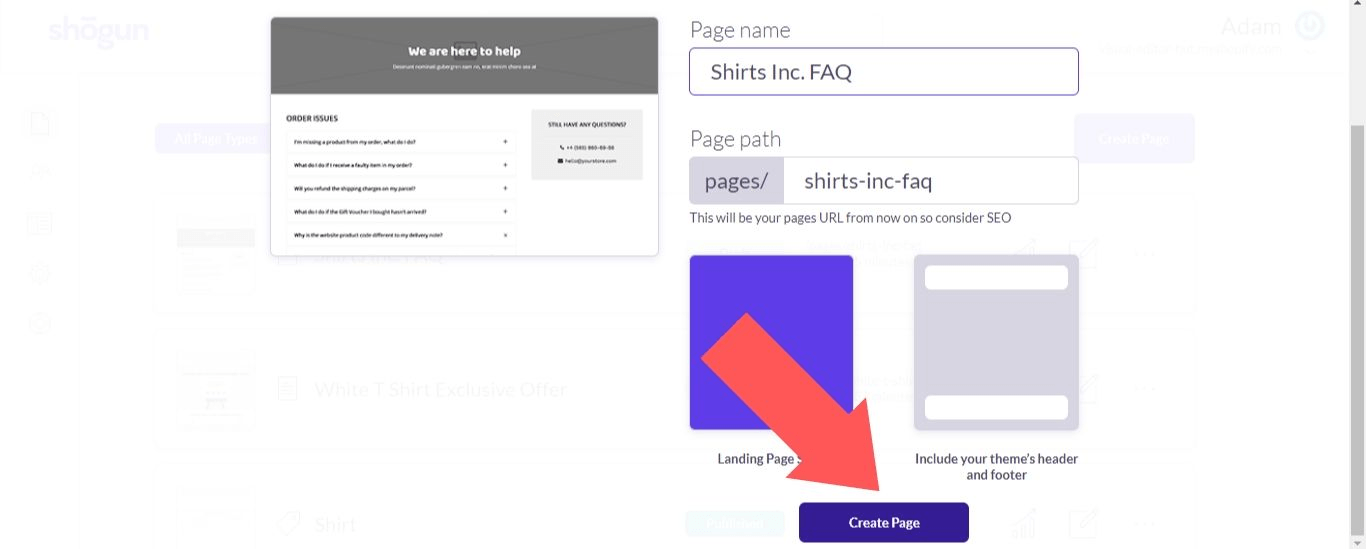
5. Replace the default content with your content. The template we’ve chosen for this example uses an “Accordian” element that displays all the questions but lets the visitor choose which answers they want to see. This improves navigability, and it allows you to have a large amount of information on your FAQ page without any intimidating walls of text.
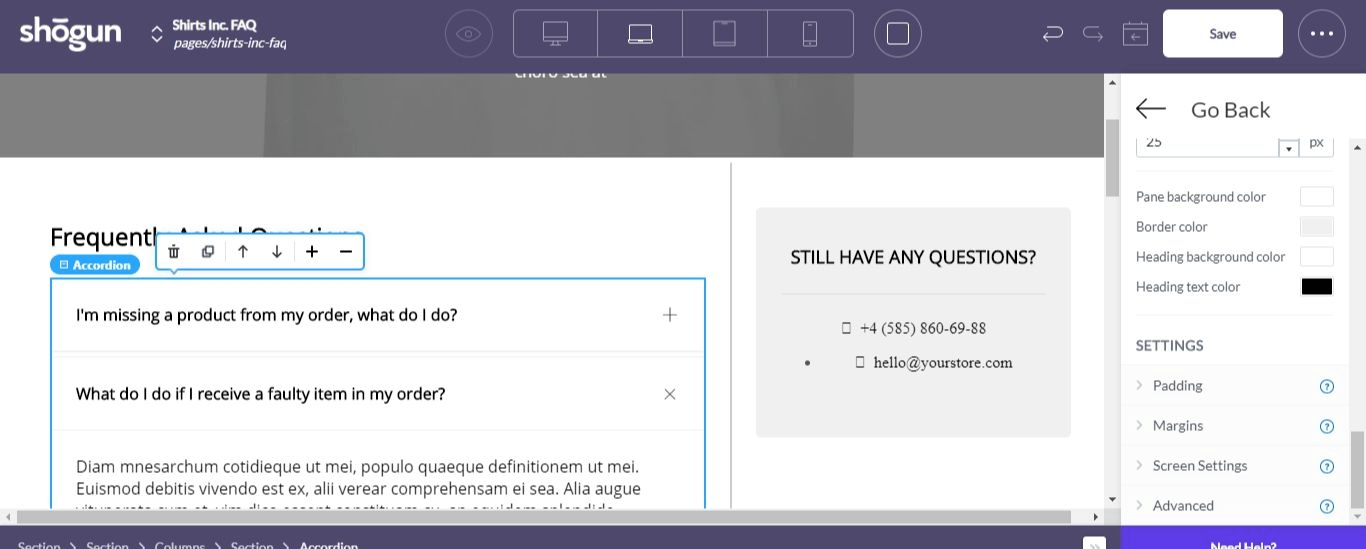
When you’re done, save your changes and publish the page.
Find Your Inner Web Designer
You may only be a redesign away from generating much more revenue from your online store.
And you don’t even have to hire a designer. From product pages to landing pages to FAQ pages, you can build everything your Shopify store needs with Shogun.
#cta-visual-pb#<cta-title>Customize Shopify pages with Shogun<cta-title>Edit your Shopify site with the Shogun drag-and-drop editor.Get your free trial

Adam Ritchie
Adam Ritchie is a writer based in Silver Spring, Maryland. He writes about ecommerce trends and best practices for Shogun. His previous clients include Groupon, Clutch and New Theory.

