


Interested in adding a product image slider to your Shopify store?
Whether you decide to use a third party solution or make the edits to your theme natively, we’ll walk you through every step involved in this process.
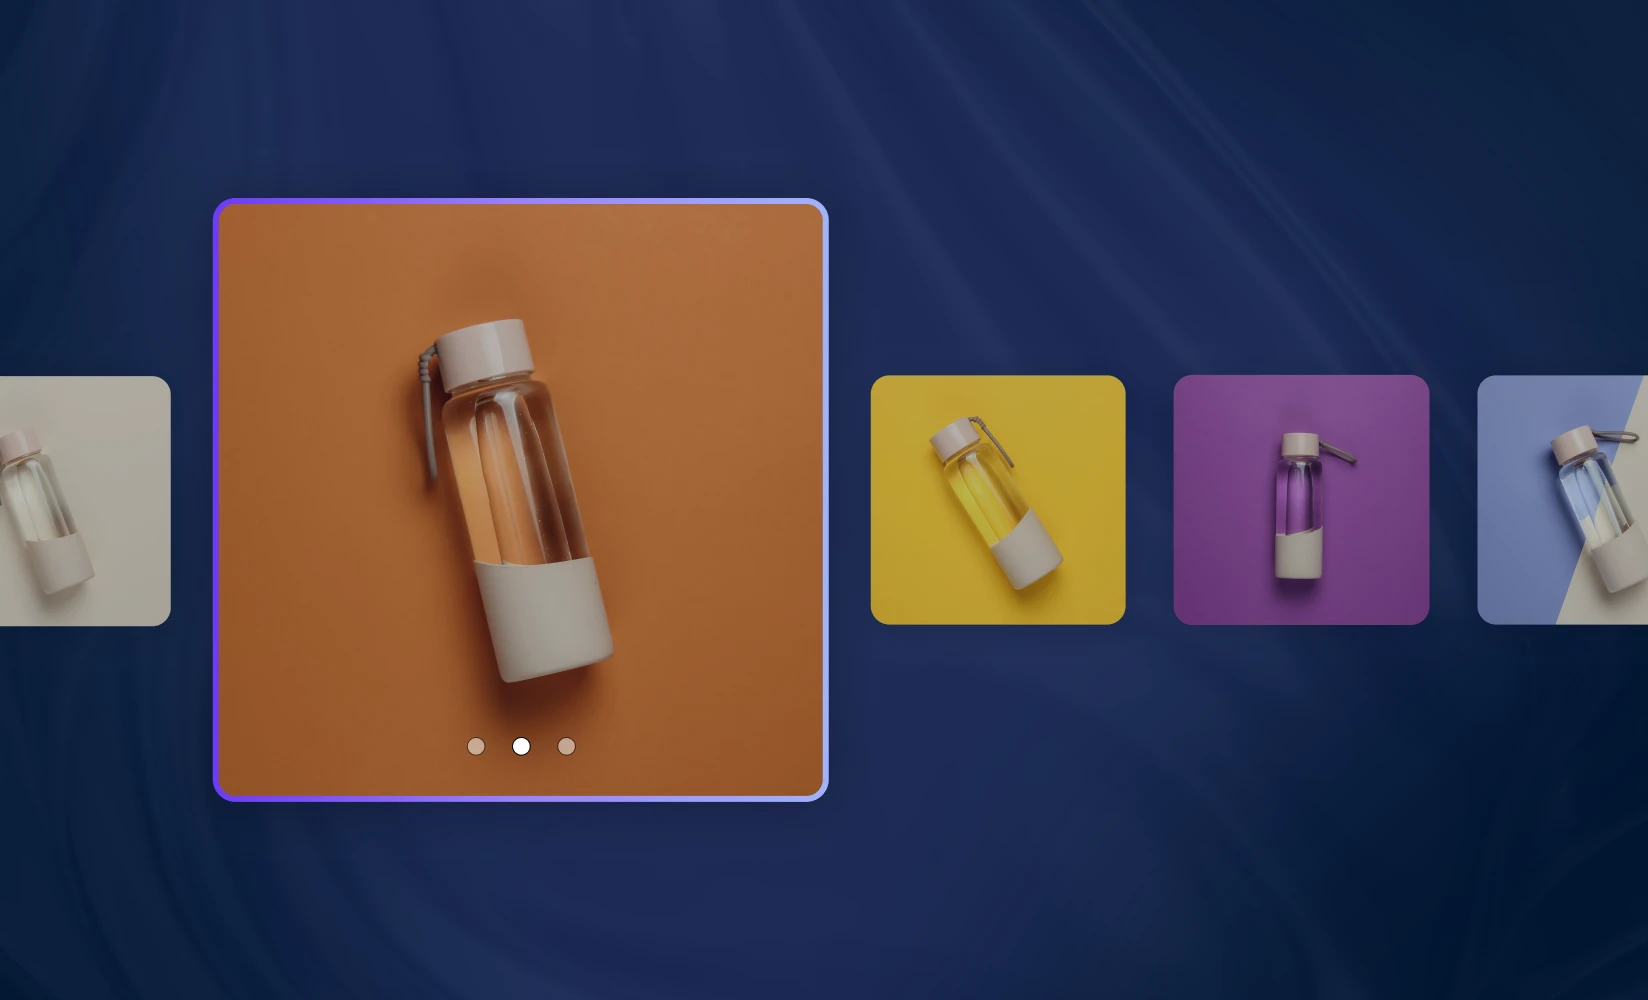
Sliders are slideshows featured as part of a web page. They can be automated (slides transition from one to the next on their own) or manual (the visitor must click on an arrow or similar design element to switch to the next slide).
The main benefit of sliders is that they allow you to add more content to the page without making it longer or more cluttered.
There are many ways that you can utilize sliders on your Shopify store, such as:
Sliders are also a particularly useful tool for presenting product images.
The key disadvantage to online shopping is that customers don’t get a chance to evaluate products in-person before they commit to making a purchase. So, you’ll need to provide as much information as you can through your website in order to convince them to hit the buy button — and visual information is much more compelling than any other type of content.
Indeed, a 2018 survey found that 60% of consumers feel like they need to see three or four images of a product before they feel comfortable purchasing it online. An additional 13% need to see five or more images.
With sliders, you can add the number of images your customers expect while still maintaining a sleek, modern page design. In this instance, you can have your cake and eat it, too.
Unfortunately, many Shopify themes don’t have a built-in product image slider feature.
In that case, you could still add a product image slider by editing your theme code. The following code example demonstrates how this is done:
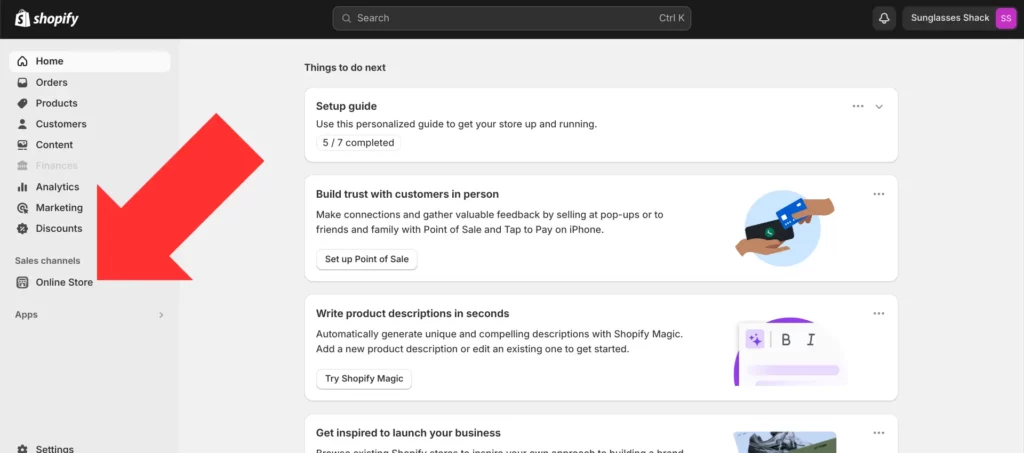
Step 1. Log in to your Shopify account and select the sales channel you would like to edit.
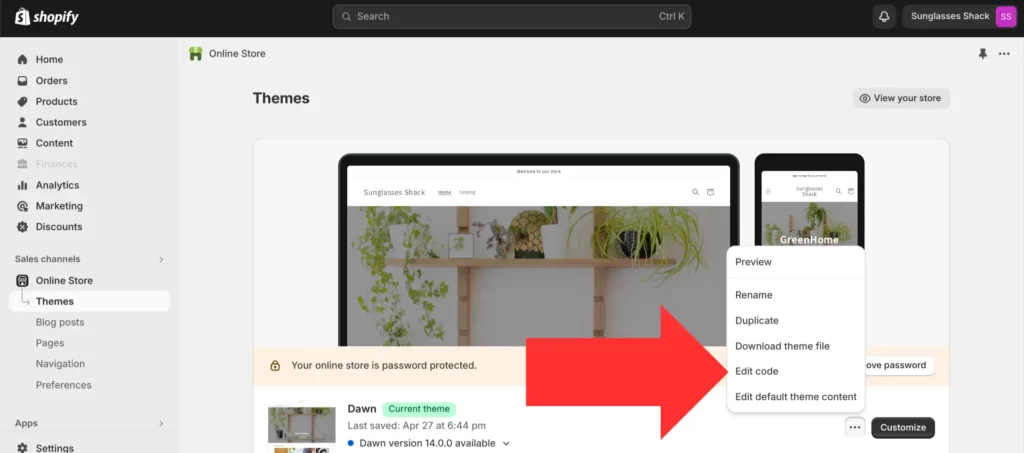
Step 2. Open the “…” menu located next to your theme and select “Edit code”.
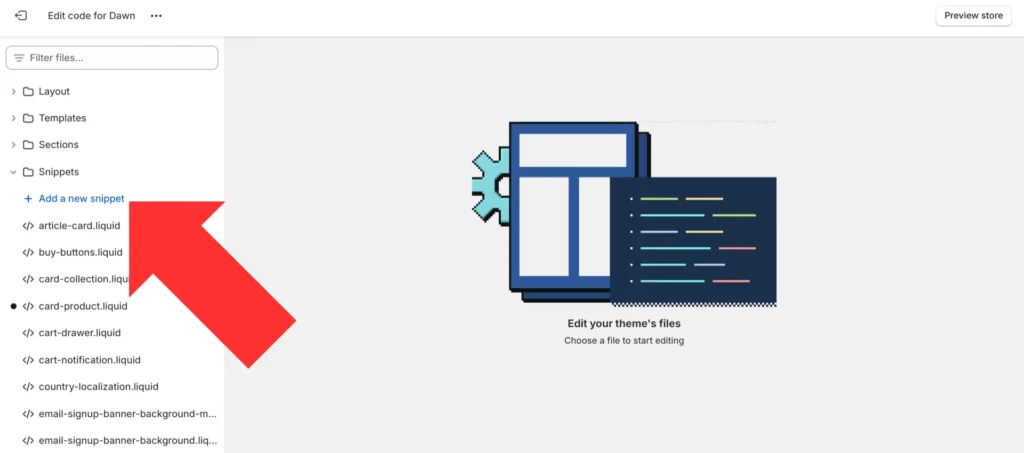
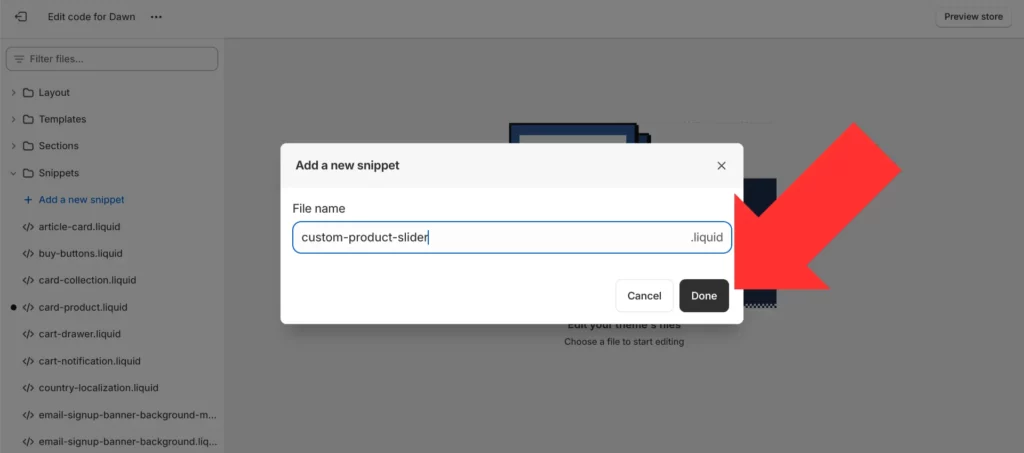
Step 3. Open the “Snippet” folder in the left sidebar and select “Add a new snippet”.
Step 4. Name the file “custom-product-slider”, then select “Done”.
Step 5. Add the following code to your new snippet:
{% if product.images != null %}
  <div class="carousel product__image-slider" role="document" aria-label="{{ 'products.modal.label' | t }}" tabindex="0">
    {%- for media in product.media -%}
      <div class="carousel-cell">
        {% if media.media_type == "video" %}
          {{ media | media_tag: image_size: "720x", autoplay: true, loop: loop, controls: true, preload: "none", autoplay: true, height: "100%", width: "100%" }}
        {% else %}
          <img src="{{ media | img_url: '1440x' }} 1440w, {{ media | img_url: '1080x' }} 1080w, {{ media | img_url: '720x' }} 767w, {{ media | img_url: '480x' }} 480w" data-flickity-lazyload-srcset="{{ media | img_url: '1440x' }} 1440w, {{ media | img_url: '1080x' }} 1080w, {{ media | img_url: '720x' }} 767w, {{ media | img_url: '480x' }} 480w" sizes="(min-width: 480px) 1440px, 1080px, 767px, 480px" data-flickity-lazyload-src="{{ media | img_url: 'master' }}" alt="{{ media.alt | escape }}" border="0" data-media-id="{{ media.id }}" />
        {% endif %}
      </div>
    {%- endfor -%}
  </div>

  {% if product.images.size > 1 %}
    <div class="carousel product__image-thumbnail">
      {%- for media in product.media -%}
        <div class="carousel-cell">
          <img src="{{ media | img_url: '1440x' }} 1440w,
            {{ media | img_url: '1080x' }} 1080w,
            {{ media | img_url: '720x' }} 767w,
            {{ media | img_url: '480x' }} 480w"
            data-flickity-lazyload-srcset="
              {{ media | img_url: '1440x' }} 1440w,
              {{ media | img_url: '1080x' }} 1080w,
              {{ media | img_url: '720x' }} 767w,
              {{ media | img_url: '480x' }} 480w"
            sizes="(min-width: 480px) 1440px, 1080px, 767px, 480px"
            data-flickity-lazyload-src="{{ media | img_url: 'master' }}"
            alt="{{ media.alt | escape }}"
            border="0"
            data-media-id="{{ media_id }}"
          />
        </div>
      {%- endfor -%}
  </div>
  {% endif %}
{% else %}
  {{ 'product-1' | placeholder_svg_tag }}
{% endif %}

<script>
var elem = document.querySelector('.carousel.product__image-slider');
var flkty = new Flickity( elem, {
contain: true,
imagesLoaded: true,
lazyLoad: 1,
wrapAround: true,
pageDots: false,
{% if product.images.size < 2 %}
prevNextButtons: false,
{% endif %}
adaptiveHeight: true
});
var elemThumbnail = document.querySelector('.carousel.product__image-thumbnail');
var flktyB = new Flickity( elemThumbnail, {
asNavFor: '.carousel.product__image-slider',
contain: true,
imagesLoaded: true,
lazyLoad: 4,
pageDots: false,
prevNextButtons: false
});
</script>
Save your changes.

Step 6. Open the “Sections” folder and select the “main-product.liquid” file.

Step 7. To replace the standard featured image section with a product image slider, search for the following code:
{% render 'product-media-gallery', variant_images: variant_images %}
And replace it with this code:
      {% comment %}{% render 'product-media-gallery', variant_images: variant_images %} {% endcomment %}
      {% render 'custom-product-slider' %}
Finally, save your changes.

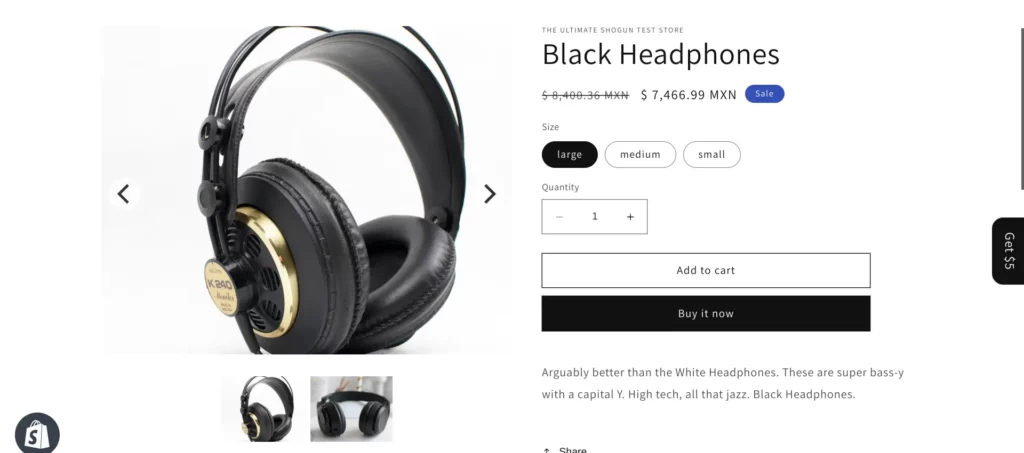
Once you’ve completed these steps, you’ll find that your product pages with multiple product images now have a product image slider.
It should be noted that the code example detailed above was demonstrated on the latest version of Dawn, Shopify’s default theme. That code may not work if you use another theme or an earlier version of Dawn.
Also, even if that code does work for you, customizing the styling of this slider would require editing the code — and if you don’t have extensive web development experience, that could be a quite difficult and time-consuming process.
Shogun provides a much easier way to add and edit product image sliders for your Shopify store:
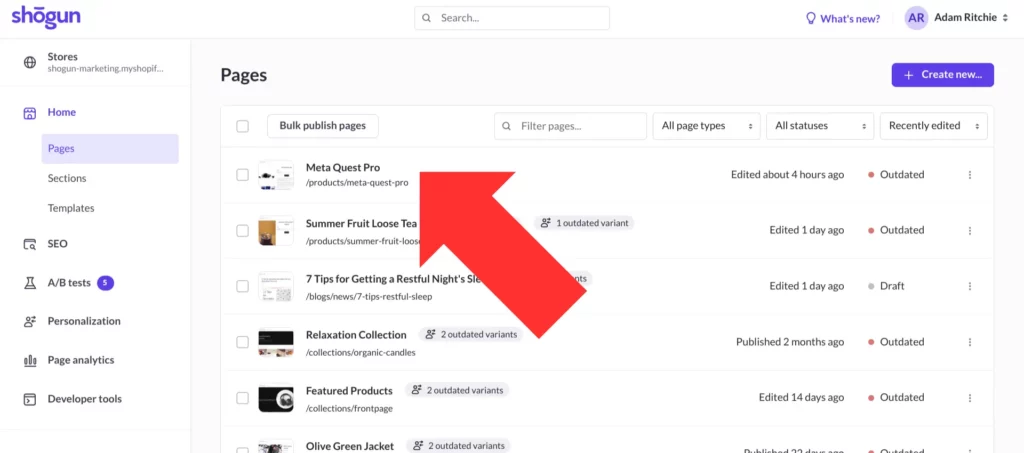
Step 1. Open the Shogun app and select the page you would like to edit.
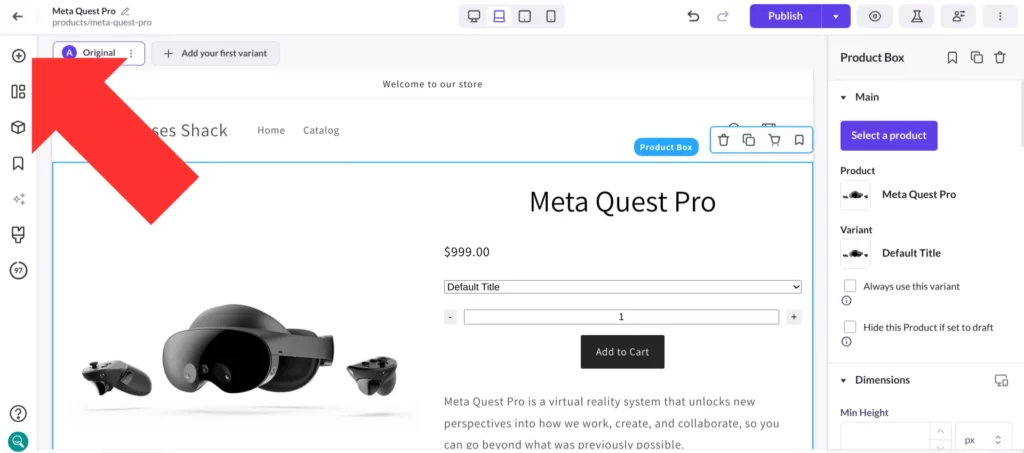
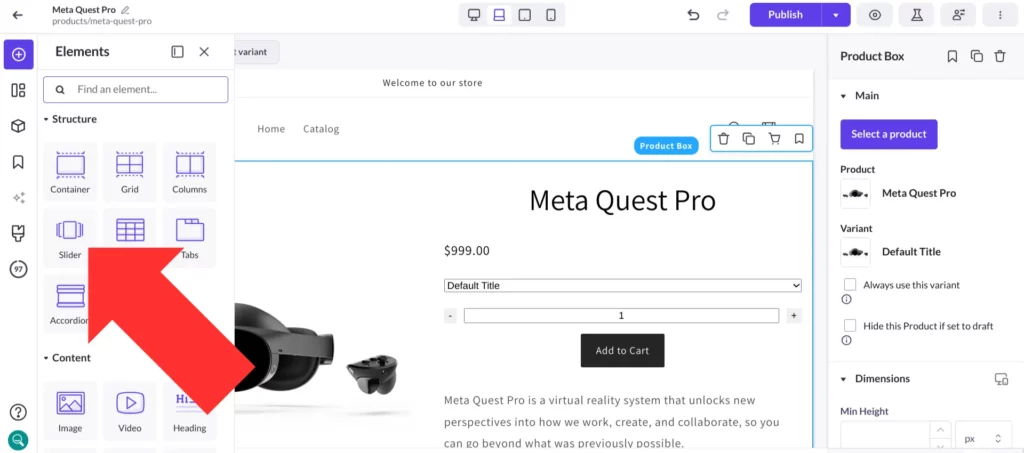
Step 2. This will open the page in Shogun’s visual editor, which provides you with a vast library of elements that you can use to customize your pages. Select the “Elements” icon (the one that looks like a plus sign inside a circle) in the left sidebar to open the elements library.
Step 3. Click and hold on the “Slider” element icon, then drag it to wherever you want to place the slider on your page.
You’ll find that Shogun offers a wide variety of options for customizing your product image slider, including:

As you can see, Shogun gives you complete control over your product image sliders.

