How to Set Up BigCommerce Conversion Tracking
Peter Drucker, one of the most influential figures in business consulting, once wrote that “if you can’t measure it, you can’t manage it.”
That logic certainly applies to your BigCommerce store. For example, if you can’t measure the effectiveness of your ads, how can you determine if they’re worth what they’re costing you?
According to WordStream, the most expensive keywords in Google Ads can cost more than $50 per click, and the average small to medium-sized business that uses Google Ads spends more than $100,000 per year on the service.
It’s easy to see how many clicks your ads are getting. But how do you know if the people who are clicking on your ads are actually following through with a purchase, newsletter sign-up, or whatever else it is that you want them to do? You must keep track of these conversions – only then will you be able to make informed decisions regarding your advertising strategy.
In this guide, we’ll show you how to set up BigCommerce conversion tracking with ads on the three most popular search engines: Google, Bing, and Yahoo.
Create customized pages in BigCommerce with ShogunBuild dynamic pages that convert shoppers into customers. Get started now
BigCommerce Conversion Tracking for Google Ads
When people need to search for something online, they use Google more than 90% of the time. Over 63,000 Google searches are conducted every second. This platform supplies you with an essentially unlimited number of people who you can introduce to your store.
Before you can set up BigCommerce Google Ads conversion tracking, there are three steps you need to take:
- Set up a Google Analytics account and obtain your tracking ID.
- Confirm that you’re using One-Page Optimized Checkout on BigCommerce.
- Match the Checkout Labeling in Google Analytics to the checkout steps in your BigCommerce store.
Obtaining Your Google Analytics Tracking ID
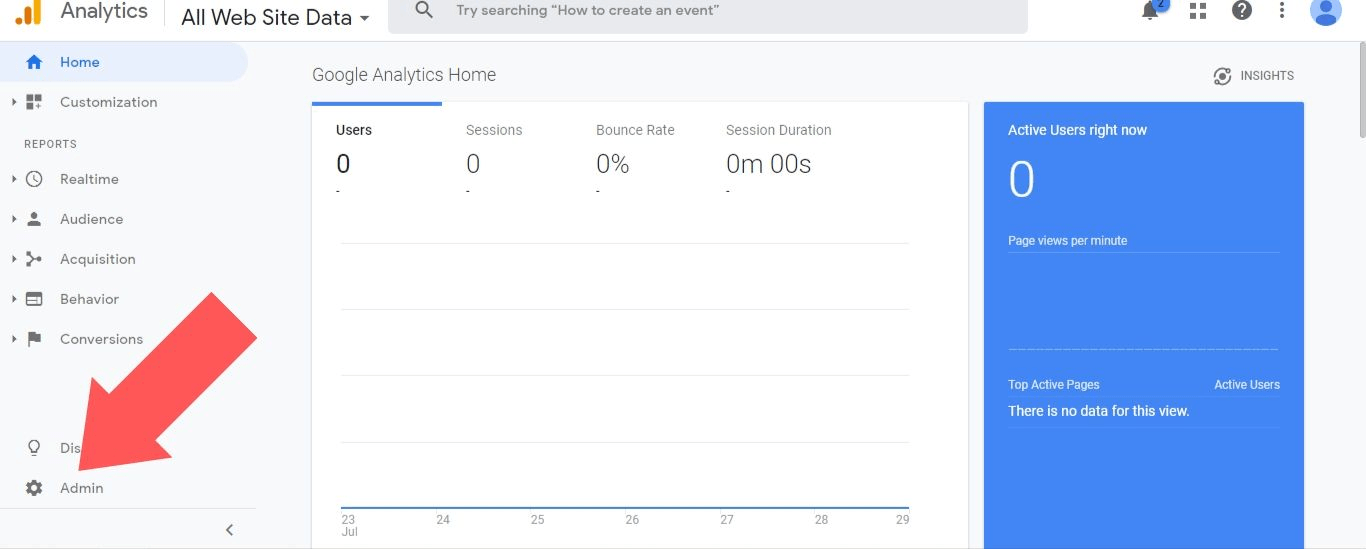
1. Sign in to Google Analytics and select “Admin”.
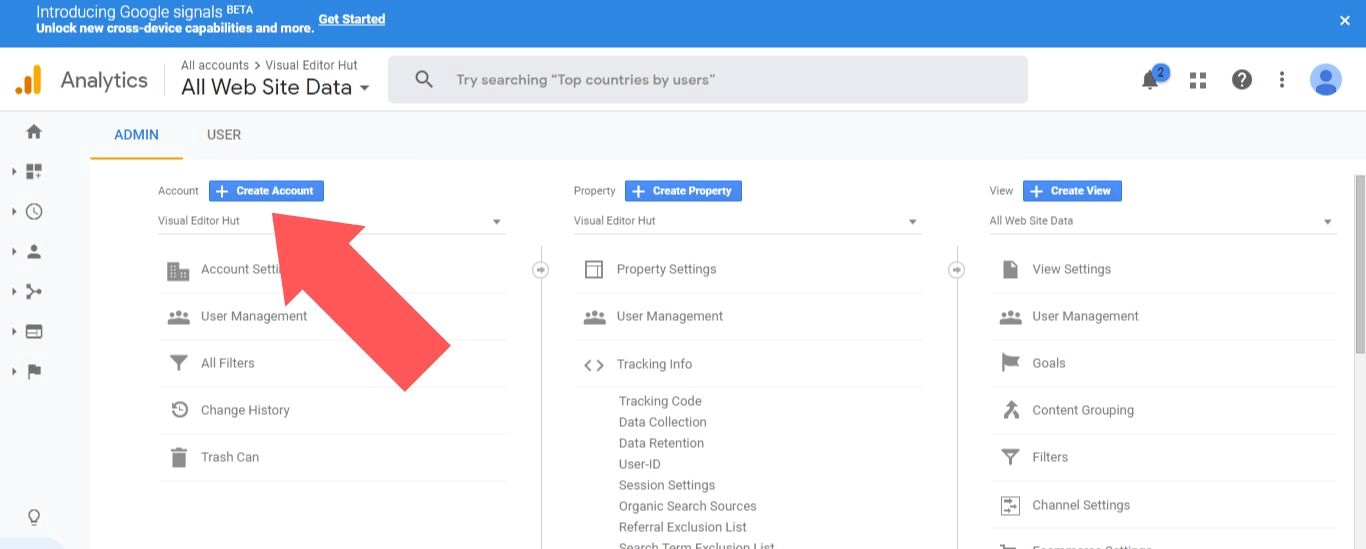
2. Select “Create Account”.
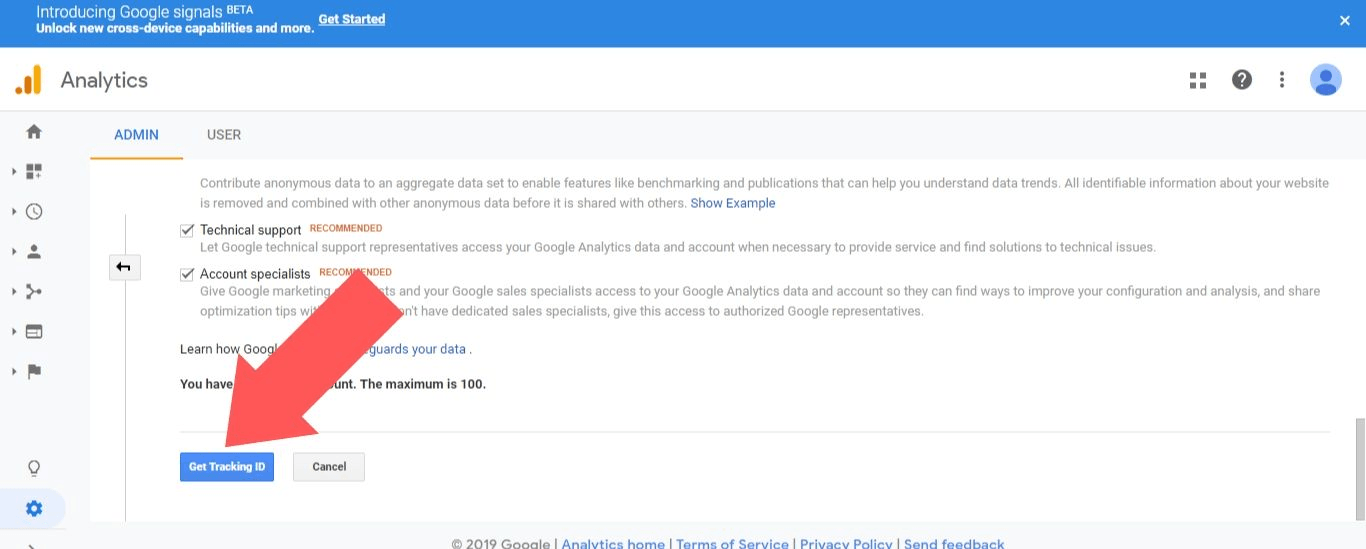
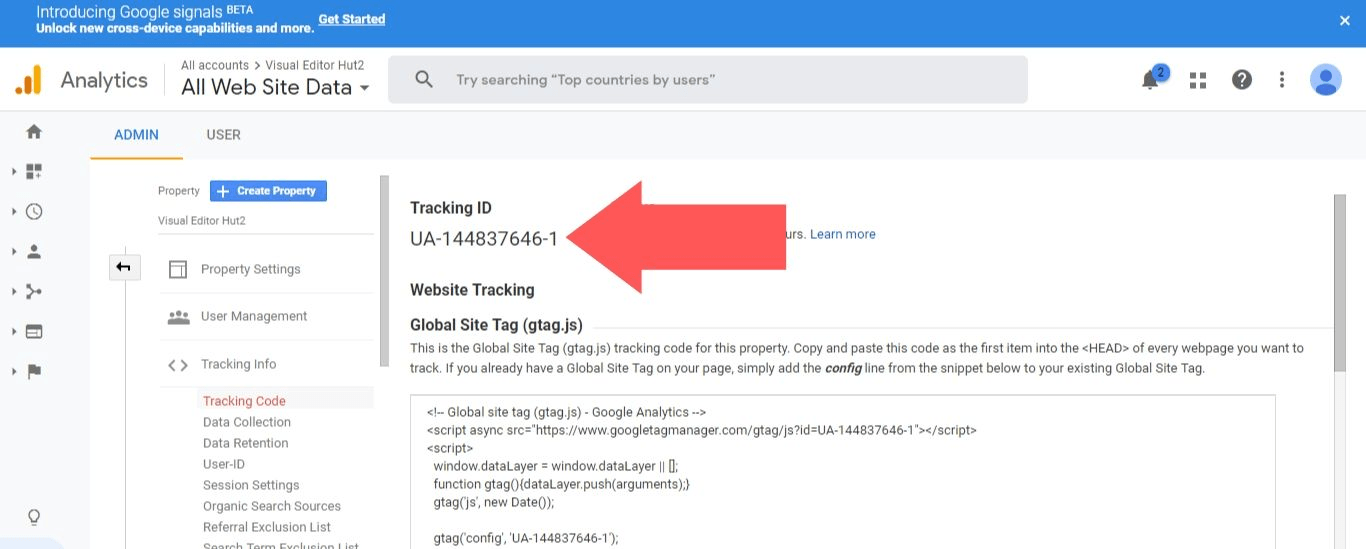
3. Enter your account name, website name, website URL, industry category, and time zone. Then, scroll down and select “Get Tracking ID”.
4. Now that you’ve finished setting up your Google Analytics account, take note of the “Tracking ID”. You’ll need this information later on in the process.
Enabling Optimized One-Page Checkout
Optimized One-Page Checkout is the default setting for BigCommerce stores, so there’s a good chance you don’t need to do anything here.
If you’ve customized your checkout process at some point, though, just go to “Advanced Settings” > “Checkout” from the BigCommerce dashboard to reset it back to Optimized One-Page Checkout.
Matching Google Ads Checkout Labeling to BigCommerce Checkout Steps
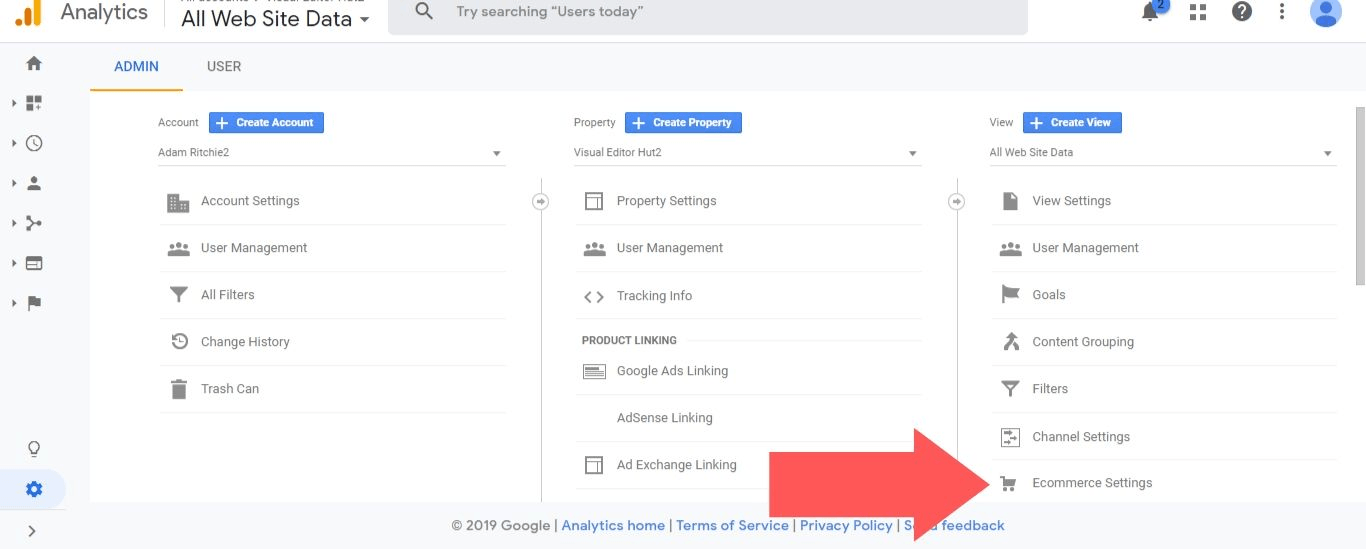
1. After signing in to Google Analytics, select “Admin”.

2. Select “Ecommerce Settings”.
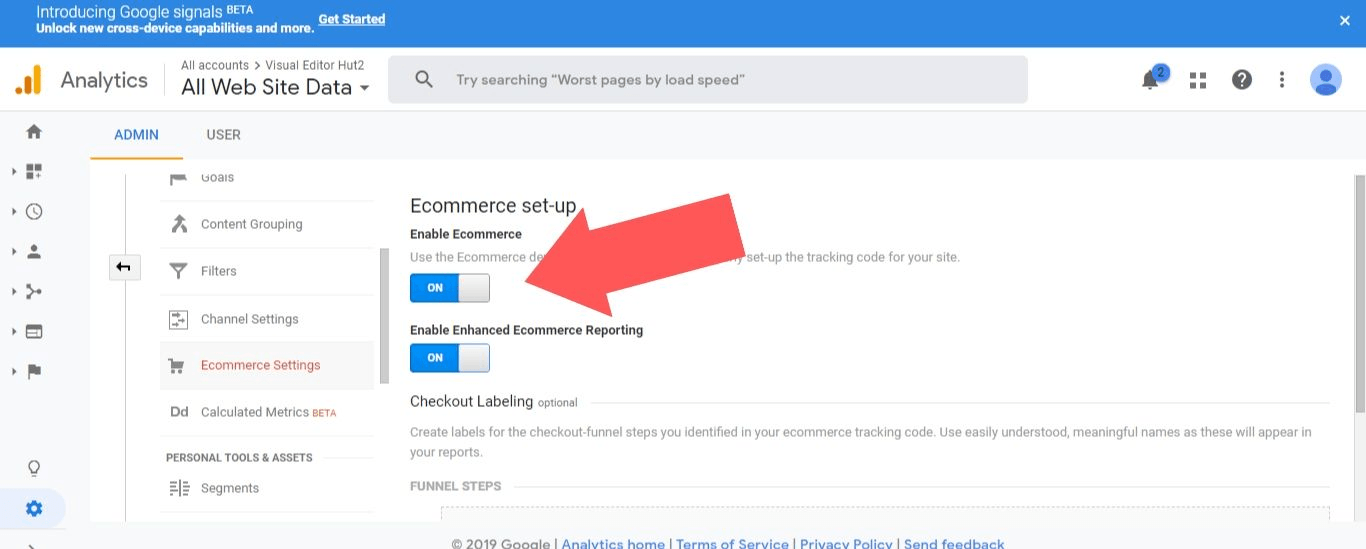
3. Toggle the “Enable Ecommerce” and “Enable Enhanced Ecommerce Reporting” options to “On”.
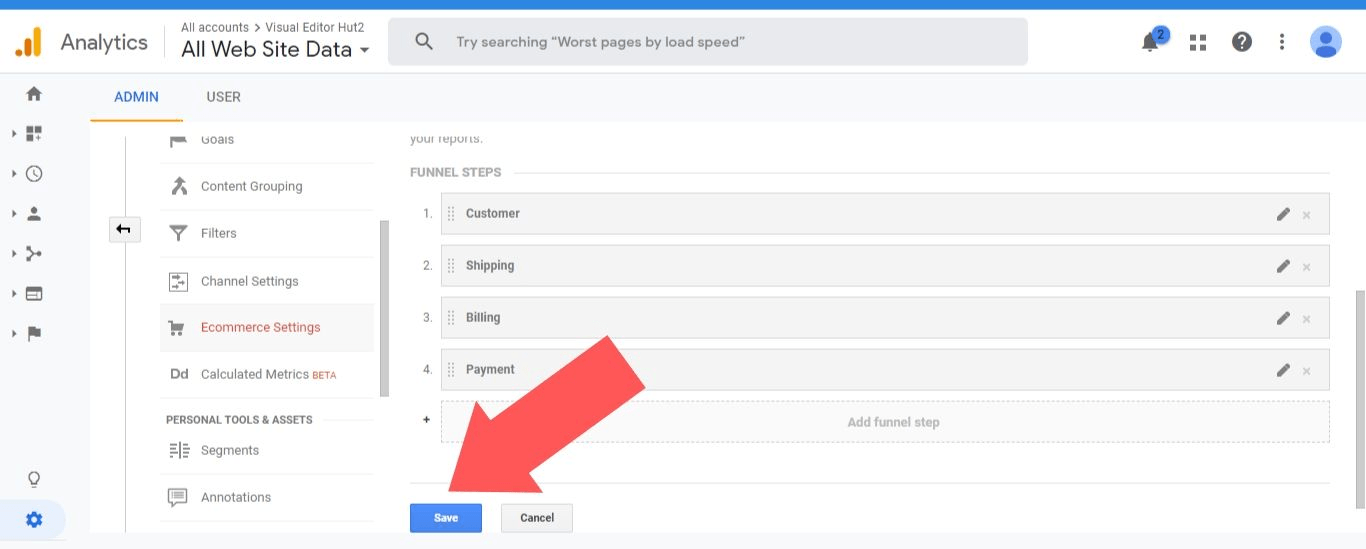
4. Edit the “Checkout Labelling” so that it goes from “Customer” to “Shipping” to “Billing” to “Payment”. Then, select “Save”.
Setting Up Conversion Tracking
Now that those preliminary steps are out of the way, we’re ready to integrate Google Ads with your BigCommerce store:
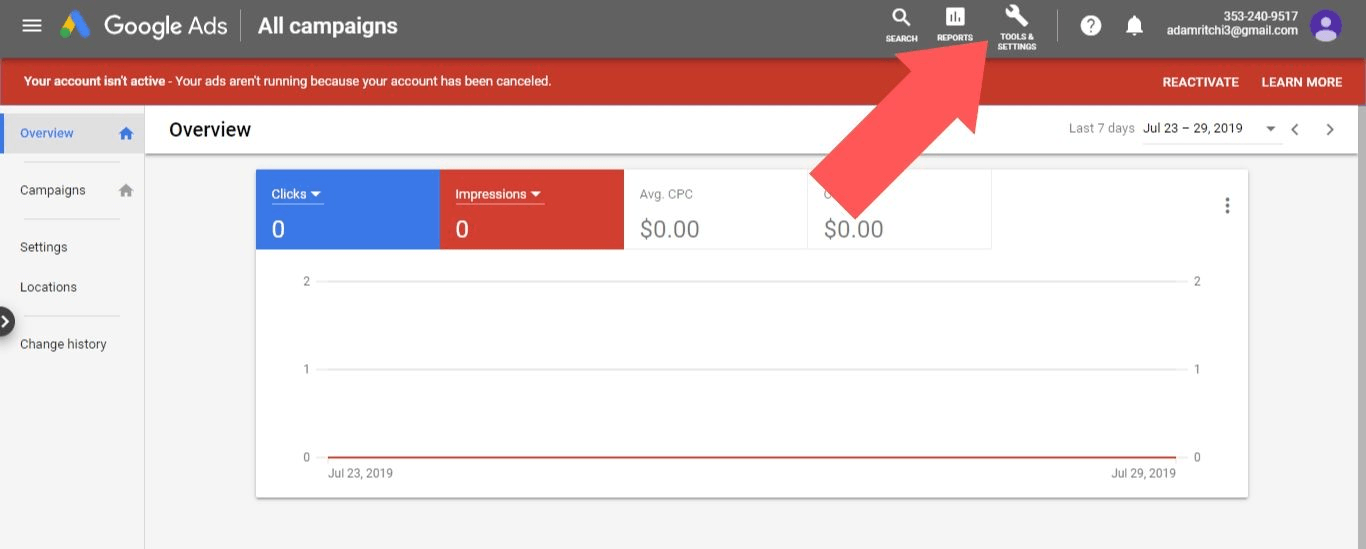
1. Log in to your Google Ads account and select “Tools & Settings”.
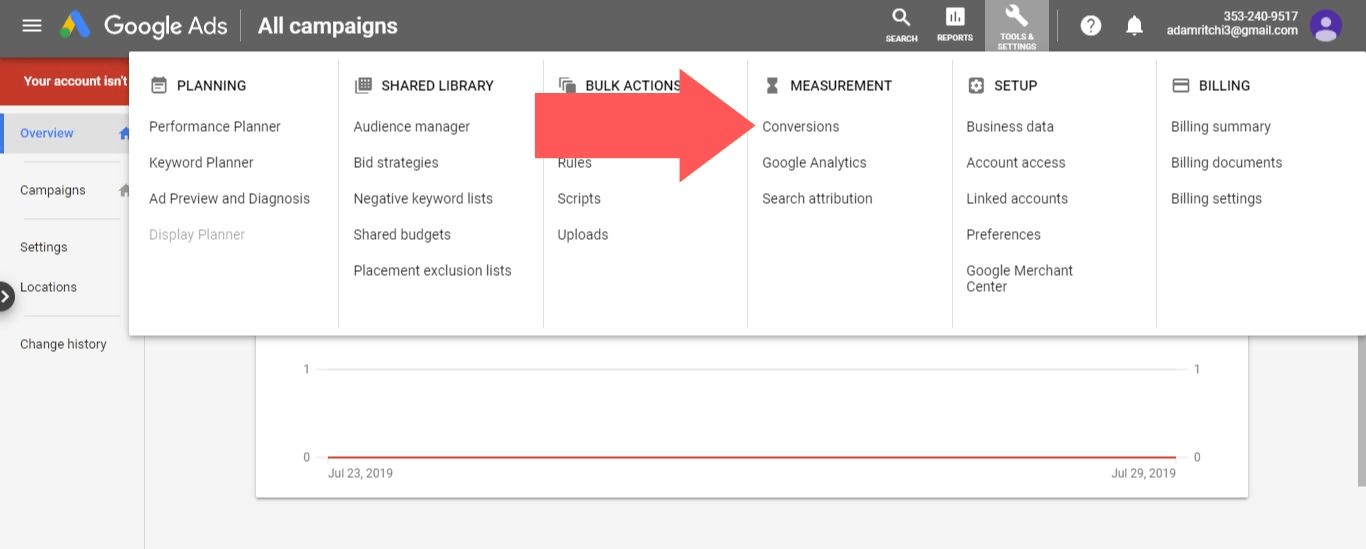
2. Select “Conversions”.
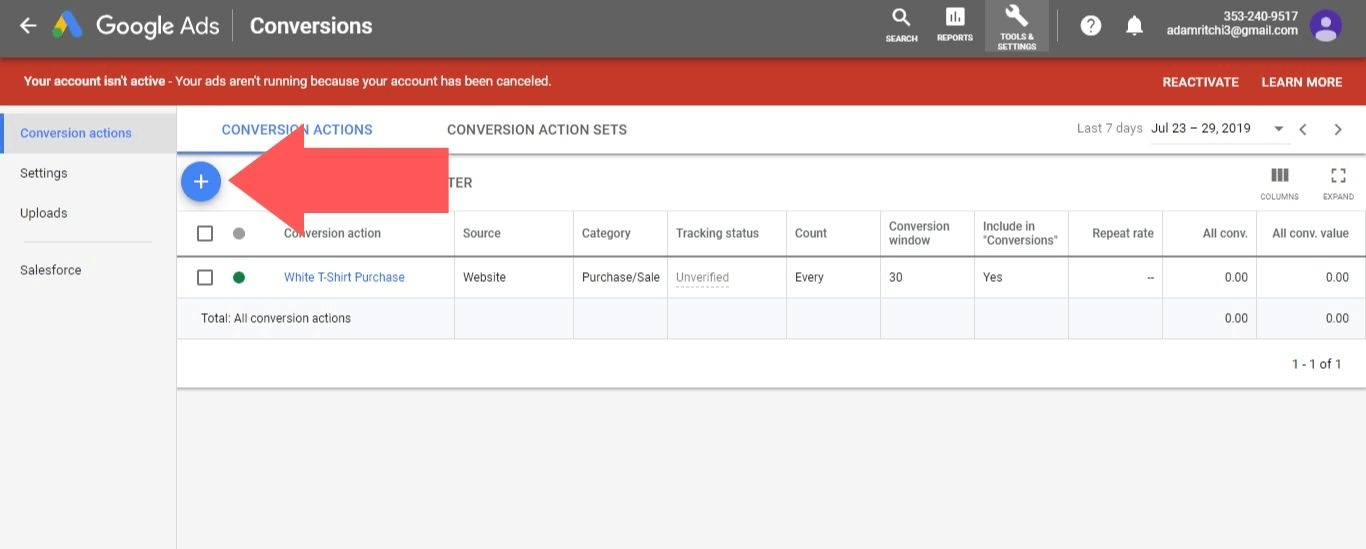
3. Click on the blue plus sign icon to create a new conversion action.
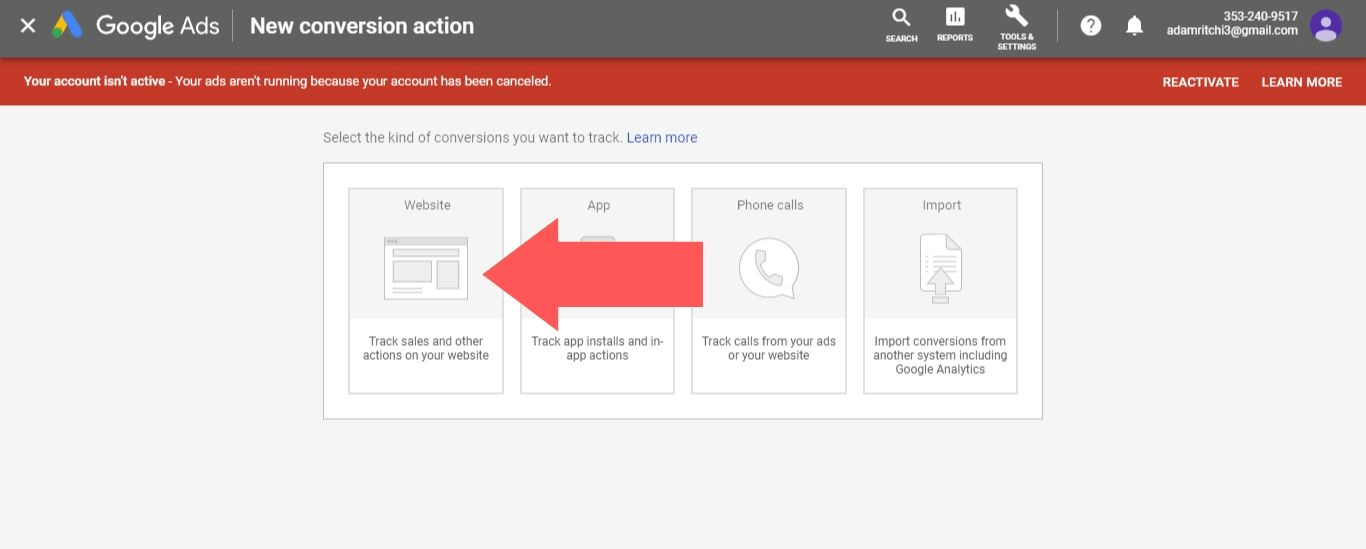
4. Select “Website”.
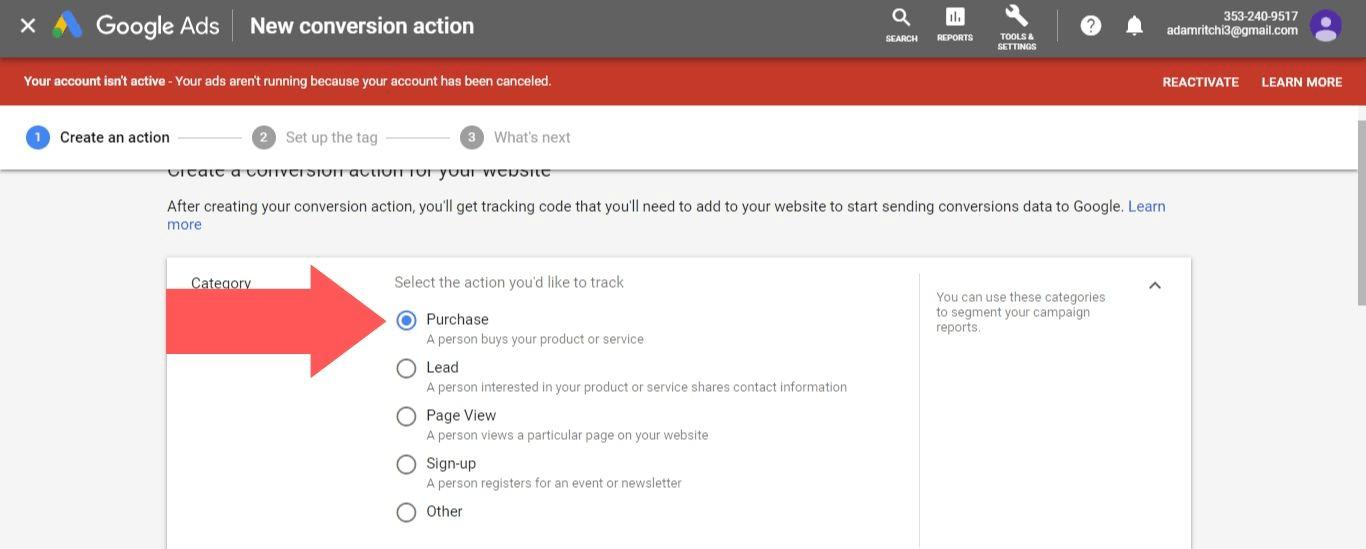
5. In the “Category” section, select which action you want to track (for this example, we’ll select “Purchase”).
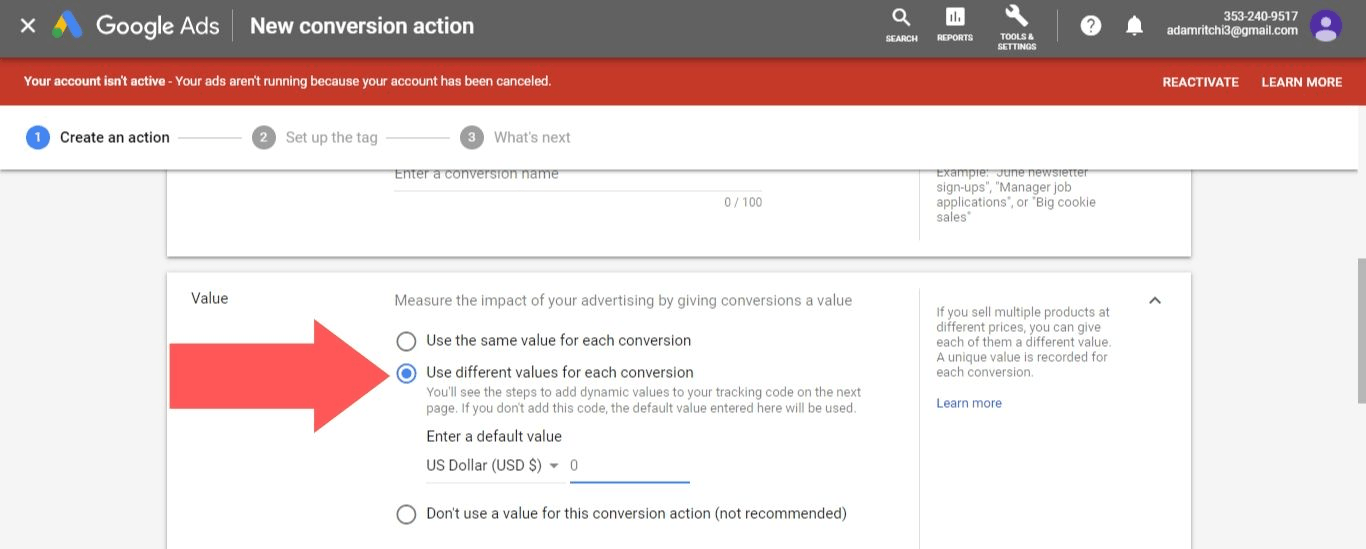
6. In the “Value” section, select “Use different values for each conversion” and enter “0” for the value.
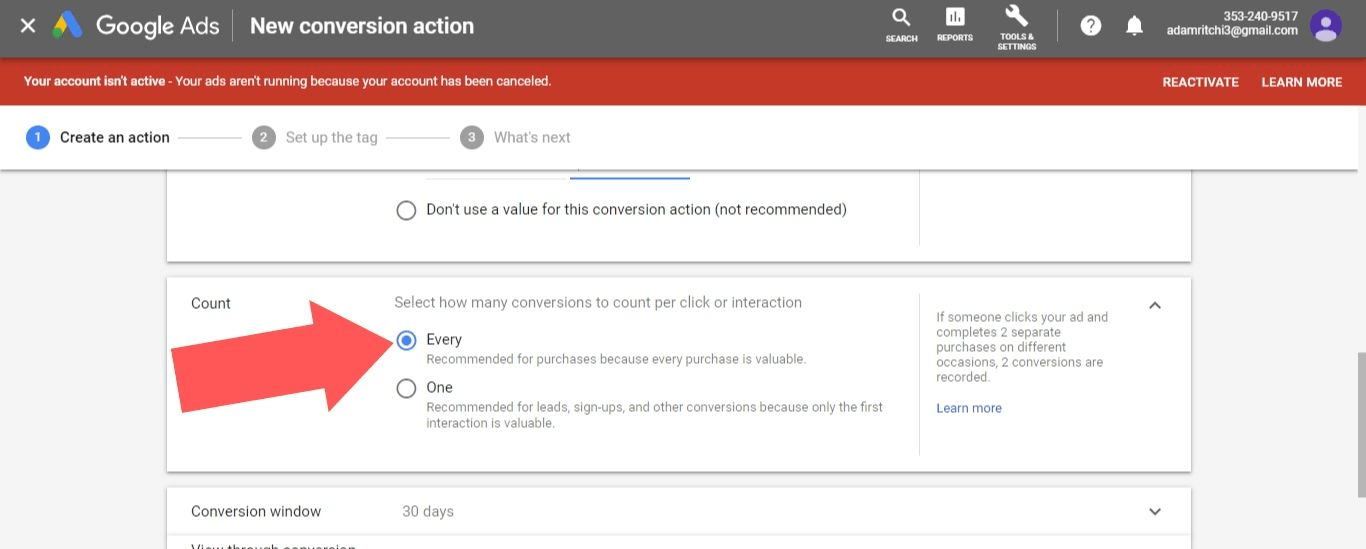
7. In the “Count” section, select “Every”.
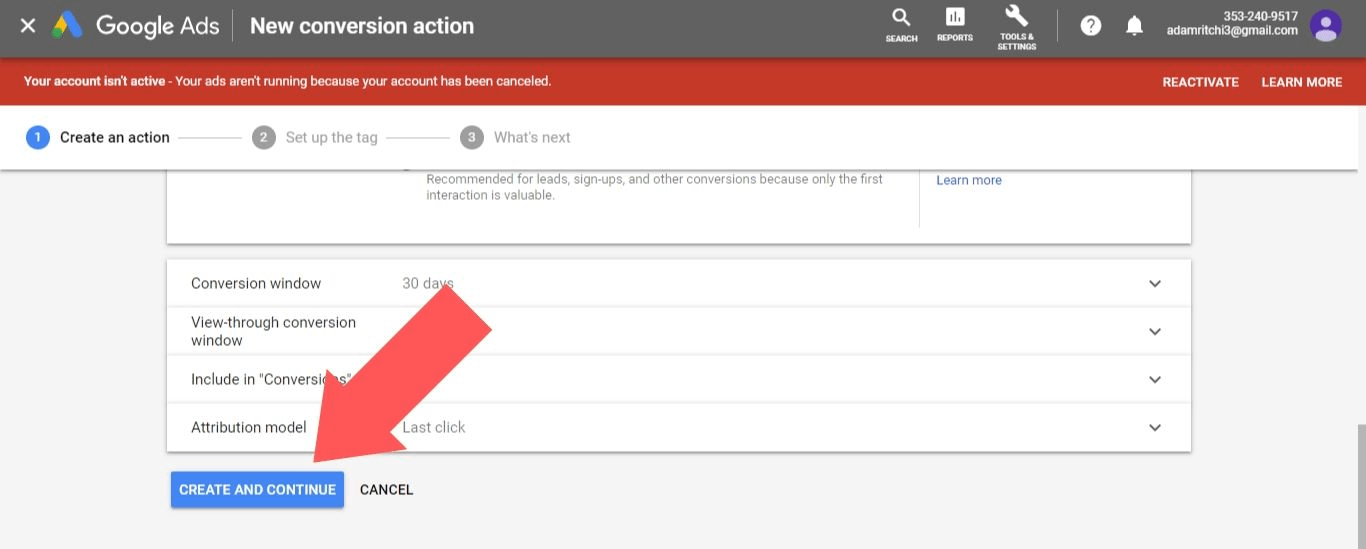
8. Adjust the rest of the settings as you see fit, then select “Create and Continue”.
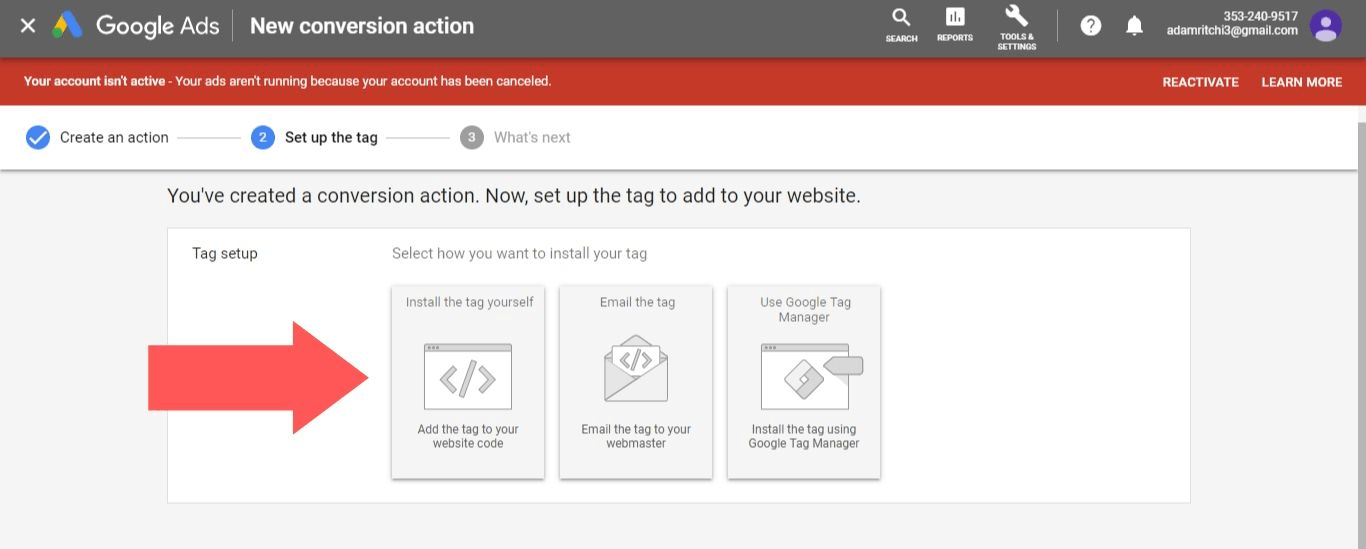
9. Select “Install the Tag Yourself”.
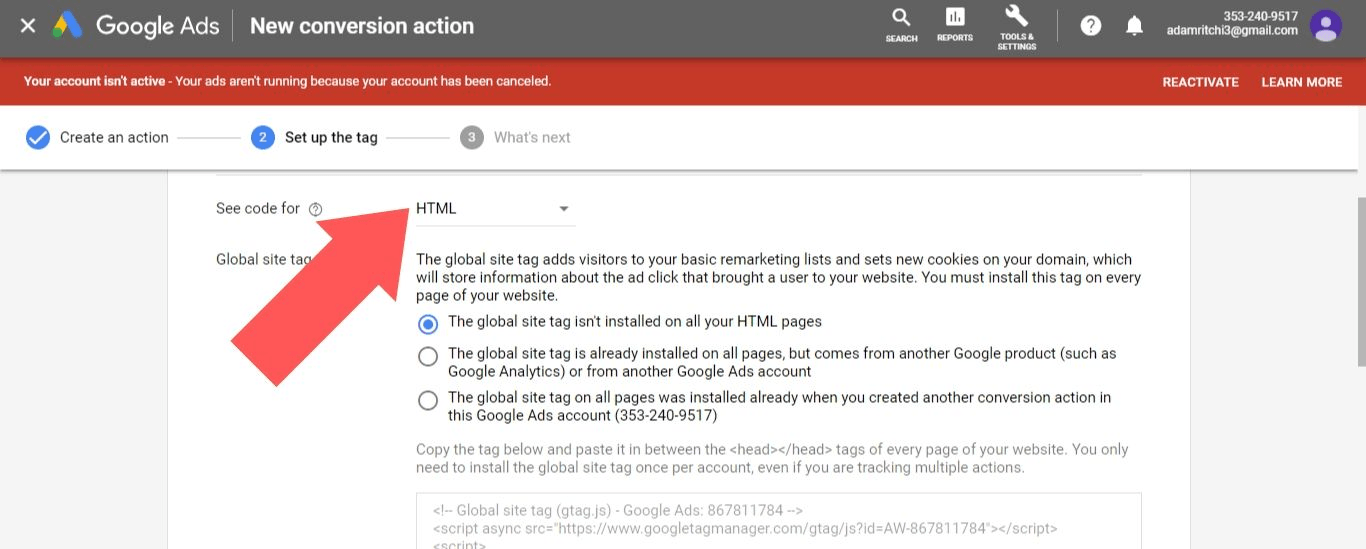
10. In the “See code for” section, select “HTML”.
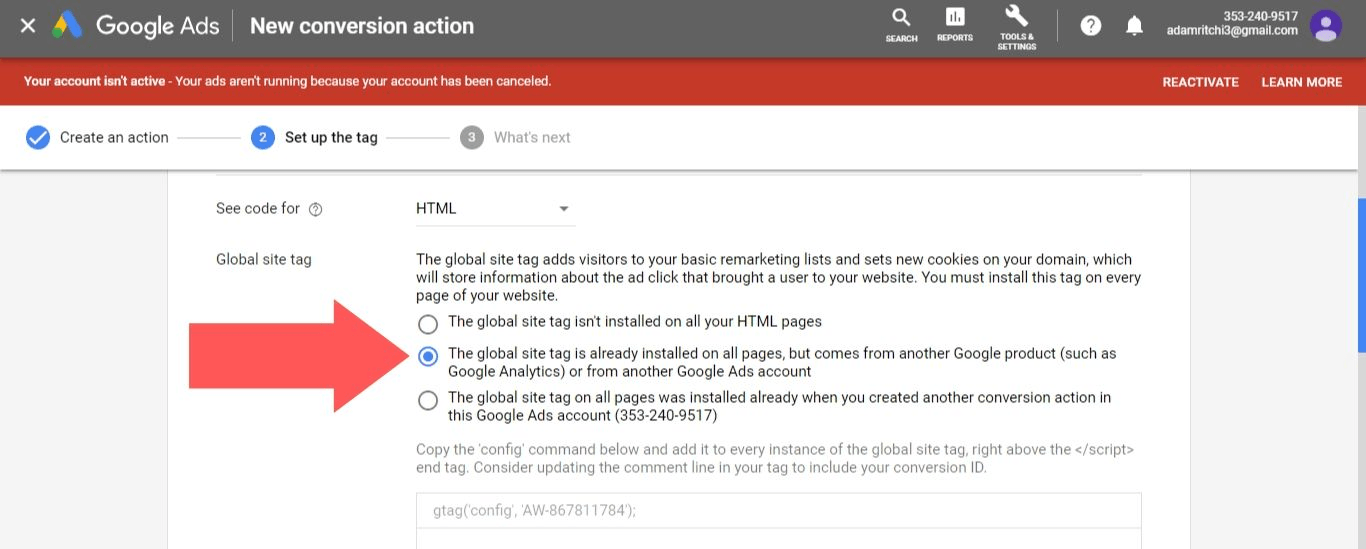
11. In the “Global site tag” section, select “The global site tag is already installed on all pages, but comes from another Google product (such as Google Analytics) or from another Google Ads account”.
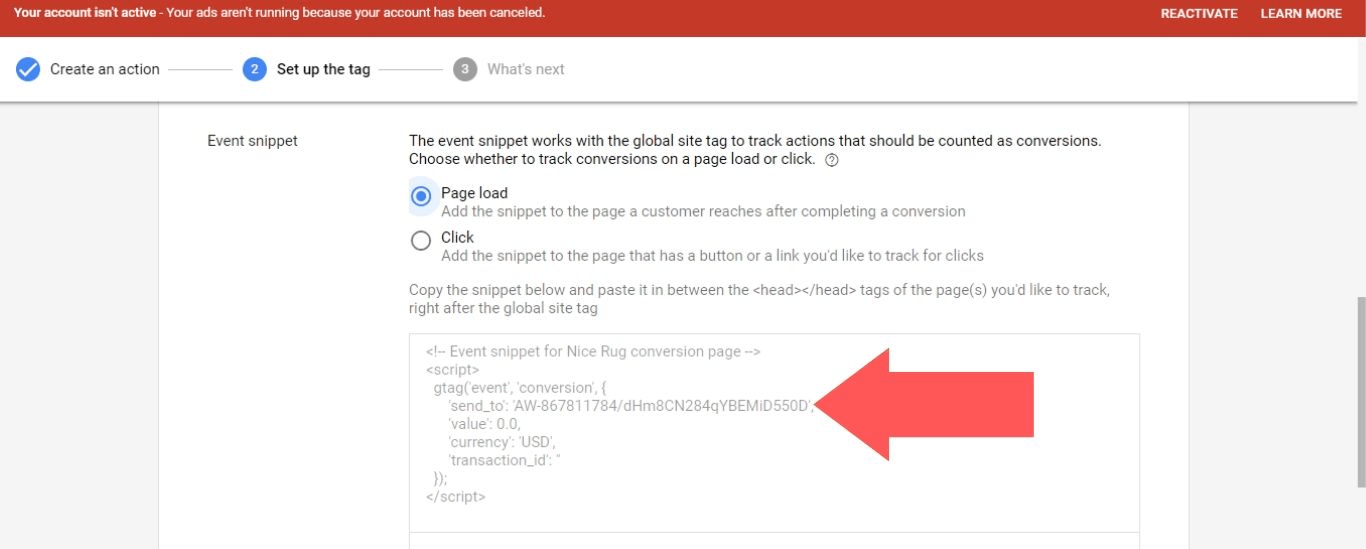
12. In the “Event Snippet” section, select “Page Load”.
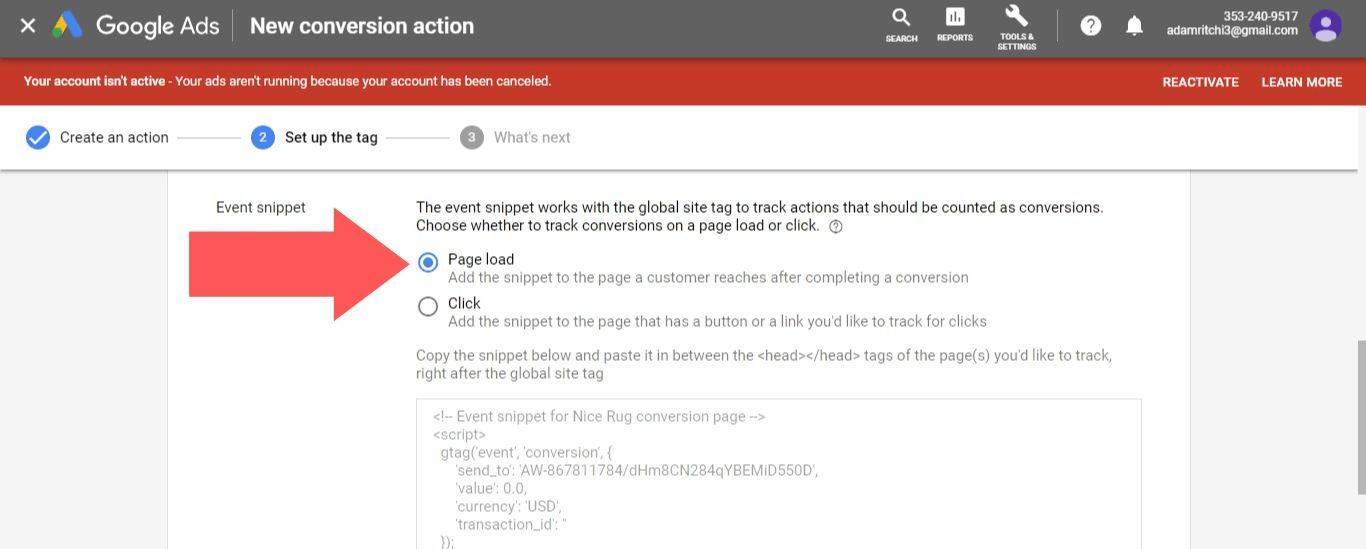
13. Take note of the values in the event snippet next to “send_to” (in this example, it’s “AW-867811784/dHm8CN284qYBEMiD550D”, but it’ll be different for you).
The first value is your conversion ID, which is the same for every conversion action created in your account. The second value is the conversion label, which is unique for every conversion action. We’ll need to use these later.
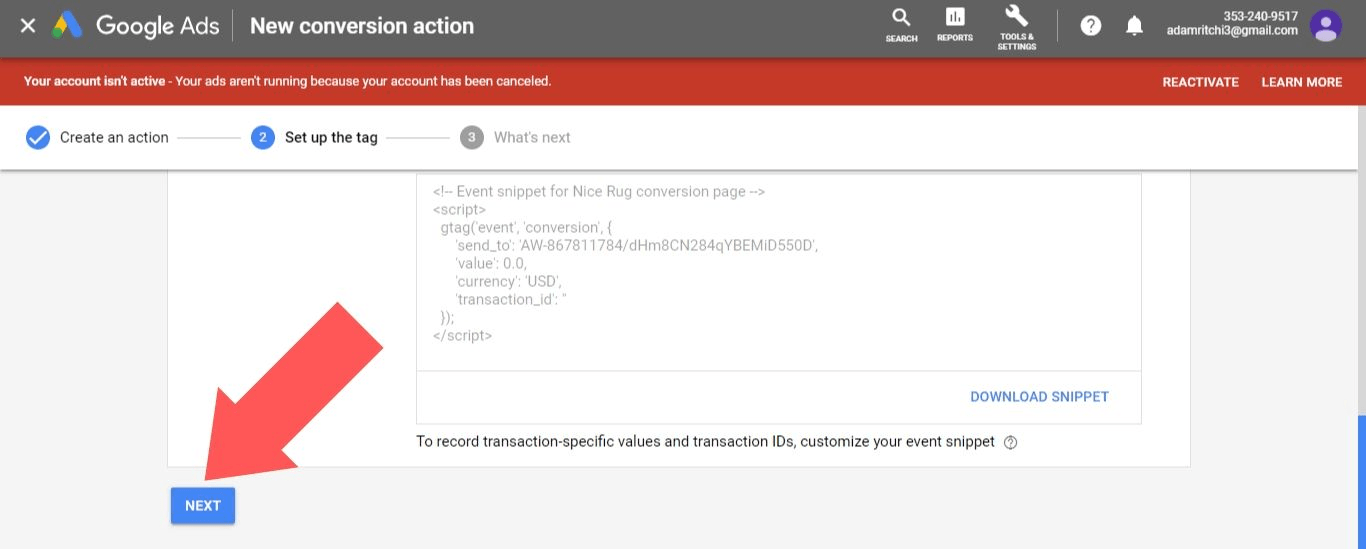
14. Select “Next”.
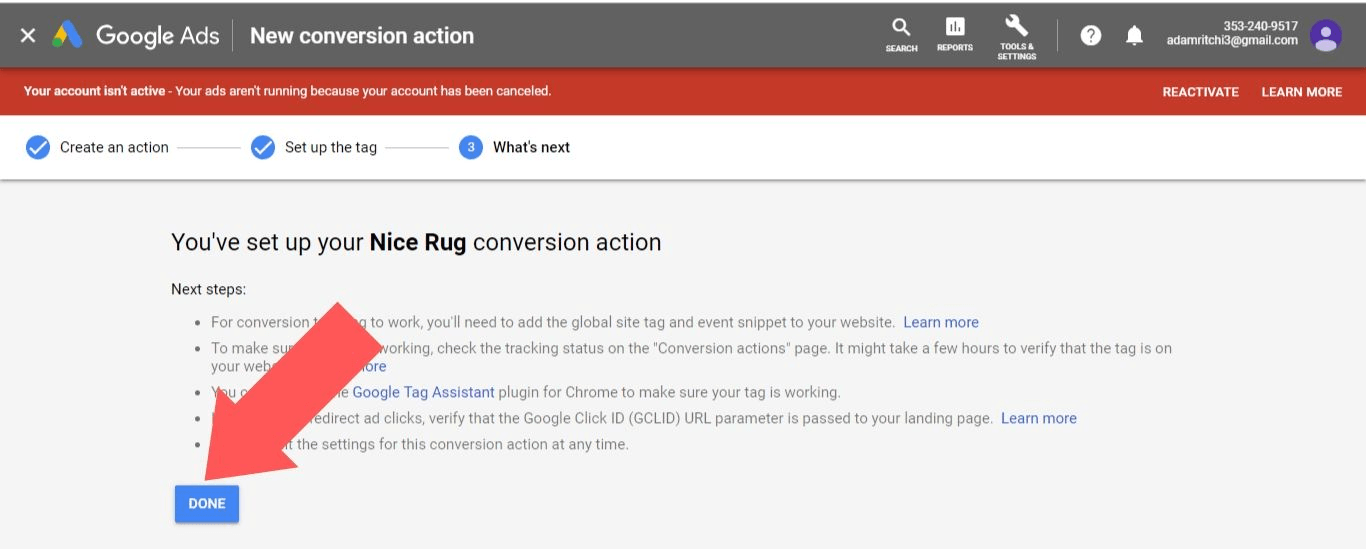
15. Select “Done”.
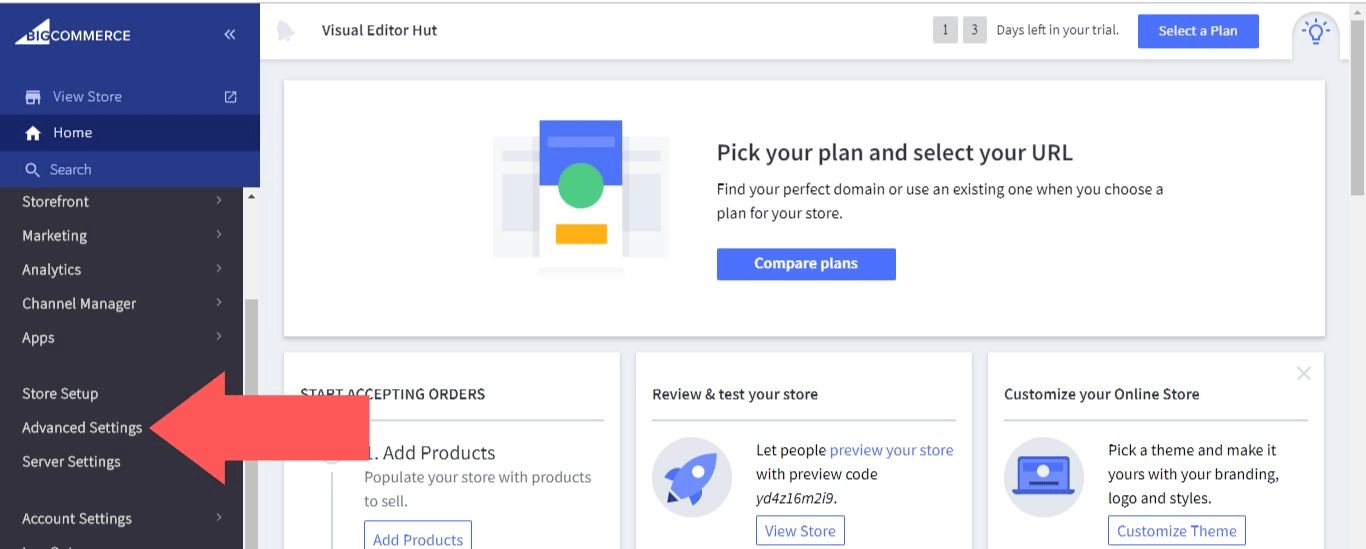
16. Now that you’ve created a conversion action in your Google Ads account, it’s time to add the conversion code to your BigCommerce store. Log in to your BigCommerce account and go to “Advanced Settings”.
17. Select “Web Analytics”.
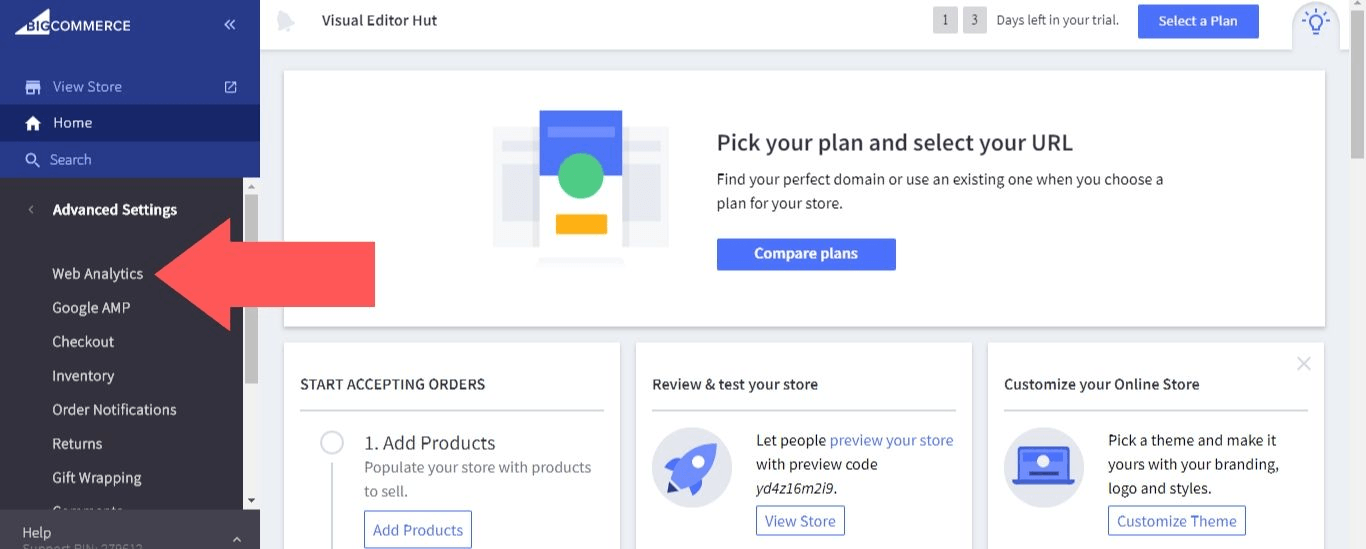
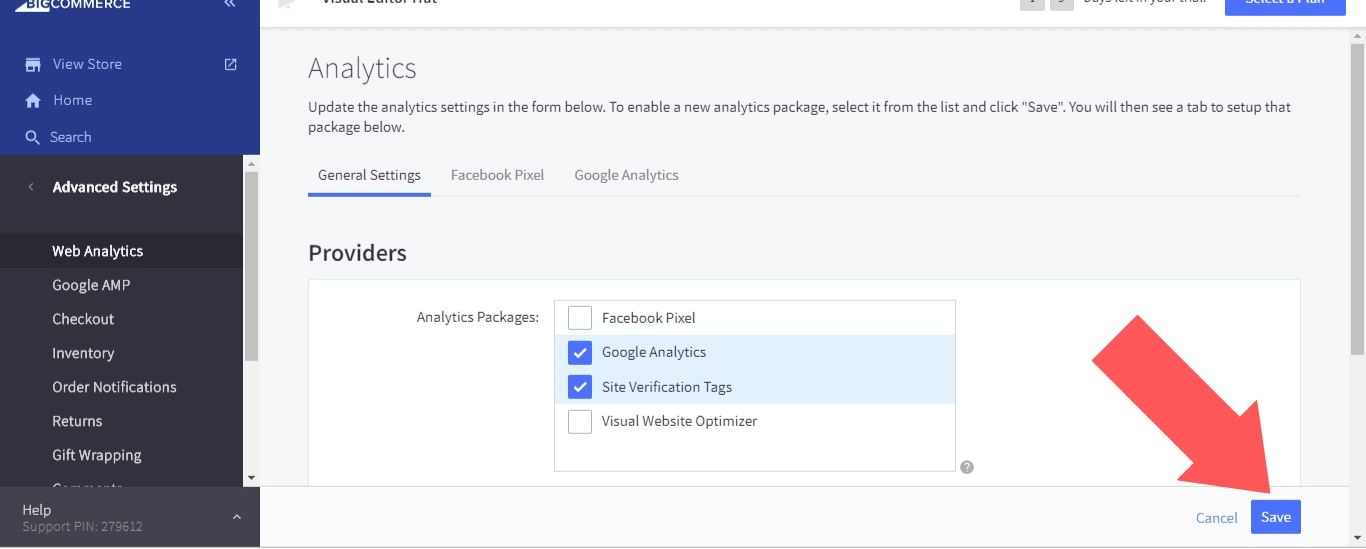
18. In the “Analytic Packages” section, check the options for “Google Analytics” and “Site Verification Tags”. Then, select “Save”.
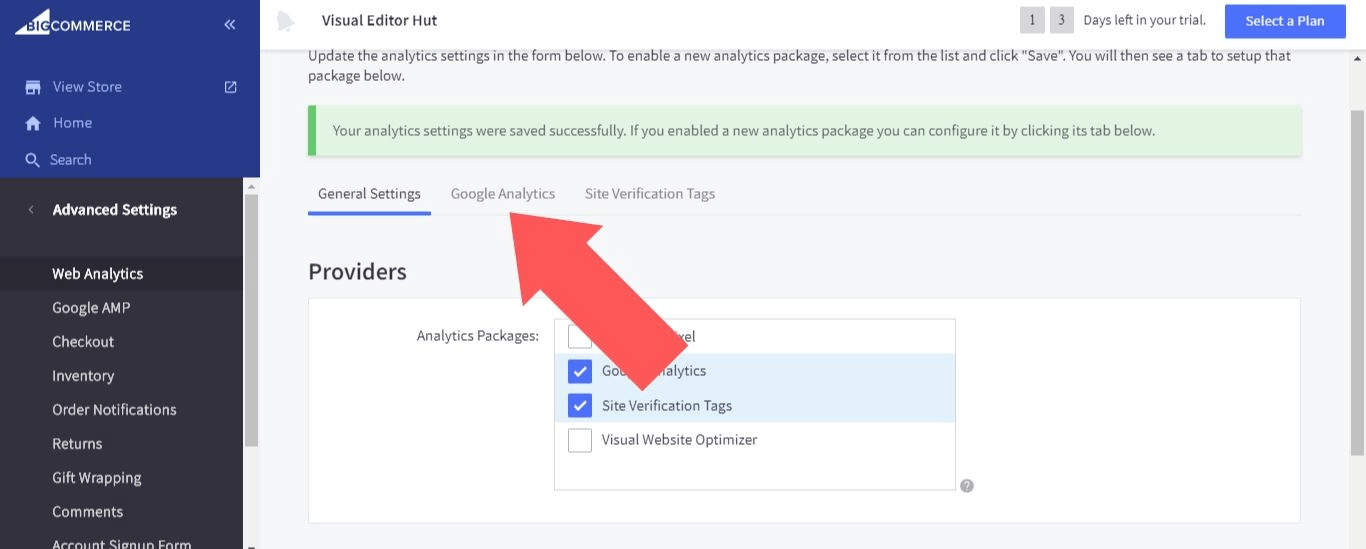
19. Open the “Google Analytics” tab.
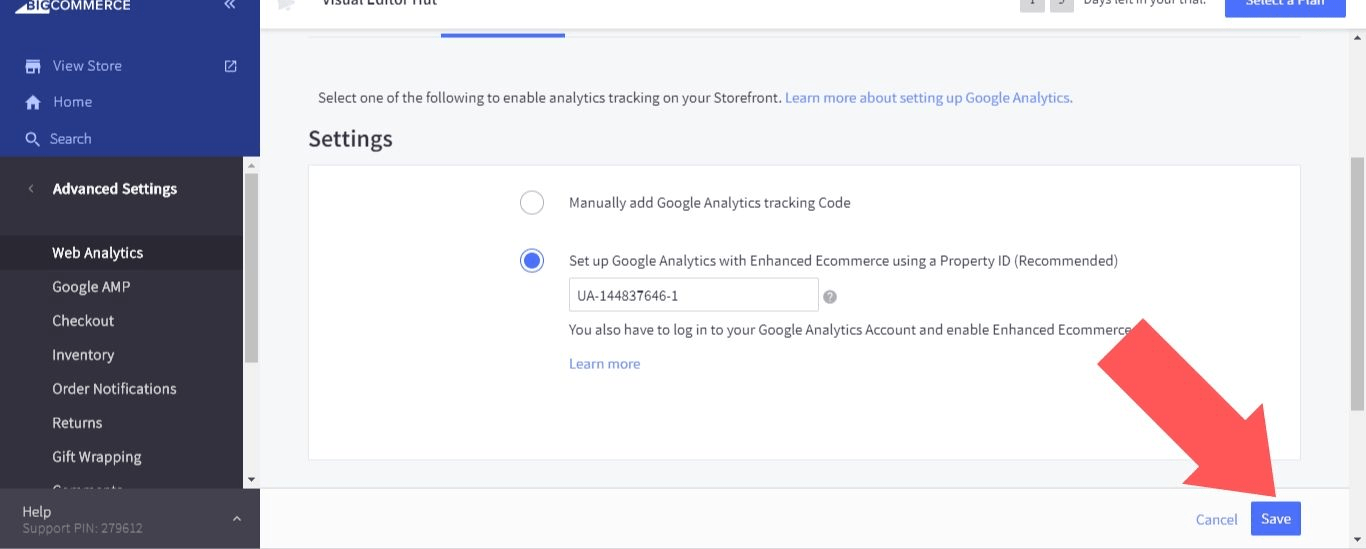
20. Select “Set up Google Analytics with Enhanced Ecommerce using a Property ID (Recommended)” and enter the Google Analytics Tracking ID that you obtained earlier. Then, select “Save”.
21. Open the “Site Verification Tags” tab.
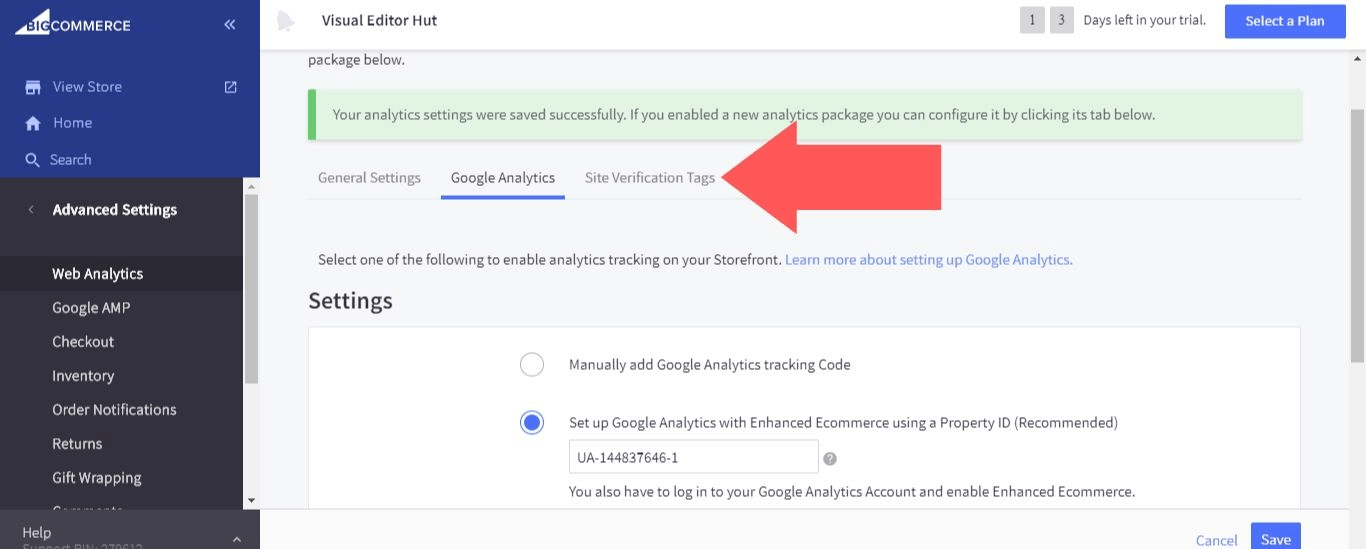
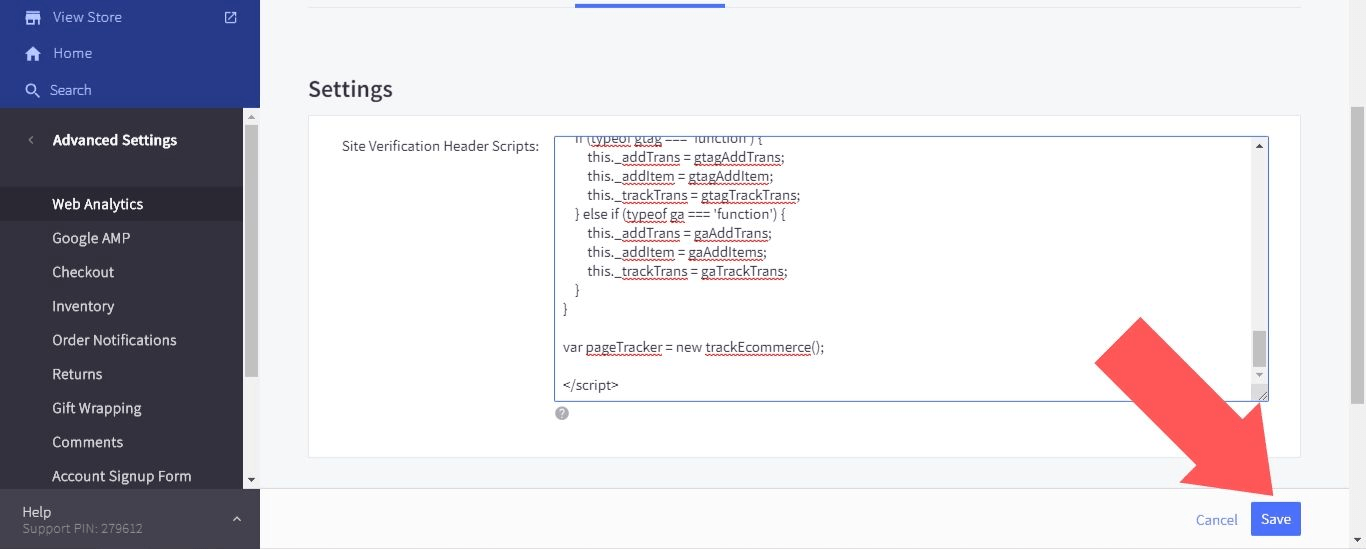
22. In the “Site Verification Header Scripts” section, paste the following code:
<script async src=”https://www.googletagmanager.com/gtag/js?id=TRACKING ID”></script>
<script>
window.dataLayer = window.dataLayer || [];
function gtag(){dataLayer.push(arguments);}
gtag(‘js’, new Date());
gtag(‘config’, ‘CONVERSION ID’);
function trackEcommerce() {
function gaAddTrans(orderID, store, total, tax, shipping, city, state, country) {
ga(‘ecommerce:addTransaction’, {
id: orderID,
affiliation: store,
revenue: total,
tax: tax,
shipping: shipping,
city: city,
state: state,
country: country
});
}
function gaAddItems(orderID, sku, product, variation, price, qty) {
ga(‘ecommerce:addItem’, {
id: orderID,
sku: sku,
name: product,
category: variation,
price: price,
quantity: qty
});
}
function gaTrackTrans() {
ga(‘ecommerce:send’);
}
function gtagAddTrans(orderID, store, total, tax, shipping, city, state, country) {
this.transaction = {
transaction_id: orderID,
affiliation: store,
value: total,
tax: tax,
shipping: shipping,
items: []
};
}
function gtagAddItem(orderID, sku, product, variation, price, qty) {
this.transaction.items.push({
id: sku,
name: product,
category: variation,
price: price,
quantity: qty
});
}
function gtagTrackTrans() {
gtag(‘event’, ‘purchase’, this.transaction);
gtag(‘event’, ‘conversion’, {
‘send_to’: ‘CONVERSION ID/CONVERSION LABEL’,
‘value’: this.transaction.value,
‘transaction_id’: this.transaction.transaction_id,
});
this.transaction = null;
}
if (typeof gtag === ‘function’) {
this._addTrans = gtagAddTrans;
this._addItem = gtagAddItem;
this._trackTrans = gtagTrackTrans;
} else if (typeof ga === ‘function’) {
this._addTrans = gaAddTrans;
this._addItem = gaAddItems;
this._trackTrans = gaTrackTrans;
}
}
var pageTracker = new trackEcommerce();
</script>
Note that TRACKING ID, CONVERSION ID, and CONVERSION LABEL are used as placeholders in the code above. You’ll need to replace them with your Google Analytics tracking ID, Google Ads conversion ID, and Google Ads conversion label (we recommend that you extend the text box to make it easier to edit).
When you’re done, select “Save” to finish setting up Google Ads conversion tracking for your BigCommerce store.
#cta-visual-fe#<cta-title>Fast and Flexible CMS For BigCommerce<cta-title>Gain full control over your site without sacrificing page speed with Shogun Frontend.Learn more
BigCommerce Conversion Tracking for Bing and Yahoo
While Bing and Yahoo don’t get the same amount of traffic as Google (combined, they make up 4.6% of the search engine market, which is less than one-tenth of Google’s 90.8% share), they still receive hundreds of millions of visits per day. There’s plenty of opportunity to attract new customers through these platforms.
Because of a partnership between Microsoft (the owner and operator of Bing) and Yahoo, ads for both of these search engines are managed through the Microsoft Advertising service. That means you can take out two birds with one stone by integrating your BigCommerce store with your Microsoft Advertising account. To do so:
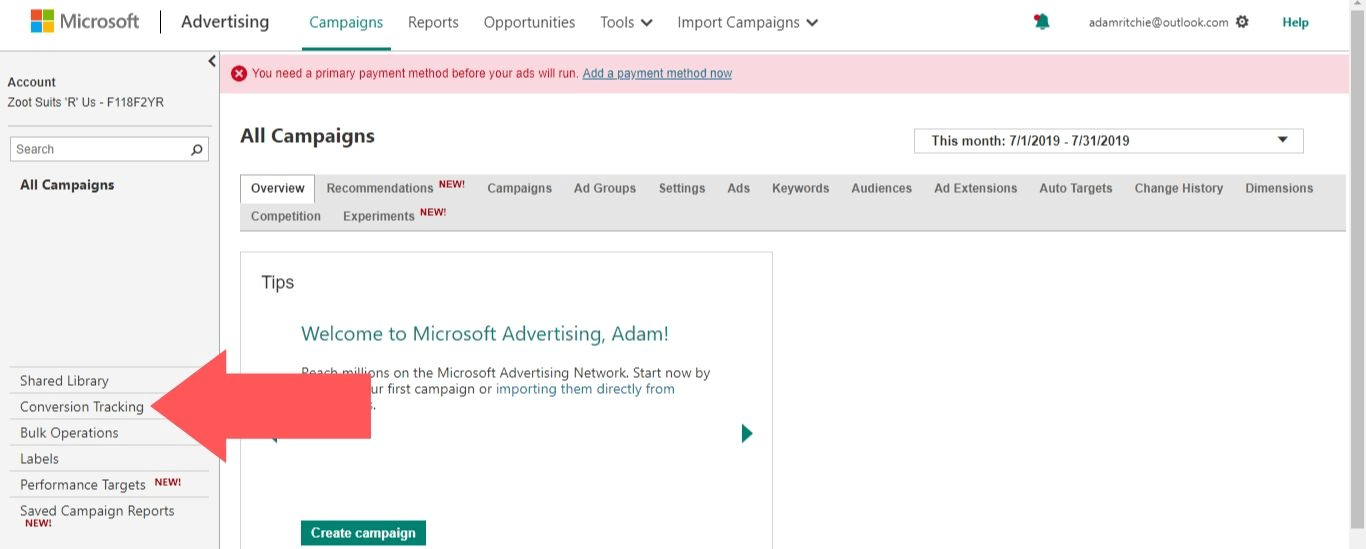
1. Log in to your Microsoft Advertising account and select “Conversion Tracking”.
2. Select “Get started”.
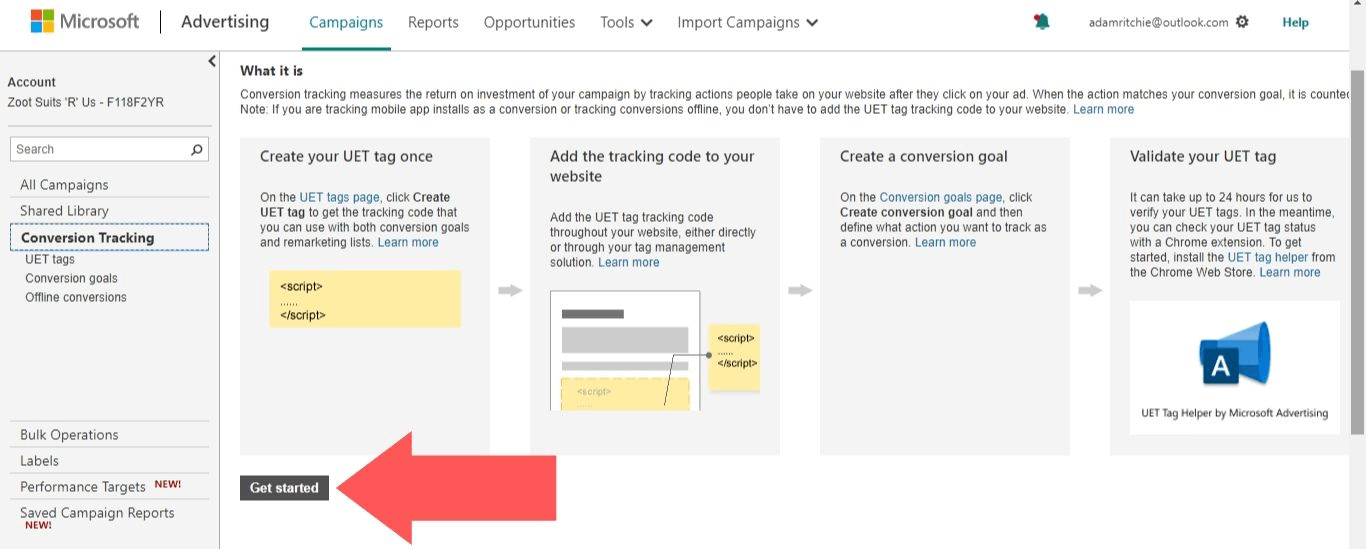
3. Select “Create UET tag”.
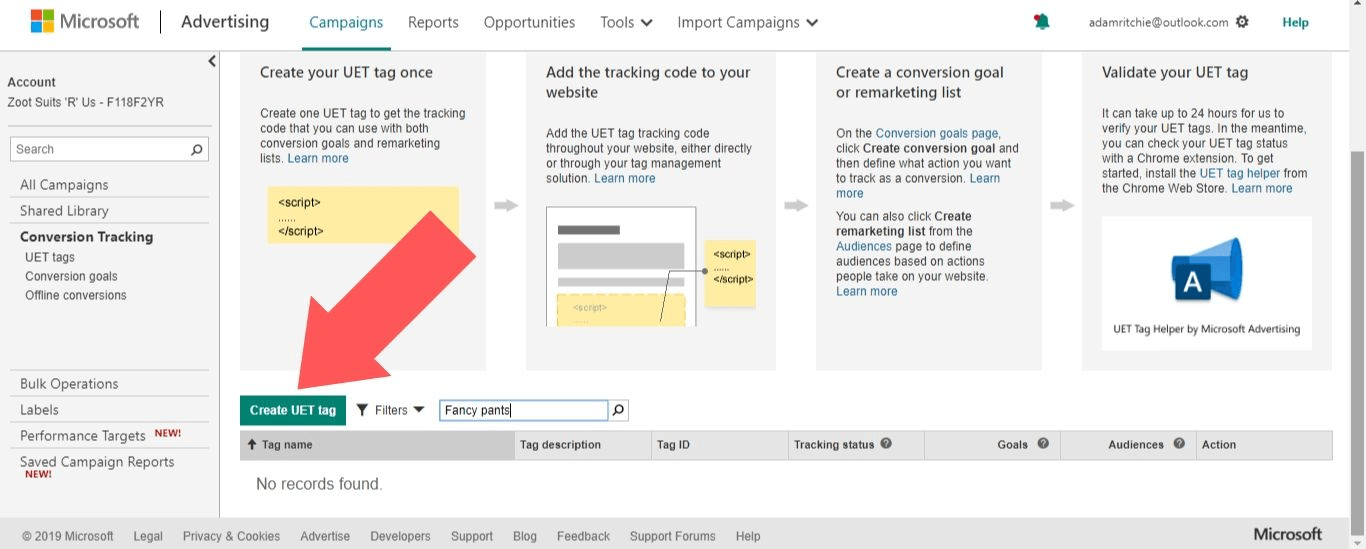
4. Give your tag a name and description. Then, select “Save”.
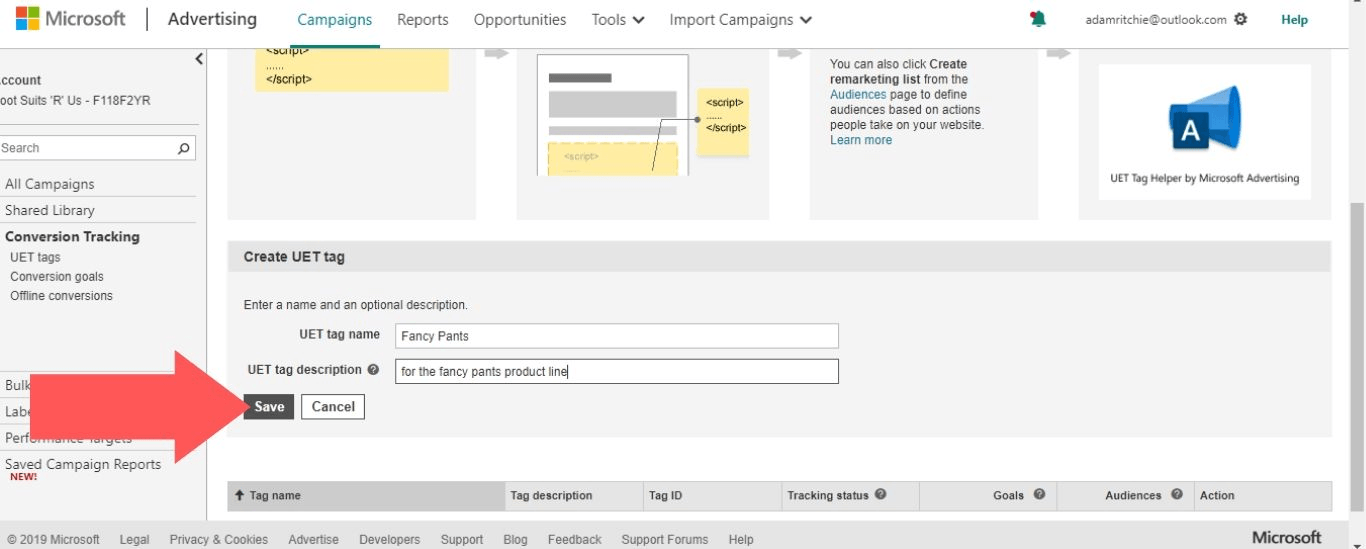
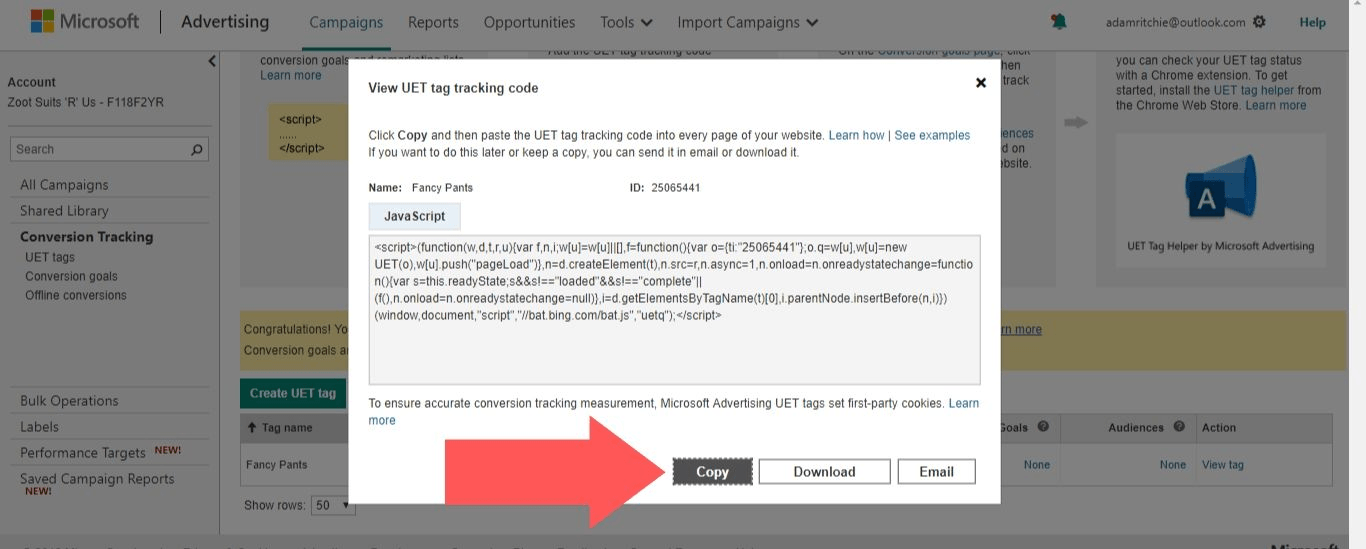
5. Copy the code (you can also download it or email it to yourself for safe keeping).
6. Now you need to create a conversion goal. So, select “Conversion goals”.
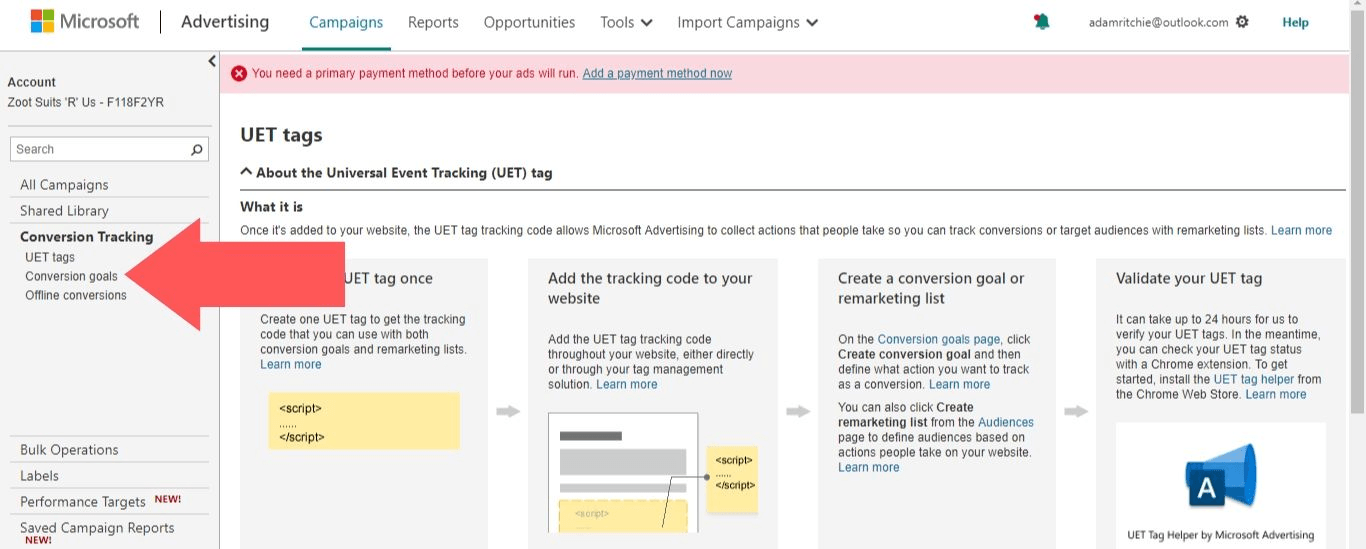
7. Select “Create conversion goal”.
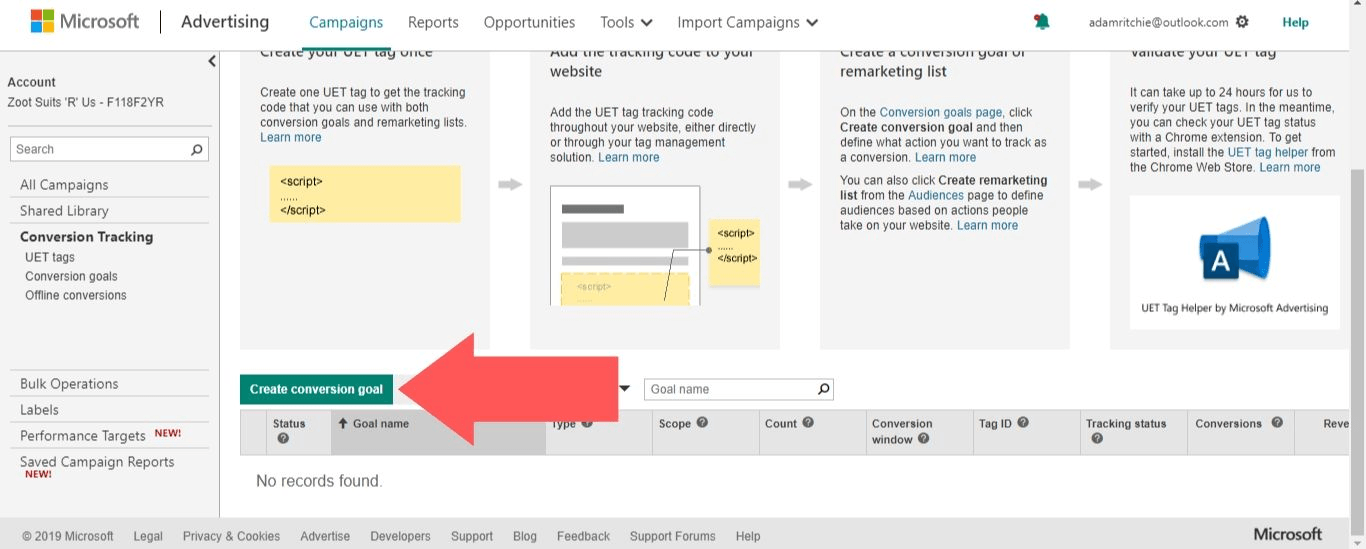
8. Choose a name for the conversion goal and select which type of conversion that you want to track. Then, select “Next”.
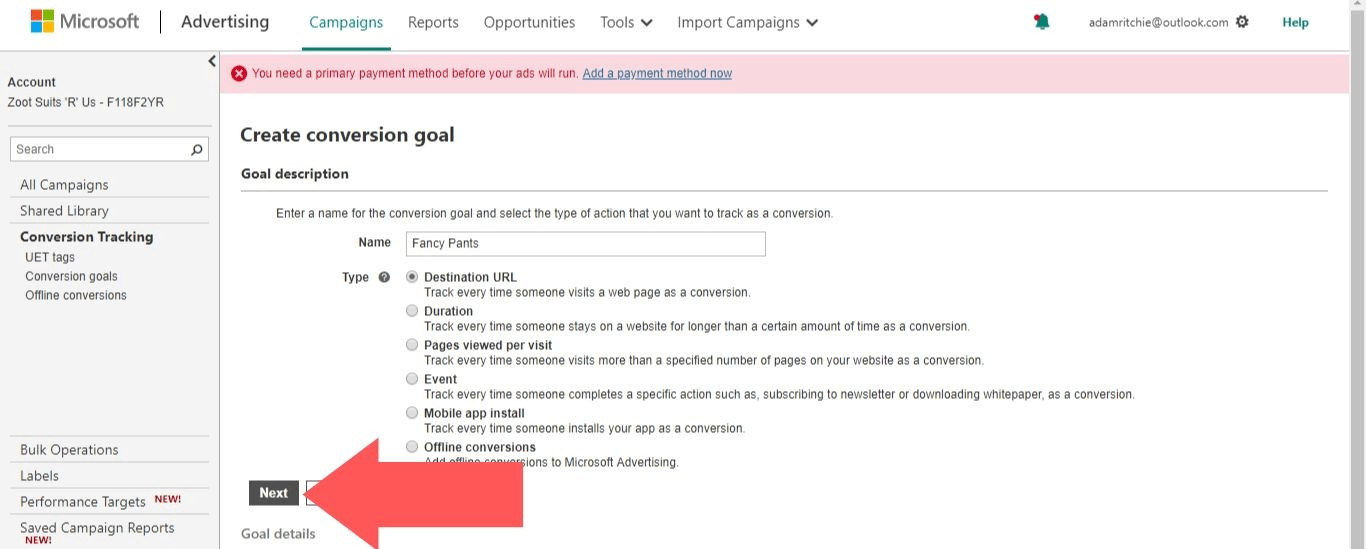
9. To track orders, open the dropdown menu next to “Destination URL” and select “Equals to”. Then, enter the URL of your order confirmation page in the “Web page URL” field.
- If you’re using Optimized One-Page Checkout, your order confirmation page URL will look like this: https://www.yoursitename.com/checkout/order-confirmation
- If you’re not using Optimized One-Page Checkout, your order confirmation page URL will look like this: https://www.yoursitename.com/finishorder.php
In the “Revenue Value” section, select “Conversion action value may vary (for example, by purchase price)” and set the value as “0”.
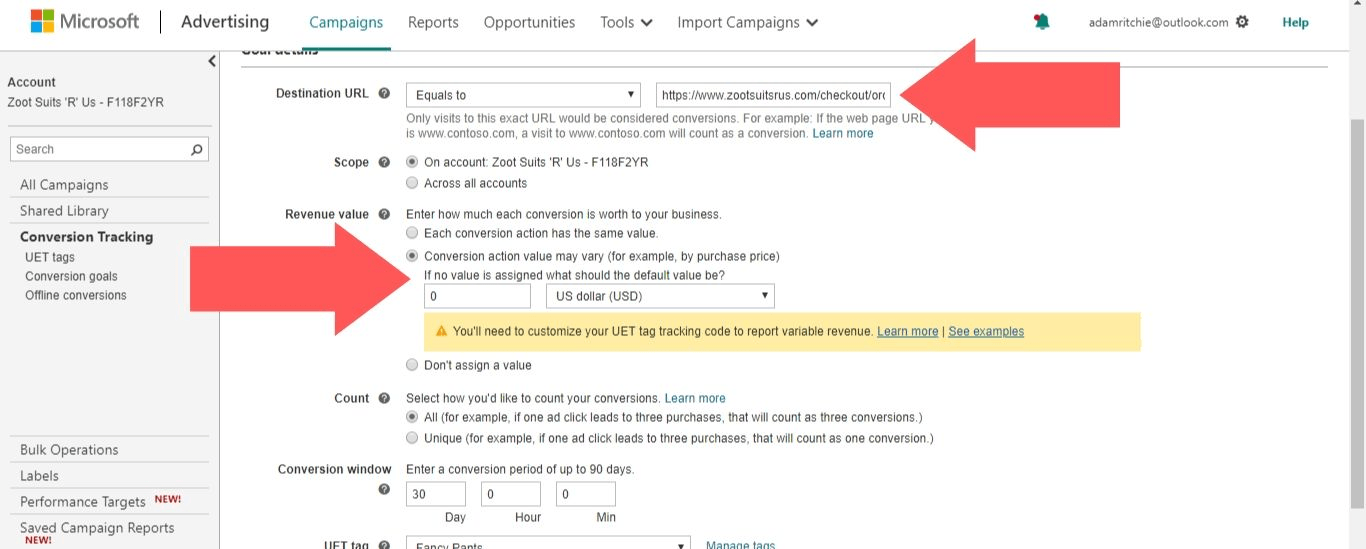
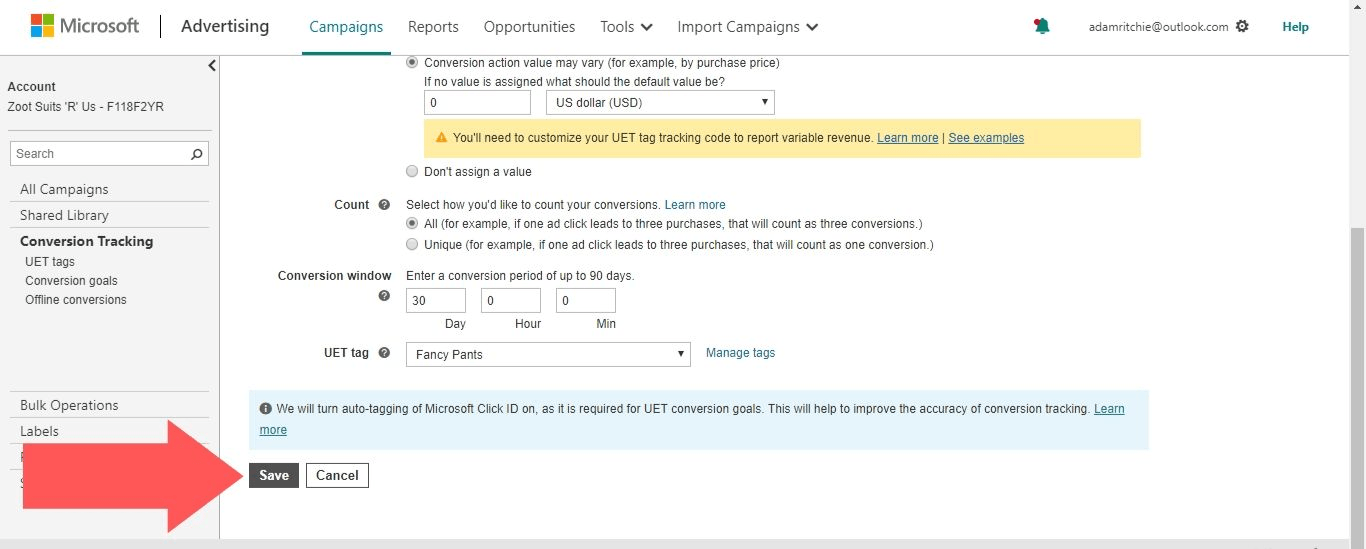
10. Adjust the rest of the settings as you see fit and select “Save”.
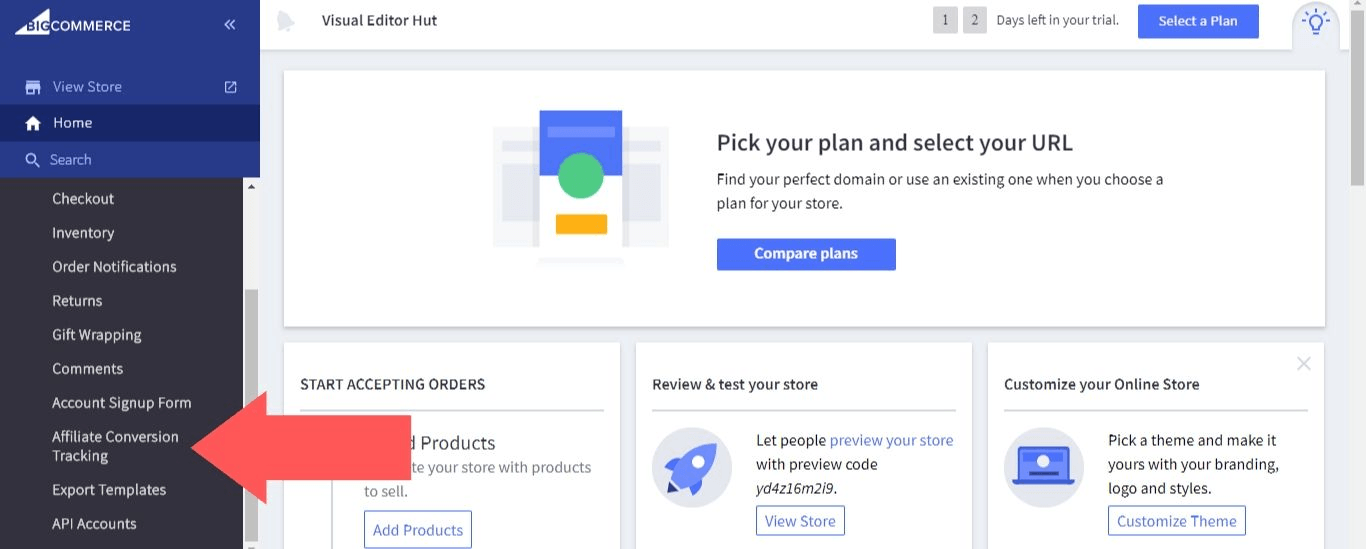
11. The last stage of this process is to add the UET tag tracking code to your BigCommerce store. Sign in to your BigCommerce account, go to “Advanced Settings”, and select “Affiliate Conversion Tracking”.
12. Paste your UET tag tracking code into the “Conversion Tracking Code” field.
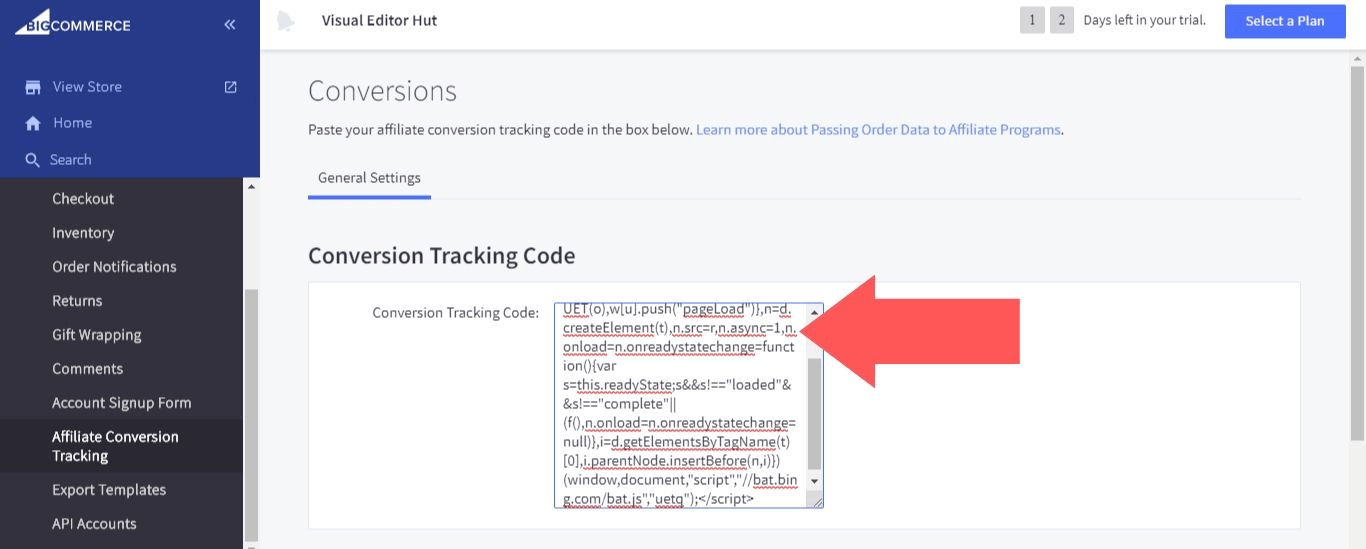
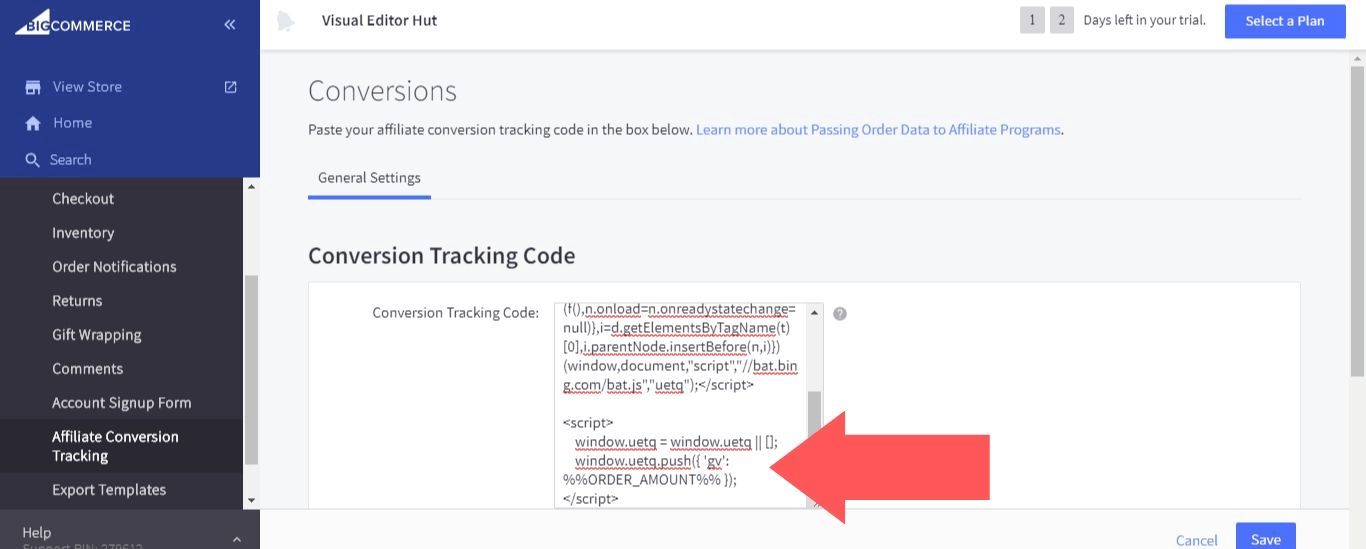
13. Below the UET tag tracking code, enter the following code:
<script>
window.uetq = window.uetq || [];
window.uetq.push({ ‘gv’: %%ORDER_AMOUNT%% });
</script>
Select “Save” to finish setting up BigCommerce conversion tracking with Microsoft Advertising.
BigCommerce Analytics Tracking with Shogun
Shogun is one of the most highly rated apps in the BigCommerce marketplace, with a perfect 5 out of 5 average score on more than 100 reviews.
Shogun’s easy-to-use interface gives everyone the ability to create pages that look and function like they were made by a pro. And with Shogun’s extensive library of elements, you can make just about any kind of page you want. The only limit is your imagination.
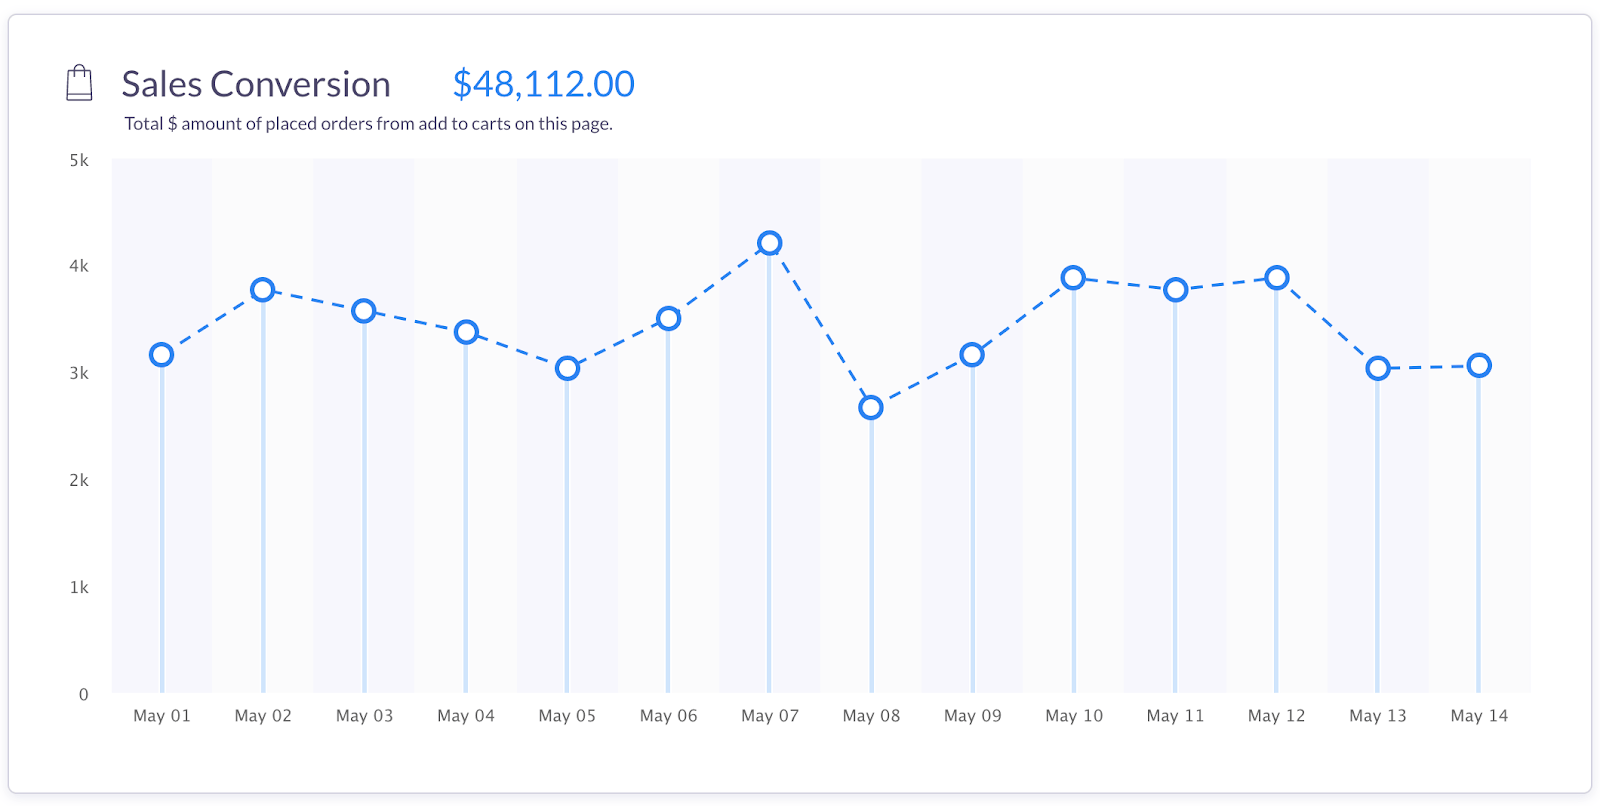
But Shogun does more than just help you build pages. With its analytical tools, Shogun allows you to evaluate how your pages are performing as well (this is just one way in which using Shogun leads to thousands of dollars in savings).
For each page, you can track the following BigCommerce analytics metrics:
- Total Sessions: The number of users who have visited the page.
- Bounce Rate: The percentage of users who left the page without further store activity.
- Top Clickthrough Destinations: A list of where users most often go to from the page.
- Top Outside Referrers: A list of where users are most often coming from when they land on the page.
- Sales Conversions: The dollar amount of placed orders from add to cart buttons on the page
- Add to Cart: The percentage of users who clicked an add to cart button on the page.
These metrics can be displayed in total or broken down by device (widescreen, desktop, tablet, and mobile device).
Also, maybe you have an idea for a page, but you’re not sure if it will actually improve user experience or not. A/B testing page elements can help you understand what works and what does not.
Conversion Tracking Will Help You Beat the Competition
Every dollar counts. If you can find a way to make your advertising efforts more effective, you will generate more sales. You could use this extra income to lower your prices or improve your service, which would give you an edge over your competitors and also lead to more sales.
Conversion tracking gives you the data you need to optimize your advertising. It shows you what’s working and what isn’t, so you’ll always be able to make the smartest move.
Create customized pages in BigCommerce with ShogunBuild dynamic pages that convert shoppers into customers. Get started now

Adam Ritchie
Adam Ritchie is a writer based in Silver Spring, Maryland. He writes about ecommerce trends and best practices for Shogun. His previous clients include Groupon, Clutch and New Theory.
The latest ecomm tips sent to your inbox
share this post
You might also like
Cookie Settings is not available. Cookie Consent is disabled or is just disabled for your country.


