The Starter’s Guide to BigCommerce for WordPress
In December 2018, BigCommerce released BigCommerce for WordPress, a plugin that allows you to keep WordPress as your frontend interface while using BigCommerce behind the scenes for functions such as payment processing and catalog management.
WordPress is used by 35% of all websites in the world, making it by far the most popular content management system (CMS). For comparison’s sake, the next-most popular CMS, Joomla, is used by just 3% of websites.
There’s good reason why WordPress is so popular. First of all, it’s especially easy to use. The primary draw of using a CMS in the first place is that it gives you the ability to manage a site without having to deal with code (or hiring someone to deal with code for you). With WordPress’s simple, intuitive interface, anyone can quickly create and edit pages.
Another attractive feature of WordPress is its flexibility. There are thousands of themes and plugins that you can use to customize your store. The sheer number of available add-ons may be the biggest advantage that WordPress holds over competitors such as Joomla and Drupal.
WordPress does have its limitations, though. The fact that WordPress is highly popular has made it a frequent target for cyberattacks, which puts the sensitive financial information of your customers at risk. Also, the technical demands of supporting a store will often overwhelm servers, leading to slow loading and downtime.
That’s where BigCommerce for WordPress comes in. Out of the box, this plugin provides you with PCI-compliant checkout that will protect the sensitive information of your customers. BigCommerce also provides you with their servers hosted on the Google Cloud Platform (99.99% uptime) for e-commerce operations, so you can continue to expand your inventory and process more orders without sacrificing the quality of your user experience.
Indeed, the BigCommerce for WordPress plugin gives you the best of both worlds. With the flexible CMS of WordPress and the powerful e-commerce engine of BigCommerce, there will be nothing in the way of your online store’s success.
BigCommerce for WordPress Requirements
Before you can use the BigCommerce for WordPress plugin, you’ll need the following:
- A WordPress site.
- The BigCommerce for WordPress plugin installed on your WordPress site.
- A live BigCommerce store (if you don’t already have a BigCommerce store, you can start a trial through the BigCommerce for WordPress plugin).
- The permalinks settings of your WordPress site set to either “Plain” or “Default”.
- The shipping, payment, and tax settings of your BigCommerce store completed so that customers are able to check out.
- The “Optimized One-Page Checkout” option enabled for your BigCommerce store (this is the default option, so you likely won’t need to change anything).
How to Install BigCommerce for WordPress
After you’ve confirmed that you have the above requirements in place, use the following steps to install the BigCommerce for WordPress plugin:
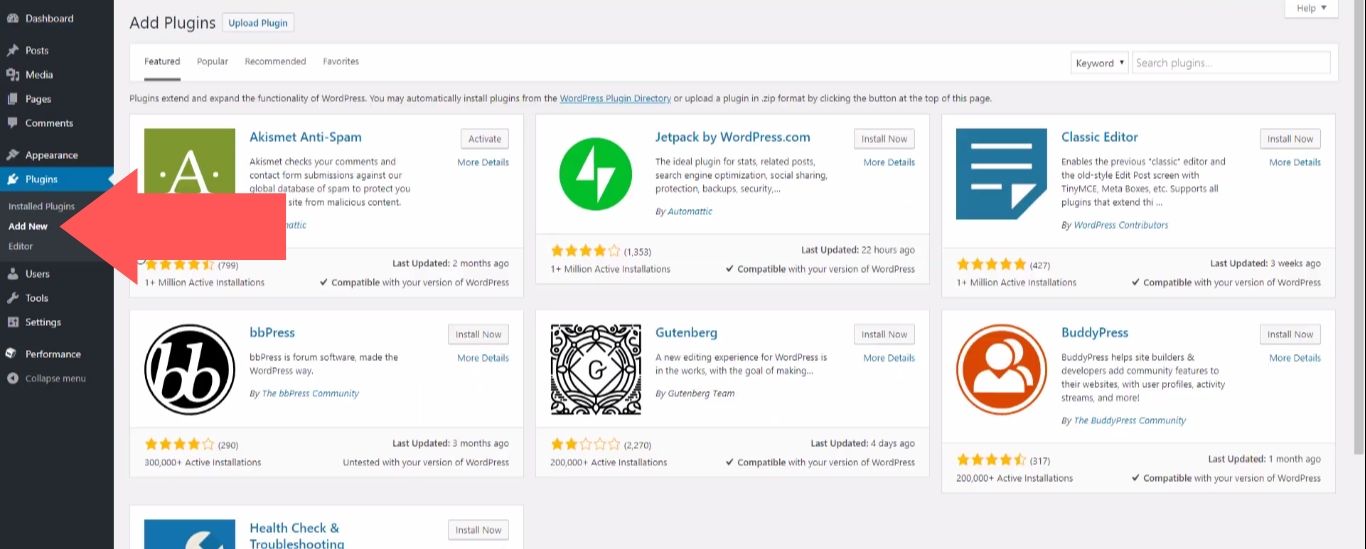
1. After signing in to your WordPress account, click on the “Plugins” option in the left sidebar and select “Add New”.
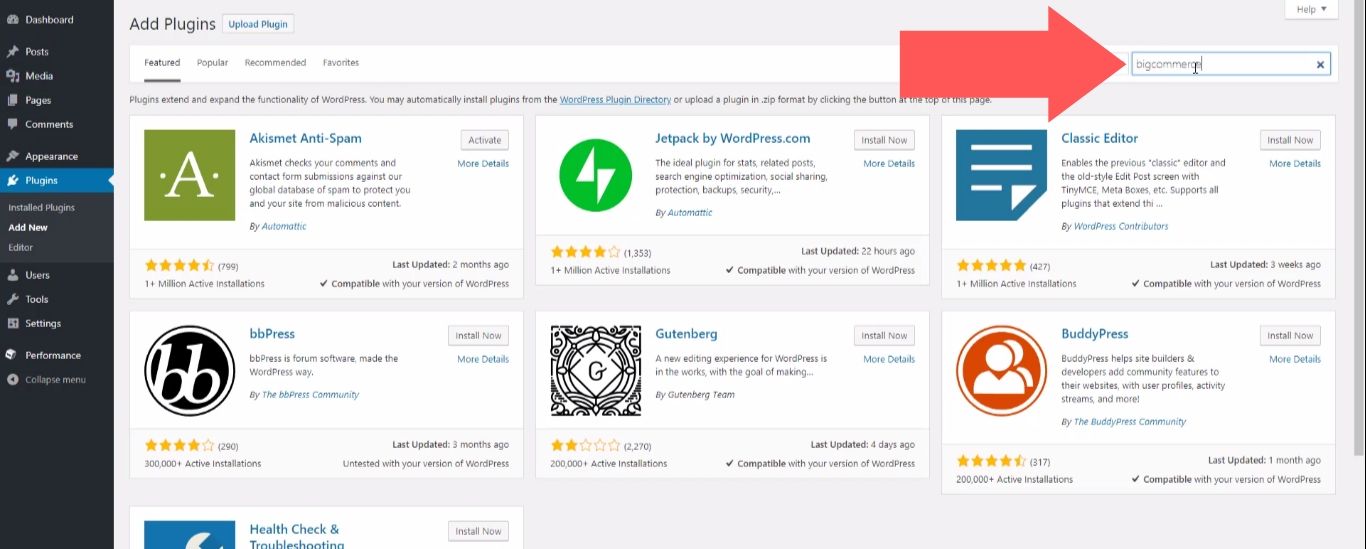
2. Search for the term “BigCommerce”.
3. Click on the “Install Now” button next to the result for “BigCommerce for WordPress”.
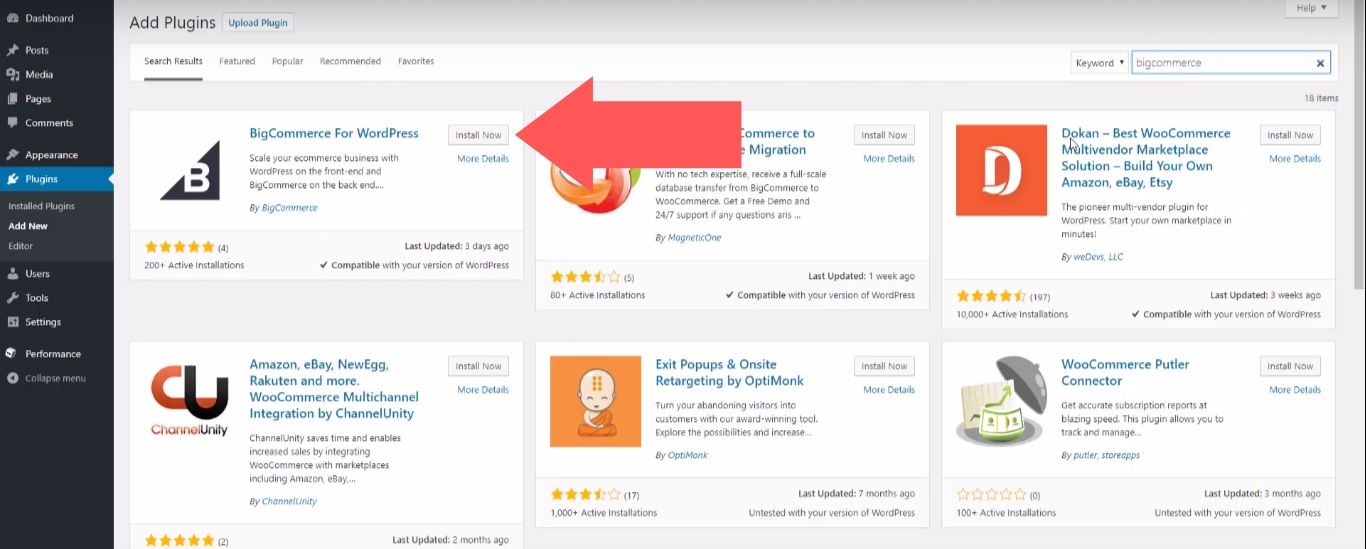
4. After the plugin finishes installing, select “Activate”.
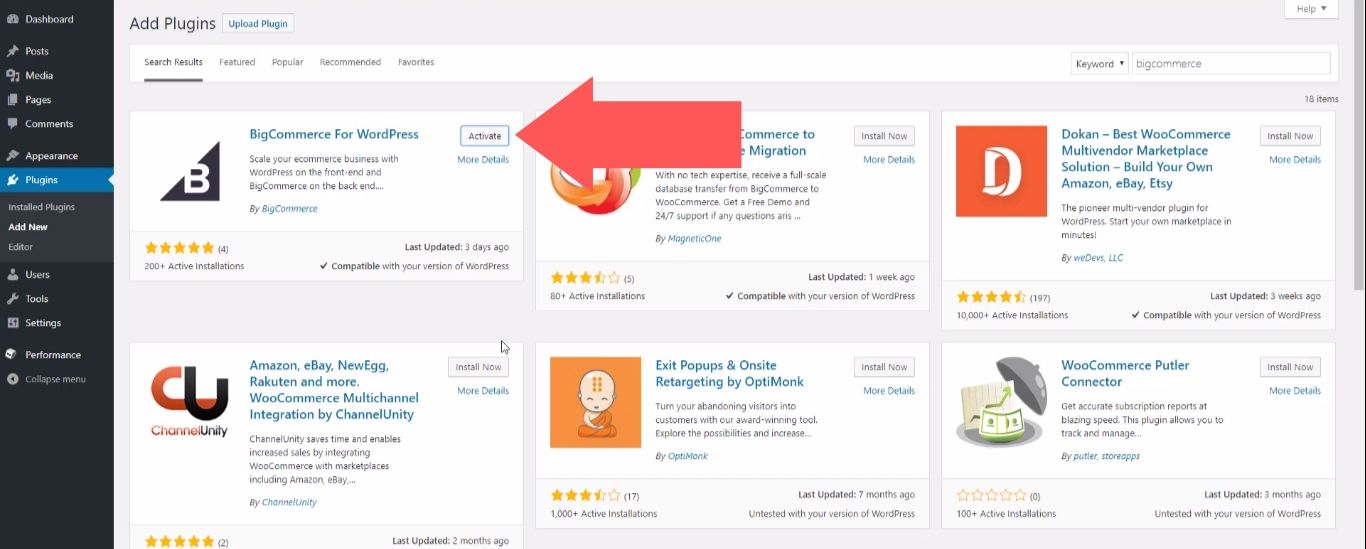
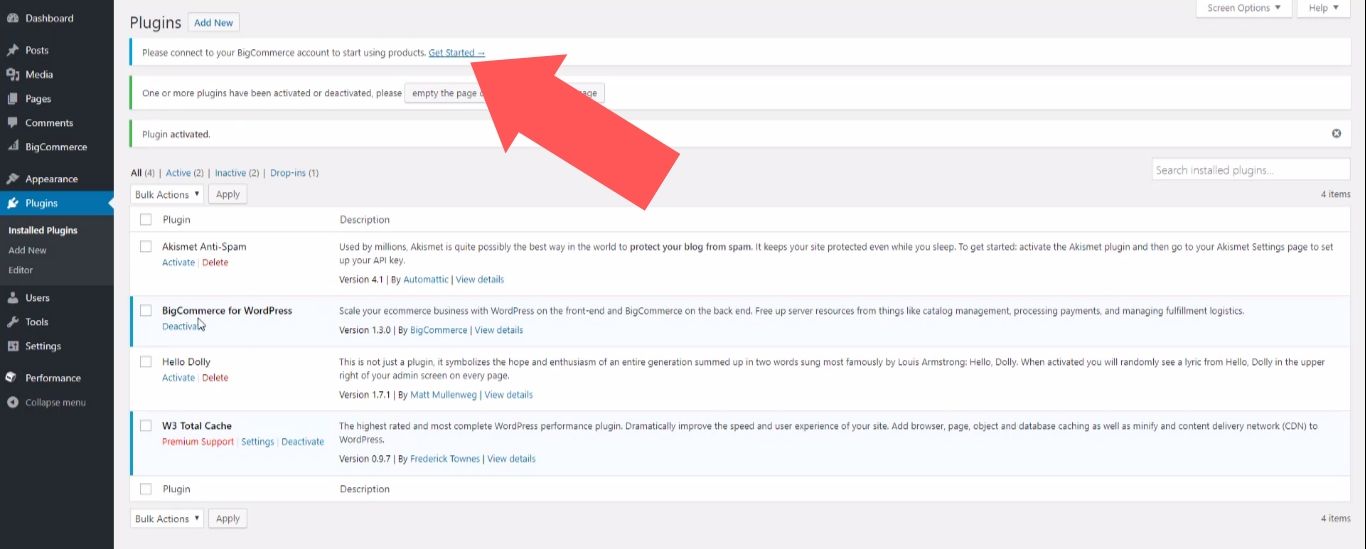
5. You will see “BigCommerce for WordPress” listed on the “Plugins” page, and there’s now a “BigCommerce” option in the left sidebar of your dashboard as well.
At the top of the “Plugins” page, you’ll also see a message that reads “Please connect to your BigCommerce account to start using products”. Click on the “Get Started” link next to this message.
6. If you already have an account, select “Connect My Account”. If you don’t, select “Create New Account” to start a trial.
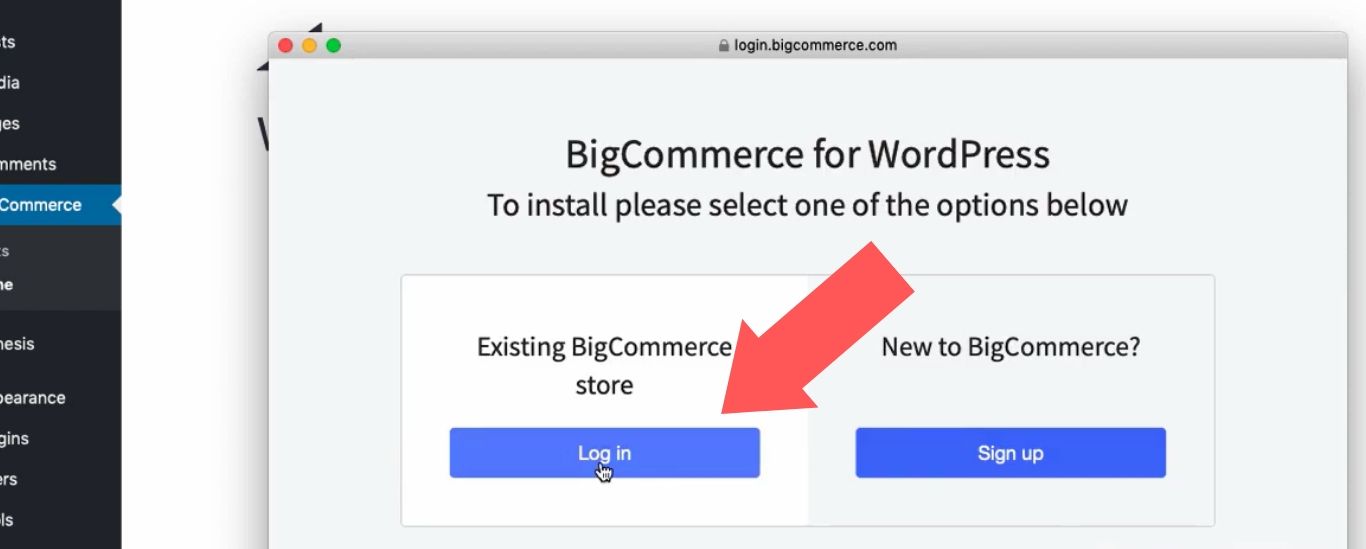
In this guide, we’ll show you what the process is like if you select “Connect My Account” at this stage (the process is virtually the same if you choose “Create New Account”, with the only difference being that you need to start a trial before you continue).

7. Under “Existing BigCommerce Store”, select “Log In”.
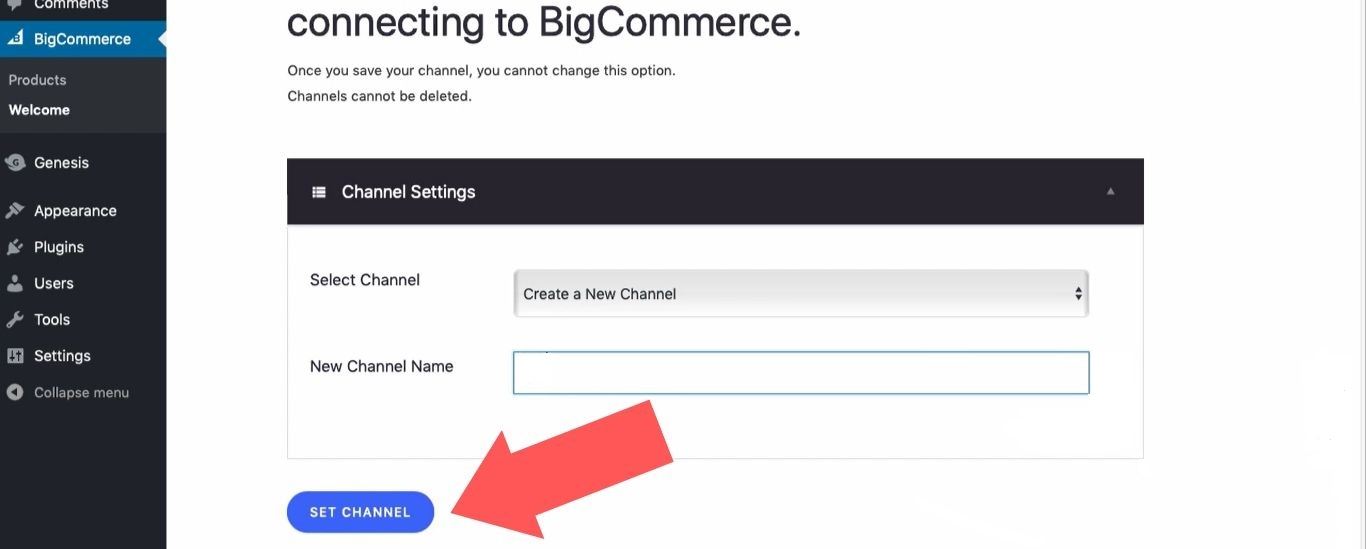
8. The final step is to create a channel. In the “Channel Settings” section, open the “Select Channel” dropdown menu and select “Create a New Channel”, then enter a name for your channel.
This is how BigCommerce will identify your WordPress site – it’s the same as if you were connecting Amazon, eBay, or another third-party channel to your store.
When you’re done, select “Set Channel”.
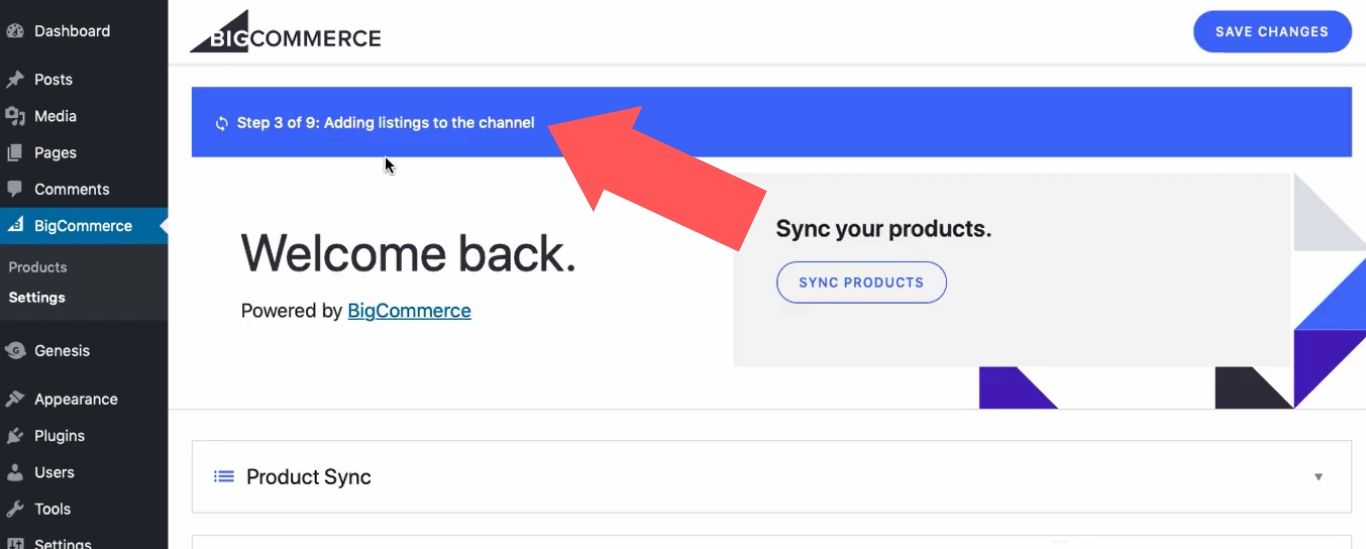
9. After you create your channel, WordPress will automatically update your site with information from your BigCommerce store (this usually takes about two minutes).
Setting Up BigCommerce for WordPress
Now that your installation is complete, let’s take a look at some of the options you have in the settings of this plugin:
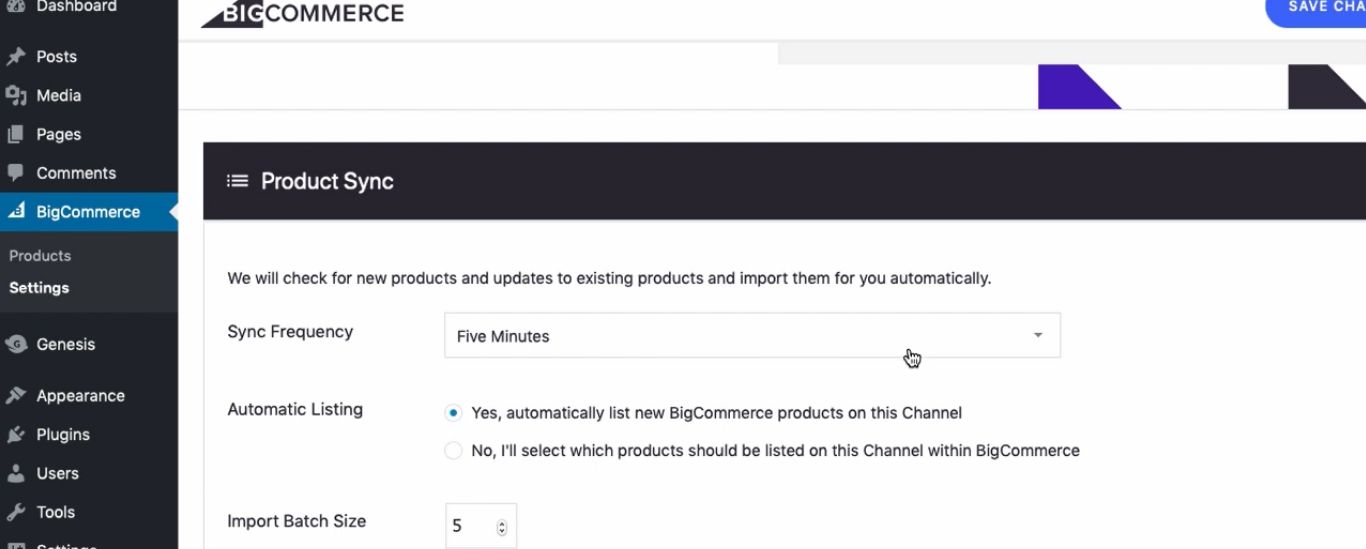
Product Sync
Here, you can choose how often your BigCommerce inventory is synced with your WordPress site. You can also choose whether to sync all your products or select specific products. The latter option is ideal for multistore setups.
Cart & Checkout
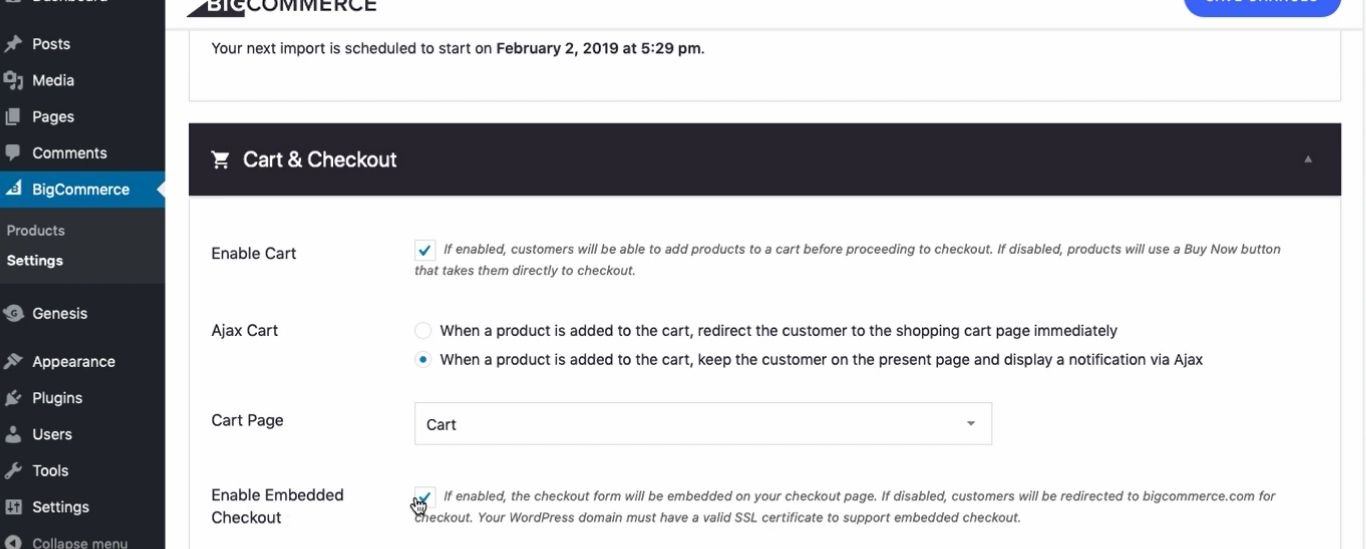
With the “Enable Cart” option activated, your customers can add items to their cart and continue shopping before they go to checkout (otherwise, customers would need to click on a “Buy Now” button and go through the checkout process for every product that they want to buy).
The other key option in this section is “Enable Embedded Checkout”. By toggling this option on, customers will be able to checkout on your WordPress site instead of being redirected to the checkout page of your BigCommerce store. Your WordPress site must have an SSL certificate for this option to be enabled, though.
Editing Product Pages
After installation, the BigCommerce for WordPress plugin creates a page for each of your products.
You’ll see that there is an “Edit” option for these pages just like any other page in WordPress.
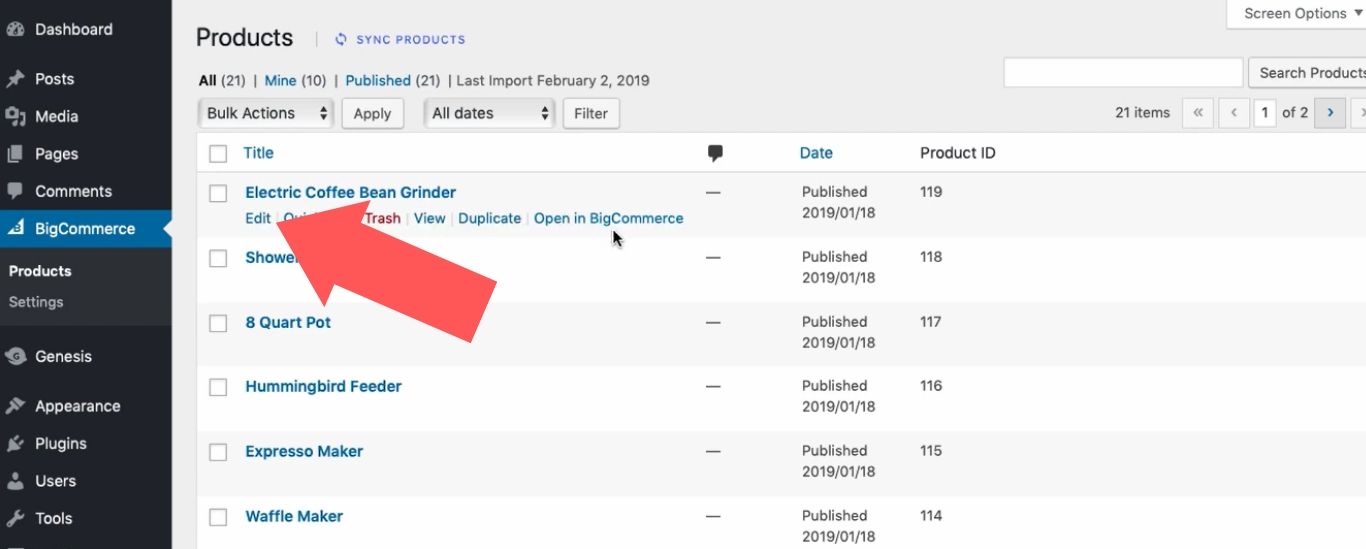
BigCommerce for WordPress will have imported the title, description, and featured image of the product that you set up in your BigCommerce account. Keep in mind that editing these areas in WordPress is a waste of time, as any changes will be overridden the next time your site syncs with WordPress.
To change the title, description, or featured image of a product, you’ll need to do so in BigCommerce (thankfully, there’s also an “Open in BigCommerce” option for each page in WordPress that makes it easy to quickly go in and edit those details where the changes will stick).
What youcan do in WordPress is add new content such as video, image galleries, and additional text, which will help you convince customers that they should buy your products.
Not everything that was imported from BigCommerce can be viewed in the editor. If you look at the preview of a product page, you’ll see that (depending on your BigCommerce settings and your WordPress theme) content such as customer reviews, an “Add to Cart” button, and related products were also imported. Without lifting a finger, your WordPress product page will already have everything you need to convert visitors into customers.
Adding Products to a Page or Post
One of the most valuable benefits of the BigCommerce WordPress integration is that you can use it to instantly create a call-to-action ad in the middle of a page or post.
For example, if you’re writing a post that outlines the benefits of one of your product categories, you could use BigCommerce for WordPress to insert an ad for a relevant product in a place where those benefits will still be fresh in the reader’s mind.
The page you add your product to doesn’t even need to be specifically about your products. This is where you can really get creative and use the content on your WordPress site to drive sales on your BigCommerce store.
1. In the body of a page or post, you’ll see that you now have the “Add BigCommerce Products” block available as an option.
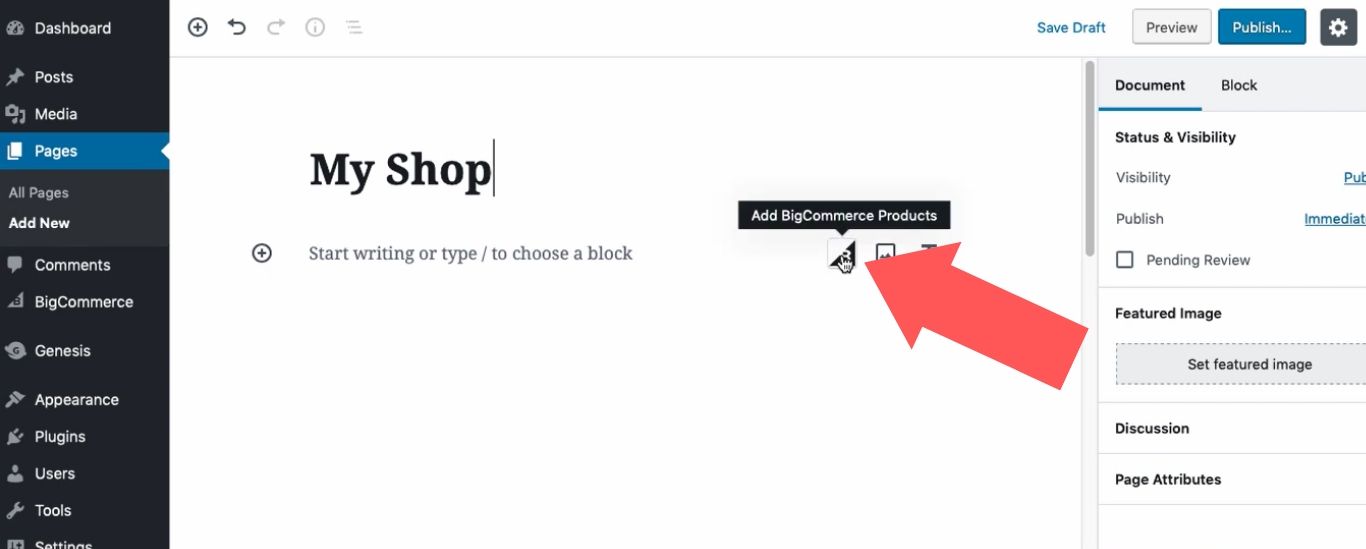
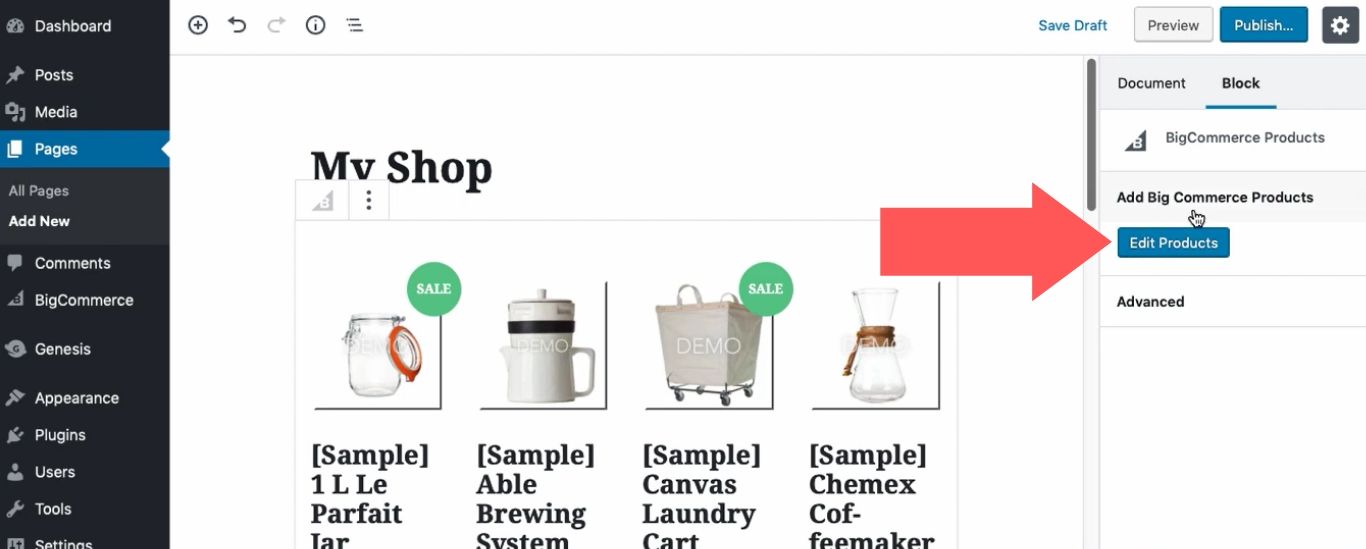
2. After you select the “Add BigCommerce Products” block, all of your products will appear. To narrow it down to a single product, click on the “Edit Products” button.
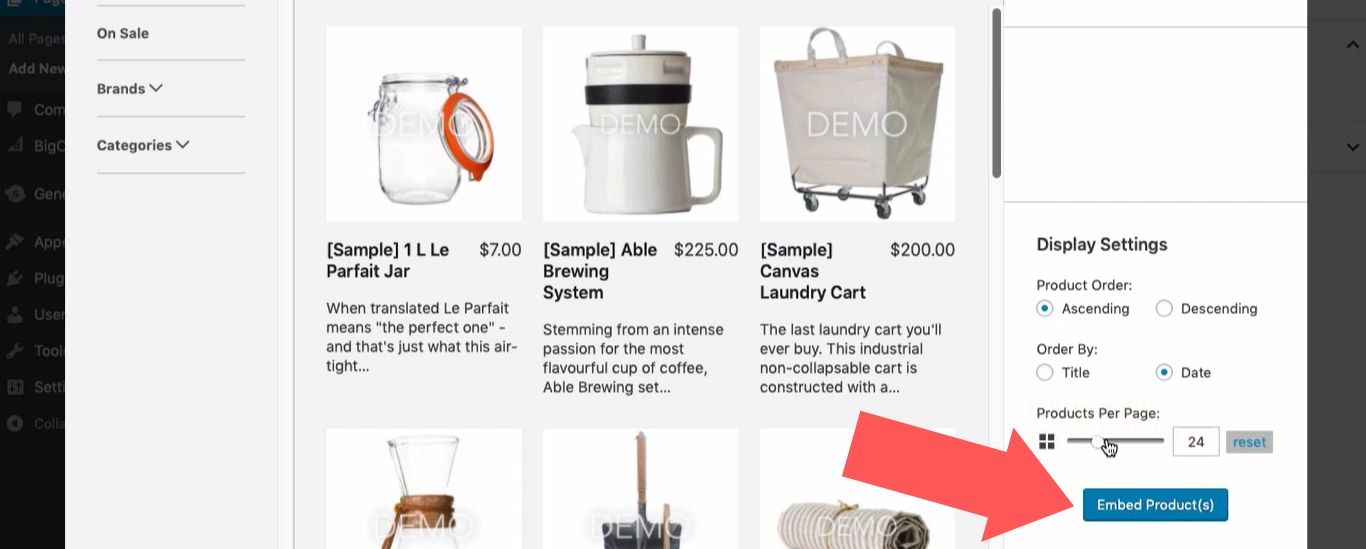
3. Use the search bar to find the product you’re looking for. You could also add all your products to the page (this is useful for when you’re creating a general “Shop” page) or all products that belong to a particular brand or category.
When you’re done, select “Embed Products”.
Supported and Unsupported BigCommerce Features
One thing you must consider before setting up BigCommerce for WordPress is that not every feature native to BigCommerce is currently supported by this plugin.
The BigCommerce features that are supported at this time include:
- Product Variants/Product Variant Pricing
- Product Promotions
- Secure Shopper Accounts/Logins with PCI-Compliant Checkout
- Shopper-Specific Pages (Cart, Checkout, Account Profiles, Sign In, Shipping & Returns, Gift Certificates, Order History)
- ShipperHQ Integration
- Google Accelerated Mobile Pages
- Google Address Autocomplete
- Google Analytics Enhanced Ecommerce
- Facebook Pixel
- Multi-Channel Selling (eBay, Amazon, Facebook, Instagram, etc.)
- Bulk Listing
- Automatic Inventory Syncing
- Unified Order and Fulfillment Management
The following BigCommerce features are currently not supported by BigCommerce for WordPress, so you may want to seek another solution if you believe they are important to your store.
- Product File Upload Field
- Warranty Field
- Availability Field
- Persistent Cart
- Cart Preview
- Cart Page Promotional Banners
Supported Payment Methods
We’ll leave you with one last piece of information about BigCommerce for WordPress: compatible payment gateways. This is incredibly important for your store, of course, as there’s no way you’ll be successful if you’re not able to receive money from your customers.
BigCommerce for WordPress allows you to use the following methods to accept payments from customers:
- Adyen
- Affirm
- Afterpay
- Amazon Pay
- Apple Pay
- Authorize.Net
- BlueSnap Payments
- CCAvenue
- Chase Integrated Payments
- Chase Merchant Services
- Chase Pay
- Clover Payments
- CyberSource Direct
- eWay Rapid
- First Data Payeezy Gateway
- Google Pay
- Heartland Payment Systems
- Klarna Payments
- Masterpass
- MIGS
- MyVirtualMerchant
- NMI
- Offline Payment Methods
- Paymetric
- PayPal Express Checkout
- PayPal powered by Braintree
- PayPal Credit
- PayPal Website Payments Pro
- QuickBooks Payments
- Sage Pay/Protx VSP Direct
- SecureNet
- ShopKeep Payments
- Square Payments V2
- Store Credit
- Stripe
- Test Payment Gateway
- USAePay
- Visa Checkout
- Worldpay Core
- Worldpay Ecomm
For more technical details about this plugin, refer to the BigCommerce for WordPress GitHub page.
Alternatives to BigCommerce for WordPress
Instead of using WordPress as a CMS for your BigCommerce store, you can use the Shogun page builder app to fully customize your store and add all the elements you need.

Shogun is a native CMS to BigCommerce, so it eliminates the need to integrate two separate solutions for the content and commerce needs of your online store.
And while it may be true that WordPress offers many themes for you to choose from, the fact remains that no matter which theme you pick, there will be limitations on what you can change about the appearance of your store.
Most themes function as simple templates: the design is fixed, and you simply enter your own text and media into the pre-arranged sections. You may be able to adjust the color scheme and other relatively superficial elements, but usually that’s about it.
Shogun gives you much more control over the look of your store. It allows you to overhaul everything. You can still use a template as a starting point (Shogun comes included with templates for home pages, landing pages, product pages, collection pages, and blog posts), or you can choose a blank slate. Either way, you can arrange the elements on the page in any way that you want, and you can add new elements as needed.
The available elements include everything from text blocks to countdown clocks to customer review sections. Also, each element is fully customizable. The font, text size, text color, background color/image, and other details within each element can all be adjusted. You can adjust the padding and margins that separate each element as well.
Shogun has been shown to save businesses tens of thousands of dollars on web development costs. After all, why pay someone for custom web design when you can do it yourself?

Adam Ritchie
Adam Ritchie is a writer based in Silver Spring, Maryland. He writes about ecommerce trends and best practices for Shogun. His previous clients include Groupon, Clutch and New Theory.


