The Easy Way to Add a Custom HTML Section to Shopify
Adding an HTML section to your Shopify store can communicate your brand voice more authentically, creating an immediate connection with visitors and making your storefront more memorable.
There are two ways you can add HTML sections to Shopify: using Shopify Sections to edit theme files or using the agile visual editor Shogun. We’ll guide you through both of these methods.
Add HTML sections to Shopify with ShogunAdd custom code snippets to any page on your Shopify store with an easy to use visual editor. Get started now
Adding Custom HTML to a page Using Shopify Sections
To begin, you’ll want to create a brand new HTML section within your Shopify theme.
Step 1: Create a custom HTML section on your Shopify theme
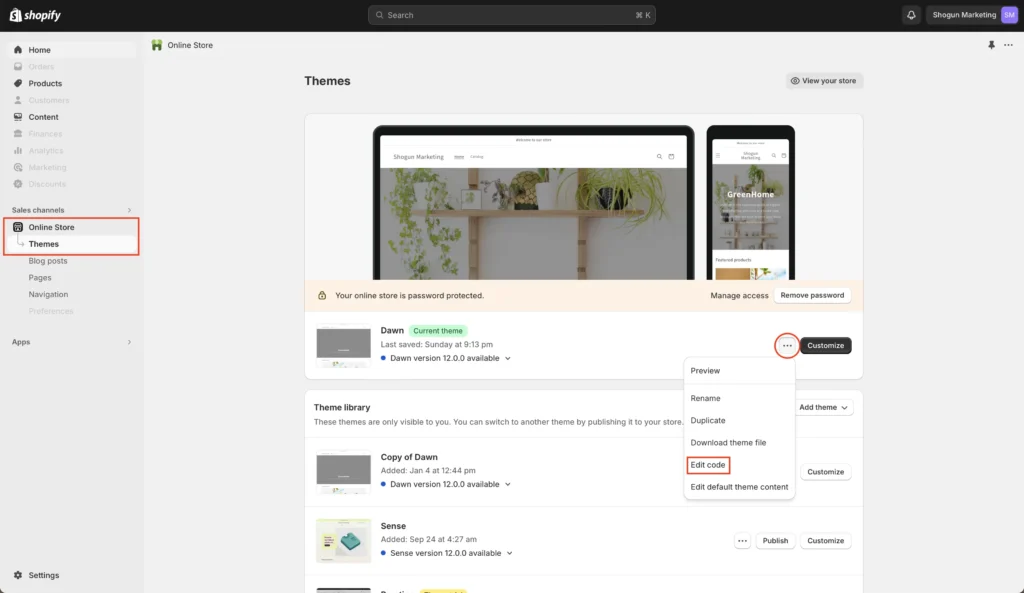
Once you’re on your Shopify admin dashboard, navigate to your Online Store and click on ‘Themes.’ Click on the three dots on your current theme and click ‘Edit code.’
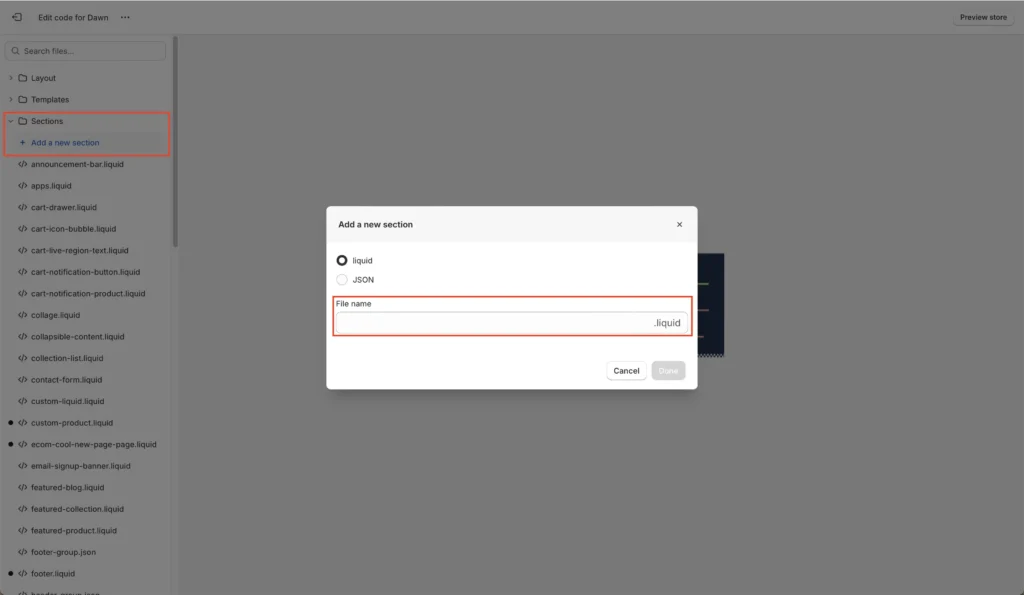
This will take you to the code editor. Within the ‘Sections’ folder, click ‘Add a new section’ and create a new file name, such as ‘custom-HTML’ with a .liquid file extension. Press ‘Done.’
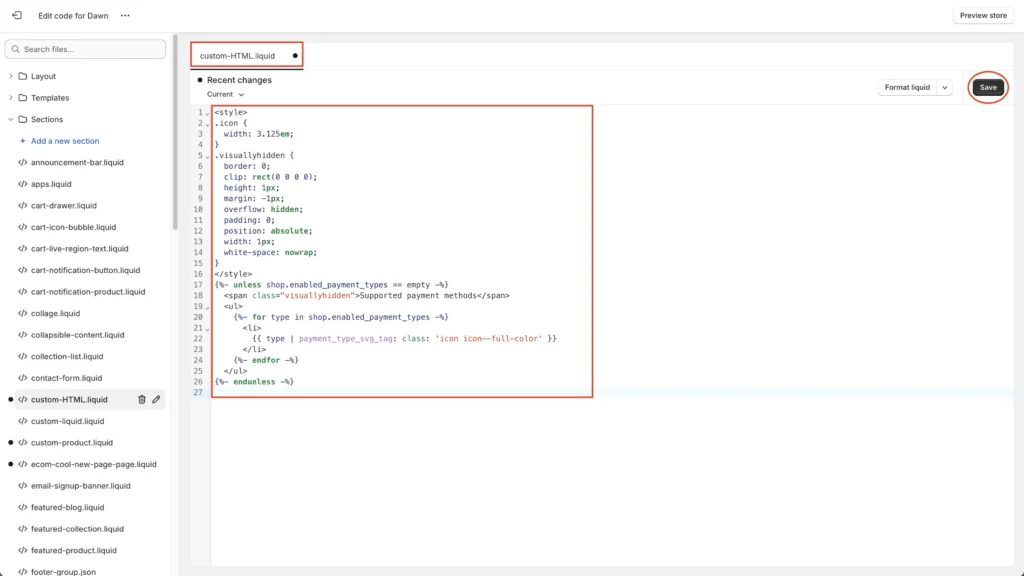
You’ll now have a custom HTML section that you can work with in the theme customization section of your site. Paste whatever HTML you’d like to use into your new section and press ‘Save.’
Step 2: Add that Shopify HTML section to any page
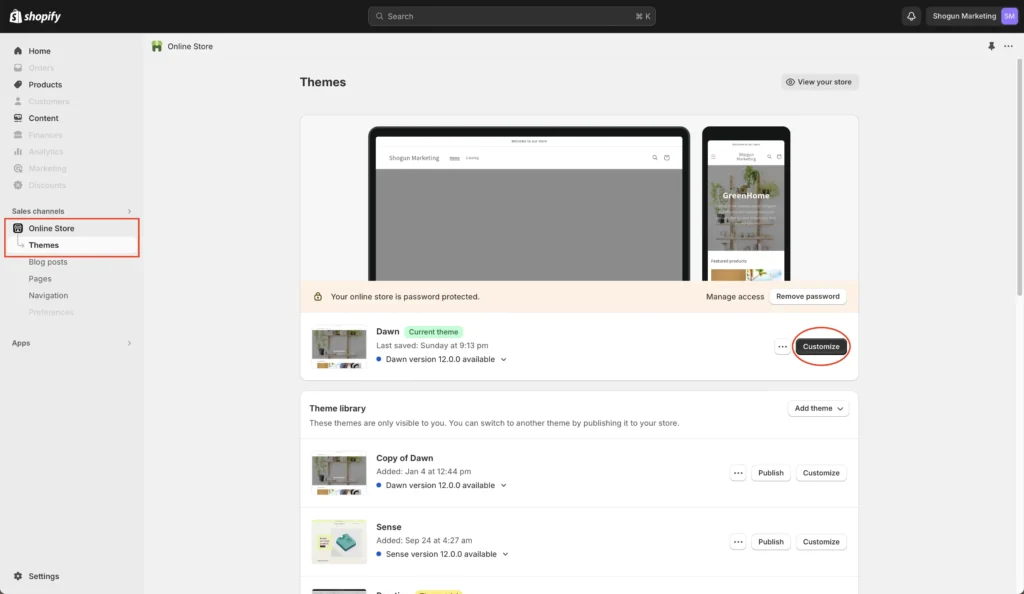
Head back to your Online Store dashboard and go to ‘Themes.’ Click on ‘Customize.’

To add an HTML section to a page, navigate to the right page, click ‘Add section,’ and insert a ‘Custom HTML’ section.
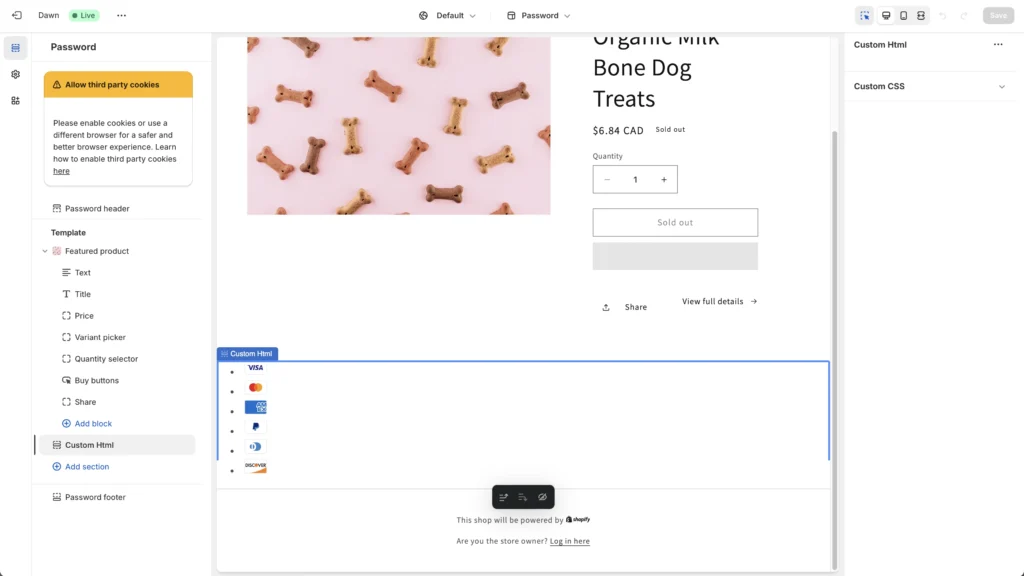
Once you add the section, whatever you chose HTML for should appear visually on your page. In this case, we can see a list of payment methods.
Other HTML Code Snippets
If you’re looking for other ideas of HTML code for your Shopify store, try out these examples. All you have to do is cycle back and re-do steps 1 to 2 for each new HTML section you create.
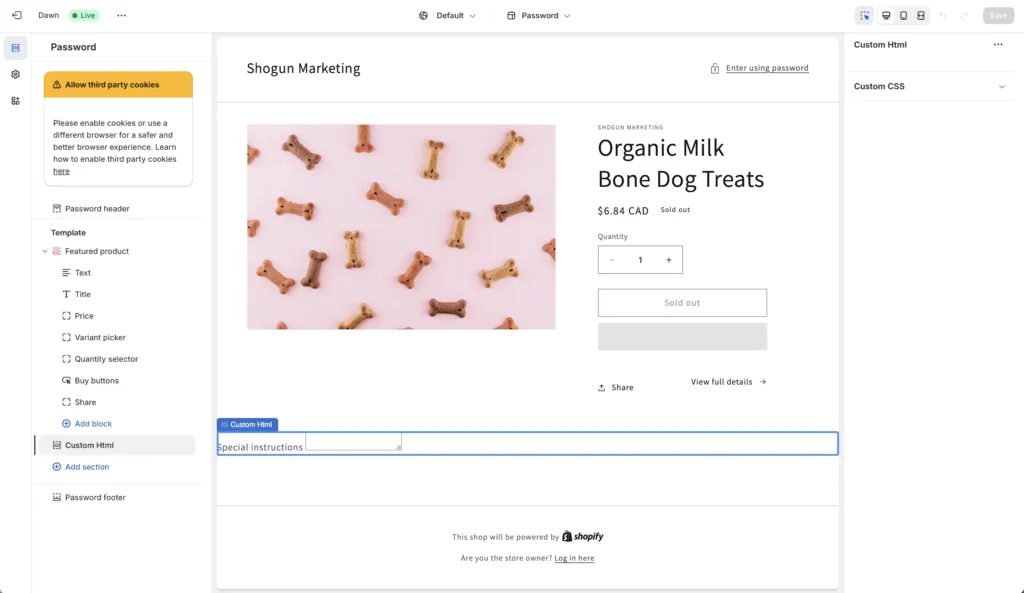
Special Instructions HTML Section
Code Snippet:
  <label for="CartNote">Special instructions</label>

  <textarea name="note" id="CartNote">{{ cart.note }}</textarea>
For ecommerce stores selling customizable or personalized goods, having a ‘Special instructions’ text box can allow customers to fill out customization details about their order.
Testimonials HTML Section
Below is a sample HTML snippet for including a testimonials sections on to a page:
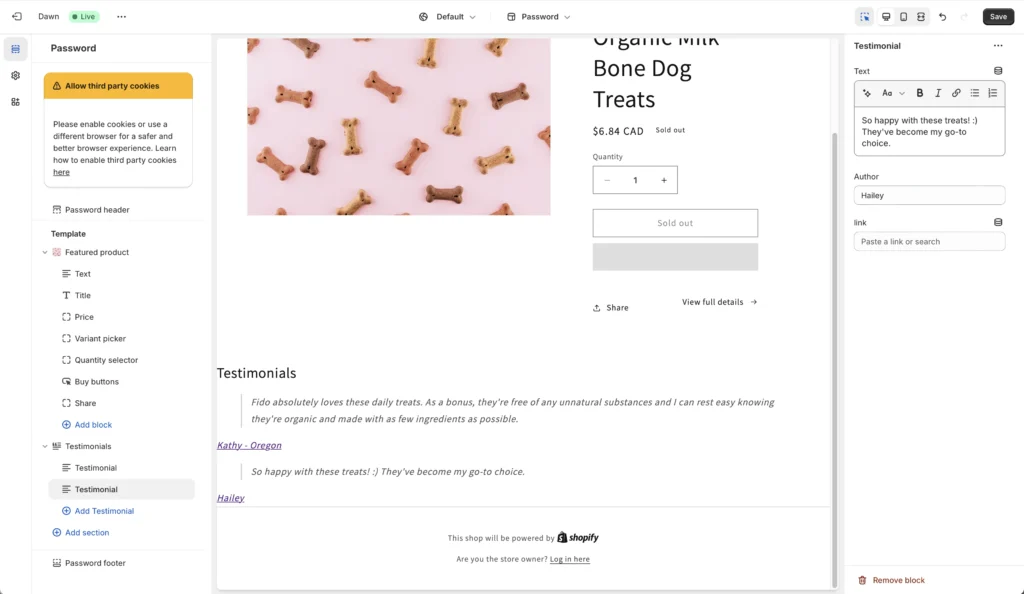
Code Snippet:
  <h2>{{ section.settings.title }}</h2>

  {%- if section.blocks.size > 0 -%}
    {%- for block in section.blocks -%}
      <blockquote>
        {%- if block.settings.quote != blank -%}
          <p>
            {{ block.settings.quote }}
          </p>
        {%- endif -%}
      </blockquote>
      {%- if block.settings.author != blank -%}
        <cite>
          <a href="{{ block.settings.link }}">
            {{ block.settings.author }}
          </a>
        </cite>
      {%- endif -%}
    {%- endfor -%}
  {%- endif -%}

  {% schema %}
  {
    "name": "Testimonials",
    "class": "index-section",
    "max_blocks": 8,
    "settings": [
      {
        "type": "text",
        "id": "title",
        "label": "Heading",
        "default": "Testimonials"
      }
    ],
    "blocks": [
      {
        "type": "quote",
        "name": "Testimonial",
        "settings": [
          {
            "type": "richtext",
            "id": "quote",
            "label": "Text",
            "default": "<p>Add customer reviews and testimonials to showcase your store’s happy customers.</p>"
          },
          {
            "type": "text",
            "id": "author",
            "label": "Author",
            "default": "Author’s name"
          },
          {
            "type": "url",
            "id": "link",
            "label": "Link"
          }
        ]
      }
    ],
    "presets": [
      {
        "name": "Testimonials",
        "category": "Text",
        "blocks": [
          {
            "type": "quote"
          },
          {
            "type": "quote"
          },
          {
            "type": "quote"
          }
        ]
      }
    ]
  }
  {% endschema %}
For any ecommerce store, customer testimonials will help you boost credibility, build trust, and make it more likely for you to make a sale. A well-placed testimony can serve as social proof, letting prospective customers know that your product or service is dependable.
Add HTML sections to Shopify with ShogunAdd custom code snippets to any page on your Shopify store with an easy to use visual editor. Get started now
Using Shogun to Add HTML to your Shopify store
While using the code editor to insert custom HTML into your Shopify store is versatile, it does come with its own set of challenges. Especially if you aren’t proficient or comfortable with the backend of Shopify, that method may have its limitations or not feel very intuitive. Stepping in to eliminate these barriers and make the process much more accessible is Shogun: your non-technical, user-friendly solution to customizing your ecommerce store.
Step 1: Navigate to a page
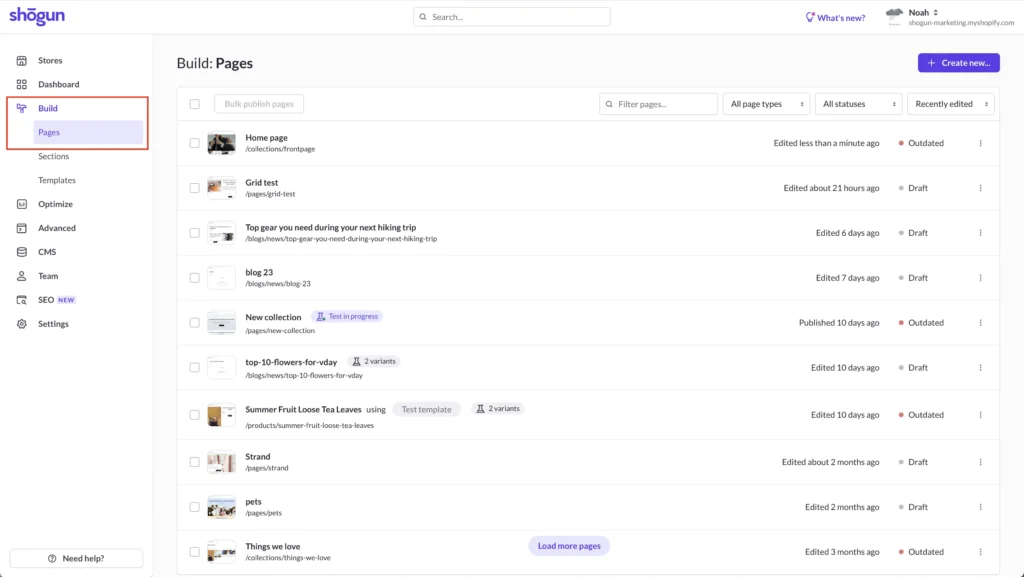
From the Shogun dashboard, click on ‘Build’ on the left-hand navigation menu and then ‘Pages,’ where you’ll see a list of all the pages on your ecommerce store. Click on the page to which you want to add custom HTML.
Step 2: Drag and drop the custom HTML section onto your page
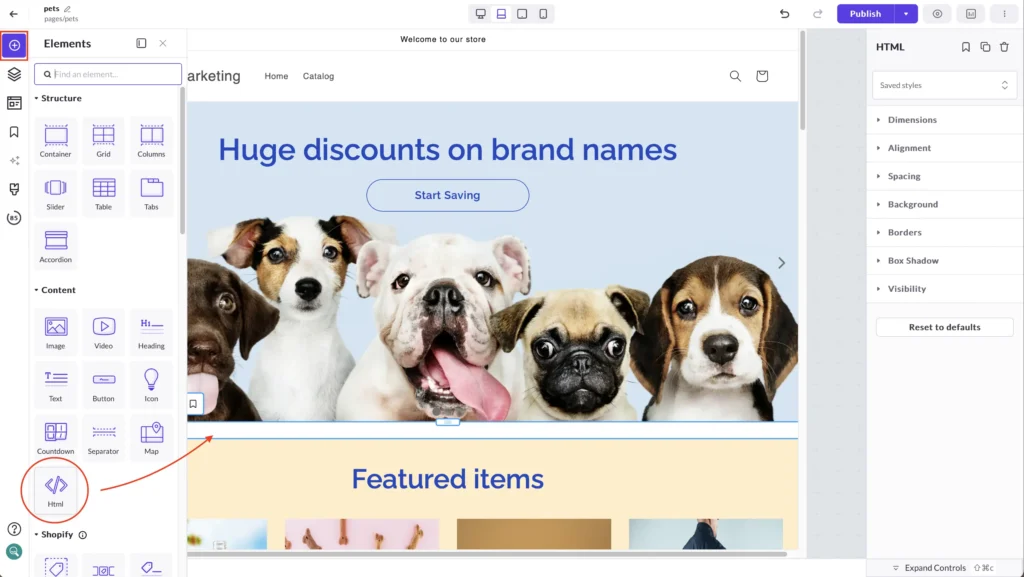
Click and drag the HTML module from the ‘Elements’ tab anywhere you want on your page. Click on the module to open the HTML editor.
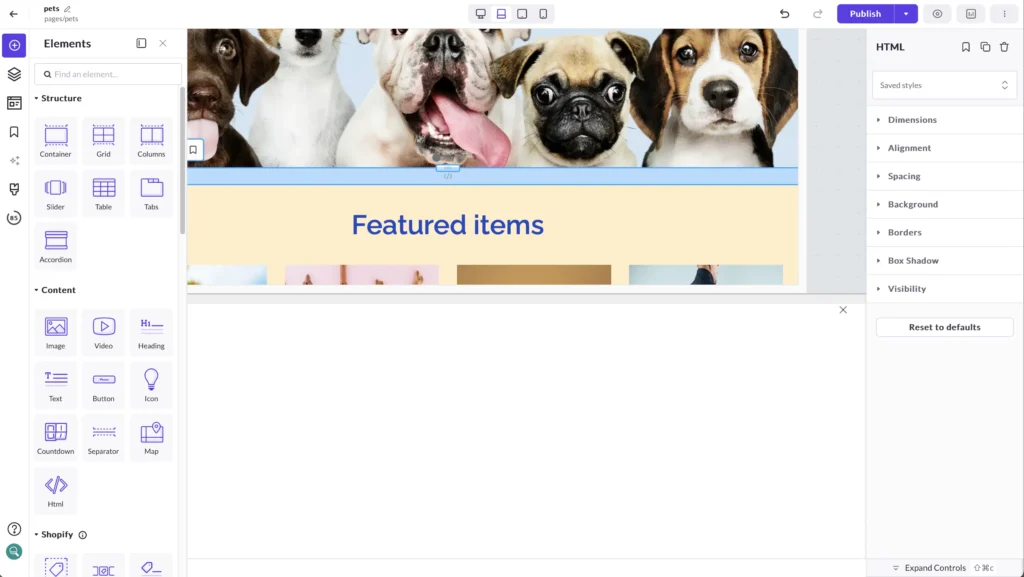
Click on the module to open the HTML editor. Here, you can enter whatever HTML code you wish. Note that the HTML editor doesn’t support templating languages like Liquid.
Instead of having to create custom modules in the backend of Shopify, making changes to your Shopify store becomes as simple as dragging an element and placing it where you want. This visual approach simplifies and speeds up the process, making sure your ecommerce store is always ready for business.
Custom Elements feature
Shogun also boasts developer tools where you can create custom reusable elements for your Shopify pages using HTML/Liquid, CSS, and Javascript. This feature is only available with certain Shogun plans. If your plan supports Custom Elements, here’s how you create custom elements:
Step 1: Go to the ‘Advanced’ section of your Shogun dashboard
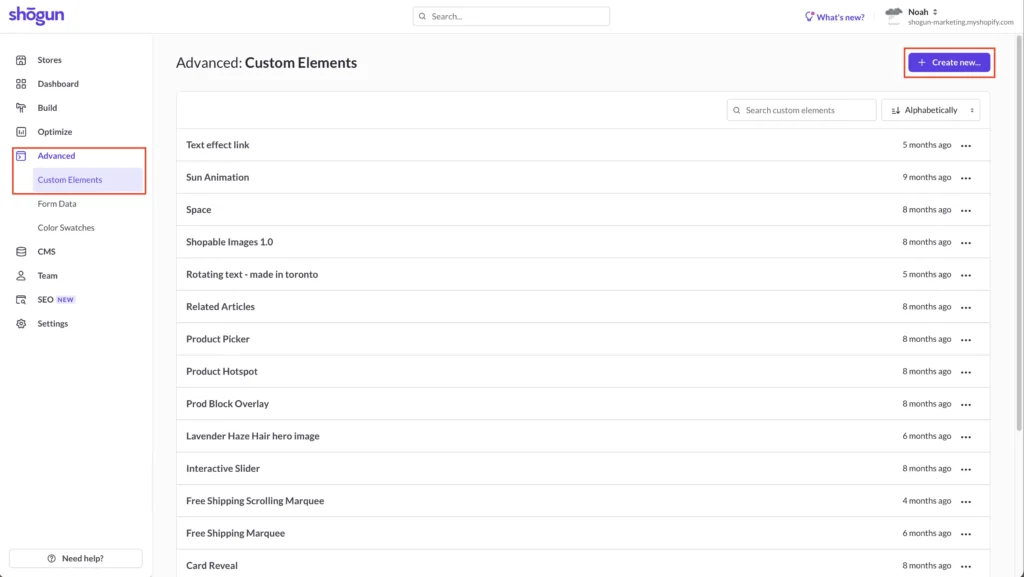
From your dashboard, click on ‘Advanced’ on the left-hand navigation bar and click ‘Custom Elements.’
Step 2: Create a custom element using Liquid (HTML), CSS, or JS
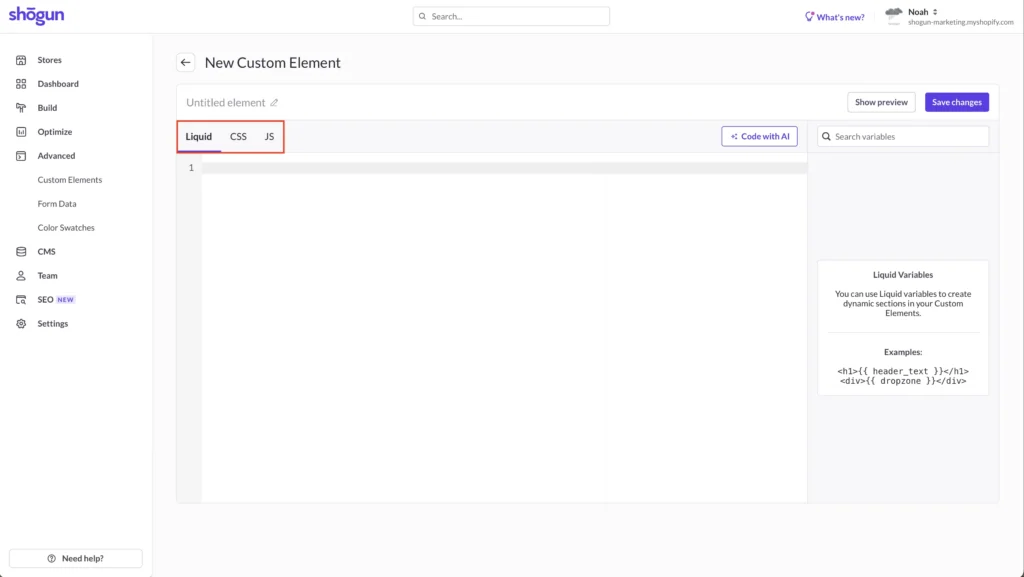
Within the custom element editor, there are three tabs to accommodate different types of code. Note that the ‘Liquid’ tab supports Liquid and HTML.
Step 3: Add your custom element to any page
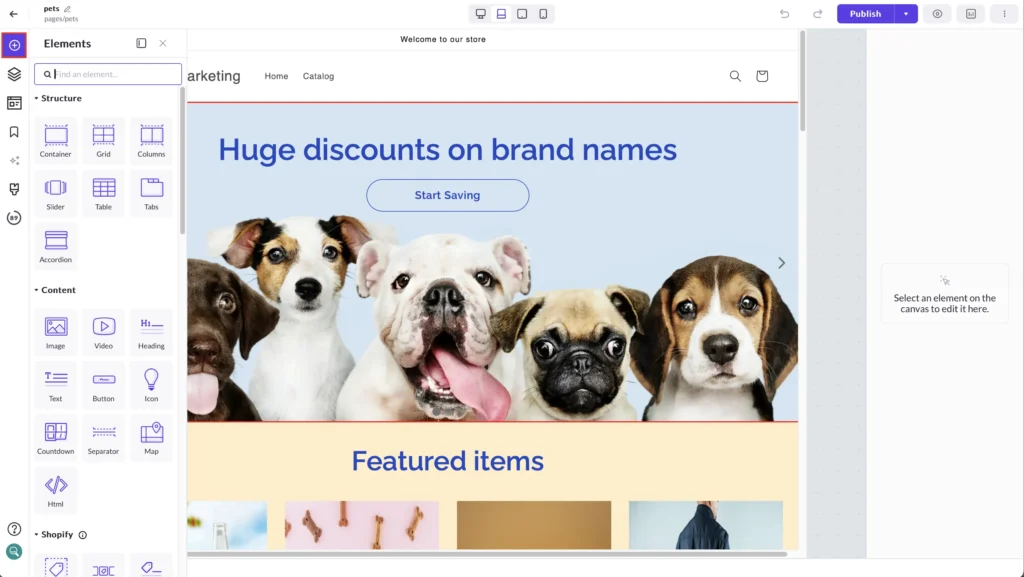
After you’ve created your custom element, you’ll see it in the ‘Elements’ library of the main editor. To use it, simply drag it from the sidebar into the content area. If there are editable fields associated with the element, like the testimonials section in our example above, those fields will appear in the editor sidebar.
Add HTML sections to Shopify with ShogunAdd custom code snippets to any page on your Shopify store with an easy to use visual editor. Get started now

Phill Moorman
Phill, the VP of Marketing at Shogun, is a seasoned expert in ecommerce. With a keen focus on strategic marketing, Phill drives growth and cultivates brand success in the dynamic online marketplace.

