How to Create Facebook Ad Campaigns for Shopify

Advertising is important for online businesses.
Brick-and-mortar stores depend on advertising as well, but they also benefit from customers simply walking in off the street. When a store has a physical location, some people will inevitably find their way in without the store even needing to make any effort.
That just doesn’t happen for ecommerce stores. If you want people to be aware of your presence, you must go out and grab their attention. And when it comes to grabbing people’s attention, there’s no better place to do that than Facebook.
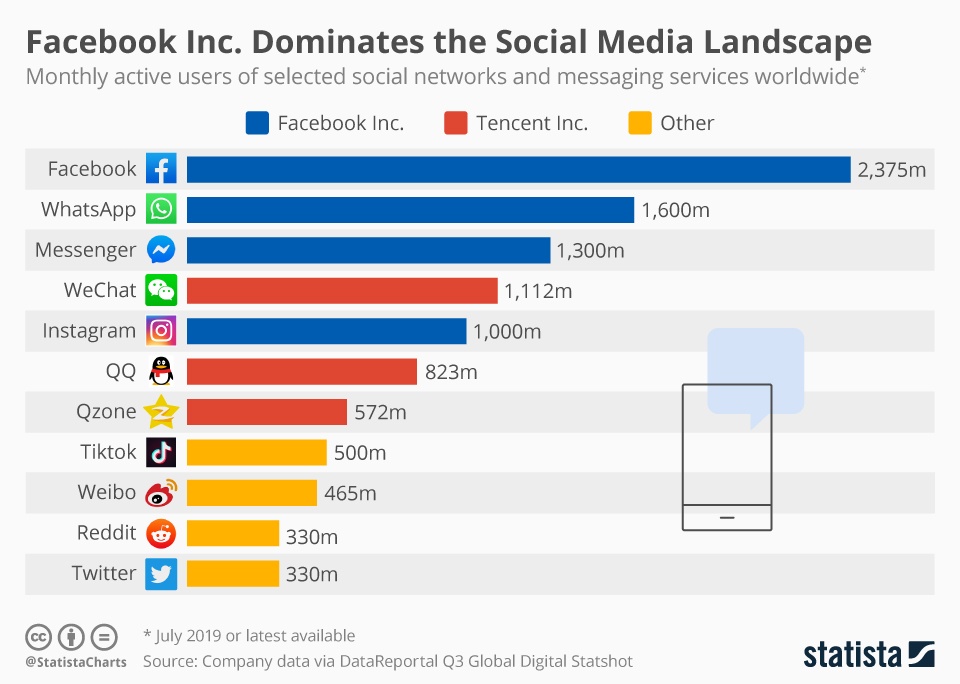
Facebook is by far the most popular social network in the world, and the company also owns three of the other top five social networks. Advertising on Facebook allows you to expose your Shopify store to a never-ending supply of potential customers.
In this guide, we’ll show you how to connect your Shopify store to Facebook and go over some of the most effective techniques for Facebook ad campaigns.
#cta-visual-pb#<cta-title>Create and edit Shopify store pages with Shogun<cta-title>Shogun Page Builder is the ultimate store design tool for Shopify.Learn more
Connecting your Shopify store to Facebook
To run Facebook ad campaigns for your Shopify store, you’ll need the following:
- Admin access to a published Facebook for Business page
- Admin access to a Facebook advertising account
- Admin access to a Facebook Business Manager account that’s connected to both your Facebook for Business page and your Facebook advertising account
Once you have all that in place, you can install the Facebook Marketing app on your Shopify store:
1. After logging in to your Shopify account, select the “Marketing” option in the left sidebar of the dashboard.
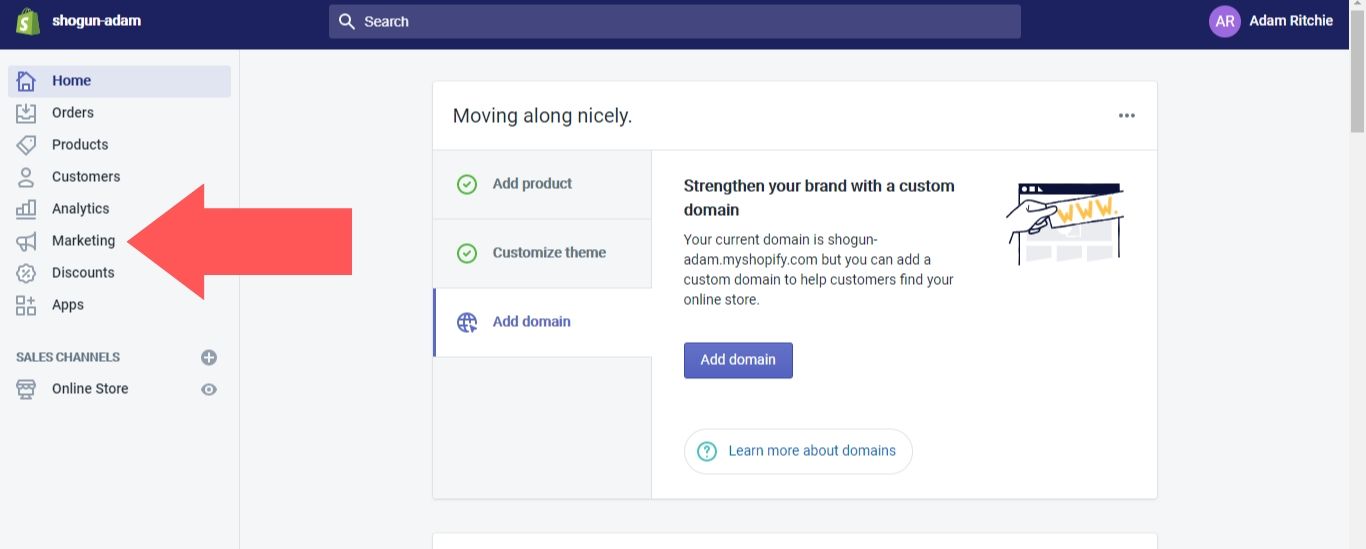
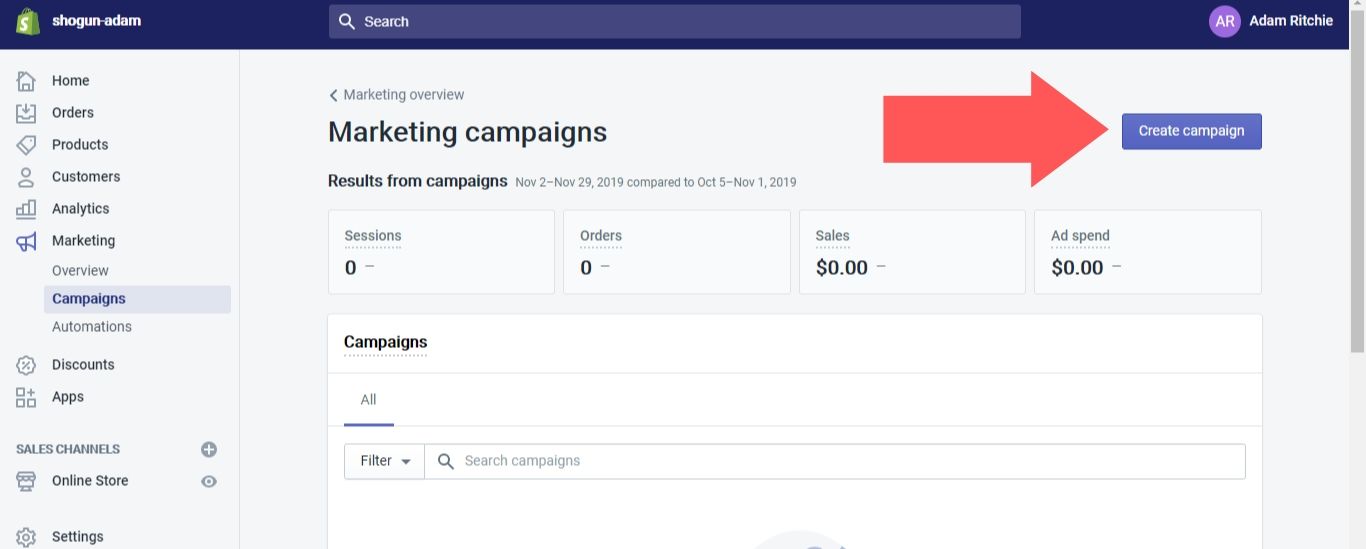
2. Select the “Campaigns” option under “Marketing,” then click on the “Create campaign” button.
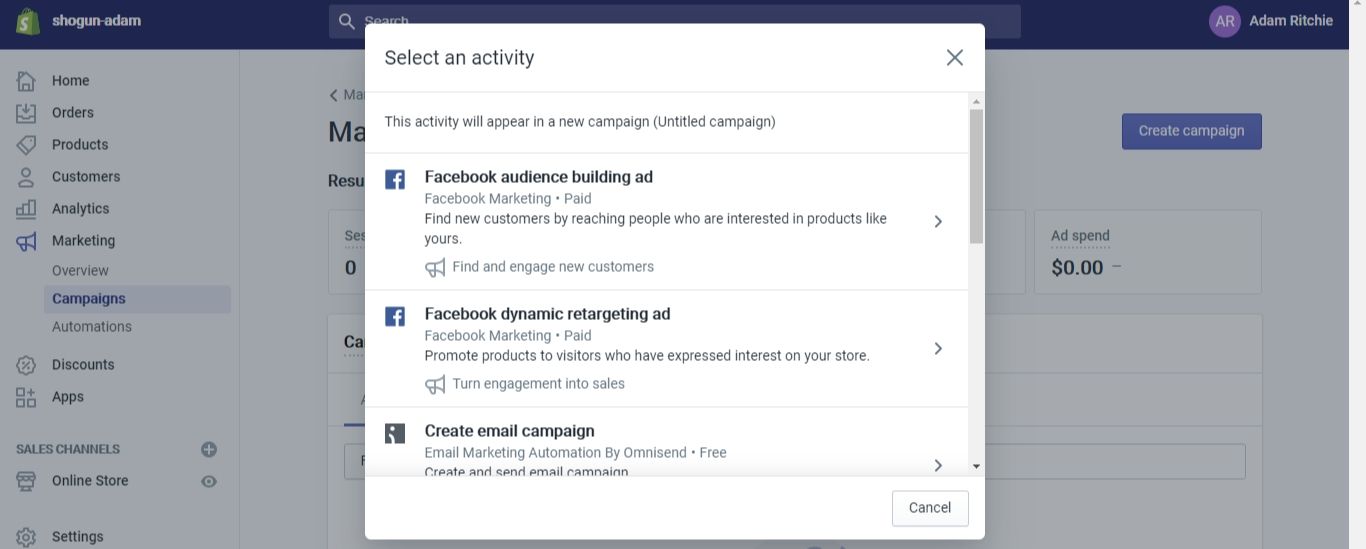
3. Select either “Facebook audience building ad” or “Facebook dynamic retargeting ad” (we’ll go over the difference between these two options a bit further down in this guide).
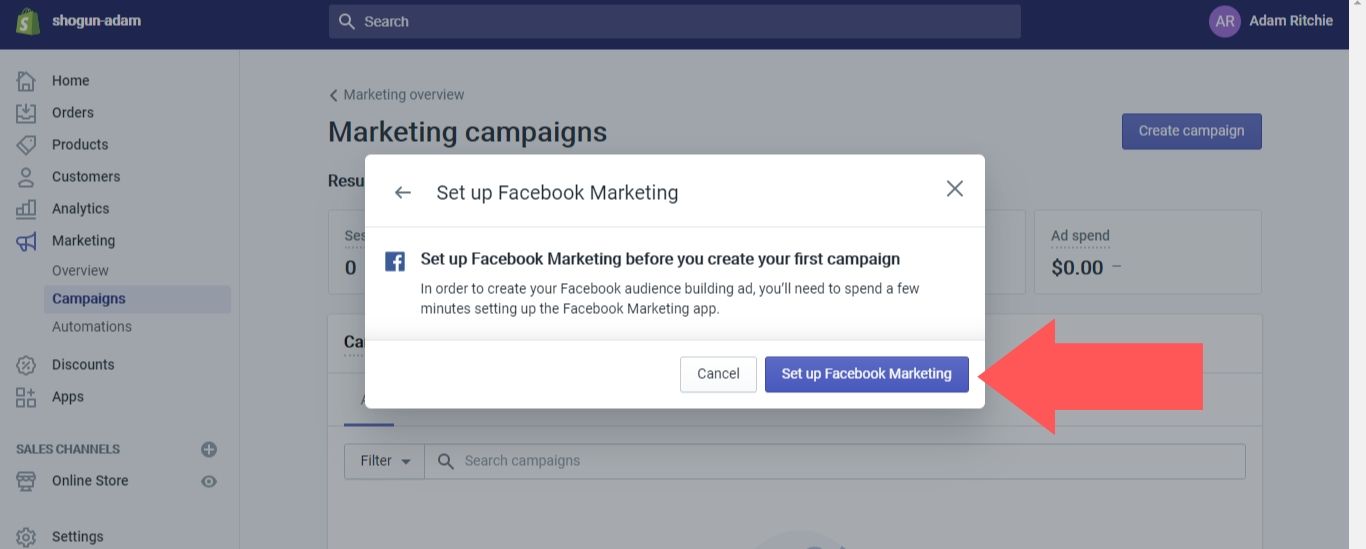
4. Click on the “Set up Facebook Marketing” button.
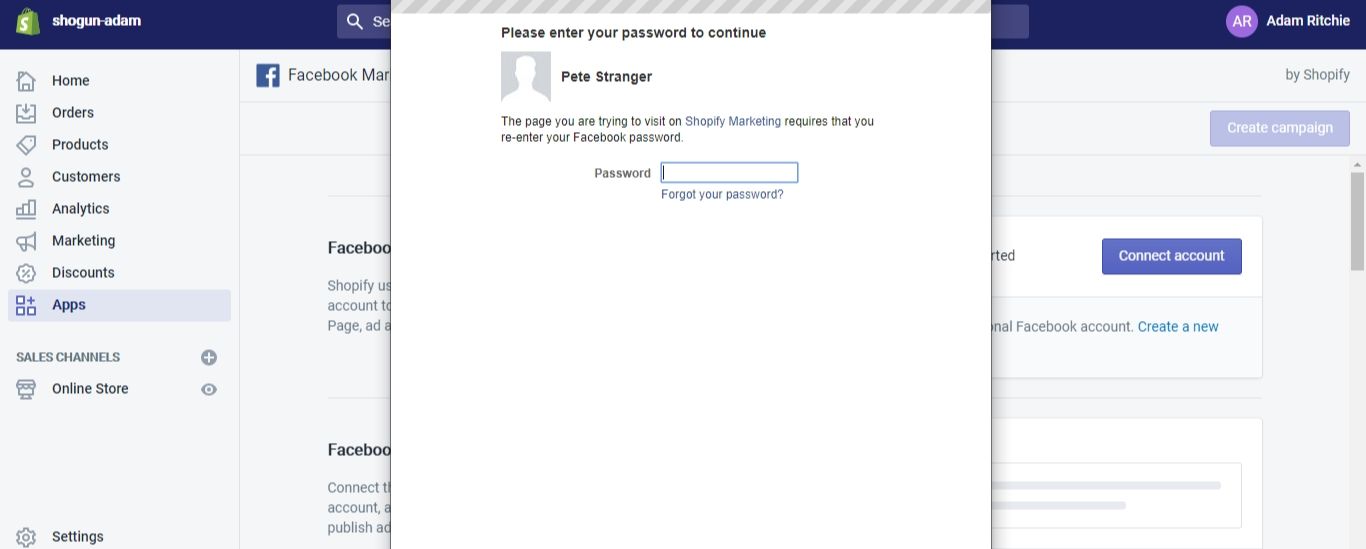
5. You’ll be taken to the Facebook Marketing control panel, which is now available in the “Apps” section of your Shopify dashboard. Click on the “Connect account” button and enter your login credentials.
Select your Facebook for Business page in the “Ads will post from this Facebook Business Page” field, your Facebook advertising account in the “Ads will be billed to this Facebook Ad Account” field and your Facebook Business Manager account in the “Your Page and ad account will be owned by” field. In the “Ads will target people in” field, select the country where you want to target your ads.
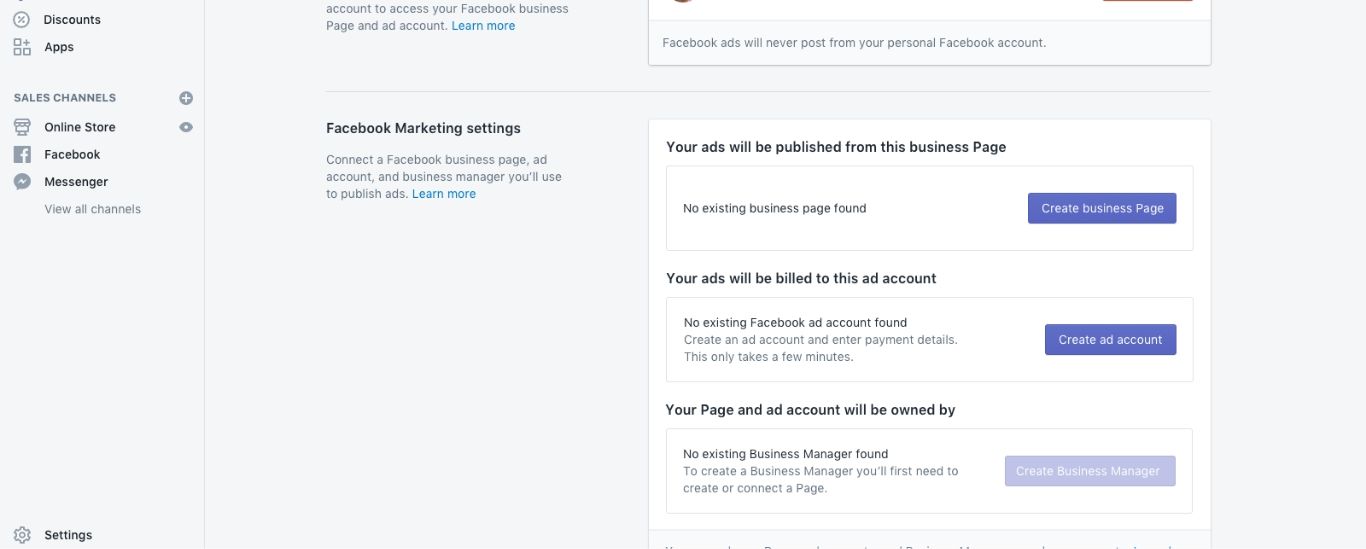
At this point, you just need to accept the terms and conditions to finish connecting your Facebook accounts.
Adding a Facebook Pixel to your Shopify store
Of course, you shouldn’t start running Facebook ad campaigns until you’ve first set up the Facebook Pixel on your Shopify store.
The Facebook Pixel is a piece of code that allows you to track what people do after they land on your site from a Facebook ad. For example, you can see how many people ended up making a purchase or adding an item to their cart after clicking one of your ads.
This information shows you the efficacy of your Facebook ad campaigns. If your ads are resulting in a high number of conversions, then you’ll know that you’re getting a good return on your investment in the campaign. In that case, nothing would need to be changed. But if your ads aren’t resulting in enough conversions, then you’ll know that you need to go back to the drawing board and improve your Shopify Facebook ads strategy.
The Facebook Pixel also allows you to create Custom Audiences for your ads, which you can use for retargeting. This involves presenting ads specifically to people who have already visited your site and performed a certain action, such as subscribing to your newsletter.
Research shows that people are 10 times more likely to click on a retargeting ad than a standard ad. This is a powerful method for increasing traffic to your store, and the Facebook Pixel makes it easy.
To add a Facebook Pixel to your Shopify store, follow these steps:
1. You’ll need to create a Facebook Pixel before you can add it to your store. Log in to your Facebook Business Manager account, open the main menu and select the “Pixels” option under “Measure & Report.”
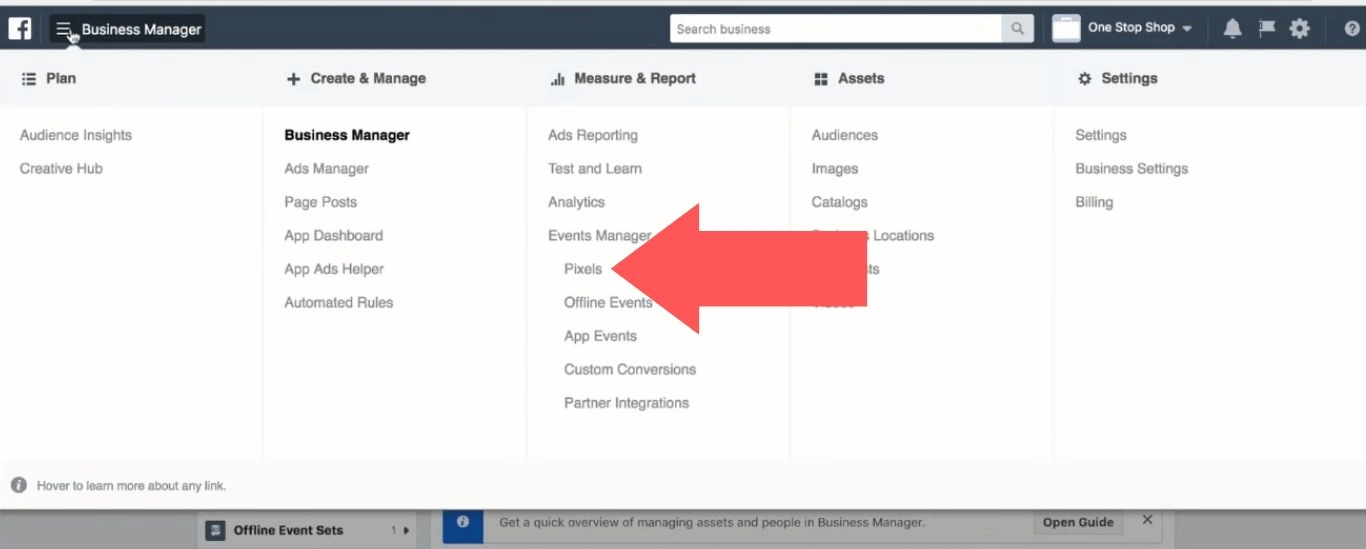
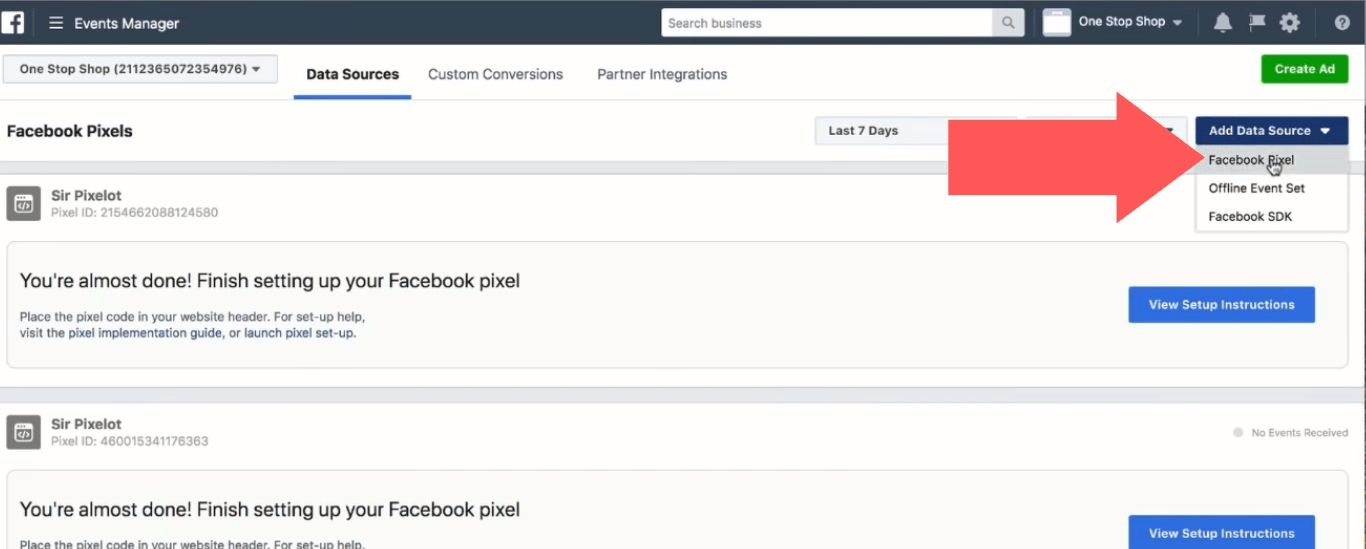
2. Click on “Add Data Source” and select the “Facebook Pixel” option in the dropdown menu.
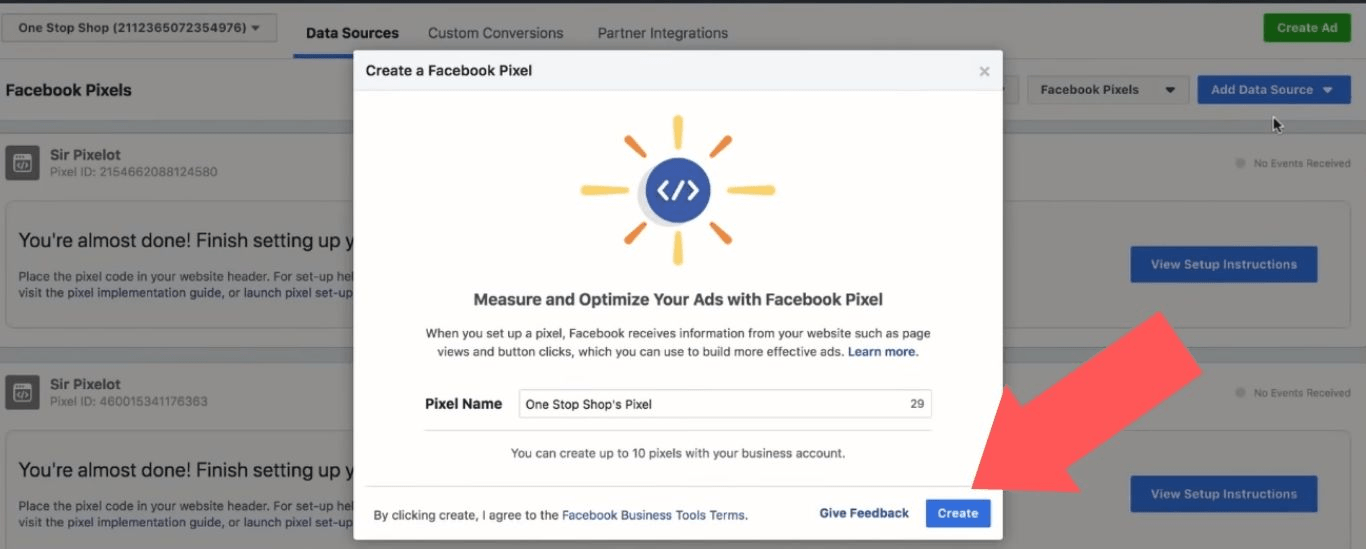
3. After entering a name for your Pixel, click on the “Create” button.
4. On the new Pixel page, you’ll see the Pixel ID in the top-left corner. Copy this to your clipboard.
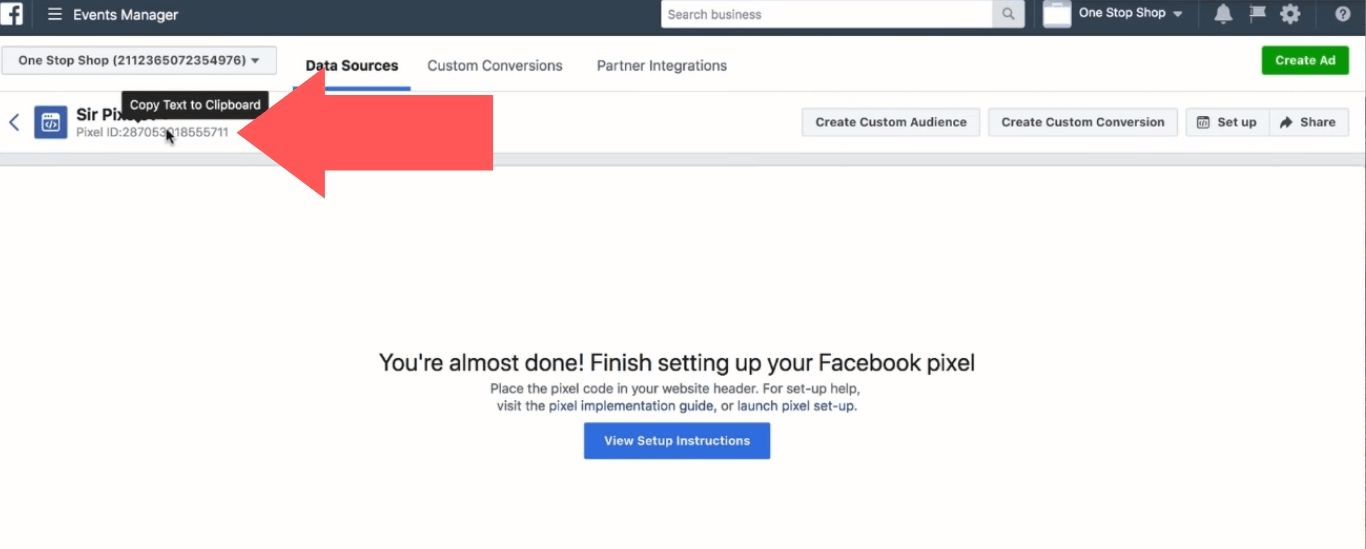
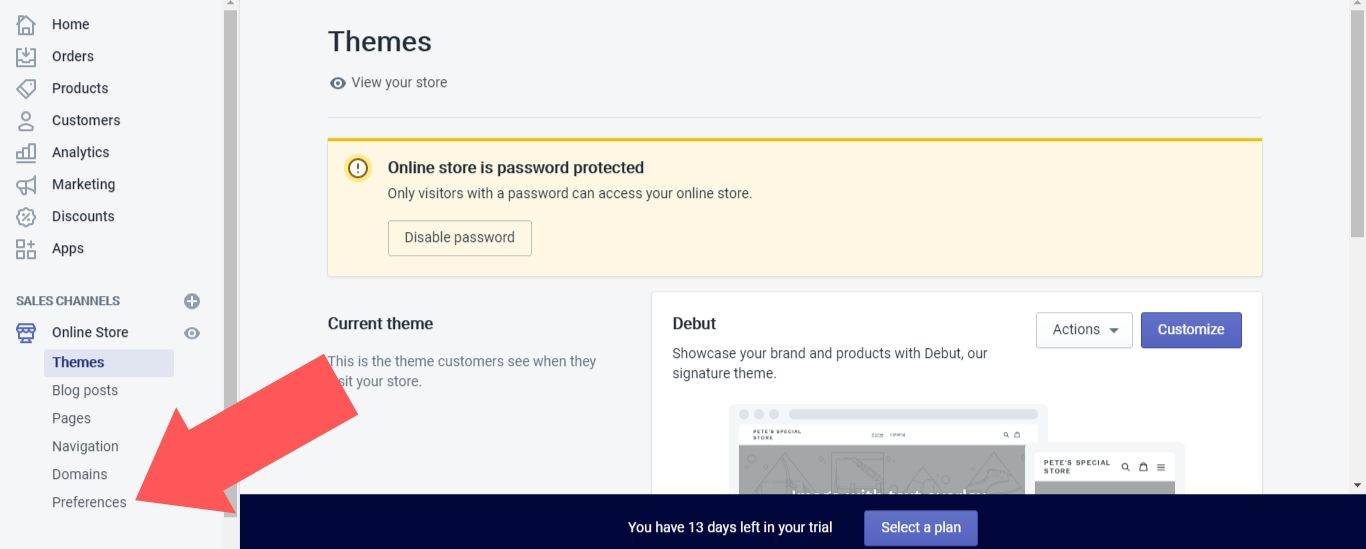
5. Log in to your Shopify account and select the “Online Store” > “Preferences” option in the left sidebar of the dashboard.
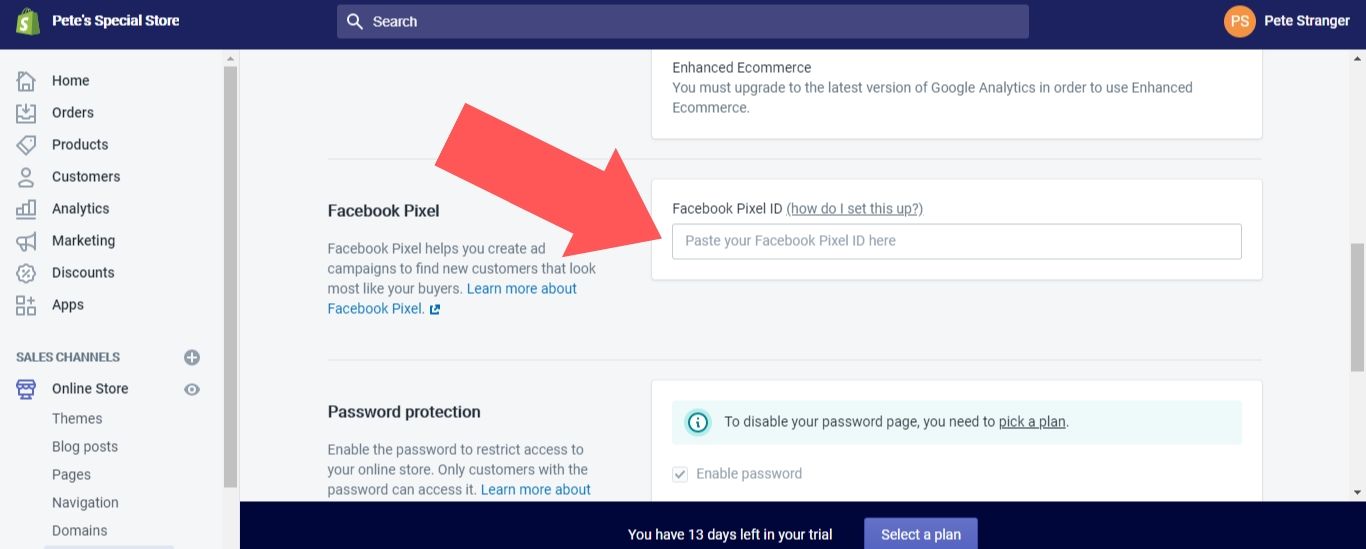
6. Enter your Pixel ID in the “Facebook Pixel ID” field. Then, select “Save.”
Tips for creating Facebook ad campaigns for Shopify
Remember, the Facebook Marketing app for Shopify allows you to create two kinds of ads: audience building and dynamic retargeting.
Audience building ads are used to attract new people to your site. If your store is new or small, you should focus on this type of ad, because retargeting with the Facebook Pixel is only effective when you’re tracking 1,000 or more actions per month. As your store grows over time, you’ll be able to move on to retargeting ads.
Even if you narrow your audience building ad down to your location, the pool of potential customers that can be reached should still be quite large. So, you’ll need to refine the targeting even further. Thankfully, Facebook lets you select a specific age range, gender, language and other demographics for your ad. You can make sure that your ad money is only spent on the type of people who are most likely to buy your products.
If you’re tracking enough activity, you should absolutely take advantage of dynamic retargeting ads. Another option is to manually upload a list of contact information (this can be derived from your records on current customers, collected from a contact form on your website, etc.) to use for retargeting.
#cta-visual-pb#<cta-title>Create and edit Shopify store pages with Shogun<cta-title>Shogun Page Builder is the ultimate store design tool for Shopify.Learn more
Budget
There are many factors that you should consider when setting a budget for your Facebook ad campaign, including:
- The more your product costs, the more you should expect to spend on advertising.
- If you’ve chosen sales conversions as your objective, this will cost you more than an awareness- or consideration-based objective such as traffic, lead generation or app installs.
- Your Facebook ads will automatically analyze engagement data and optimize themselves, so be patient. It will take a little time before you know whether your ad was a good investment or not.
Content
Once you’ve chosen your audience and worked out your budget, it’s time to create the actual content of your ad.
It’s worth mentioning that what works for one business won’t necessarily work for another. The right approach for your content depends on the nature of your products and the demographics of your average customer.
That said, there are a few Facebook ad best practices that every business should follow:
- Use an original image: Anyone who’s spent a decent amount of time on the internet knows how to spot a stock image. They just blend into the background, and you need to grab the user’s attention. Create your own image for your campaign, and get creative so that it stands out. Note that the recommended ratio of height to width is between 1.91:1 to 4:5. And use a high-resolution image — otherwise, your business will look unprofessional.
- Be concise: Once you’ve grabbed a Facebook user’s attention, you then need to hold it. A wordy description is going to make their eyes glaze over. Actually, there won’t even be a chance for their eyes to glaze over — if the user sees a dense paragraph, they’ll likely just keep scrolling. Keep the headline and body text of your ad as short as they can be.
- Express your value: There are over 100,000 ecommerce stores based in the United States alone. Chances are, there are many other stores that offer products similar to yours. So, why should the user choose you? What makes you unique? Maybe your products are particularly affordable or high-quality, or perhaps you have a special discount to promote. Whatever it is, highlight this fact in your ad.
- Use a call to action: A call to action (CTA), which is a direct statement to the reader encouraging them to immediately perform an action (“learn more,” “download now,” etc.), will make your ad more effective. Don’t just describe your offer to the user. Tell them to act now!
Let’s review what these principles look like in practice with an example from one of the masters of modern marketing, Dollar Shave Club:
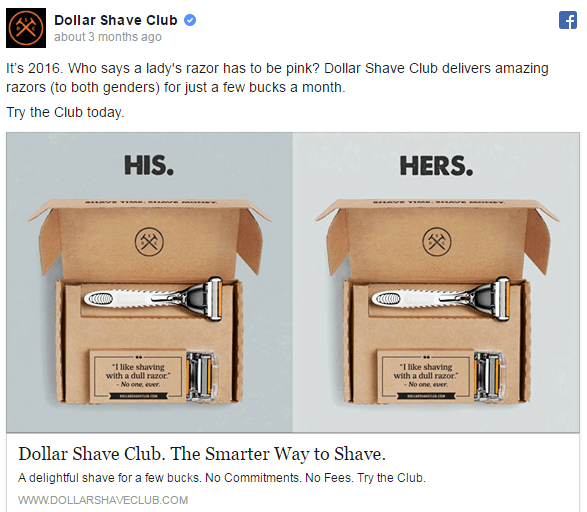
See how the image pops out? The top-down angle is more unusual than what you’d see in most stock photos, and the stark his/her labels make for a downright striking graphic.
Then, there’s its brevity: The headline clocks in at just eight words. The rest of the text is broken up into short, easily digestible sentences, including five sentences that are four words or less.
They efficiently communicate the value of their service with the “Dollar Shave Club delivers amazing razors (to both genders) for just a few bucks a month” line. Quality and affordability. It’s plain as day.
Finally, Dollar Shave Club doubles up on the CTAs with “Try the Club today” above the image and “Try the Club” below it.
It should be noted that these tips apply to the most popular type of Facebook ad, the single image ad. There are many other types of Facebook ads, such as video ads and carousel ads, that you should experiment with in order to see what works best for you. Keep in mind that with the Facebook Pixel, you can easily determine what’s working and what isn’t.
Additional ways to collect information about your customers
There’s no need to limit analytics to advertising.
A page builder app like Shogun helps you do more than quickly create high-quality landing pages, product pages and blog posts for your Shopify store — you can also learn more about how people interact with your site, as the following metrics are tracked for each page you create:
- Total Sessions: How many people have visited the page.
- Bounce Rate: The percentage of visitors who backed out before clicking through to another page on your store.
- Top Clickthrough Destinations: Where visitors most often go to when they leave the page.
- Top Outside Referrers: Where visitors are most often coming from when they land on the page.
- Sales Conversions: The amount of sales that are generated by the page (note that this is represented as a dollar amount rather than the quantity of items sold).
- Add to Cart Conversions: The percentage of visitors who clicked on an add-to-cart button on the page.
You can view these stats for the page’s entire history, or you can choose to narrow the scope down to a certain range of dates. With this data, you’ll be able to improve the effectiveness of your Facebook ads and make more informed decisions regarding all the other aspects of your Shopify store.
A/B testing is another way to test your market. This is useful for when you have an idea about how to improve the conversion rate of one of your pages, such as adding a new featured image or rearranging the layout. If you just went ahead and implemented your idea, you wouldn’t know whether any movement in the conversion rate was due to the changes you made or some other outside factor. Every experiment needs a control group.
A/B testing allows you to compare the performance of your original page against the version with changes over the same period of time. That way, you’ll know for sure if your improvement was successful or if you were better off before.
#cta-visual-pb#<cta-title>Create and edit Shopify store pages with Shogun<cta-title>Shogun Page Builder is the ultimate store design tool for Shopify.Learn more

Adam Ritchie
Adam Ritchie is a writer based in Silver Spring, Maryland. He writes about ecommerce trends and best practices for Shogun. His previous clients include Groupon, Clutch and New Theory.

