Shopify CSV Import: How To Bulk Import Products into Shopify Super Fast
Have you just received a large shipment of new products from your supplier? Moving to Shopify from another platform? Or maybe you need to update your product catalog en masse with unique descriptions, variations, and URLs?
If any of this sounds familiar, you’ve probably grappled with how to import products to Shopify without the tedious and backbreaking task of entering each new product individually.
Thankfully, Shopify has a handy CSV (Comma Separated Values) upload feature that makes importing product catalogs a breeze if you set up the files correctly.
In this guide, we’ll walk you through six important steps to using the CSV upload function to import products into Shopify without breaking your site.
We’ll cover:
#cta-visual-pb#<cta-title>Build beautiful Shopify product page<cta-title>DIY your ecommerce product page design with the best drag-and-drop page builder for Shopify.
Start designing for free
A step-by-step guide on how to import products on Shopify
Specifically designed to streamline your ecommerce website setup, these six steps will have you cruising in no time and may even enhance your processes.
First, log into your Shopify account, so let’s get started.
1. Log into Shopify and back up your existing product data
Before you upload anything to Shopify, we want to protect ourselves against something going wrong during the import process.
By saving a backup of your current product catalog, if something goes awry (which shouldn’t happen if you’re following these steps to the T), you can always revert your site to a previous state and begin again.
Log into your Shopify admin and navigate to the Products tab.
Hit Export near the top right of the window, choose your settings (select all products here), and then choose the CSV file type.
Selecting the “CSV for Excel, Numbers, or other spreadsheet programs” option is recommended if you’re using a spreadsheet program to manage your data.
Once done, click Export products.
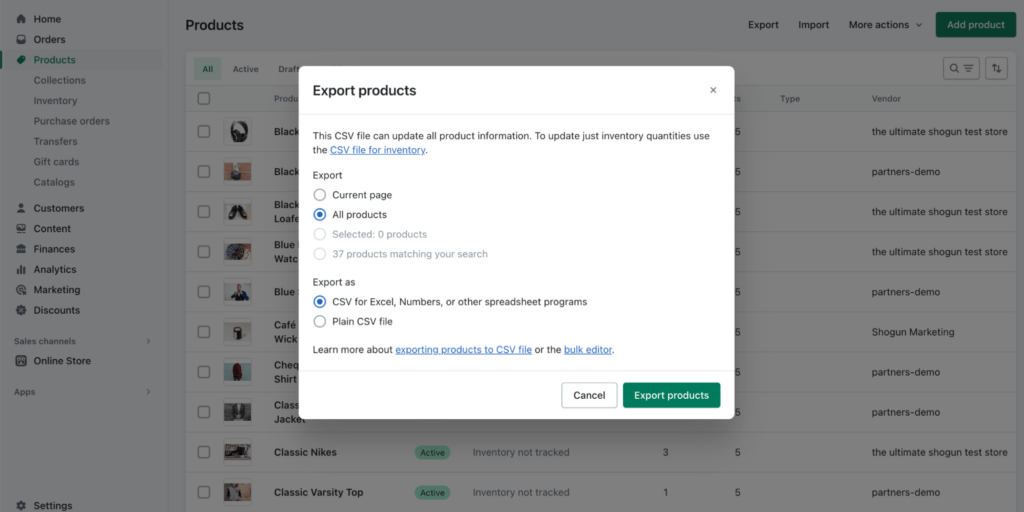
Keep the resulting CSV file in a location that’s easily accessible to you and safe from accidental deletion or loss.
2. Download Shopify’s sample CSV file
Now we’re ready to dig in. Start by downloading the CSV template that Shopify helpfully provides (you can get it here).

When you import products into Shopify, you must ensure the data is organized under the right column headers so that the platform understands where to map (assign) each data point.
You may encounter an error if you don’t execute this step accurately.
Manual execution can be complex, underscoring the importance of Shopify’s sample template in achieving a correct outcome.
3. Fill in the CSV file with your product data
Now, you’ll add your product data to that CSV file, also known as your import template.
This is the most time-consuming part of the whole process, but it’s worth not rushing. Taking the time to organize and input your product data carefully helps to ensure accuracy, minimizes the risk of errors or issues upon upload, and can save significant time and effort in the long run.
A well-prepared CSV file will streamline your product import process to Shopify, allowing for a smoother and more efficient online store setup.
The spreadsheet structure is key to fully fleshing out your products in Shopify.
Each column heading represents a vital element of your product listing, so it’s important to understand each.
Here’s a quick walkthrough of the column headings that you’ll see in the first row of your CSV data and what data you need to include under each.
Pay particular attention to how to format the sheet for product variations.
Handle
First up is the Handle column. This is the unique name you give to your product, which will also serve as the URL slug for your product page.
Keep it short and simple, but make sure it accurately identifies your product. A good practice is aligning this field with the product name.
This is helpful for identifying the product and customer navigation, as the Handle will become the page URL upon upload.
Title and Body (HTML)
The following two columns are crucial for your product page.
The ‘Title’ is the headline displayed on the product page. The ‘Body (HTML)’ is the product description, a comprehensive summary of your product that can influence a potential customer’s purchasing decision.
A well-crafted product description is essential for product page optimization. If you’re looking for more guidance on how to write an effective product description, we have an in-depth article that includes examples here.
Vendor, Type, Tags, and Published
These four columns are reasonably straightforward:
- Vendor: Enter the vendor for your product here, which is often the brand name.
- Type: Specify the product category here. This information is vital for site navigation.
- Tags: Include additional tags that could help users filter products. Remember to separate each tag with a comma.
Published: Use the field value “TRUE” to publish the product immediately. If you want it to remain unpublished, use “FALSE.”
Product Variants
Now things get interesting.
The next 17 (from Option1 Name to Variant Barcode) columns involve creating product variants.
In the Shopify CSV file, the top entry is always considered the parent listing, so you only need to fill out the first eight columns (the ones we’ve covered above) for the top row like this:

The Option fields are where you can specify the available product variations (such as colors and sizes for an apparel store).
By writing “Title” under the Option1 Name column, you’re referring to the product title you set in the second column. All product variants have the same title, an approach often preferred because it strengthens brand consistency and enhances product searchability.
It’ll only vary in terms of size, color, or any other parameters you set.
Next, you’re going to include the Variant SKU code, which will help your inventory tracking system keep stock of your available inventory as variants sell in your store.
#cta-paragraph-pb#Learn how to generate SKU codes in our guide: 10 Free SKU Generator Tools For Creating SKUs Quickly & Efficiently.
You’ll also need to fill out a few more details about how the variants will be fulfilled and managed, alongside the weight in grams for each product (to help calculate shipping costs).

Lastly, indicate the variant’s price (if it differs from the standard price) and whether the product requires shipping and is taxable.
Image Source
In this column, you’ll include URL links to product images.
As you’re linking to images rather than uploading them directly, hosting these images on a reliable platform is crucial.
You can use services like Photobucket, Imgur, and Google Photos, or host them on your store, provided it has adequate storage and bandwidth capabilities. Make sure the images are accessible via the provided URLs to ensure proper display on the product page.
Image Alt Text
Alt text is displayed if an image URL fails to load or a user has a screen reader enabled. It’s also helpful from an SEO standpoint.
Here, write a brief product description using 5–6 words.
SEO Title and Description
These two columns allow you to determine what’ll be displayed in search engines when your product appears in search results.
For example:

The SEO Title is the product name that appears and should be kept below 60 characters for optimal display in search results. The SEO Description is a summary of the product and should be limited to about 155 characters to ensure adequate visibility in search engines.
Note that Shopify has longer character limits for the SEO title and description (70 and 320), but what we’ve suggested above is best practice.
Google Shopping Columns
You can leave the field blank if you’re not using Google Merchant Center (which you really should be).If you are, and you’re looking to get your products displayed accurately in Google Shopping, you’ll need to fill in the relevant data, such as age group and product category.
Variant Image
If you want to display different images for your product variants, include the URLs in this column.
Variant Weight Unit and Taxcode
Indicate whether you want the variant weight to be displayed in kilograms or pounds, as well as any special tax code you might need to include for the product.
Status
You have three options here:
- Active: the product is available online.
- Draft: you’re still working on the page and wish to publish it later.
- Archived: you’re no longer selling this product but want your product page to remain in your Shopify account.
Easy, right?
Now head back to the top and complete those steps for every new product you wish to import to Shopify.
#cta-visual-pb#<cta-title>Build beautiful Shopify product page<cta-title>DIY your ecommerce product page design with the best drag-and-drop page builder for Shopify.
Start designing for free
4. Double-check that your file meets Shopify requirements
Now that you’ve completed your CSV file, it’s time to upload it.
Well, it’s nearly time to upload it. First, let’s double-check a couple of important requirements to avoid potential errors on import.
Run through this quick three-step checklist before moving forward:
- Check that your data is under the right headers, especially if the file was exported from another store, as the columns don’t necessarily map over between stores.
- Verify that your file is under 15MB (the maximum for importing to Shopify). If your file is larger, split your products between multiple files to stay under that limit.
- Confirm your handles don’t include any spaces, accents, or other characters like commas or periods (letters, dashes, and numerals only)
All sorted? Let’s move on.
5. Upload your CSV and confirm whether you want to overwrite matching products
Now we’re ready to import.
Naturally, you’ll start by hitting the Import button (it’s right next to the Export button we used earlier).
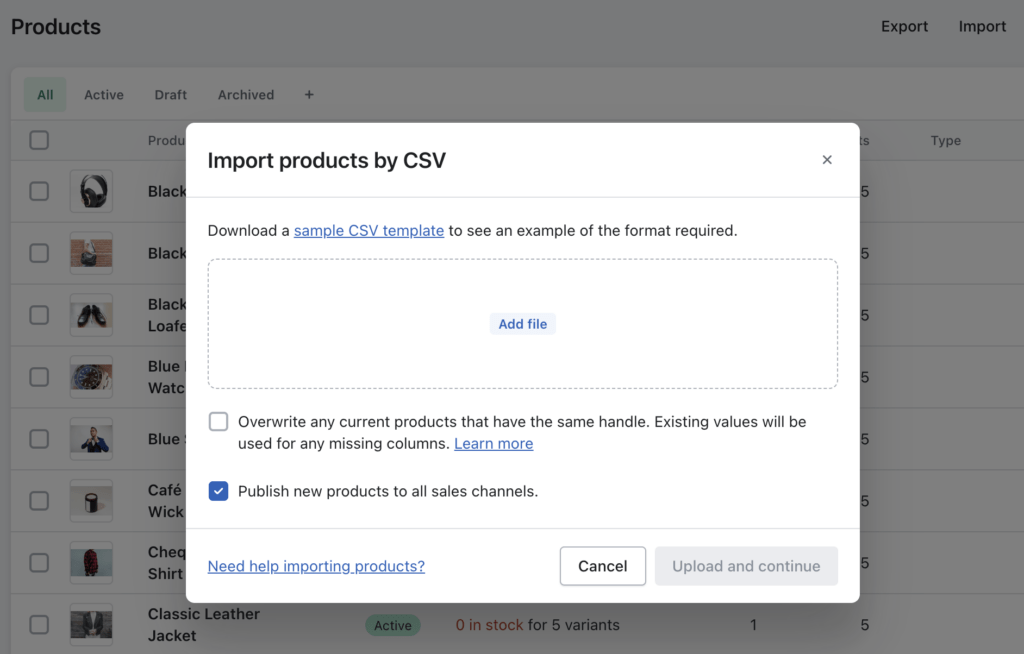
Drag and drop your CSV file into the pop-up box, or click Add file to navigate and locate it manually.
You’ll see that before you import the products, you have two boxes to check (or not, depending on your preferences).
The first is to “Overwrite any current products with the same handle. Existing values will be used for any missing columns.”
For instance, if you’re uploading a product with the handle “straight-jeans-black” and already have a product with that handle, the old product will be replaced with the new one, including any data you’ve included, such as images and pricing.
Select this option if you’re uploading new info on existing products (for example, if you’d like to replace the imagery or update the pricing).
The second is “Publish new products to all sales channels.”
In the Shopify context, sales channels are where your products can be sold. This could be your Online Store on Shopify or other platforms like Amazon, Walmart Marketplace, Instagram, and Facebook.
Tick this box if you want the new products you’re importing to be available across all these platforms.
Check the boxes that apply to your needs, then hit Upload and continue.
6. Import your products and confirm changes
One final step before your new products are live on your Shopify store.
When you first import the sheet, Shopify provides you with one example listing so you can check your work:
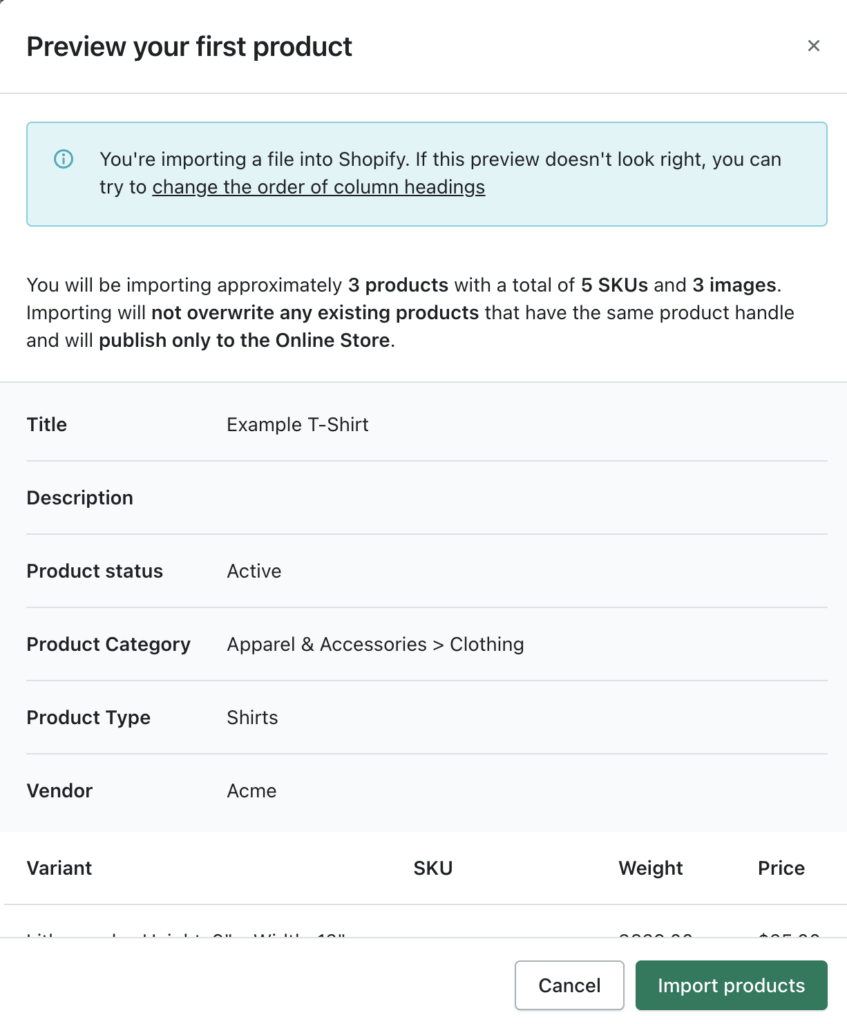
Triple-check that all the data you’ve entered aligns with Shopify’s fields. Because you’ve used their CSV file, you shouldn’t see any problems here, but it’s always worth a quick check.
Then, hit Import products and wait for Shopify to do its thing.
Once Shopify has finished processing your new items, it’s wise to check out a few new product pages to ensure everything is displaying as expected.
Four software tools that help you import products to Shopify
As you’re probably thinking, importing products to Shopify can be a tricky and time-consuming experience prone to errors if you’re not careful where you place certain data points.
Thankfully, many Shopify apps are available to help make the upload process easier.
Here are four of the best.
1. CedCommerce Importer

CedCommerce Importer is a helpful tool for uploading products into Shopify.
A free plan is available, but the paid plans are affordable for companies uploading 100s of products a month.
According to several customers, CedCommerce Importer has a fantastic customer support team who can help you navigate some of the trickier aspects of importing products to Shopify.
Its intuitive interface and excellent customer service make the import process much easier.
2. POKY

POKY is another product import tool for Shopify, with a low cost (just $2.95 per month) and helpful features like the ability to source new product suppliers.
By simplifying the product import and sourcing process, POKY offers a cost-effective and easy way to handle your product uploads.
3. Matrixify

Matrixify is one of the most popular tools for ecommerce site owners who need to import CSV files into their Shopify catalog.
One of the most significant benefits is that Matrixify can handle file sizes up to 10GB, which is a bunch more space than the size limit imposed by Shopify when doing a manual CSV import.
So, if you’re dealing with large product datasets, Matrixify allows you to manage them more efficiently.
4. Robo Product Importer

Robo Product Importer is a simple tool that helps online business owners manage a successful import of products into Shopify.
This tool works as a browser extension, scraping data from pages like Alibaba and Amazon and uploading the relevant data directly to your Shopify store. So, it’s a good option for dropshipping sites.
Robo Product Importer significantly simplifies the product import process by automating data transfer from supplier pages.
How brands are using Shogun to customize product pages with ease
With your product data now in Shopify, it’s time to enhance your pages to drive conversions.
With its easy-to-use drag-and-drop editor, Shogun Page Builder allows you to construct high-converting, personalized product pages, sans coding.
After populating Shopify with products, use Shogun to customize individual product pages or apply a universal Product Page Template if you’re an Advanced plan user. This ensures a unified, compelling shopping experience across all products.
Find more about this here.
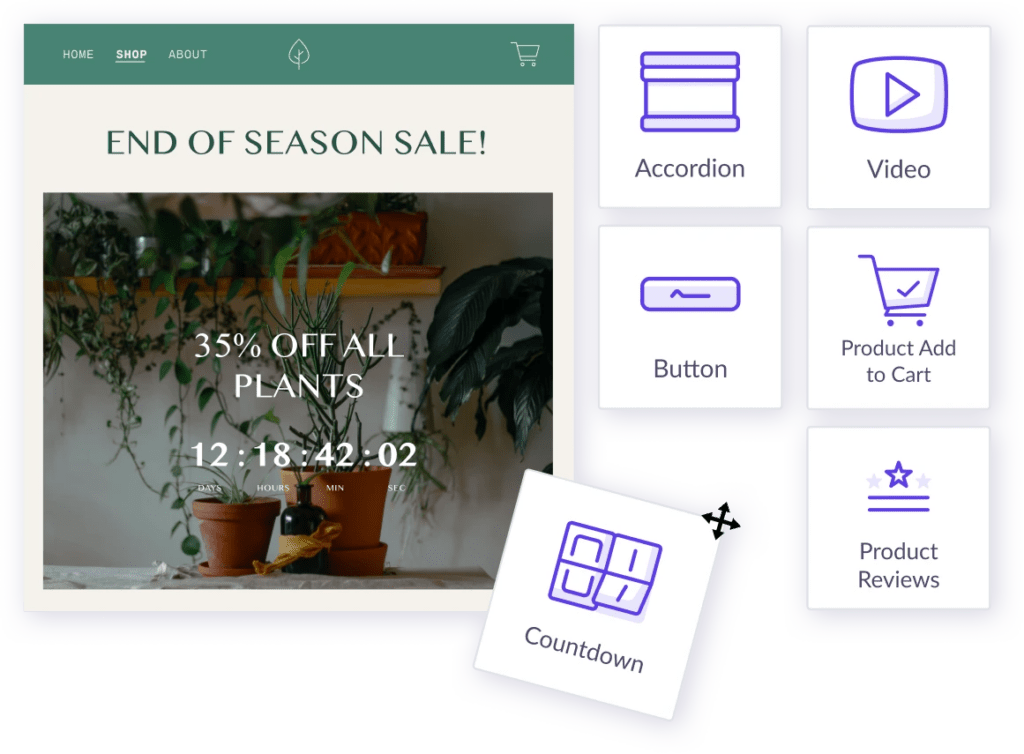
High-performing ecommerce brands use Shogun’s Page Builder to create and save Shopify page templates, ready for bulk uploads.
With our analytics tools, they can continually optimize designs to maximize conversions.
Scale your business faster by understanding how to import products into Shopify
Understanding how to import products to Shopify using a CSV file is a powerful tool to have under your belt.
This process is a great way to upload new images or product data and expand your range with newly available products.
Of course, getting the products into Shopify is only half the battle—now you’ve got to get them sold!
#cta-paragraph-pb#Keep learning with our in-depth guide: How to Start Selling on Shopify: A Complete Guide For Shopify Merchants.
#cta-visual-pb#<cta-title>Build beautiful Shopify product pages<cta-title>DIY your ecommerce product page design with the best drag-and-drop page builder for Shopify.
Start designing for free

Leigha Henderson
Leigha is a content marketing specialist and content creator. She found her path through a love of research, strategy, data, and the written word. (And skiing. She also loves skiing.)


