How to Add Products on Shopify to Start Selling Super Fast

Creating your online store on Shopify is an exciting first step in your ecommerce journey. But, for your store to come to life, you need to give it a heart—your amazing products.
After setting up your store, it’s time to add your wares. This is where the magic of your first sale begins.
If you’re unsure about how to add your products on Shopify, don’t worry—you’ve arrived at the right place.
In this article, we’ll walk you through a step-by-step guide on how to add products to Shopify, empowering you to begin profiting from your store without delay.
Bookmark this page so you can refer to it whenever you need it!
So let’s get started.
Here’s what we’re going to dig into:
#cta-visual-pb#<cta-title>Build awesome Shopify stores<cta-title>DIY your store design with the best page builder tool by creating stunning store pages and landing pages that drive conversions.Start building for free
How to add products on Shopify in 8 simple steps
If you’re wondering where to start on how to add products to your Shopify store, we’ve created this guide to walk you through each step of the process.
From product descriptions and images to pricing and inventory management, we cover all aspects needed to successfully showcase your products.
This guide aims to streamline the process, saving you time and effort, and allowing you to focus on what truly matters–growing your business.
Here’s an overview of what each step entails:
| Step | What you need to know |
|---|---|
| 1. Create a new product in Shopify | Begin by adding a new product on Shopify. |
| 2. Enter your product details and media | Add a descriptive title for your product and write a unique product description that highlights its key features and benefits. Keep the length of the description in mind. |
| 3. Set a price | Set a price for your product. This influences your profitability and the perceived value of your products in the eyes of potential customers. |
| 4. Categorize your product and choose your sales channels | Organize your product by category and choose your sales channels to reach your target customers. |
| 5. Manage your inventory settings | Keep track of your product stock levels to ensure you can meet customer demand. |
| 6. Set up shipping and fulfillment | If your product is physical, set up your shipping and fulfillment processes to ensure timely delivery. |
| 7. Update search engine optimization (SEO) settings | Improve your visibility on search engine results pages (SERPs) to drive more traffic to your online store. |
| 8. Save, publish, and sell 🎉 | Review all the product details carefully before saving, publishing, and selling your product. |
| BONUS STEP: How to create custom pages with Shogun | Use Shogun, an easy-to-use page builder tool that integrates with Shopify, to elevate your pages (homepage, collection pages, landing pages, etc.) to meet your brand’s unique standards. |
Step 1: Create a new product in Shopify
OK, it’s time to add your first product.
From the Shopify admin, click on the Products tab on the left sidebar. Click on the Add product button to create a new product.
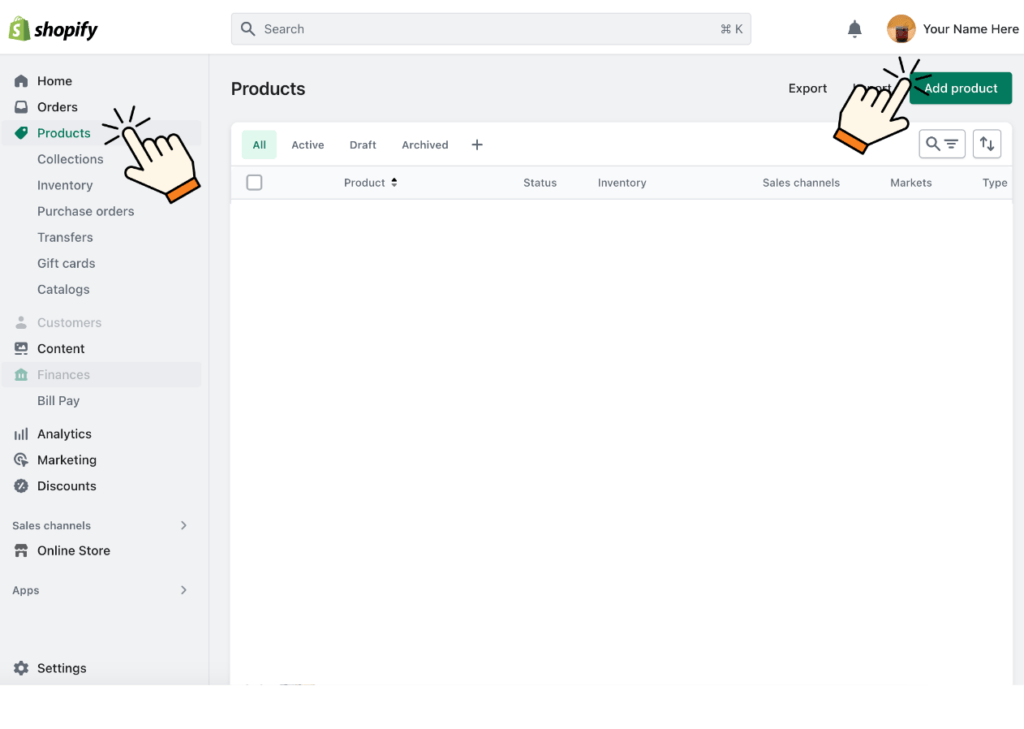
#cta-paragraph-pb#If you’re still learning the ins and outs of creating pages, here’s how to add any type of page on Shopify and more specifically, how to add a new product page.
Step 2: Enter your product details and media
Now it’s time to hype your product so your customers know exactly what they’re buying, and it gives you a chance to flaunt your flair.
First, add a descriptive title for your product. Then, write up a unique product description, highlighting its key features and benefits while keeping length in mind.
Once you’re happy with your title and description, you can start adding images, videos, and even 3D models of your product to really give your customers a feel for your product.
P.S. When editing your products, make sure the Status is in Draft mode.
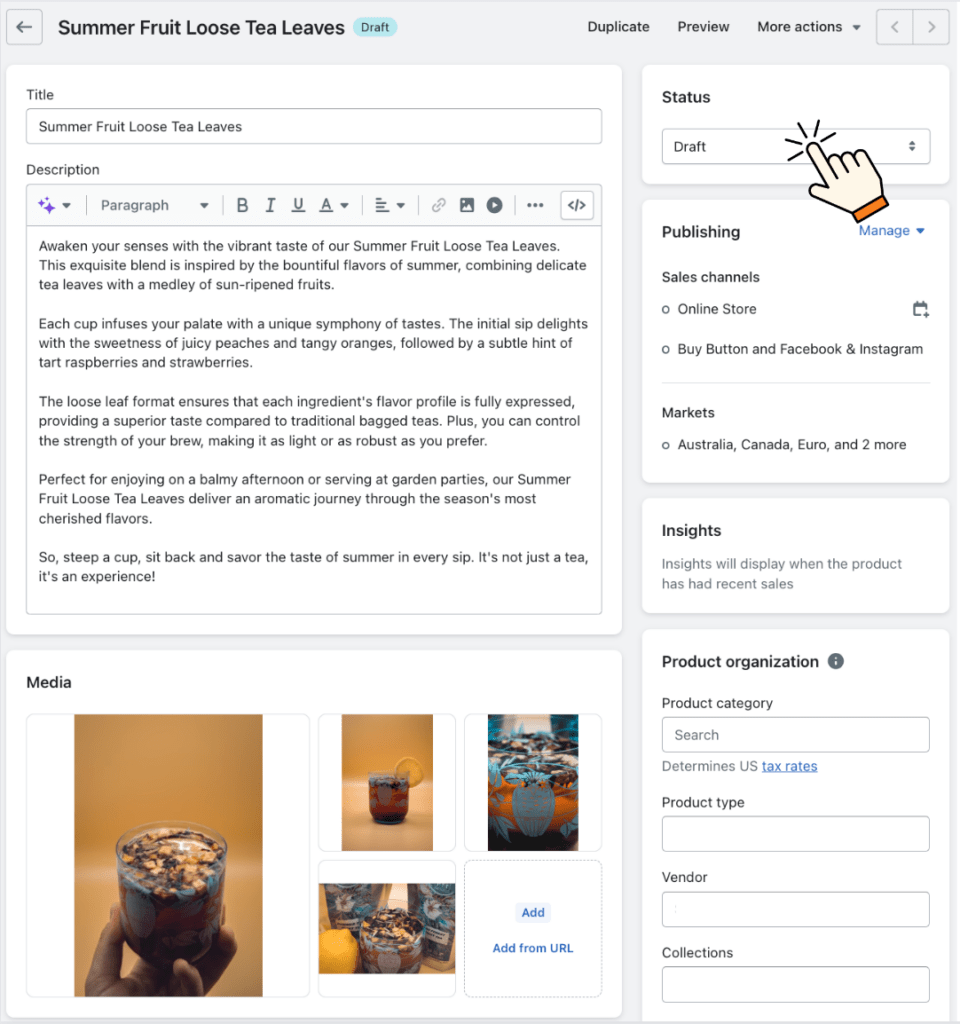
If you’re looking for that extra sparkle in your product descriptions, use some Shopify Magic.
Shopify’s Magic ✨ function is an AI-powered tool designed to help create engaging and effective product descriptions.
To use Magic on Shopify, first, you need to add your Features and keywords and choose a Tone of voice. You can also add any Special instructions that are unique and custom to your brand.
After you hit Generate text, you can review, edit, and fine-tune this auto-generated description to best suit your product and brand voice.

#cta-paragraph-pb#Learn more about how to write product descriptions that really sell. Get valuable insights on crafting compelling product descriptions, enhancing your ecommerce brand by driving customer engagement, boosting SEO rankings, and ultimately increasing sales.
Step 3: Set a price
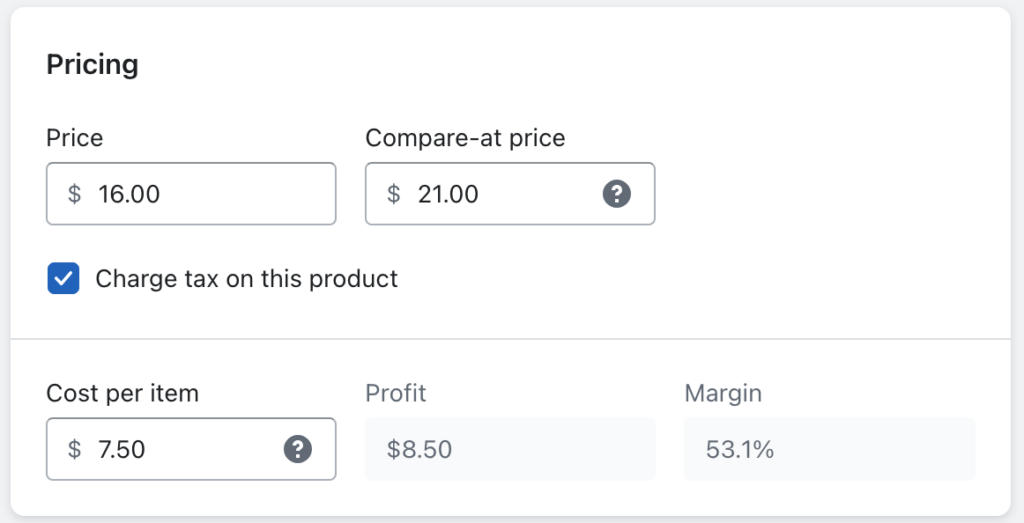
The next step is to set a price for your product. This step not only influences your profitability but also affects the perceived value of your products in the eyes of your potential customers.
Here’s everything you’ll (probably) need to fill out:
- Price on Shopify refers to the amount you charge customers for a particular product. It’s the final cost that customers pay when purchasing your item.
- Compare at price displays the original price of a product that is now on sale. It’s a way to show customers the discount they are getting from the original price.
- Charge tax on this product is a setting that determines whether sales tax will be applied to the product. If checked, Shopify will automatically calculate and add the appropriate sales tax at checkout based on the customer’s location.
- Cost per item is your cost for acquiring or producing the product. This information is used in Shopify’s profit margin reports, but it isn’t visible to your customers.
#cta-paragraph-pb#If you need tips for pricing your wares, read our post on ecommerce pricing strategies so you can stay profitable while attracting customers.
Step 4: Categorize your product and choose your sales channels
See the Product organization box on the right? Within it are four fields to help categorize your product:
- Type refers to the category or kind of product you’re selling. You can assign your product to one of the preset categories. It helps organize your store and makes it easier for customers to find what they’re looking for. Note that this may affect how your products are found from the main navigation bar.
- Vendor is the brand or manufacturer of the product. This information can be useful for customers who are loyal to certain brands.
- Collections in Shopify are groups of products you’ve chosen to link together in a specific category, like ‘Summer Sale’ or ‘New Arrivals’. They help customers navigate your store and discover products they might be interested in.
- Tags are keywords associated with your product. They can be used to label products for internal organization, filtering, and search optimization in your Shopify store.

You’ll now need to choose where your customers can buy your products. Deciding which sales channels to make your products available is a key step in reaching your desired customers.
Besides your online store, you can opt to use various platforms such as Facebook, Instagram, Amazon, Walmart, and more.
These channels can extend your reach and improve visibility, thus potentially boosting sales. Understand more about the different marketplace channels brands can leverage.
Next, if your brand is selling in additional regions, you can choose specific markets through Shopify Markets. This feature enables you to manage your international business in one place, simplifying the process of selling in multiple countries.
In the Publishing box, hit Manage and choose between Manage channels and Manage sales markets, check each box that applies to your brand.

#cta-paragraph-pb#Need a refresher on Shopify product collections? Our guide shows how to set up your collections, enabling brands to enhance customer navigation, improve shopping experiences, and boost sales.
Step 5: Manage your inventory settings
Start by setting the SKU (or Stock Keeping Unit) which is essential for tracking inventory.
Next, you’ll need to determine the available quantity of your product and if you want to keep selling when the product sells out.
Finally, specify any product-specific options that your customers might want to choose from, such as material or style.
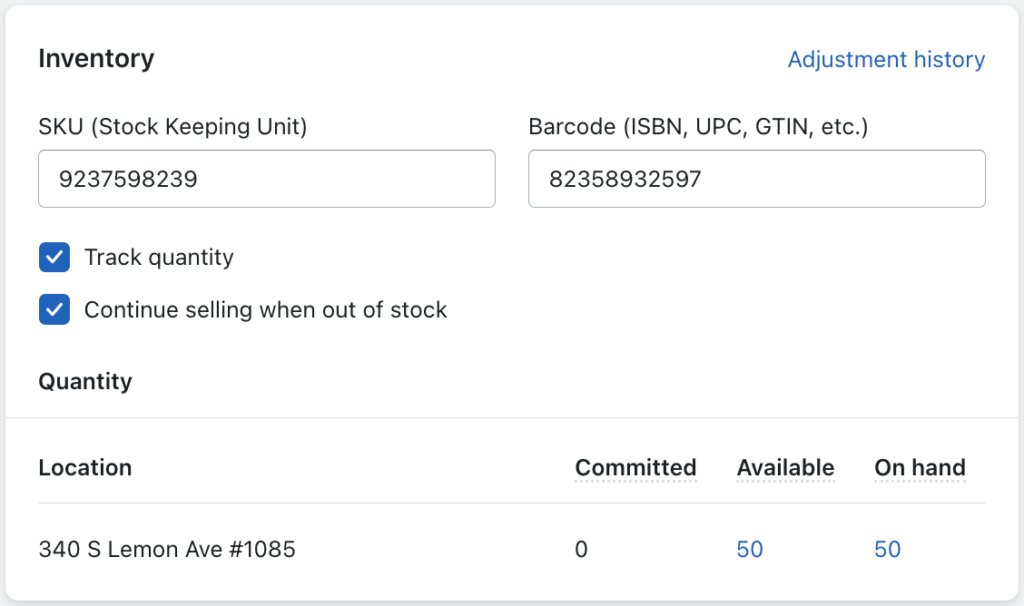
If you need help generating an SKU, we got you covered.
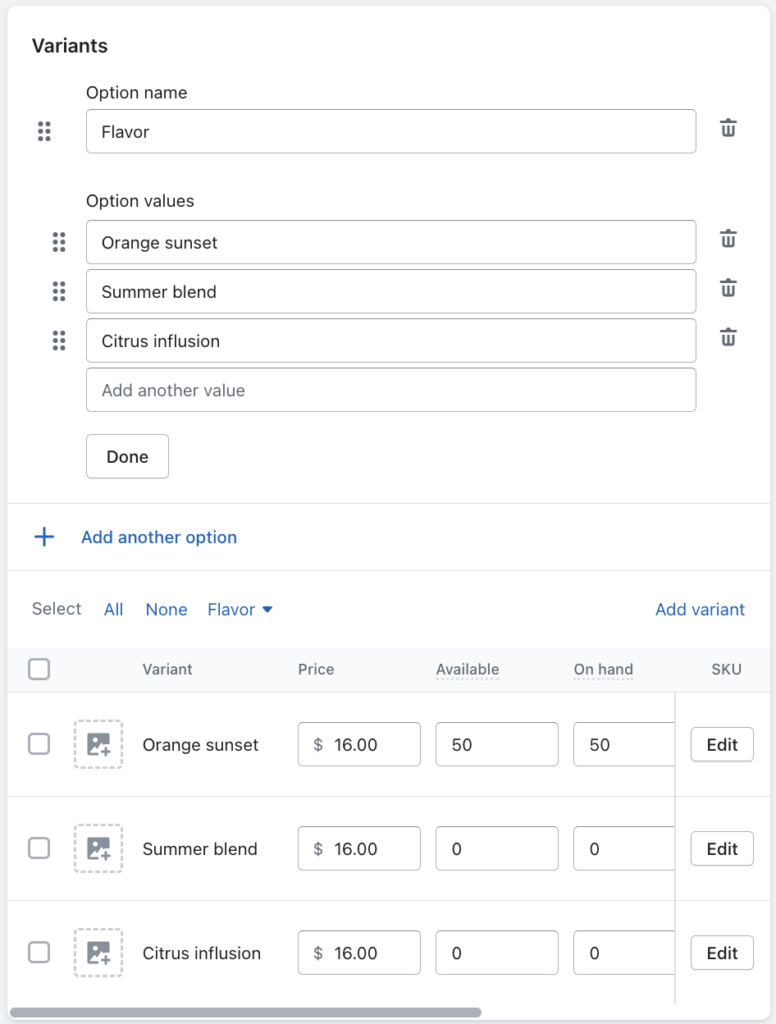
If your product comes in different variants, such as size or color, you’ll want to create these variants and assign prices accordingly.
For the Option name, this is where you’re highlighting what varies, such as the size, color, or flavor. The Option values is where you can add the different sizes, colors, or other variations of your product.
Once adding in your variations, you’ll need to fill out the Price, how many are Available, On hand, as well its SKU and Barcode.
Step 6: Set up shipping and fulfillment
If your product is physical, this step is essential. Make sure you click the Physical product box. If you sell digital products or services, hop to the next step!
Here, you will add the shipping weight for your product and whether you’ll sell it internationally or not.
The Shipping weight is how much a package weighs when it’s being sent. It’s not just the weight of the product, but also everything else that goes with it, like the wrapping, boxes, and padding.
Select your Country/Region of origin, and if it’s the United States, for example, you’ll have to choose your state of origin as well.
The HS (Harmonized System) code is a globally recognized product classification system. It is a numerical code that identifies the type of product being transported across international borders. You can get an HS code from your country’s government website.
If you’re looking for more about shipping your products, check out this guide on ecommerce fulfillment.

If you’re setting up a digital product, check out this guide from Shopify. It offers valuable guidance on how to effectively sell services or digital products on Shopify.
Step 7: Update search engine optimization (SEO) settings
Take your store to the next level with search engine optimization (SEO).
This step is essential for improving your visibility on search engine results pages (SERPs), thereby driving more traffic to your online store.
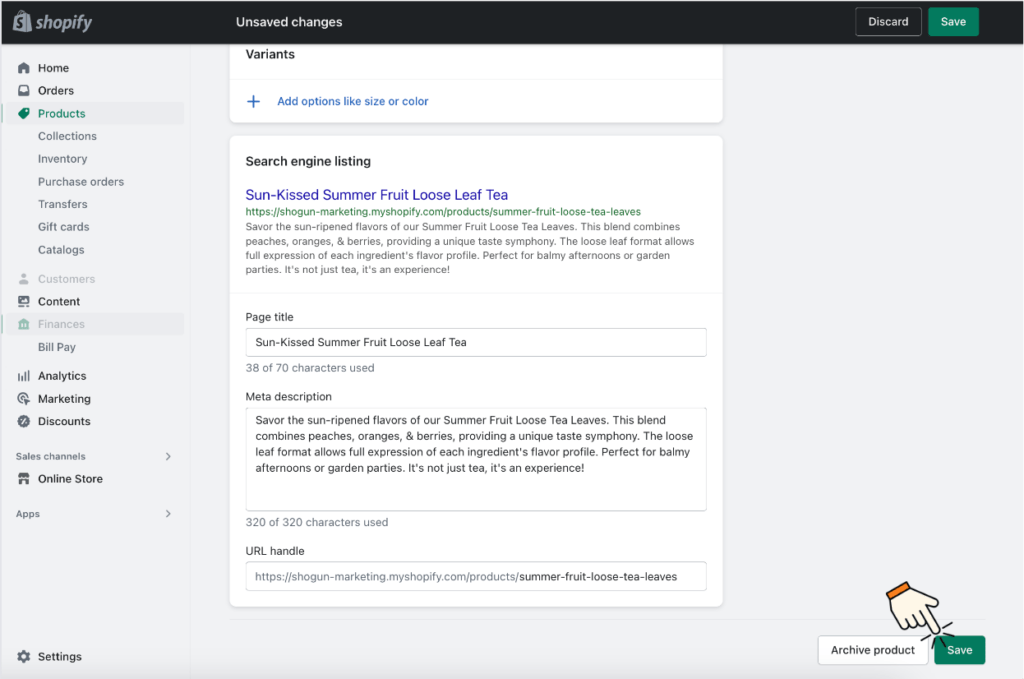
In the search engine listing settings, there are three distinct fields that you can update. By default, these fields will automatically use content from your product details.
For optimal SEO, you should manually edit these fields to make sure they’re tailored to your target audience and accurately reflect your product. This way, they’ll display exactly how you want them to in the SERP, helping to attract more potential customers to your Shopify store.
As you change these details the search engine listing preview will change to show how it’ll look on Google.
The Page title is the title of your product page as it appears in search engine results. It should be concise, descriptive, and ideally contain keywords relevant to your product.
The Meta description is a brief summary of the product that appears below the page title in search engine results. It should be engaging and informative, giving potential customers compelling reasons to click on your link.
The URL handle is the web address of your product page. It should be simple, readable, and ideally contain keywords relevant to your product.
Shopify’s page title and meta description are above the recommended character count. Here are the best practices for your title and description:
- Keep the product title under 60 characters
- Keep the meta description under 155 characters
And don’t forget about the URL!

#cta-paragraph-pb#Learn more about the best SEO tips for product pages and, more specifically, about SEO for Shopify stores.
Step 8: Save, publish, and sell 🎉
Once you’ve entered all the necessary information for your stellar products, review it carefully to make sure you’re ready to show it off to the world.
Click on the Save button to store the product details as a draft. To make the product visible on your online store, hit the Publish button.
What if you want to get ready for a product launch? Or maybe you want to schedule your product to go live at midnight… Hit the hay and schedule your page to be published at a later date.
First, make sure the status is set to Active. In the Publishing section, click the calendar icon next to Online Store.
Choose the date and time that you want the product to publish to your online store and then click Schedule publishing.


#cta-visual-pb#<cta-title>Create your perfect Shopify store today<cta-title>Start building for free with Shogun Page Builder to assemble a fully custom revenue machine.Get started for free
Bonus Step: How to create custom pages to showcase your products on Shopify with Shogun
Enter Shogun, an easy-to-use page builder that integrates seamlessly with Shopify.
Once you have successfully added your product to Shopify, Shogun’s custom page builder will elevate your pages (homepage, collection pages, landing pages, and the rest) to meet your brand’s unique standards.
If you already have Shogun Page Builder, you can find it from your Shopify admin by clicking apps and the Shogun Landing Page Builder app.
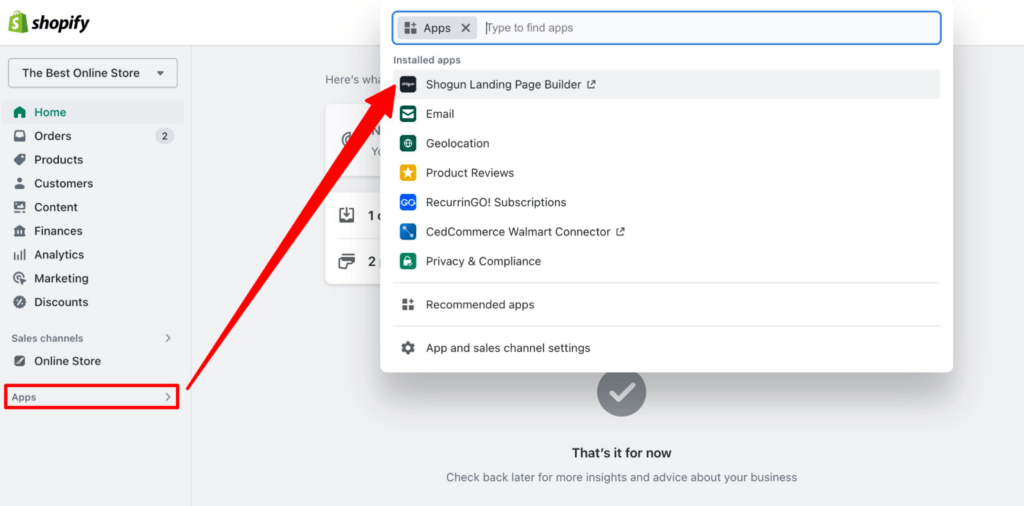
If you don’t have Page Builder yet, you can easily add it to your store from the Shopify App Store.
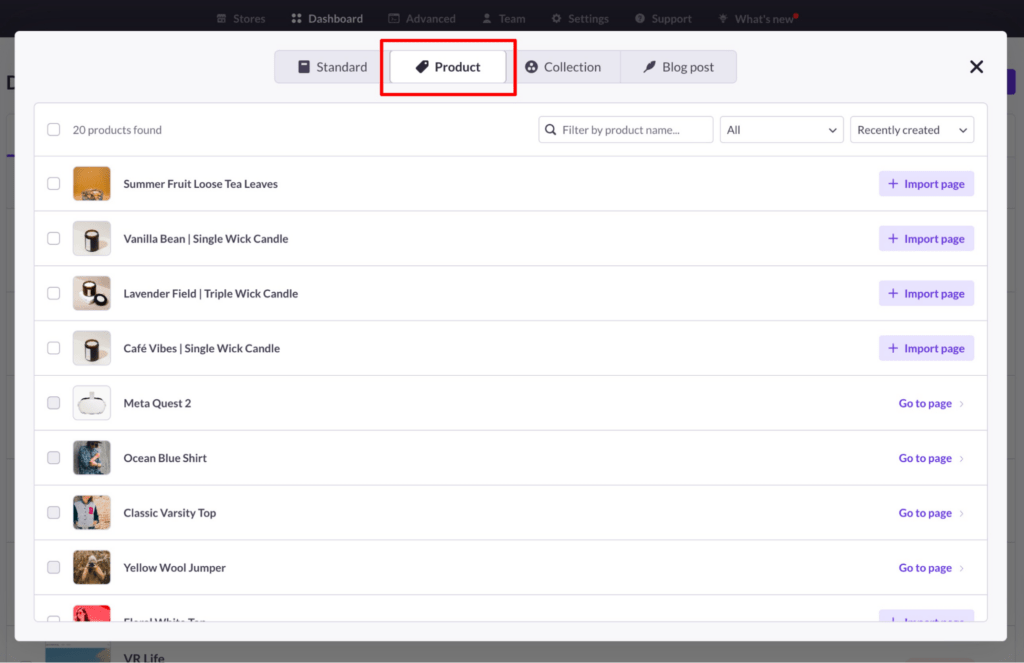
From your Shogun dashboard, click on Create new and select Page. You’ll see pre-built templates for all types of pages.
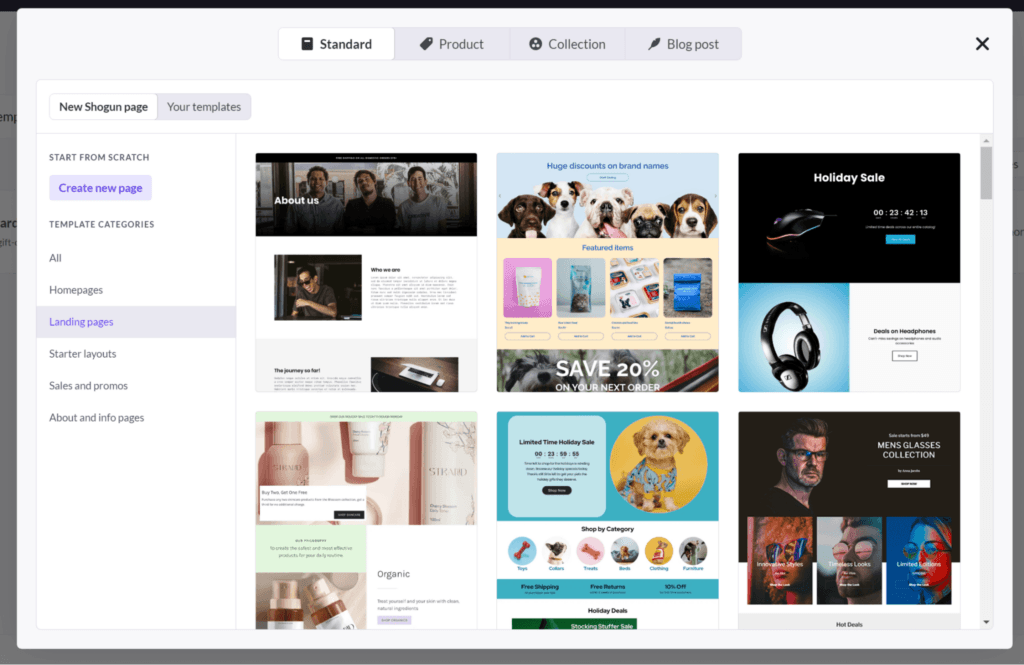
If you click the Product tab at the top, you’ll see a list of your products from Shopify. Select one or several to import to Page Builder.
Here, we’ll import one product. It’ll ask whether you want to apply an existing product page template (if you’ve created one), use a custom layout, or go with the existing Shopify theme product page layout.
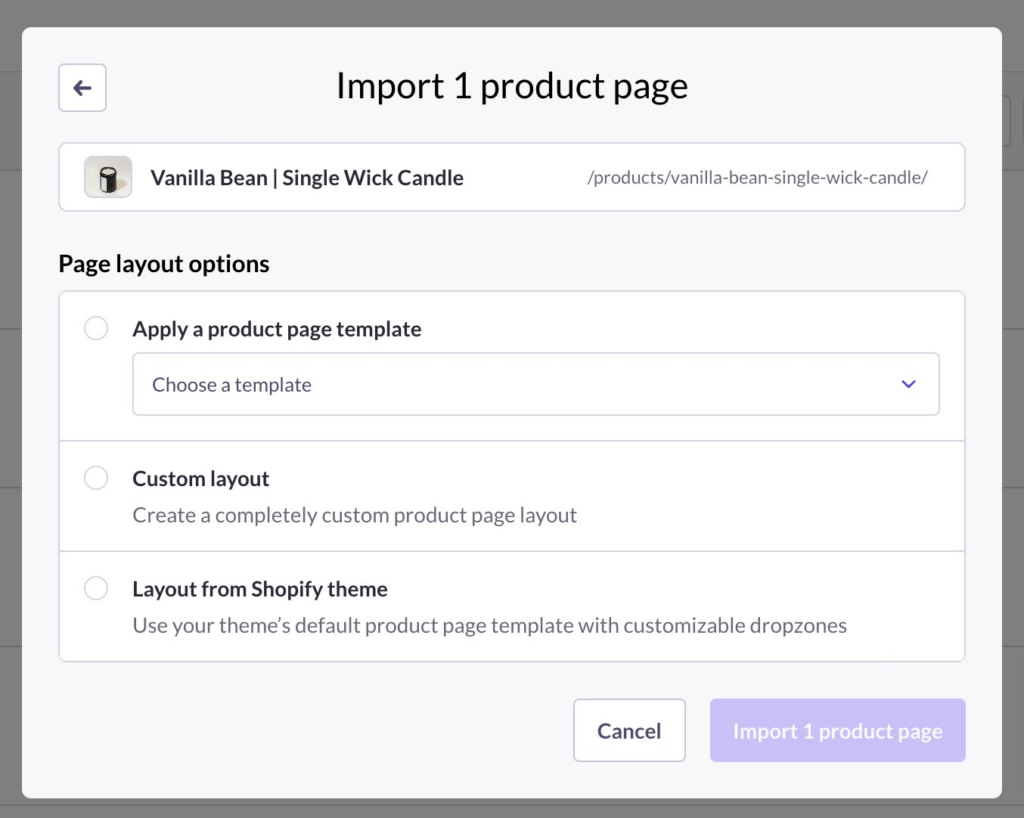
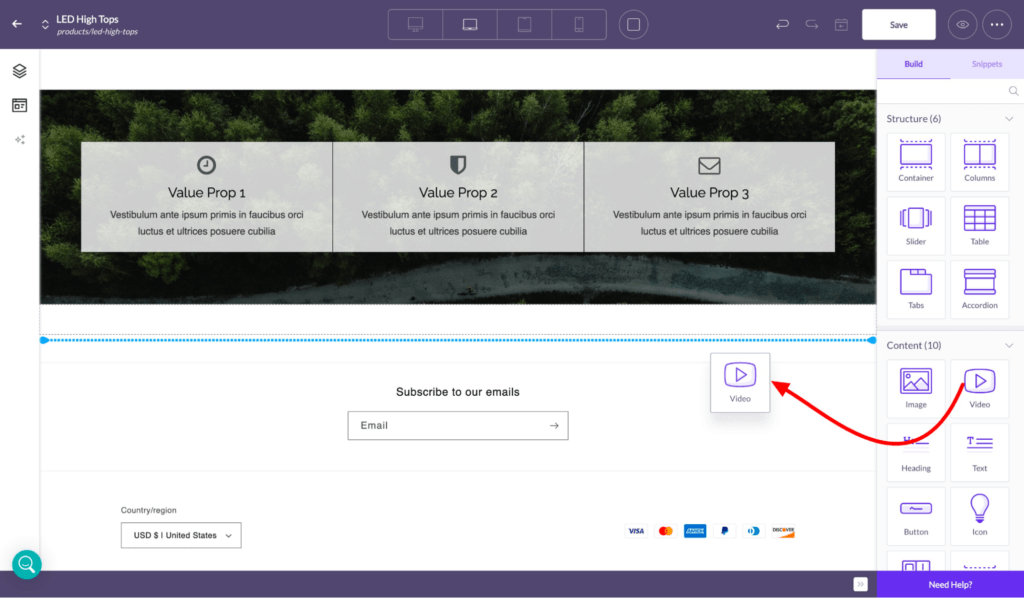
Once you’ve chosen, you’ll be taken to the visual editor, where you can drag and drop elements onto the page to create a custom layout.
You can add accordions, tabs, images, videos, pre-built blocks of content, and more. You can even magically write product descriptions and page copy throughout with Shogun’s AI Text feature.
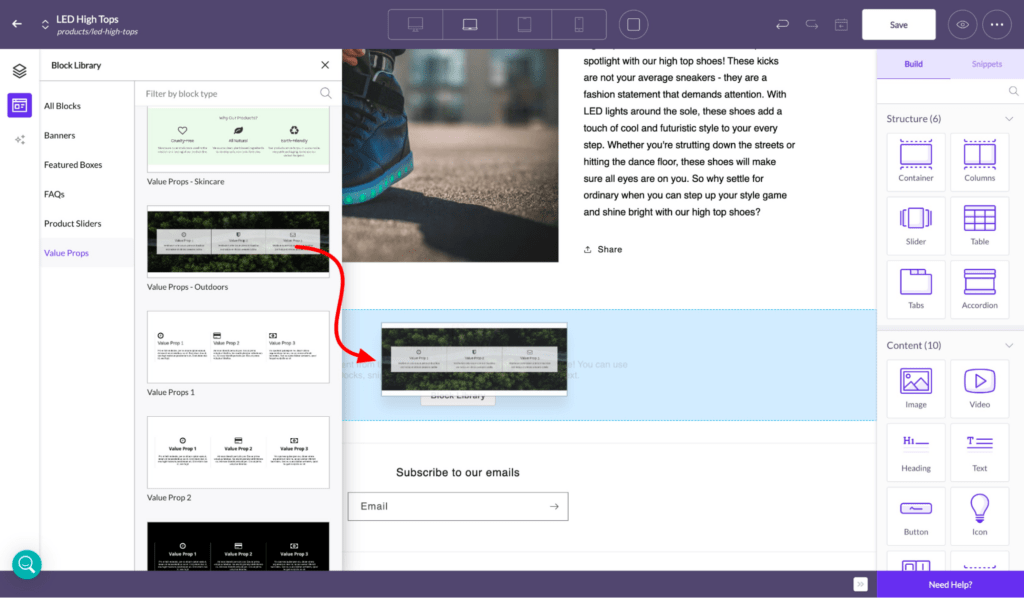
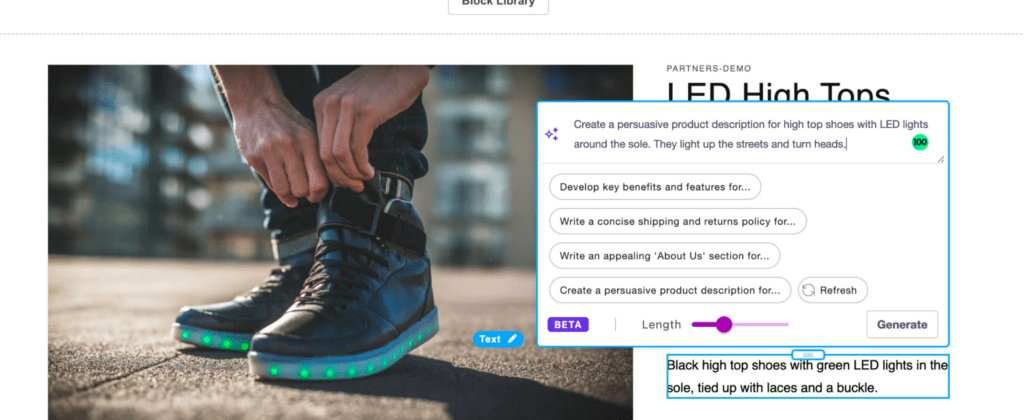
Once you’re satisfied with your design, click on Save and then Publish to make the product page live.
Continue to customize your product pages to get the most conversion potential out of them. You can then turn your best version into a product page template that can quickly be applied to every product in your catalog.
For any other page you build on Shogun, you can use the Product box element to add any product or collection to any page in a flash.
FAQs for adding Shopify products
Let’s wrap things up by answering any other questions you may have about adding products on Shopify.
How do I add product inventory in Shopify?
To add product inventory in Shopify, start by heading to your Shopify admin dashboard. From there, click on Products, and then hit Add product.
This will prompt you to enter the necessary details for your product, including its title, description, media, and pricing. Once you’ve filled out these fields, you’ll need to set the inventory quantity.
After all the necessary information has been entered, simply click Save to complete the process.
Can you add custom products to Shopify?
Yes, you can add custom products to Shopify. Navigate to Products and click on the product you wish to customize.
Then, scroll down to the Variants section and click Add customization. From here, you can add various customization options, such as text fields or file uploads, depending on your needs.
Why is my product not showing on Shopify?
If your product isn’t showing on Shopify, it could be due to several reasons. Common issues include the product being marked as hidden, not being added to a collection, or having inventory issues.
Check your product visibility settings, ensure it’s assigned to the correct collection, and verify its inventory status to resolve this issue.
How many products can I add to my Shopify store?
There’s no limit to the number of products you can add to your Shopify store.
However, keep in mind that adding a large number of products may affect your store’s performance and loading time. It’s essential to optimize your store for better user experience and faster load times.
Showcase your products in all their glory
Adding products on Shopify can seem like a daunting process. But when you break it down into actionable steps, it‘s fairly simple.
Each step plays a role in how your product is presented and discovered by customers, ensuring that your product listings are comprehensive, engaging, and optimized for both search engines and the user experience.
By putting in the work to fully describe your products early on, your future self will thank you for the increased sales that result.
With the extra step of using Shogun Page Builder to create custom product pages optimized for conversions, you’ll be able to compete with some of the top DTC brands out there.
So, what are you waiting for? Start adding those products to your Shopify store today.
#cta-visual-pb#<cta-title>Build better product pages today<cta-title>With Shogun Page Builder, you can customize every must-have page for your store, super simply.Start building for free

Leigha Henderson
Leigha is a content marketing specialist and content creator. She found her path through a love of research, strategy, data, and the written word. (And skiing. She also loves skiing.)

